Meal Prep Delivery

Monday, February 28, 2022

Family Handyman Approved: DeWalt Titanium Pilot Point Drill Bit Set

Family Handyman Approved: DeWalt Titanium Pilot Point Drill Bit Set 

DeWalt brings a lot of value to the table with their new DW1361 drill bit set. I knew these drill bits would do fine in wood, but I really wanted to see how well the larger diameter bits performed in something more difficult — acrylic, aluminum or brass.

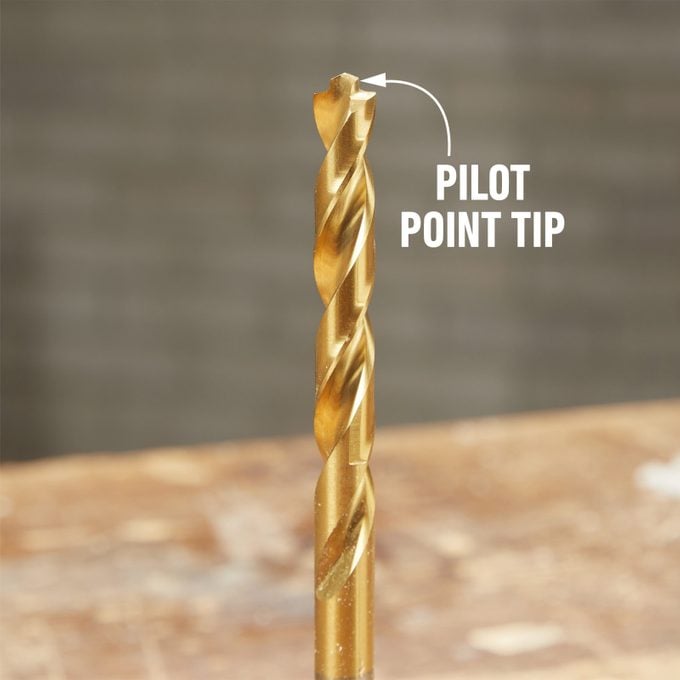
The guide point should eliminate the need to drill pilot holes for large diameter bits, which saves a lot of time. I’m going to test that.

What Is the DeWalt Titanium Pilot Point Drill Bit Set? 

Dewalt Drill Bit Set Fh22d Approved Dewalt Drill Bit Set 02 11 002

This new drill bit set from DeWalt includes 21 titanium drill bits for a variety of materials. I was impressed with one thing right away — the case has a clear lid. Bravo. At a glance, I can see exactly what’s inside.

Included in this set: A small carrying case and bit sizes from 1/16-in. to 1/2-in., with doubles sizes of 1/16-in., 5/64-in., 3/32-in. and 7/64-inch.

How We Tested

I drilled multiple holes in plywood, hardwood, one-inch clear acrylic plastic and 1/4-in. brass stock.

In wood, I compared the entry and exit hole quality with that of a brad point drill bit, known for their clean cutting. These don’t perform on the same level as my fine woodworking brad point drill bits, but they’re not supposed to. Their strength lies in their versatility. I would never put my brad point bits into brass, but I won’t think twice using the DeWalts.

Dewalt Drill Bit Set Fh22d Approved Dewalt Drill Bit Set 02 11 006

In brass, the pilot point design provides two distinct benefits:

  1. It eliminates the need to pre-drill pilot holes for large diameter bits, which is more accurate and saves time.
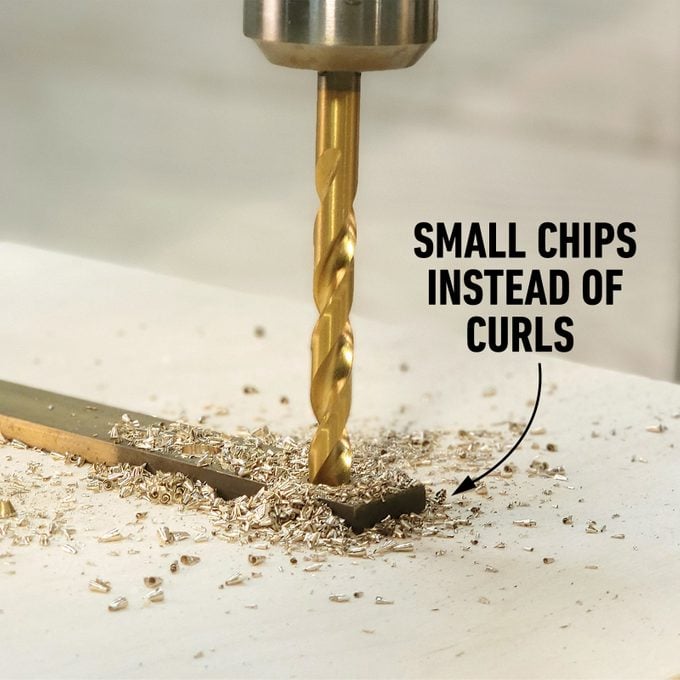
  2. Instead of a long curl of waste material which can clogs the flutes, the design creates small chips which are quickly and cleanly ejected. To me, this is a primary reason these bits run as cool as they do.

Dewalt Drill Bit Set Fh22d Approved Dewalt Drill Bit Set 02 11 005

When drilling in acrylic plastic, heat is always the enemy. The plastic heats up, the flutes start clogging, and all of a sudden you’re melting things.

These drill bits cut clean and cool. Unlike the brass chips, the waste material was a stringy curl but it ejected cleanly. No clogging, no melting.

DeWalt Drill Bit Set Performance Review

I was impressed with the performance of these drill bits. The bits came sharp and chip ejection was fantastic.

Dewalt Drill Bit Set Fh22d Approved Dewalt Drill Bit Set 02 11 003

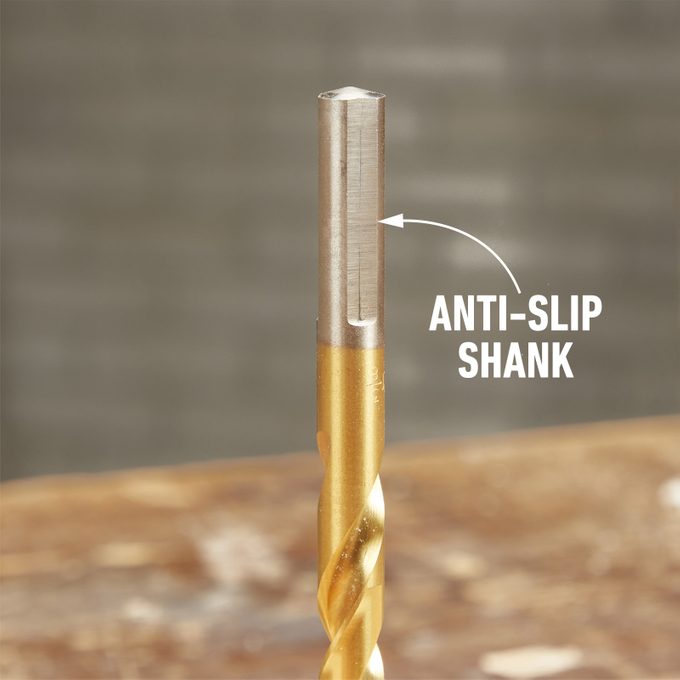
The anti-slip shank design did its job well in the drill press, even when I forgot to tighten the chuck during the photoshoot! However, I would prefer a quick-release hex shank design for easier integration into my cordless drill kits.

Dewalt Drill Bit Set Fh22d Approved Dewalt Drill Bit Set 02 11 004

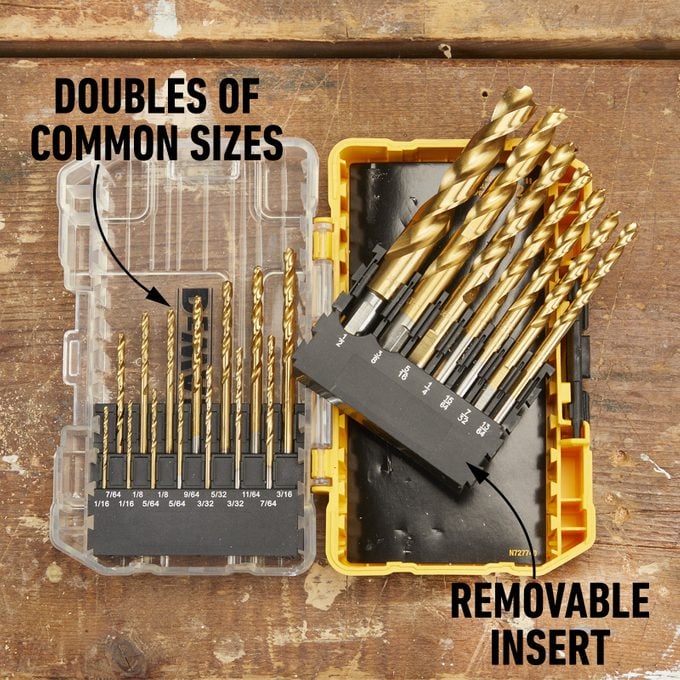
Where this bit set really shines is the value-added features. It’s the little things, like how easily the case inserts pop out. My large fingers easily retracted and inserted even the smallest bits. I appreciate that.

Also included are the most commonly broken or lost bit sizes. Very cool.

This bit set comes packed in DeWalt’s new Tough Case, which turned out to be what I liked best. DeWalt has given a lot of thought to their new tool case system and it shows. Not only can the individual inserts be swapped out with other bit sets, the case itself is part of a larger interconnectable and customizable system. This really appealed to me.

Where To Buy It

Overall, this well-designed drill bit set can be found for less than $35 at The Home Depot. And at that price, there’s no reason you shouldn’t own two.

Add to cart


Article source here: Family Handyman Approved: DeWalt Titanium Pilot Point Drill Bit Set

7 Best String Trimmer Harnesses

Mow grass with a string trimmer harness

Buying a String Trimmer Harness

String trimmers, AKA weed whackers, are incredibly useful yard maintenance tools that make quick work of grass and weeds in hard-to-reach areas. The problem is, these tools are notoriously large, heavy and awkward. Even newer, lighter models will make your arms burn after an hour or two of trimming in the hot sun.

That’s when a string trimmer harness comes in handy.

Worn over the torso, these harnesses take the weight of your string trimmer off your arms and distribute it evenly over your back, shoulders and core. I can tell you from experience as a nationally ranked powerlifting athlete, no matter how strong you are, you don’t want to do serious string trimming work without a harness!

When choosing the right harness, here are some things to consider:

  • Comfort and style: Designs vary greatly. A sling-style harness is more or less a single nylon strap that holds up your trimmer. While they’re often padded, they aren’t as comfortable for long jobs as a full, front-and-back padded harness.
  • Adjustability: Most string trimmer harnesses adjust, but the range of varies. Try one on before buying it, if possible, or make sure it can be exchanged.
  • Hook location: Depending on your height and arm length, the location of the support hook impacts how handy and comfortable that harness will be. Although some have adjustable hooks, many don’t. You don’t want a harness with a hook that’s too low or high.
  • Right-handed vs. left-handed design: Many harnesses easily adjust for right- and left-handed users, but not all. Some are only meant for right-handed use. If you’re left-handed, make sure the harness you buy will work for you.
  • Cost: This varies greatly, from around $12 to $200. Decide ahead of time what you’re willing to spend.

Keep reading for our top picks and why we like them.


Article source here: 7 Best String Trimmer Harnesses

6 Best Electric Wood Chippers

6 Best Wood Chippers Ft Ecomm Via Amazon.com

Buying an Electric Wood Chipper

Electric wood chippers — AKA shredders or mulchers — efficiently transform bulky and cumbersome sticks, brush and leaves into a manageable pile of shredded chips. These chips can be easily disposed of or reused as landscaping mulch.

Electric wood chippers, although less powerful than gas-powered chippers, are much more affordable and require less maintenance. They’re also light and easy to maneuver. Best of all, because they lack the combustion engine and harmful fumes of gas models, they can be safely used inside your garage.

Although most electric wood chippers look similar, some may be better suited to your specific needs. Take the time to carefully consider these factors when choosing your woodchipper:

  • Weight: You’ll most likely wheel your chipper out to the yard or driveway, so pay attention to how much it weighs. If you have joint or strength issues, go with a lighter option that will be less work to pull and push into place. Keep in mind you’ll likely sacrifice power.
  • Chipping capacity: Some electric wood chippers handle larger diameter sticks than others, so make sure to choose the correct capacity for your yard waste. The maximum cutting diameter will be clearly stated on the machine. Electric wood chippers sometimes jam or clog, so it’s better to err on the side of higher capacity.
  • Bag capacity: Some chippers come with a collection bag or container that fills with chips as you work. Think about how much debris you’ll be processing and choose a bag size that suits your needs. Hard-sided containers can be easier to pour and dump into a yard waste bag than soft-sided bags.
  • Cost: Although some higher-end options can be expensive, electric wood chippers are relatively affordable, most ranging from $100 t0 $250. In our experience, the higher the price, the larger diameter branches it can handle.


Article source here: 6 Best Electric Wood Chippers

13 Best Mulch Tips and Tricks

in a garden setting, wheelbarrow full of smaller buckets with mulch; person walking away with one of the smaller buckets

Easy Mulch Spreading

It’s easier to mulching around flowers and bushes in tight quarters if the mulch is in a small container. So I place buckets and pails in my wheelbarrow and fill them with mulch.

It doesn’t matter if the mulch misses the bucket and lands in the wheelbarrow. Once you’ve emptied the buckets, dump the contents of the wheel­barrow in an open area and spread it out. — Eric Swartz.


Article source here: 13 Best Mulch Tips and Tricks

8 Best Stand Up Weed Pullers

8 Best Stand Up Weed Pullers Ecomm Via Amazon.com

Buying a Stand Up Weed Puller

A stand up weed puller is a garden tool that saves wear and tear on your back. No more bending over or crouching down to remove ground-blanketing clover, lawn-invading crabgrass or the base of wall-clinging ivy.

“Weeding gardens is backbreaking, time-consuming labor,” says Katie Dubow, a gardener, president of Garden Media Group and host for Cottage Farms on QVC. “As the summer wears on, it can start to feel like a never-ending process. The good news is there are ways to make weeding much easier on your body.”

What to look for in a stand up weed puller

  • Weed-specific operation: Choose a tool specifically for the weeds you need to remove.
  • Ergonomic design: Tools made to fit your natural body positions decrease the change of injury. “Look for a lightweight, ergonomic wood handle at least 50 inches long to reduce back strain,” Dubow says.
  • Weight: Plastic is less durable, but lighter and easier to wield.
  • Sturdiness: Weed pullers made of powder-coated steel with screws to hold parts together will last longer than other materials.
  • Helpful features. Things like telescoping handles, foot pedals and easy-release buttons make weeding less tedious.


Article source here: 8 Best Stand Up Weed Pullers

The 7 Best Cordless Ratchets

7 Best Cordless Ratchets

Buying a Cordless Ratchet

After pumping the handle of your manual socket wrench for the hundredth time to drive the six-inch lag screws for your new deck foundation, you may be asking why they don’t make a power tool for this job.

Well, they do!

It’s a cordless ratchet. Not only will it drive those lag screws with ease, it performs multiple other chores, too. A cordless ratchet has become pretty much a must-have tool for builders and remodelers, as well as those in auto and appliance repair.

The best cordless ratchet for you isn’t necessarily the most expensive one. Like a lot of tools, it depends on what you’ll use it for. True, more expensive models tend to develop more torque, and their batteries last longer and charge more quickly. But other features are just as important.

If you’re looking to add a cordless ratchet to your tool collection, here are some features you should consider:

  • Anvil size: The anvil holds the socket, and they come in 1/4-in. and 3/8-inch sizes. Choose a tool with the smaller anvil for small engine and appliance repair. Choose the larger anvil for automotive repair or construction. Some cordless ratchets have convertible anvils — a handy feature.
  • Power: Cordless ratchets develop from 25 to almost 60 foot pounds of torque and spin at speeds from 250 to 400 revolutions per minute (rpm). The more powerful a cordless ratchet, the tougher the job it can handle. And the faster it spins, the faster you can work.
  • Head size: A small ratchet head makes the tool more maneuverable.
  • Weight distribution: The best cordless ratchet has balanced weight distribution and an ergonomic design, with the ratchet head and the handle weighing about the same. An unequal weight distribution makes the tool harder to hold and operate.
  • Battery run time: Battery run time is important if you have a lot of lag screws or tire lugs to drive. It can vary from 30 minutes to almost 70 minutes. Battery capacity has a lot to do with that. Most cordless ratchets have a capacity of 2.0 amp-hours, but some offer batteries with twice that.
  • Battery charging time: Varies from 60 to 90 minutes. Larger capacity batteries take longer to charge, but also have longer run times.
  • Functionality features: A battery charge indicator prevents you from starting a job you can’t finish, and a trigger lock prevents the tool from starting accidentally. A forward-reverse switch and a brake that prevents the tool from over-tightening are standard.
  • Handle length: At times you’ll need to develop extra torque by pulling on the handle. A longer handle gives you more leverage, but gets in the way in tight places.
  • Cost: Prices range from under $50 to more than $200.
  • Brushless motors: Models with brushless motors tend to be more powerful, compact and ergonomic.


Article source here: The 7 Best Cordless Ratchets

Saturday, February 26, 2022

10 Woodworking Portable Power Tools for DIYers

hands using a Bosch Variable Speed Palm Router

Portable Woodworking Power Tools

Hand held power tools strike a balance between traditional woodworking tools and industrial machines found in furniture factories. More efficient than the former, and lighter and less expensive than the latter, hand held power tools are the essential middle ground.

Most of these tools come in corded and cordless versions. Battery technology has brought power and longevity to a level I could have never imagined! My first 9.6-volt cordless drill needed to be recharged every hour, but the batteries in contemporary tools last considerably longer. These tools enable the user to do serious woodworking without plugging in.


Article source here: 10 Woodworking Portable Power Tools for DIYers

The Best Belt Sanders of 2022

8 Best Belt Sanders Ft Ecomm Via Walmart.com

Buying a Belt Sander

Belt sanders are fantastic tools for smoothing, shaping and grinding away materials such as wood and metal.

They provide far more powerful sanding than you could hope to achieve by hand, and they’re even more powerful than most other types of power sanders. The most common mistake new users make with belt sanders is accidentally removing more material than they intended.

Here’s a quick overview of the different styles of belt sanders, and a list of features to consider when making a purchase.

Handheld or bench-top belt sander

If you’re working on a large piece of material, the sander needs to move, so opt for a handheld model. For something smaller, the sander needs to stay while you maneuver the work material, so your best choice is a bench-top model.

There are other styles of belt sanders with specific specialties, such as curved sanders for pipes, or drum sanders for floors. While those sanders do use a belt, they’re not what most people mean by “belt sander.”

Standard handheld or mini-belt sander

Most handheld belt sanders are two-handed tools with the belt beneath the grip to allow slight downward pressure. Mini-belt sanders (sometimes called file sanders) are handheld models with the belt mounted in front of the grip. These tools are great for sanding surfaces a normal belt sander can’t reach, and they usually have narrower belts — an inch wide or less.

Corded or cordless: Bench-top belt sanders are always corded, with some requiring 220-volt electrical service. Corded handheld units are good for a big project or repetitive work. Handheld cordless sanders let you maneuver around an object with ease. There are a few pneumatic sanders on the market, but we have not included them here.

Length and width: Width and circumference of the belt differentiates belt sanders. A 3 x 21 sander would take a belt 3-in. wide and 21-in. around. Wider belts are better for larger material, while narrow belts are good for detailed projects.

Speed settings: Some belt sanders have only one speed, while others have multiple settings. Handheld models may have trigger-sensitive variable speed.

Flush ends: The design of some belt sanders extends past the edge of the sanding belt, which prevents you from getting to the inside edges of corners. Whether this is an issue depends on your project. If you’re flattening a work bench, it won’t matter.

Dust collection: Belt sanders produce a lot of sawdust. They all attempt some dust control, but none are 100 percent effective. Ideally, look for a belt sander with a dust collection port that connects to a shop vacuum or dust extraction system. Even then, plan on spending some time sweeping up after you use it.

Cost: Entry-level handheld sanders are likely to run around $100, but you’ll get much more performance for your investment if you step up to $250 or so. A splurge handheld might run up to $400. Bench-top models range from $100 for entry-level models and up to $800 for a high-quality unit. Splurge bench-top sanders can run into the thousands.

Brushed or brushless Motor: Brushed electric motors are more affordable, but brushless motors last longer and generate less heat.

Additional features: These include trigger locks, pressure indicators and easy belt removal. None are essential to the operation of a belt sander, but they’re always nice to have.


Article source here: The Best Belt Sanders of 2022

7 Best Gas Chainsaws

Ryobi Gas Chainsaw Lifestyle

Buying a Gas Chainsaw

For large-scale projects, you don’t want to be limited by the portability and runtime of an electric chainsaw. For big jobs, choose a gas-powered chainsaw. Sure, they require fuel and more maintenance. But when used correctly, these heavy-duty tools are extremely efficient for cutting, pruning and felling trees.

When shopping for a gas-powered chainsaw, consider these features:

  • Weight: While larger saws generate a lot of power for big jobs, they can also be heavy. Choose a saw that’s light enough for you to effectively maneuver, on a vertical plane and for sideways cuts when trimming branches and angled logs. Be realistic about how much weight you can safely handle.
  • Bar length: The length of the bar (in inches) indicates the maximum log diameter it can safely and effectively cut. Choose a bar an inch or two longer than whatever you will be cutting. Don’t assume that the longer the bar, the better. If you don’t need the length, you won’t use it efficiently.
  • Use: Think about your tasks. Smaller, lighter-duty saws (approx. 11 to 13 inches) are great for smaller jobs like pruning. And because they’re lightweight and maneuverable, they’re inherently safer than larger options. Medium-duty saws (14-16 inches) can handle a bit more and are versatile enough for lots of residential tasks. Pro-style saws (18 to 22 inches) are OK for smaller tasks but better suited to felling and processing large logs.
  • Maintenance: Gas chainsaws require regular maintenance and need periodic adjustment to keep the chain in the ideal position. Look for features that make these processes easier, like tool-free chain adjustment knobs and an automatic chain oiler.
  • Cost: Gas-powered chainsaws range from less than $200 to more than $3,500. Determine your budget and you’ll find a saw to match.

Safety

Gas-powered chainsaws are dangerous tools and can easily injure or kill the user in a fraction of a second. According to the Centers for Disease Control and Prevention (CDC), 36,000 people are treated for chainsaw injuries every year. So be sure to receive the proper safety training before using one.

This video offers helpful chainsaw safety tips. And we strongly recommend having a professional or experienced user walk you through how to safely start and operate a gas-powered chainsaw. You should also never use one without personal protective equipment, including chaps and face, hearing and eye protection.


Article source here: 7 Best Gas Chainsaws

9 Best Kitchen Light Fixtures

9 Best Kitchen Lights Felsisk Pendant Lamp Ft Ecomm Via Ikea.com

Buying a Kitchen Light Fixture

No one wants a poorly lit countertop or island when wielding sharp knives! Kitchen lighting is important for creating a welcoming ambiance and making cooking tasks safer.

Besides finding a style that fits your aesthetic, there are other things to consider, including:

  • Type: Do you need a flush-mount ceiling light, recessed lighting, track lighting and/or task lighting such as pendants? Your best bet is to layer your lighting to reduce dark spots and shadows. Jennifer Johnson, CEO of The Light Center, says you should always think about what kind of light you need to complete the tasks at hand. She loves under-cabinet lighting for food prep and recommends recessed lighting for general overall light.
  • Ceiling height: Lower ceilings usually work best with flush-mount or recessed kitchen light fixtures. Higher or vaulted ceilings can also accommodate chandeliers, longer pendants and semi-flush-mount fixtures.
  • Maintenance and materials: These go hand-in-hand. Johnson recommends “easy-wipe surfaces” such as flat metal or smooth glass. Anything textured will be harder to clean. Fabric drum lights or paper shades can be hard to keep grease-free and won’t repel a messy splash as well as nonporous materials.
  • Cost: Light fixtures range from the super-budget-friendly to the stratosphere. Johnson says the lowest priced, quality pendant will probably cost at least $100 to $200 each. All lighting costs vary based on materials, design and brand.
  • Installation Homeowners with some experience can successfully install home lighting, Johnson says. If you’d rather hire a pro to do it, someone with general handy skills will run you $40 to $60 an hour, while a licensed electrician charges $100 to $180 an hour. As with anything, hiring a licensed pro will get you more knowledge and expertise. Sometimes lighting stores have pros on staff or ones they recommend, so ask if you’re not sure.
  • Surfaces and glare: Your countertops, paint finishes and other surfaces will react with whatever lights you choose. Black soapstone will soak up some of the light, Johnson says, whereas polished quartz will reflect and bounce the light back up at you, potentially creating glare. Your eye may have trouble transitioning between the glare and a chef’s knife in your hand, especially as you age. Frosted or etched glass, or lenses on the lights, help diffuse light and cut glare.

Note: Lighting experts generally recommend installing dimmer switches on all light fixtures wherever possible.


Article source here: 9 Best Kitchen Light Fixtures

Small Engine Maintenance Tips from the Pros

Introduction

Battery-powered yard tools are taking over, but it’s not quite the end for gasoline and small engines. You can keep yours running smoothly for years with regular maintenance and some inside knowledge.

I talked with Dave Cheney of DC Carb and learned gallons of tips on small engine maintenance. Plus, he showed us how to rebuild a carburetor, which is not as scary at it sounds.

Meet the Expert

Specializing in carburetor rebuilds, Dave Cheney has been wrenching on small engines for more than 30 years.

Gardener Pouring Petrol Into Lawn Mower, Surface Level View

Keep your small engines healthy

Feed your machine fresh air

  • Small engines need clean air. A clean air filter allows maximum airflow and the optimum fuel/air mixture. You can and should clean the air filter.
  • If the air filter is too far gone, or if it’s made of paper and it’s clogged, it needs to be replaced.

Clean Engine Fh22apr 617 10 069 0001

Always use new gas

  • Small engines love fresh fuel. If your can of gasoline has been sitting around for more than four months, recycle that old gas.
  • Ethanol blends have an even shorter life. Through oxidation and evaporation, gasoline becomes less combustible. That leads to poor performance, rough idling and varnish deposits.
    • Pro tip: Never add fuel stabilizer to old gas; stabilizer won’t bring gas back to life. Add stabilizer only to fresh gas to extend its use.

Gardener Pouring Petrol Into Lawn Mower, Surface Level View

Avoid ethanol blends

  • Small engines prefer ethanol-free gas.
  • Ethanol attracts moisture from the air, which separates from the gas and sinks to the bottom of the tank. This can cause ignition problems.
  • But that’s not the worst of it. Ethanol is also corrosive and burns really hot, which can cause overheating and severe engine damage.

Check for spark

  • A spark plug checker can provide critical information.
  • First, it will tell you if electricity is getting to the spark plug.
  • Second, if there is no spark, it lets you determine the cause of failure.

Gardener Pouring Petrol Into Lawn Mower, Surface Level View

Inspect the spark plug diode

1. Clean and reuse

  • If the spark plug looks slightly brown — not too dark — simply clean the spark plug with a soft wire brush, check the gap and reinstall.

Small Engine Fh22apr 617 10 074 0001

2. Replace

  • Once your spark plug becomes an oil-fouled and deteriorated electrode, it needs to be replaced.
  • A new spark plug costs less than $10. It will create the right spark to best ignite the fuel/air mix in the combustion chamber.

Small Engine Fh22apr 617 10 074 0001

Carburetor too far gone? Buy new!

  • If your carburetor has reached the point of no return, finding a new replacement online is easy.
  • Cheney says Amazon and eBay are great places to start looking.

Clean/Re-build the Carburetor

We’ve all done it — delayed fall maintenance until spring. The engine might fire up but it won’t stay running for long. It’s time to disassemble and clean the carburetor.

1. Remove the carburetor

  • Disconnect the fuel line. If there’s still fuel in the tank, crimp the line to avoid leaks.
  • Most of the time you’ll find two bolts holding the carburetor to the engine. Remove these bolts and the carburetor.

Gardener Pouring Petrol Into Lawn Mower, Surface Level View

2. Disassembly

  • After removing the main jet and the float bowl, Cheney pokes out the float hinge pin with a nail set.
  • Take the float off with care. The inlet needle and spring clip are under the float and easy to lose.

Gardener Pouring Petrol Into Lawn Mower, Surface Level View

3. Remove the idle jet

  • A dirty idle jet is the reason small engines pulse and surge instead of idling smoothly. It’s also easy to overlook.
  • On this carburetor, the idle jet is behind a small plastic cap.
  • Cheney uses an old dental pick to pop out the cap. Then he removes the idle jet with a small flat-head screwdriver.

Gardener Pouring Petrol Into Lawn Mower, Surface Level ViewGardener Pouring Petrol Into Lawn Mower, Surface Level View

4. Soak in carb cleaner

  • Soak the parts in Berryman Chem-Dip cleaner for 15 minutes. This takes care of most surface grime.
  • After soaking, use a brush to clean off any remaining debris.

Gardener Pouring Petrol Into Lawn Mower, Surface Level View

Small Engine Fh22apr 617 10 068

5. Deep cleaning

  • A deep clean removes debris not reachable by soaking.
  • Cheney uses an ultrasonic cleaner, but you can place parts in a pot of boiling water for 15 minutes.

Gardener Pouring Petrol Into Lawn Mower, Surface Level View

6. Clean the needle seat

  • To make sure the needle seats cleanly, clear debris out of the needle seat with a cotton swab.

Gardener Pouring Petrol Into Lawn Mower, Surface Level View

7. Reassemble and install

  • Lay the clean parts out on your bench and do one final inspection.
  • Reassemble the carburetor, bolt it to your machine and don’t forget to prime it!

Small Engine Fh22apr 617 10 033 Hsp

Rules for seasonal storage

Drain the carburetor

  • You need to take one more important step after running your small engine out of fuel for the season.
  • Some gas will remain in the carburetor’s float bowl, and you need to drain it completely. Many carburetors have a small drain plug on the bottom of the float bowl for this purpose.
  • If left to sit, the gas will varnish and you’ll need to remove the carburetor to clean it.

Gardener Pouring Petrol Into Lawn Mower, Surface Level View

Don’t winterize — exercise

  • Perhaps the easiest way to avoid the downside of seasonal maintenance tasks is to “exercise” your engine.
  • Instead of draining the engine of all gas, keep the fuel tank full in the off-season and run the engine once a month for about 10 minutes. Cheney has used this technique for years. It saves him time and provides peace of mind.
  • He knows his small engines always have good gas and the internal workings are always coated in fresh oil. Seems like a no-brainer.

Change the oil

  • Change the oil in your small engine every season.
  • Fresh, clean oil keeps sludge from building up and helps maintain good compression.
    • Pro tip: Some lawn mowers don’t have an oil drain plug; the oil drains out of the fill tube at the top of the engine. Before you tip over your lawn mower to drain the oil, unscrew the gas cap and stretch plastic over the gas tank opening. Then screw the cap back on. The plastic will prevent gas from leaking out the cap vent.

Dave’s Bench Kit

Cheney depends on these tools the most in his shop.

Gardener Pouring Petrol Into Lawn Mower, Surface Level View

Screwdrivers

  • Basic? Yes. Indispensable? Yes, also that.

Small Engine Tools Fh22apr 617 10 004

Flexible pry bar

  • This strong, non-marring poly/nylon pry bar won’t damage brass or aluminum. Get a set for $10 at Harbor Freight.

Small Engine Tools Fh22apr 617 10 010

Wrench

  • Cheney has a set of combination wrenches in imperial and metric.

Small Engine Tools Fh22apr 617 10 006 001

Needle-nose pliers

  • You’ll always need a pair when working on carburetors.

Small Engine Tools Fh22apr 617 10 003

Ratchet driver

  • This 1/4-in.-drive ratchet with an extension gets the socket into tight places.

Small Engine Tools Fh22apr 617 10 006

Dental pick

  • An old dental pick can poke, pull and clean where other tools can’t.

Small Engine Tools Fh22apr 617 10 002 001

Carb cleaner

Small Engine Tools Fh22apr 617 10 001

Slip joint pliers

  • These adjustable pliers can play many roles.

Small Engine Tools Fh22apr 617 10 007 001

Hose clamp pliers

  • Removal of flat-type or ring-type hose clamps is much easier with these ($14 online).

Small Engine Tools Fh22apr 617 10 005

Hose pinch

  • These locking pliers will clamp on a hose without causing damage ($25 online).

Small Engine Tools Fh22apr 617 10 007

Wire cutters

  • Cheney uses these for snipping linkages.

Small Engine Tools Fh22apr 617 10 007 002

Nitrile gloves

Getty Images 1304034577 Grid

Wire brush

  • A must-have for cleaning small parts.

Small Engine Tools Fh22apr 617 10 008

Jet cleaning brushes

  • These micro-wire brushes remove debris from jets.

Small Engine Tools Fh22apr 617 10 002


Article source here: Small Engine Maintenance Tips from the Pros

How to Make a DIY Indoor Herb Garden

Cut all pieces of wood Cut the wood for the base (A), sides (B), top cap (C), front and back top faces (D) and pot supports (E). All the co...