No matter your home’s size or location, who wouldn’t love to sit in a cozy little room, placed right off the kitchen, illuminated by a crackling fireplace and welcomed by a petite sofa with plush pillows for extra comfort?
There’s a name for such a room, if you can believe it. They’re called keeping rooms, and they’re making a modern-day comeback recently.
What Is a Keeping Room?
A keeping room is a small room, generally adjacent to the kitchen, where folks can gather while the host prepares a meal. Back in the day, the hearth or fireplace in the kitchen was the only source of heat in the house—which is why it was called the “hearth room” as well—and guests often flocked there to keep warm and spend some time with their host.
These days, you’re more likely to see comfortable seating in this space to kick back and relax while keeping the cook company. While these rooms may feature a fireplace as an homage to the original purpose, it’s not necessary.
What Is the History of Keeping Rooms?
Keeping rooms off the kitchen were often seen in Colonial-style homes as far back as the 1770s. Much like how our modern breakfast nooks or kitchen island are the go-to hub for family conversations, homework and leisure time, keeping rooms served the same purpose.
It was common for keeping rooms to have a fireplace with either a small-scale sofa or a set of plush chairs for folks to stay warm and converse. Keeping rooms right off the kitchen was ideal as the hostess could meal prep while her guests were warmly entertained nearby.
What’s the Difference Between a Keeping Room and a Family Room?
A keeping room is a smaller-scale room with little to no distractions (think televisions and electronics). Instead, keeping rooms are a quiet place to talk, read or do a little office work while keeping warm next to the kitchen.
A family room is a larger space to entertain, watch the big game or have a family movie night. They are also not necessarily adjacent to the kitchen. Family rooms can get a little more lively as opposed to the quieter space of a keeping room.
How to Use a Keeping Room Today
Today’s keeping room can quickly become your little retreat while dinner is finishing in the oven. While generally seen in older homes, modern-day builders are beginning to incorporate these rooms into the design of newer houses, where they are most often called a “flex room” or “free room.” Think of these rooms as an overflow room of sorts—they can be a comfortable cozy nook or a larger area to gather off the kitchen.
The possibilities of how to use a present-day keeping room are endless. If your keeping room has a lot of natural lighting, it can be a tranquil place to decorate with a few house plants while setting up a little area to play chess or a friendly afternoon game of scrabble. There are no hard and fast rules these days for incorporating a keeping room into your kitchen design!
We know frying isn’t healthy — at least, it wasn’t until we discovered the air fryer. It uses less oil, so food that’s air-fried is lower in fat and calories. Plus, cleaning an air fryer is much easier than cleaning a deep fryer.
To help you care for your new favorite kitchen appliance, we’ve put together a quick guide on how to clean an air fryer.
Are Air Fryers Hard to Clean?
We get it, cleaning kitchen appliances is intimidating. Luckily, an air fryer is easier to spruce up than other cooking gadgets, like an oven. All it takes is warm soapy water and a dish cloth to remove food buildup.
The most time consuming part? Allowing the basket to soak if there’s lots of sticky residue. Check out the handy tools recommended below to ease the process.
How to Clean an Air Fryer
Tools and supplies
Dawn Powerwash dish spray: A good sponge and dish soap are really all you need. We recommend Dawn Powerwash for the job because it cuts through grease effectively. Plus, it’s so easy to use. Just spritz and scrub with your favorite sponge!
Scrub Daddy sponges: When cleaning the air fryer basket, turn to the internet’s favorite dish sponge: Scrub Daddy. It’s sturdy enough to remove food buildup and grease and more durable than traditional sponges. Just be careful not to scrub the interior cooking surface too hard, or you’ll scratch it. Pair with Scrub Daddy products like a sponge handle for a superior clean.
Swedish dishcloths: The air fryer isn’t clean until you wipe down the main unit. Instead of paper towels, opt for Swedish dishcloths. They’re more absorbent and reusable, and ideal for all areas of the home. Just rinse with water, wipe down the air fryer and you’re good to go!
Directions
1. Unplug the air fryer
Safety first! Turn off and unplug your air fryer. Allow it to cool completely before cleaning.
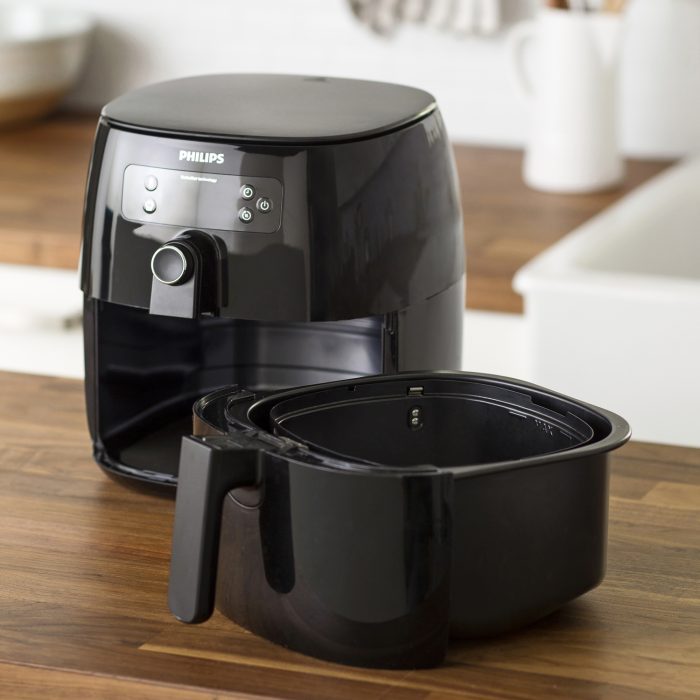
2. Clean removable parts
Remove the basket, tray and pan. Many air-fryer accessories can be washed like any other dish, with soap and warm water. If you don’t feel like washing them by hand, place them in the dishwasher. Most air fryers feature dishwasher-safe pieces, but check the instruction manual for your specific model.
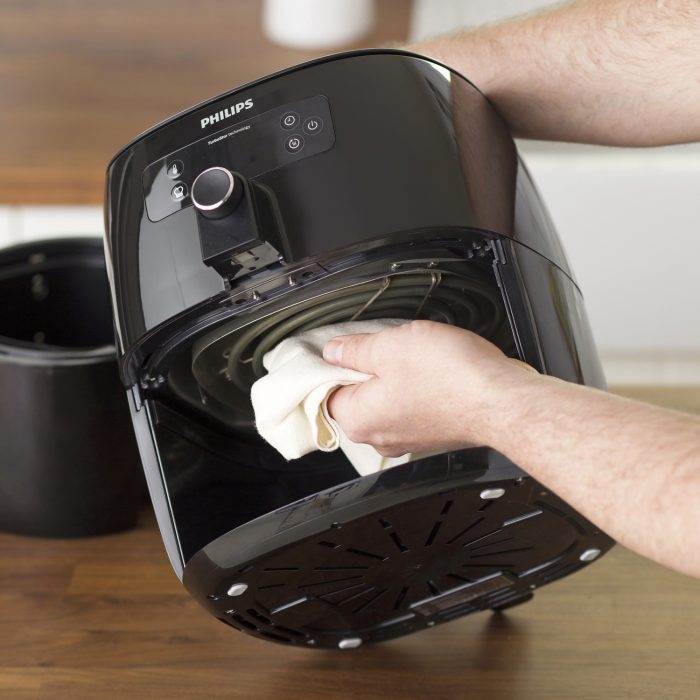
3. Clean the main unit
The main unit should never be immersed in water. Instead, take a damp cloth and wipe down the entire unit and the control panel to remove food splatters or grease residue. If you notice any food stuck on the heating coil, remove with a soft dish brush.
4. Check the heating coil
Check the heating coil after each use; it’s usually in the top of the unit. If there’s oil or residue on the coil, let the unplugged machine cool, then wipe with a damp cloth or dish brush, as you would with the heating element on an electric stove.
5. Dry and reassemble
Completely towel dry or air dry all the parts before reassembling the air fryer.
FAQs
Can you clean an air fryer with water?
Yes and no. Though some foodies found filling the air fryer basket with soapy water and turning it on inside the main unit will do trick, we don’t recommend it, because it could damage the nonstick coating on the interior cooking surface. Instead, unplug the air fryer and clean the basket with warm soapy water, then wipe down the main unit with a cloth.
How often should you clean an air fryer?
The key word here is “often.” Clean after every use, or every few uses, to avoid greasy food buildup.
How do you keep an air fryer clean?
Cover the cooking surface with foil or an air-fryer liner. We prefer the latter because it’s much easier to cook with. Just pop the liner in the basket, layer ingredients on top, and remove when you’re done.
Air Fryer Cleaning Tips
If the basket or pan has baked-on grease, soak it in hot water and soap for 20 to 30 minutes. Then remove the now-softened gunk with a scrub brush.
If you notice a stinky odor, chances are you’ve got food particles trapped in or on it. Mix baking soda and water to form a paste. Then grab a scrub brush or old toothbrush and thoroughly scrub the interior.
Never use metal utensils to remove crumbs or baked-on grease from your air fryer. It can damage the nonstick coating and prevent the fryer from working properly.
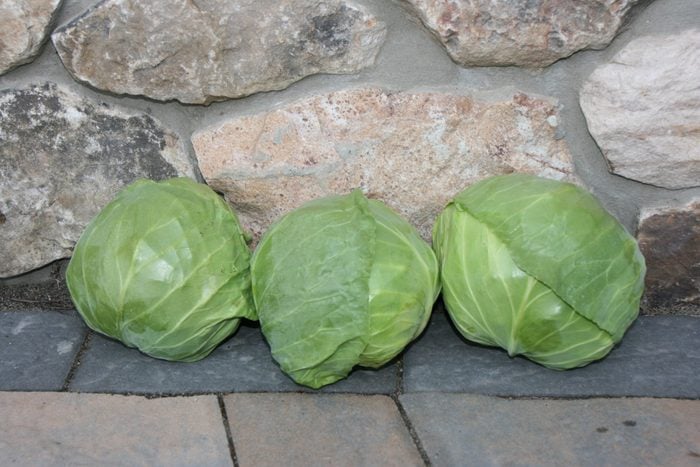
It’s surprising how large a homegrown cabbage plant can grow and how much better it tastes than store-bought.
For a mini cabbage, try Katarina, which produces a small but tasty head and grows well in larger containers. To keep cabbage butterfly larvae from eating the leaves, you may need to cover it with a light horticultural cloth.
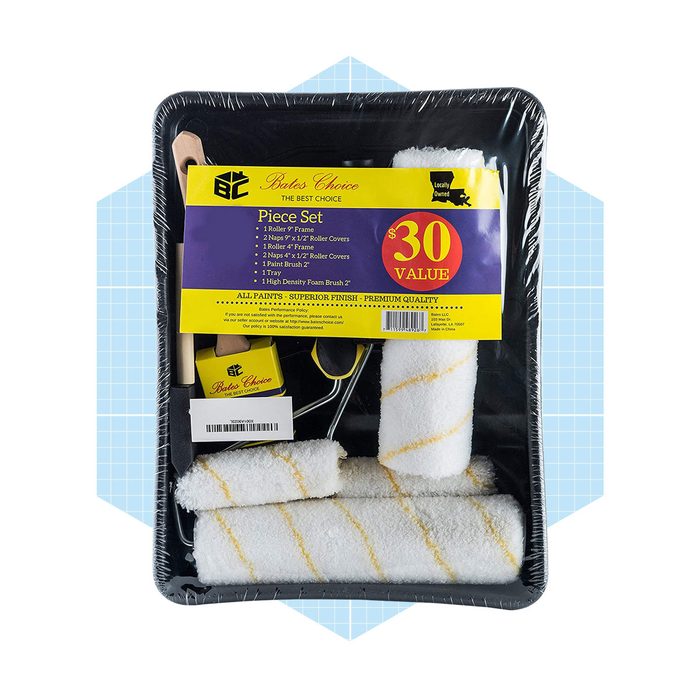
Whether you already have a living room renovation in mind or you’re just looking to stock up on this painting necessity, paint roller deals are the perfect start to any paint project. Save on traditional paint rollers, textured roller covers and edgers in various sizes and materials—all that’s left to purchase is the paint bucket!
As Sales Editor of Family Handyman and a self-identified DIY fanatic, I’m always looking for the best paint roller deals. If you’re like me and love to change up the colors in your home on a seasonal basis (yes, I’m a little obsessed with redecorating), you’ll appreciate the savings from these paint-related DIY deals.
How To Choose the Best Paint Rollers for the Job
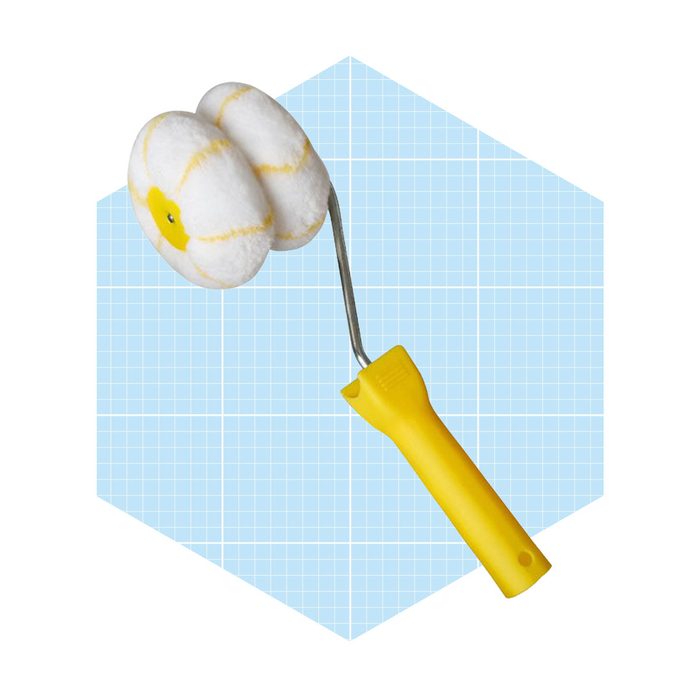
As outlined in Family Handyman’sguide to paint rollers, paint roller frames and covers come in a wide variety of sizes. Some of the most common sizes include two-inch rollers for small projects and detailing, four-inch rollers for tight corners and the classic nine-inch rollers for painting wide strokes on a wall.
Covers are available in several different materials, ranging from woven or knitted synthetic—best for most projects—to lambswool and lambskin, which work well for oil-based paints. Foam rollers, thanks to the minimized laps lines, are ideal for natural substances like wood.
If you’re not sure what you’re looking for, these deals make it possible to stock up on a range of options so you’re prepared for anything—without brushing off your bank balance.
The Best Paint Roller Deals
Wood Grip Professional Roller Frame
Cage rollers are an essential painting tool, and this wood grip roller frame saves you a few bucks at a markdown of 30%. Compatible with almost any nine-inch roller cover, this roller frame offers a heavy-duty metal frame and end caps to prevent slips and dings that are detrimental to smooth finishes.
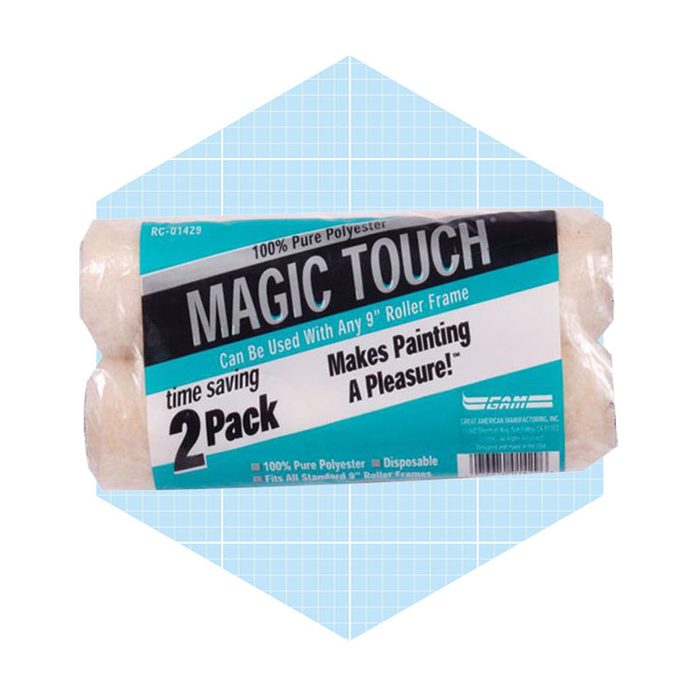
As mentioned earlier, polyester and other synthetic materials make great multipurpose paint rollers. This two-pack of polyester roller covers offers a set of disposable covers, compatible with almost any paint (including the editor-approved Restore Coat Flex Paint). Save $6 when you take home this twofer today.
Flawlessly navigate outer corners with ease using this corner paint roller kit. Reminiscent of an edger for outer corners, each roller comes with a roller handle and two mini covers that glide along the outer edge of rooms and trim, coating everything in one swipe. Snag the set for 34% off thanks to Walmart’s paint roller deals.
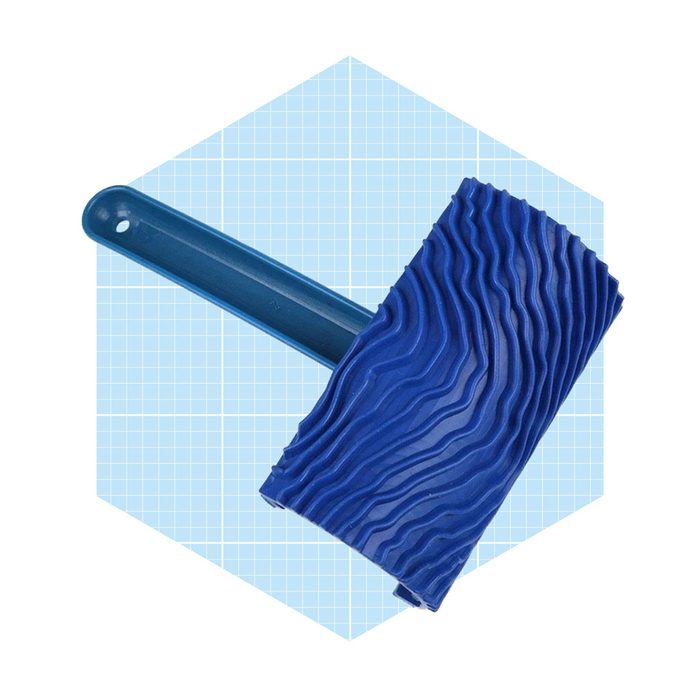
Love the look of woodgrain, but not ready to install paneling? This wood pattern roller mimics the look of wood without the use of texture paints! Simply pick one up at 50% off and swipe, roll or stamp onto surfaces to take any space from blah to boo-yah in seconds.
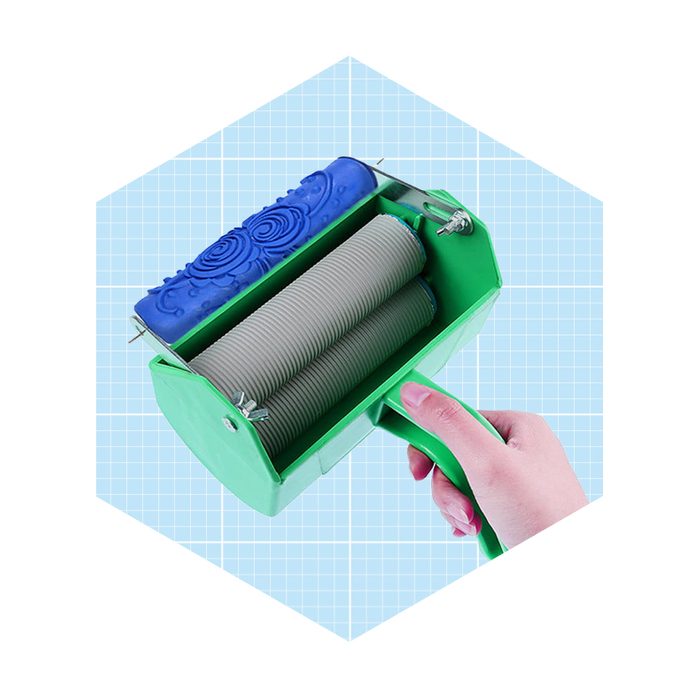
If the last roller made you excited, you’ll love this one. Pick up this wall pattern roller at a savings of 53% and get creative with four different roller patterns. Overlay the patterns on a base color, or try something wild. This innovative painting tool makes it easy to experiment with textures for less.
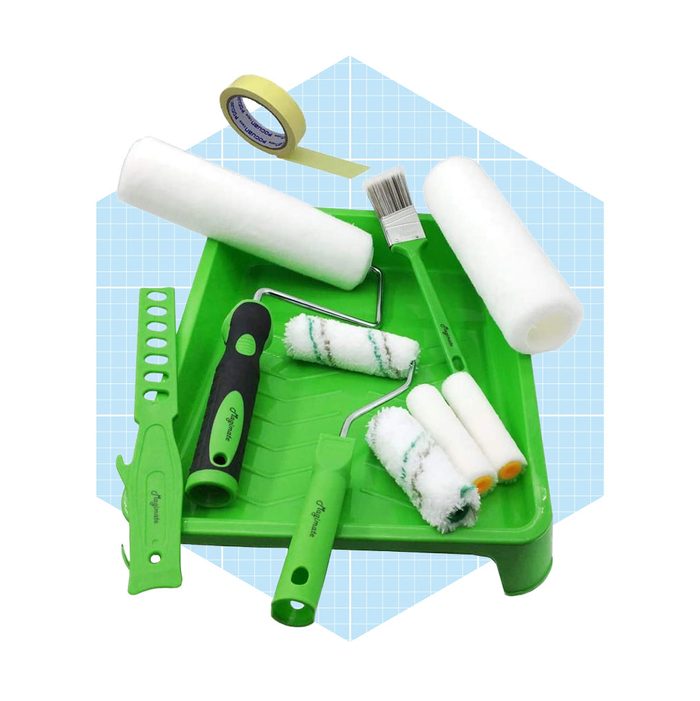
This exterior paint roller kit has everything you need to start switching up the look of your home. Pop it open for easy access to a paint tray, paint stick, masking tape, brush and rollers in two different sizes and materials. Score the set at a savings of $10 while the deal is live.
Save a generous 39% on one of the best-rated painting tools on Amazon for a limited time. This interior painting kit comes with a nine-inch roller and a four-inch roller, both with two covers ideal for interior painting. A bonus brush and sponge are also included. Use the sponge for varnishes, texture or feathering edges.
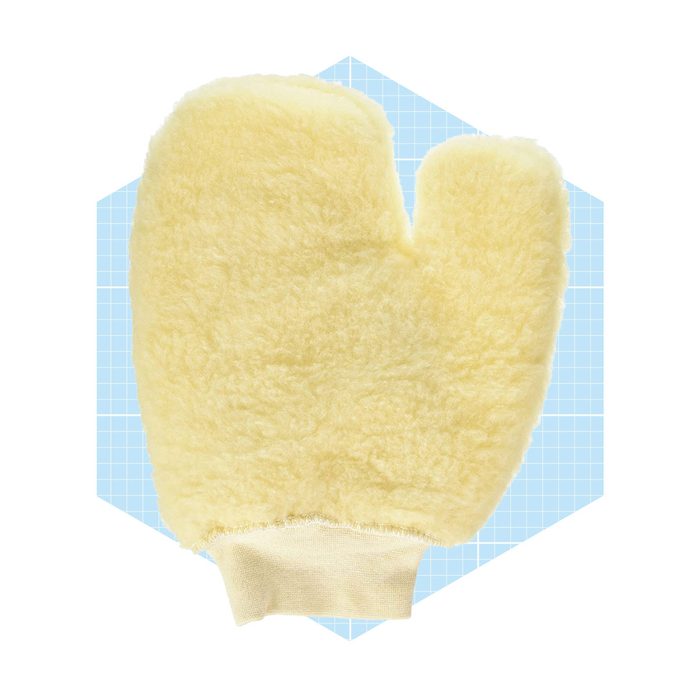
While this isn’t technically a paint roller, we’d be remiss in neglecting one of the best painting tool hacks: the painter’s mitt. Made from the same nap as a roller cover, this mitt offers a way to get into tight corners and around pipes without fussing with special equipment. For a limited time, score one at 35% off—making the price only $5!
Cleaning paint rollers efficiently requires the assistance of paint thinner when you’re working with oil-based paint, or water when working with latex. As with most paint-related projects, safety is key when cleaning supplies—always use gloves, a respirator and safety goggles when cleaning rollers and brushes.
Can you reuse paint rollers?
You can absolutely reuse paint rollers—to a point. When properly cleaned, paint rollers last for several applications. After a while, though, the fuzzy materials often deteriorate, leading to uneven coats. If you plan to reuse a paint roller multiple times for one project, keep the roller moist after removing the paint by covering it with plastic wrap to prevent dried-on flakes.
Otherwise, we recommend using a new roller cover for every project. Stock up on painting essentials with these paint roller deals for a flawless finish every time!
Shop smarter with our expert recommendations for tools, gear and money-saving deals on can’t miss DIY and home products. Sign up for the Stuff We Love newsletter.
Having fleas and ticks in and around your home can be worrisome — especially for those of us with pets.
Though fleas (photo on left, above) and ticks (photo on right) both feed on the blood of mammals, transmit diseases and sometimes cause painful allergic reactions, they’re actually very different.
Fleas are tiny blood-sucking insects that infect wild animals (think raccoons and rodents) as well as domestic ones (mainly dogs and cats). They reproduce quickly and attach to one host throughout their lifetime.
“Fleas are fantastic jumpers,” says Katelyn A. Kesheimer, Ph.D., an assistant professor and extension specialist at the Alabama Cooperative Extension System, Auburn University. Their large back legs let them jump more than six inches. For a small insect, that’s a huge leap!
Ticks are slightly larger than fleas, but still small and hard to spot. Members of the arachnid family (i.e., spiders and mites), they’re eight-legged hitchhikers who latch onto their prey, burying their heads into the skin after biting. Unlike fleas, ticks are nomads who move from one host to another at a whim.
Should you find one of these blood-sucking critters on your pet, it’s important to recognize the specific signs and symptoms of each so you’ll know what to do.
What Do Fleas and Ticks Look Like?
Though both are relatively small, fleas and ticks have noticeable physical differences. Here’s how to tell which is which.
What fleas look like
Fleas are usually dark reddish-brown to black with flat, wingless bodies and needle-like mouthparts. When they bite, they penetrate the skin, causing itching and swelling. Adult fleas measure about 1/8-in. long with three pairs of legs.
Jim Fredericks, Ph.D., an entomology and wildlife ecology specialist and senior vice president of public affairs for the National Pest Management Association, says fleas can be hard to spot with the naked eye because they move so fast along the animal’s body. “Flea combs and wetting an animal’s hair can help you grasp them for a visual inspection,” he said.
What ticks look like
Nearly 100 tick species live in the United States, and they come in all kinds of colors (brown, black, gray, red, yellow, etc.). The most common types in North America include blacklegged/deer, American dog, brown dog, lone star and Rocky Mountain wood ticks.
Ticks can range from 1/8-in. (the size of a sesame seed) to as much as 1/2-inch. They’re flat top to bottom but grow round when engorged with blood. Nymph and adult ticks have four pairs of legs but only three pairs in the larvae stage.
Did you know? A recent survey found 63% of Americans have seen or removed a tick from themselves, someone else or a pet.
Where Do Fleas and Ticks Live?
Fleas
“Almost all indoor flea infestations are because of a pet (or other animal),” says Kesheimer. Fleas may live in the yard for a while. But as soon as they find a ride into the house, they’ll abandon the outdoor life for the warmth of the indoors.
Fleas are generally content to spend their entire lives on the same hairy dog or furry cat, happily feeding and reproducing. They lay their eggs, which eventually fall off the animal and hatch into tiny worm-like larvae, infesting carpets and furniture. After emerging as adult fleas, they’ll jump back onto their host, and the cycle continues.
Did you know? Fleas can produce as many as 400 to 500 offspring in their lifetime.
Ticks
Ticks thrive in warm, humid climates and prefer to hide in tall grass, scrubs and wooded areas. They’re not only relegated to forested or rural areas; they can also be found in urban centers or coastal locations.
“Ticks usually contact a host by crawling up on the tips of low-growing vegetation and waiting for a host to pass by and brush the vegetation,” says Fredericks. Keep in mind a tick can be really patient, often waiting weeks or months for its next host to come along.
Handy tick locator: To find out which type of ticks live in your part of the country, check out this Tick Surveillance map from the Centers for Disease Control and Prevention (CDC).
Signs of Fleas vs. Ticks
Here’s how to determine whether you’re dealing with a flea or tick infestation.
Signs of Fleas
Pet scratching an irritated or infected spot;
Hair or fur loss;
Tiny black specks (flea feces) on the skin, pet beds, carpets or linens.
For humans, you may find itchy red bites around the feet and lower legs. “This is an easy jump for a flea to make from a dog to your leg,” says Kesheimer.
Signs of Ticks
Indications that your pet or you may have been bitten by a tick:
Sighting of an actual tick on you or your pet’s body;
You find ticks or their eggs in potted plants or elsewhere in the garden;
Your pet (or you) feels lethargic, with muscle weakness, loss of appetite, trouble breathing or vomiting.
Health Risks of Fleas vs. Ticks
Should you be concerned about health risks associated with fleas and ticks in your home?
For common fleas, Kesheimer says, “Not really.”
For the most part, flea bites can be itchy and annoying, but it’s rare they become a vector for diseases. A kind of tapeworm can be transmitted by fleas, but it’s rare and doesn’t generally cause serious health effects.
Ticks are another story.
In the U.S., Kesheimer says ticks are responsible for most vector-borne illnesses. The most common are Lyme disease and Rocky Mountain spotted fever.
Because tick-borne diseases can easily go undiagnosed and bring long-lasting consequences, it’s important to seek medical attention immediately if you suspect you’ve been bitten by a tick, aren’t feeling well or experiencing strange symptoms. Different species of ticks pose different threats to your health.
Fortunately, antibiotics can treat most tick-borne illnesses.
How To Get Rid of Fleas vs. Ticks
“It’s complicated,” says Kesheimer. “Since fleas are very small, you might not see them with your naked eye until there are a lot of them.” In the case of an infestation, she says you’ll likely notice tiny black specs jumping all around.
Traditionally, wood conditioner is a blend of oils and waxes that applies to wood surfaces to provide a hydrating finish. It offers a myriad of benefits, including preventing cracks and extending the life of wood-based furniture.
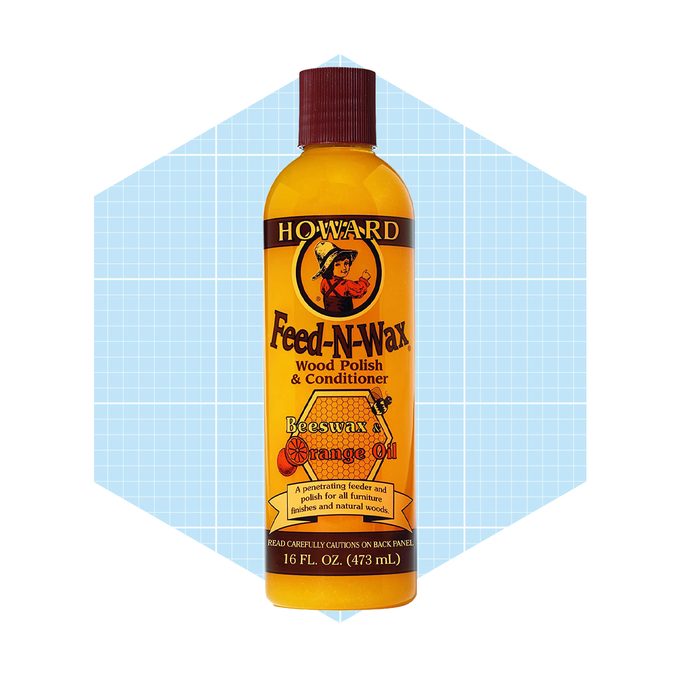
Howard Feed-N-Wax is a one-step wood conditioner, hydrator, polisher and protector. Conditioner oils “feed” wood, offering hydration and color protection that bolsters the lifespan of traditional polyurethane wood finishes. It enhances the look of hardwoods across the spectrum, including walnut, oak, cherry and maple.
It’s safe for antiques, thanks to the omission of often-seen fillers like silicon and linseed oil that can harm the wood over prolonged periods of use. An effective and safe blend of orange oil, carnauba and beeswax make up most of the formula.
The best part? Howard Feed-N-Wax doesn’t leave a chemical smell that lingers after use. Shoppers describe the orange scent of the wax as “pleasant” and “lovely.” Look forward to cleaning day—pick up a bottle and put your microfiber towels to work.
How to Use Howard Feed-N-Wax
First, coat the wood in an even, set finish—we recommend wipe-on wood finishes for a quick project. While Howard Feed-N-Wax elevates finishes of any age, it’s not a finish in and of itself. If finished wood isn’t the look you’re going for, you can skip this step. For old finishes, consider using Howard Restor-A-Finish to enhance the appearance before waxing.
After finishing the surface, clean it with a quality wood cleaner like Howard Orange Oil paired with a microfiber cleaning cloth. This removes dust, debris and helps the Feed-N-Wax penetrate the wood. Wait for the product to dry after cleaning for the best results. After the cleaner dries, it’s time to wax!
Apply a thin layer of Howard Feed-N-Wax to a soft cloth and begin wiping in large swipes, following the grain. Apply generously enough to coat the wood, while still avoiding clumps of the product from building up on the surface. The smoother, the better.
Once you apply the product, let it set for at least 20 minutes before wiping off the excess with a clean cloth. For unfinished woods and older finishes, the wait time may be closer to eight hours. Repeat the process until you achieve your desired look and any time the wood requires a little extra TLC.
Where to Buy Howard Feed-N-Wax
Howard Feed-N-Wax is a popular product available at retailers like Walmart and Ace Hardware. I recommend scooping it up on Amazon for a limited-time savings of 33%. At that price, it’s worth it to stock up on a few bottles—especially if you’re a woodworker, up-cycler or DIYer.
Shop smarter with our expert recommendations for tools, gear and money-saving deals on can’t miss DIY and home products. Sign up for the Stuff We Love newsletter.
Picture this: there’s a DIYer that you love, but you’re not sure what to get them for Valentine’s Day. No sweat! As Sales Editor of Family Handyman, I shop DIY essentials on sale for a living. I always have an eye out for the deepest discounts, so I put together this list of the best Valentine’s Day deals. Finding the perfect gift for DIYers is a breeze.
Whether your Valentine prefers stocking their industrial storage racks with power tools or top-of-the-line woodworking gear, this list has something for every DIYer. Add these finds to your cart to secure savings of up to 45% on brands like Carhartt.
When Alex Mazhukhin purchased a fixer-upper first home in 2015, he understood he was taking the first steps into the world of DIY. But did he know his desire to upgrade his family’s home would eventually lead him to starring in a streaming series centered around his building and DIY prowess?
Not exactly.
“It’s incredibly humbling,” says Mazhukhin. “Knowing that this DIY journey all started with having to get creative when it comes to making a comfortable home for starting our family. And now it’s grown into a show that anybody can watch and see where how far we’ve come.”
Mr. Build It is a new series on At Home With Family Handyman, featuring YouTuber, dad and everyman Alex Mazhukhin. The series will follow Mazhukhinand his wife Irina as they make their way through various DIY projects.
Mazhukhin and Co. will walk viewers through many aspects of home improvement, from kitchen upgrades to fireplace demolition to building a sauna in an unused shed.
Who Is Mr. Build It?
Mazhukhin gained the moniker “Mr. Build It” through his YouTube channel.
While fixing up his own home, he found invaluable inspiration from the work other people were doing and posting online. Mazhukhin quickly realized a lack of inspiration and know-how hold people back from improving their homes. He decided to make his own videos addressing this issue.
With his content, Mazhukhin hopes to help people understand everything that goes into DIY projects so that they can feel comfortable tackling them on their own.
“At first, everything seems like a giant undertaking,” Mazhukhin says. “But once you decide to eat the elephant one bite at a time and start from the first step, the only thing that is left to do is to embrace the sweat part.
“The hard work and frustration is guaranteed to come along the way. But in the end, it will be a priceless lesson and you can take that knowledge on to the next project.”
DIY Home Improvement Projects
Few people move into a new home and find it exactly how they want it. Most of the time, you have to grow into your home — and grow your home around you.
“Every project I’ve ever taken on was motivated by building our dream environment,” says Mazhukhin. If you’re motivated by a similar dream, here are some home improvement projects you can take on to create your own ideal home space:
Mr. Build It can be found on the At Home With Family Handyman streaming channel. At Home is streaming now on XUMO, The Roku Channel, LG Channels, Plex, fuboTV, Sling Free, and the Family Handyman app. It’s also available on iOS, Apple TV, Android, AndroidTV, FireTV, and Roku devices.
More streaming platforms will be announced in the coming months.
If your stair spindles are in need of a fresh coat of paint but you want to save some cash, you will be relieved to learn that you don’t have to hire a professional painter. Instead, you can do it yourself.
To successfully paint your stair spindles, you’ll need to make use of one common household item. That’s right: today, you are going to learn how to paint stair spindles with a sock. And, of course, we’ve got you covered with some more handy painting tips to make your next project go smoothly.
Can You Use a Sock to Paint Stair Spindles?
Yes, you can learn how to paint stair spindles with a sock, according to TikTok creator @diywithemma. Making this do-it-yourself project a success is as simple as gathering the right products. When we first heard that a tutorial emerged that teaches you how to paint stair spindles with a sock, we’ll admit that we had our doubts. However, it’s now clear that this process actually does work—and you can easily replicate it at home.
A sock or two that you don’t mind throwing away or recycling later
Your preferred paint
What You Need to Do
Open and mix your paint. Make sure that you put down a plastic cover to protect your home and furniture from any spare paint that could drip.
Put on your latex gloves. You’ll wear these to protect your hands.
Layer a sock on top of your latex glove on the hand you’re painting the stair spindles with. When your sock is securely layered on top of your glove, dip your hand with the sock into the bucket of paint.
Use the sock with the paint as a brush and get in the grooves.
That’s it! This DIY hack for painting your stair spindles is that simple.
More Tips for Painting Hard-to-Reach Stair Spindles
Need some more tips for painting stair spindles and other hard-to-reach spaces? Here are some of our favorite tricks.
Use mini rollers
Because stair spindles are often intricate and difficult to reach, you may decide to use mini rollers to evenly apply paint to the surface.
Use a rag
If you don’t have an old sock lying around, you can also use a piece of cloth to apply paint to the stair spindles. Just be sure you don’t drench the material and properly lay down protective plastic to safeguard your furniture and the rest of your home.
Painting something beyond stair spindles? We’ve compiled a list of painting tips to help you paint almost anything.
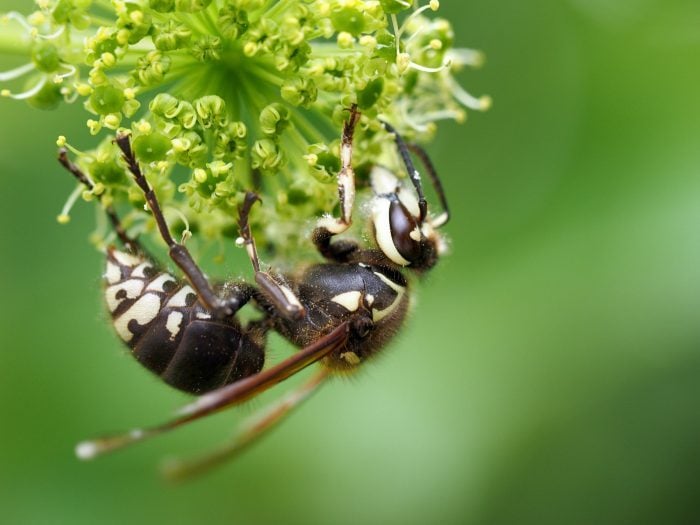
Several kinds of wasps and hornets build nests of paper. They create the paper by chewing up wood and mixing it with their saliva. If you see a large, ball-shaped nest with exposed honeycombs in your area, it was probably fashioned by bald-faced hornets (Dolichovespula maculata), which only occupy it for one season.
What Bald-Faced Hornets Look Like and Where They Live
To identify these insects, look for distinctive white markings on their face, thorax, legs and abdomen. Bald-faced hornets live throughout most of the United States, including Alaska, and also in Canada. It’s likely you have some in your neighborhood.
Bald-Faced Hornet Behaviors
According to Penn State University Extension, bald-faced hornets are not “true” hornets; they’re actually yellow jackets. All species in the genus Dolichovespula build these big, gray football-shaped nests. They’re often easier to spot in winter after leaves fall off the trees.
Yellow jackets, a type of social wasp, are predators that feed on many insects. They also like sugar and may visit hummingbird and jelly feeders, especially in the fall, when their numbers are at their highest. Social wasps build large nests and aggressively defend them if someone approaches within a few feet. There is one reproductive queen and hundreds of “workers.”
How to Deter Bald-Faced Hornets
You don’t want these pests anywhere around your home. Destroying a nest is the easiest way to deter them. However, that’s easier said than done, and dangerous to attempt if you’re not experienced.
If you find an active bald-faced hornet nest, it’s best to stay away from it. Seek professional assistance if it’s somewhere with a lot of foot traffic. If provoked, these busy insects will defend their home.
Homeowners have come up with creative ways to keep pests away. One popular and affordable pest solution is to hang pennies in a bag of water on a front porch. This hack, mostly used in the South in summer, is primarily a DIY fly repellent. Neem oil is another popular bug repellent.