For those of us that live in old houses—from before the 1950s—there are design quirks that act as conversation starters. Even though we’re scratching our heads at some old home features, they were perfectly functional 75 years ago. But those details don’t make the most sense now. There’s no need to have a coal door or an icebox door today, right?
If you have a small door next to your closet, it had a purpose in the ’50s and ’60s. Here’s what those little doors in old houses were for!
What People Think the Doors For
If you have a mini door next to a closet in the hallways, you can rest easy, because it isn’t for someone to hide in. The doors are usually narrow, about 12 inches in width and less than half the height of a standard closet. They’ve got some depth to them, too, usually about three feet.
Often, most people assume this door conceals a luggage closet. Keeping it next to a closet would be logical. But the space seems a little tight for a large suitcase, especially since old suitcases didn’t have wheels. Other popular guesses include linen storage, or space for an ironing board.
In some old houses, the little doors are designated storage space for a card table! These small spaces were meant to keep card tables—which almost everyone had in the 1950s—tucked away neat and tidy until you had company over.
As with some of the household designs mentioned before, this might not make much sense to us now, especially when those of us in the Midwest have basements that are perfect for storage. Keep in mind that card games were a prime source of entertainment and socializing in the ’50s, and it would’ve made since to be able to stow a card table in a hall closet.
Halloween is one of the best family holidays of the year. The kids get to have fun with costumes, friends and trick or treat, while parents get to invest in spooky decor and talk about Halloween from years past.
But Halloween doesn’t look the same for everyone. While you’re passing out candy to all the boys and girls during trick-or-treating this year, keep an eye out for kids with a blue Halloween candy bucket.
What Does a Blue Halloween Bucket Mean?
In recent years, a blue Halloween bucket has become an unofficial signifier for kids with autism and autism awareness. While trick-or-treating has been happening for close to 100 years, using blue buckets has only just begun to gain footing. Neighbors came together and started posting on Facebook and other forms of social media to bring awareness to the practice as early as 2018.
Why Are the Blue Buckets Important?
We’re all pretty used to the normal Halloween night practices when it comes to trick or treat. Kids ring the doorbell, say “trick or treat” and swiftly receive some form of sugar-filled compensation. But, it’s important to note that some children with autism may be nonverbal.
Because of this, saying “trick or treat!” as soon as the door is opened may not happen, but that doesn’t mean that child doesn’t still deserve the best Halloween candy you can buy. Seeing the blue bucket and being aware is the most important step!
What About Teal Pumpkins?
Look out for teal pumpkins on Halloween, too. This is used to raise awareness for children with food allergies and food-related medical conditions. It’s an important issue to think about when it comes to passing out candy with potential common allergens like gluten and peanuts. For kids with food allergies, we like these allergy-free Halloween treats.
Just remember that a little bit of knowledge and kindness can go a long way—and can even turn a regular day into a memory a child will hold onto forever.
As Halloween gets closer, you’re sure to see plenty of orange pumpkins on stoops and porches. But what if you see a teal pumpkin? These non-traditional pumpkins are much more than decor, and they serve an important purpose.
The Teal Pumpkin Project
The Teal Pumpkin Project is an effort by the Food Allergy Research & Education (FARE) organization to raise awareness of food allergies and promote inclusion of all trick-or-treaters during the Halloween season. This project originated as a local activity by the Food Allergy Community of East Tennessee and has since become a worldwide event. According to FARE, teal is the color for food allergy awareness and has been used to raise awareness about food-related medical conditions for 20 years. Those who participate in the project place a teal painted pumpkin outside their door and provide non-food treats to trick-or-treaters on Halloween.
Food Allergies Are Increasing
The incidence of food allergies is on the rise. According to FARE, one in 13 children has a food allergy. Even tiny amounts of allergens can cause serious, if not life-threatening, reactions in those affected by food allergies. Traditional Halloween candy and chocolate treats are rife with common food allergens, including ingredients derived from wheat, eggs, soy, nuts and milk. Participating in the Teal Pumpkin Project allows children who are affected by food allergies to still participate in Halloween trick-or-treating activities and not feel left out from the festivities.
How To Participate
Placing a teal pumpkin on your doorstep or at the front of your home is the first step. You can add your location to the Teal Pumpkin Project map to let trick-or-treaters know your stop is food-allergen safe. Recommended non-food treats include small containers of bubbles, spider rings, glow sticks, pencils, stickers or finger puppets. And if you do participate in the Teal Pumpkin Project, that doesn’t mean you can’t also provide traditional treats as well. If you do provide both non-food and candy treats, FARE recommends asking trick-or-treaters if they have a food allergy or just give each child the option to choose which kind of treat he or she would like.
There are ways to support for certain issues without outright telling everyone we meet. People use teal pumpkins during Halloween to show awareness of children’s food allergies and blue pumpkin buckets to spread awareness for autism. It’s a great ways to spark conversations about issues that deserve the spotlight without seeming in-your-face.
So why do some people use green porch lights? This one doesn’t have to do with Halloween or Christmas, but it is related to another holiday.
What Does a Green Porch Light Mean?
It started in 2013 with a campaign led by Walmart, called the “Greenlight a Vet Campaign.” This campaign worked to guarantee jobs for honorably discharged U.S. veterans after they returned home from service. In addition, Walmart also encouraged members of their communities to change their porch lights to green in order to show appreciation for veterans across the nation.
The campaign described the color green as renewal and hope. With all of these positive ideas in mind, Walmart hoped to start a new conversation about U.S. veterans as valued members of every community. You’ll still see these green lights around November 11, which is Veterans Day.
Occasionally, some will also use green porch lights to celebrate St. Patrick’s Day.
What’s the Best Light for My Porch?
When choosing outdoor lights, like a green light for your front porch, look carefully at the amount of lumens. The more lumens, the brighter the bulb. This 229-lumen bulb has a softer light and should generally work well for your porch, but if you don’t have many lights outside, you may need to have your single light do the work of many. In this case, look for a light like this 720-lumen bulb.
If you live where there are four distinct seasons, you can feel it in your bones when the growing season nears its end and it’s time to wind things down in your landscape.
Even if you garden where winter isn’t severe, you’ll notice some of your shrubs and flowers growing slower and losing some color in the fall. That’s because decreasing daylight and cooler nighttime temperatures let your plants know winter is on the horizon.
You’ve worked so hard to achieve an amazing garden, so take a moment in late fall to complete these last few simple tasks to close things down. Your efforts now will have a lasting positive impact on your landscape you’ll appreciate next spring. If you’re looking to learn how to close up your vegetable garden for winter, that’s a different topic.
Garden Winterization Tasks To Do Now
By the time the first frost hits, or by late December in frost-free climates, you’ve likely finished your gardening for the season and prepared your lawn for fall. Let’s talk about a few jobs you may not have thought to tackle yet, plus a few more that are important to continue until winter arrives.
Fall watering
Keeping the plants in your landscape watered consistently until the ground freezes is one of the most effective actions you can take to help them survive the winter damage-free.
The ground stays warmer than the air in the fall, stimulating plant roots to grow vigorously this time of year. It’s especially true of perennials, shrubs and recently-planted trees. Extend the time for them to become established in the fall by keeping the ground moist and mulching around their roots.
Fall watering is extra critical for evergreen plants, including conifers and broadleaf evergreens. Going into winter fully hydrated helps them avoid winter burn on their foliage. Keep them watered consistently until the ground freezes, or throughout the winter months in freeze-free regions.
Mulch plants before winter
Many people mulch their garden beds in the spring, but fall is also a critical time of year to protect the roots of your plants. Mulch helps keep the soil moist and warm, which helps plants continue growing strong.
Perennials, shrubs and trees planted in your landscape this season should take priority for mulch. Spread a three- to four-inch layer of shredded leaves, bark chips or shredded wood around the base of the plant. Don’t lay it right up against the trunk or crown; that prevents insect and rodent damage.
Top-dress garden beds
Most of us garden where the soil isn’t ideal, whether it’s heavy clay, nutrient-poor sand or hard as a rock. That’s where top–dressing your beds in late fall can help. When you add a thin layer of compost or a fluffy layer of shredded leaves on top of your garden beds after your plants go dormant, it greatly improves the structure of your soil over time.
If you repeat this task faithfully, your garden soil will take on a looser, loamy texture and grow rich in the nutrients that help plants thrive. If there’s no time to do it in the fall, don’t skip it for a year. Reschedule this task for early spring before your plants wake back up.
Apply animal repellent in late fall or early winter
Here’s a garden task that many people forget and pay for later with gnawed perennial crowns and stripped tree and shrub bark. Critters like mice, voles, rabbits and deer are still active outside in the winter looking for food. Don’t let your prized hydrangea tree fall victim to voles!
Before the fallen leaves blanket your garden, or at least by the time the ground freezes, put out animal repellent. To deter mice, voles and rabbits, spray the lower 18 inches of young trees, shrubs and vines with a liquid repellent, like Plantskydd, that doesn’t wash off in the rain or snow.
Next, spray the trunks of young trees at eye level to help deter deer from using them as scratching posts. Damage from that scratching, called “buck rub,” can kill the tree if deer rub off enough bark. Tree wraps are also an effective defense against critters.
For extra protection, sprinkle a granular animal repellent on the ground around the crowns of plants. Coral bells and coneflowers are favorites of rabbits and voles, especially when hidden under the leaves or snow. You can’t overuse animal repellent, so feel free to apply it to any plants you’re worried about.
When planting spring bulbs before winter, take extra precautions against squirrels, chipmunks and voles by spraying your bulbs with liquid animal repellent and letting them dry first. Then plant them. If these rodents still foil your bulb planting, you may need to plant the bulbs inside a physical barrier like a chicken wire basket.
Store away or switch out your flower pots
If you live where frost and snow are common, empty and store the flower pots by early winter to avoid damaged. This is especially important for terra cotta, ceramic and plastic pots, which can easily crack from winter’s freeze-and-thaw cycles. Bring the pots into an unheated shed or garage if possible, or turn them upside down and store them in a sheltered spot outdoors.
Early winter is the perfect time to swap out fall container plants for winter evergreen boughs and berry-laden branches to keep things festive. Just be sure you’re choosing frostproof containers. If you live in a frost-free climate, situate them out of the elements.
Know which perennials to cut back in late fall
If you’re growing several kinds of perennials in your landscape, you might be wondering which should be cut back in late fall versus in the spring. While most can wait out the winter intact, there are a few specific guidelines to follow when preparing your garden for winter.
Don’t cut back evergreen perennials, or those with hollow or woody stems. They tend to overwinter better if they are cut back in the spring.
Perennials with these traits should be cut back in late fall:
Any herbaceous perennials with diseased parts, like bee balm covered in powdery mildew. Some diseases, like the one causig black spots to form on black-eyed Susans, overwinter in the soil and reinfect the plants again the following year. It’s important to bag and dispose of diseased foliage rather than composting it.
Hostas and similar thick-foliage perennials make easy hiding places for harmful insects and their eggs. Cut these plants back once most of their leaves have turned yellow or brown.
Plants with seed heads you don’t want to spread around your garden.
Shield vulnerable plants
If you keep your plants watered thoroughly until the ground freezes and spread mulch around their roots, there isn’t much little needed to prepare them for winter. If your plants require more drastic measures to survive the cold, it’s likely because the plant isn’t well-suited to your climate or isn’t happy where it’s planted. Consider replacing them with hardier varieties that will overwinter more easily.
If you’re worried about newly planted broadleaf evergreens, protect them with an anti-desiccant like Wilt Stop. Products like this create a waxy coating on the leaves so they stay hydrated. It’s not a replacement for fall watering, but it could prevent the foliage from burning in winter.
Plant bulbs late in the season
Have you noticed the squirrels licking their chops when they see you hauling out your bulbs for fall planting? If so, wait to plant your bulbs until late in the season, after the squirrels fattened up on acorns and other fall fodder.
As long as you can still stick your shovel in the ground, you can plant spring-blooming bulbs until the ground freezes. Playing the waiting game often works to your advantage in this case.
Once you wrap up these tasks, you can rest easy ,knowing that your garden is prepared to take on winter. Now it’s time to sit back, relax and start dreaming about all the new things you’ll plant and grow next year!
Some 30 years ago, American kitchens received the gift of the microwave and quickly became dependent on it for lightning-fast heating. Younger generations can’t even imagine making oatmeal, hot chocolate, or popcorn without it. And yet so many of us are using the microwave incorrectly for reheated foods. Sure, we know to never zap aluminum foil, metal, or plastic, but there are equally dangerous risks involved in nuking certain foods.
For starters, a microwave does not cook food evenly, which often means that any bacteria present in the reheated foods will survive. Then there’s the problem of microwave blasts directly contributing to the production of carcinogenic toxins. To minimize the microwave risks, don’t use it to cook or warm these ten foods:
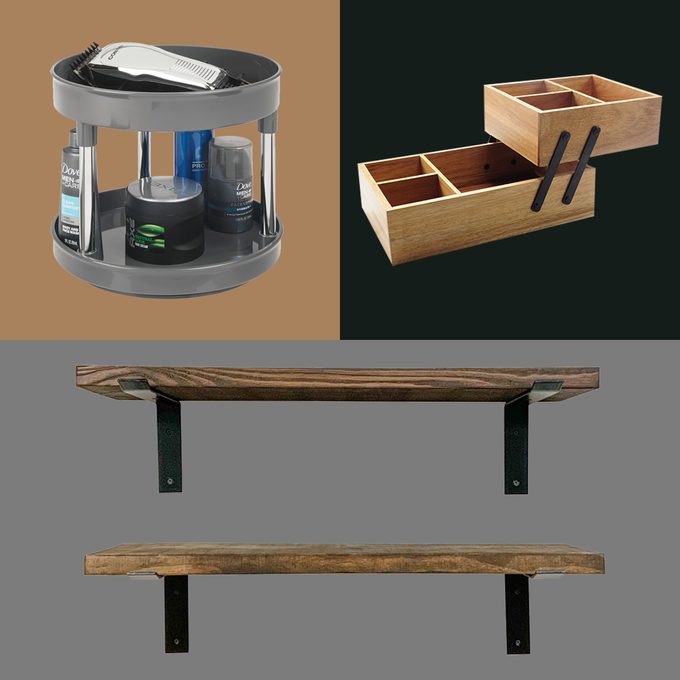
If it seems like there’s never enough storage room in your bathroom, you’re not alone. Makeup, towels, backup shampoo bottles, hair styling tools, bath toys and more all need somewhere to go. So what do you do when your vanity drawers are full? Get creative and add more bathroom storage for small spaces.
These storage products make the most of small bathrooms without a full remodel.
Sponsored by Home Depot: This piece was created in partnership with Home Depot, home to Kidde fire safety products that can help you protect your home and family with fire alarms, carbon monoxide alarms and fire extinguishers.
Now is the best time of year to upgrade your home to a hardwired smoke detector and stock up on other fire safety and prevention essentials.
Installing UL-certified smoke alarms in your home is a vital fire safety measure that may save lives. Kidde, the bestselling fire safety brand, is running an epic sale at The Home Depot, and the deals are simply too good to pass up.
What’s in the Kidde Smoke Detector Sale?
You’ll find prices on Kidde smoke detectors, fire extinguishers and even voice-based alarms marked down significantly. Expect almost everything suggested in our list of fire prevention tips to hit the sale rack, with some items dipping below five dollars.
When is the Kidde Smoke Detector Sale?
Add your favorite Kidde fire safety products to your cart ASAP before this sale ends October 31. With popular items selling fast, don’t sleep on these deals. You might want to consider adding a few extras to your cart while prices are low and items are in stock.
What are the top Kidde Smoke Detector deals?
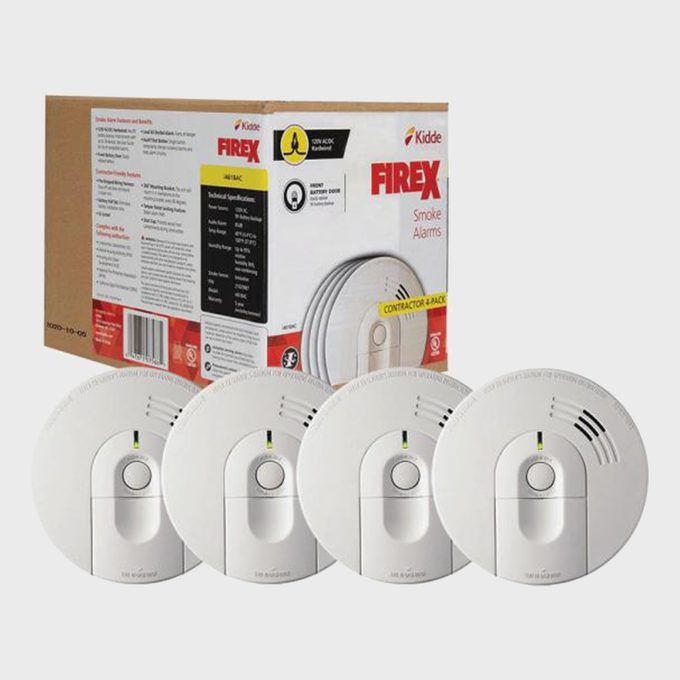
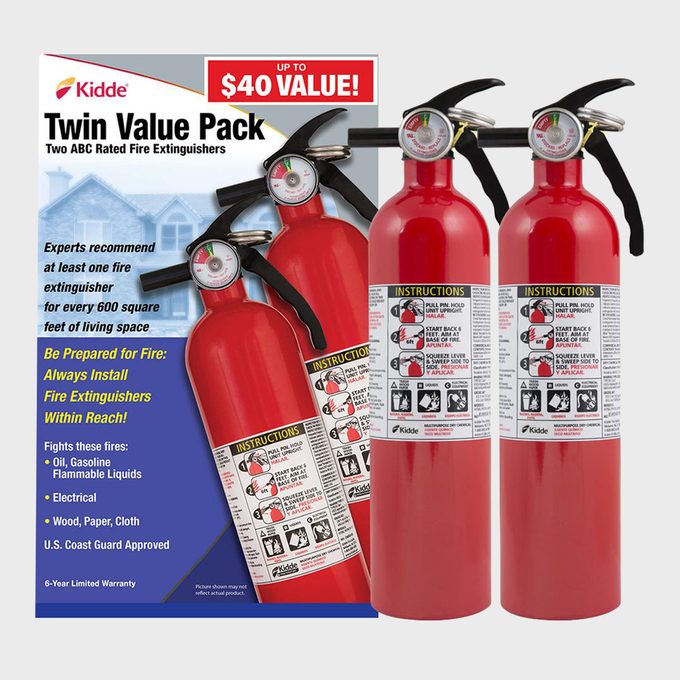
Firex Hardwired Smoke Detector with Battery Backup Four-Pack
This package of hardwired smoke detectors offers four units at a discounted price to keep an entire small home or apartment protected from fires. Each unit has battery backup and easy front-loaded battery access. Take 20 percent off this already affordable set and buy it for $39.97 instead of the usual $49.97.
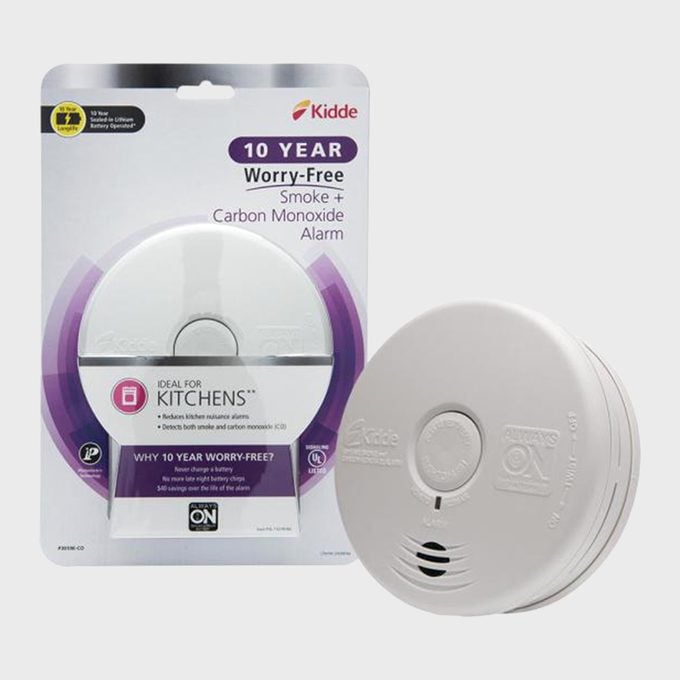
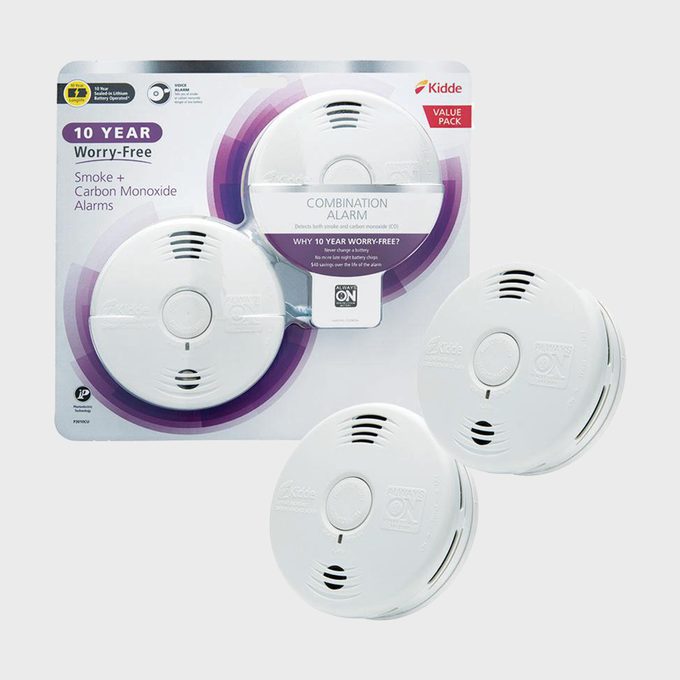
10-Year Worry Free Smoke and Carbon Monoxide Detector
Double up on home fire safety and carbon monoxide detection with this worry-free model that boasts a 10-year lithium battery. It offers continuous protection, even when the power goes out — which means you won’t get those annoying chirps and whistling sounds, either.
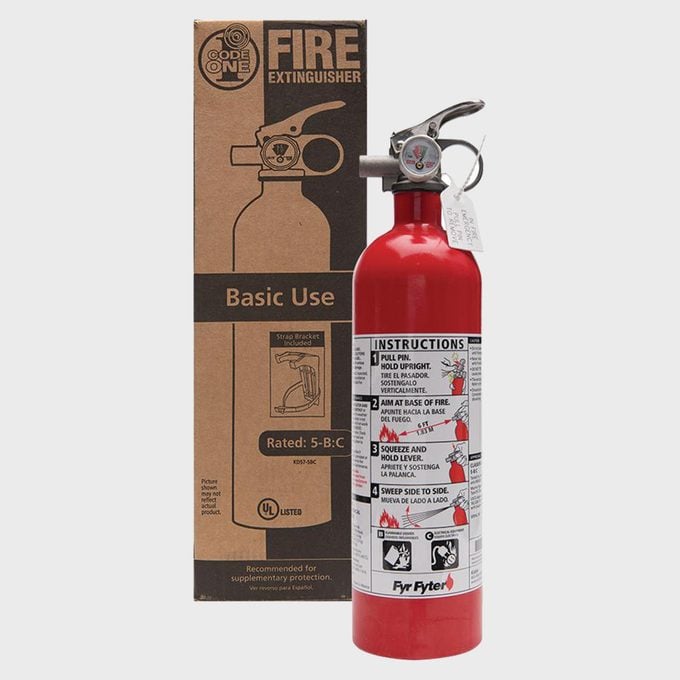
This basic-use fire extinguisher is ideal for the kitchen. It comes with a wall mount and strap. It’s marked down 34 percent so you’ll pay $9.88 instead of the usual $14.97. This is where you should keep fire extinguishers in your home.
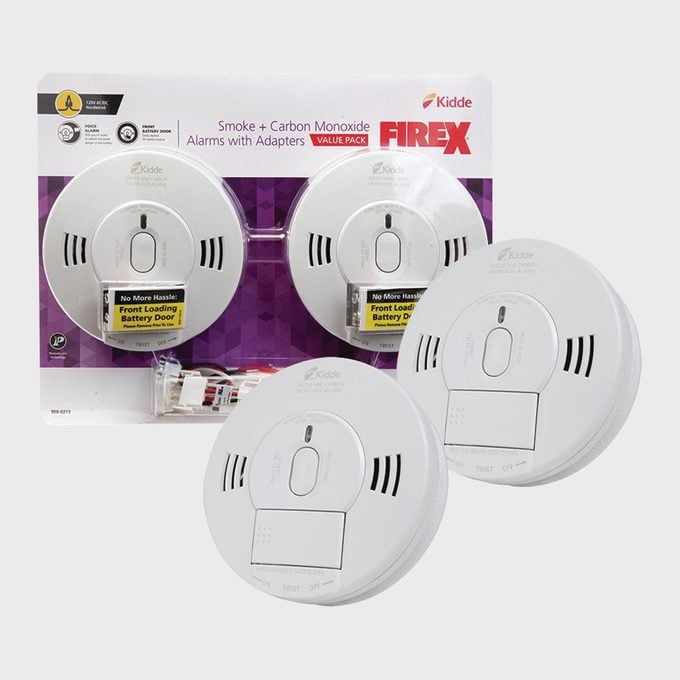
Firex Hardwired Combination Smoke and Carbon Monoxide Detector Two-Pack
This combination unit offers the reliable protection of a hardwired system and comes with adapters and voice alarm technology. The best part? You get two per pack. They’re marked down 10 percent to $79.97 instead of the usual $99.00.
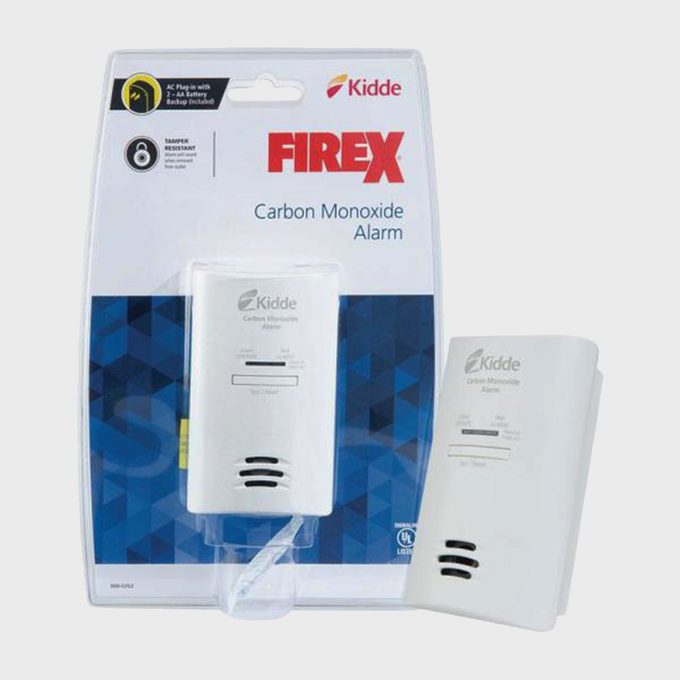
This nifty carbon monoxide detector plugs into wall outlet and offers AA battery backup for extra protection. It’s marked down 33 percent, so scoop these up fast. Buy it for $19.97 instead of $29.97 during the Kidde sale.
Having an extra fire extinguisher within reach is good fire prevention policy. Whether you’re purchasing an extra fire extinguisher to keep outside by the barbecue or inside as a backup, this two-pack of fire extinguishers is a fantastic deal at $29.97. That’s 33 percent off the usual $40 price tag.
They offer two-in-one protection, a 10-year lithium battery and voice alarm alerts in case of fire, carbon monoxide or low battery life. They’re currently nine percent off, or $89.97 instead of $99.
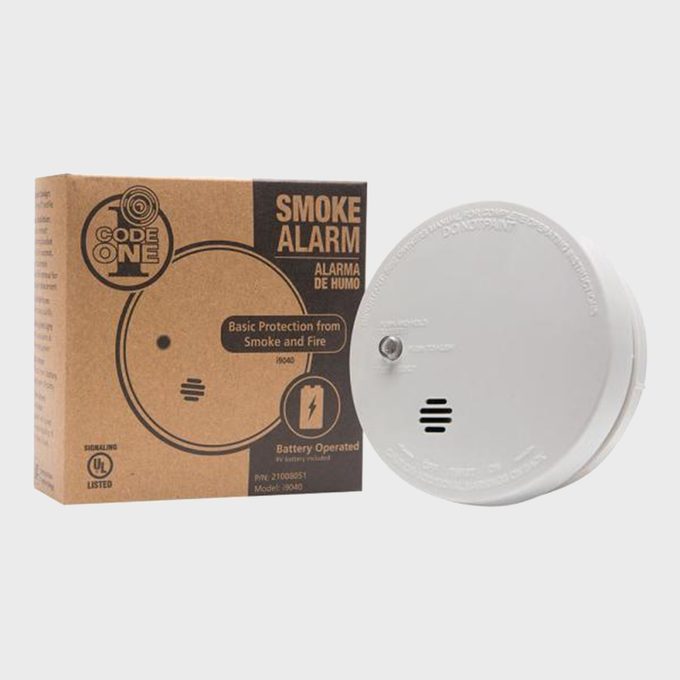
This is the most affordable fire safety device we’ve seen yet, reminding us that fire prevention and home safety can be had at any budget. The battery powered Code One smoke detector unit features an ionization sensor and goes for less than $6 during the Kidde smoke detector sale.
One of the most popular siding options for the outside of a home is also one of the oldest. Stucco has been used for centuries and it remains a popular choice for residential siding.
Nearly 25 percent of single-family homes built today feature stucco siding, according to a 2019 report from the Stucco Manufacturers Association. It ranks as the second-most popular siding in the U.S. behind vinyl. Here’s why it’s a top choice for so many homeowners.
What Is Stucco?
Stucco is a cement-like product applied to the outside of a home in multiple layers about one inch thick. Its texture varies from smooth to textured, depending on how it’s applied. It can be used over masonry or wood frame. Traditionally, it’s made of cement, lime and sand.
There are several newer stucco systems, including acrylic, insulated and crack suppression, that address cracking and other issues that can occur with stucco. (See Why Use Stucco, below.) These offer even more options for texture.
While stucco is popular in Southern and Western U.S., it’s also seen in the Midwest. Now it’s expanding to other regions as newer products solve some of stucco’s limitations.
Why Use Stucco
Like all siding materials, stucco has pros and cons you should consider for your specific situation.
Advantages of Stucco
Durability: Unlike other siding materials, stucco has some serious staying power. “When properly applied, it can last for decades without needing maintenance,” says Gregg Cantor, president and CEO of Murray Lampert Design, Build, Remodel. According to a Department of Energy study, “Properly applied stucco will have a useful service life of 100 years.”
Appearance: Stucco offers unlimited customization. The finish can be anything from super smooth to highly textured. It works well with many architectural styles and other building materials, and can be tinted a range of colors.
Fire resistance: Stucco provides a strong firewall rating — one hour — which makes it appealing when you need to meet local fire codes.
Cost: Because applying stucco requires a high level of skill, the cost will vary regionally with labor costs. “In the West, conventional stucco costs about $20,000 for a 3,000 sq. ft. home,” says Cantor. “The newer acrylic systems cost about $25,000 to $30,000.” Cantor says acrylic stucco is “probably going to be more cost effective than traditional wood, vinyl and composite siding.” That’s due to its high durability, low maintenance needs and long lifespan.
Disadvantages of Stucco
Cracks: If applied correctly, stucco should perform well. Hairline cracks are normal with conventional stucco, and stress cracks can occur as homes settle. But the newer acrylic stucco products and crack suppression systems have greatly decreased cracking.
Insulation: Conventional stucco doesn’t provide much insulation value. But with new stucco insulation systems, you’ll get better performance.
Staining: If water runs down stucco, it will stain over time, and you could have larger issues with moisture damage. Use gutters and keep sprinklers away from stucco exteriors.
How To Apply Stucco
Stucco is applied over a base of house wrap or felt paper and lath. It’s typically done in three coats applied by hand with a trowel. Color and texture are added with the final coat.
Application of newer systems vary, based on the specific manufacturer’s product. A crack suppression system requires four coats, and insulating systems require several steps. “They include a polystyrene foam board, followed by fiberglass mesh and an acrylic finish coat,” says Russ Grassa of S.G. Plastering in El Cajon, California.
Can You DIY Stucco or Should You Hire Someone?
“I don’t recommend DIY,” says Cantor. “Very few homeowners would have the skill set required to apply stucco. There are other challenges, too, like the equipment and specialty tools needed.” Cantor adds applying stucco isn’t a one-person job; it takes three or four people.
Taking Care of Stucco
Cantor recommends the following:
Inspect stucco annually for cracks or damage and repair them as soon as possible so water doesn’t seep behind the stucco finish.
Stucco typically doesn’t need cleaning. If it’s particularly dirty, hose it off using mild pressure.
Use gutters and check them periodically to make sure they’re not clogged, damaged or leaking water onto the stucco. Repair gutters as soon as you spot issues to avoid damage or staining.
Over time, the color may fade. You can paint stucco to refresh it.
Trim trees and shrubs so they don’t rub against the stucco.
Don’t put planters that hold water, such as window boxes, against stucco.
Keep soil levels around the perimeter of the home below the stucco finish. Stucco is porous and can draw up moisture from any soil touching it.
Use drip irrigation systems around the perimeter of the home. Avoid sprinkling or spraying water onto the siding.
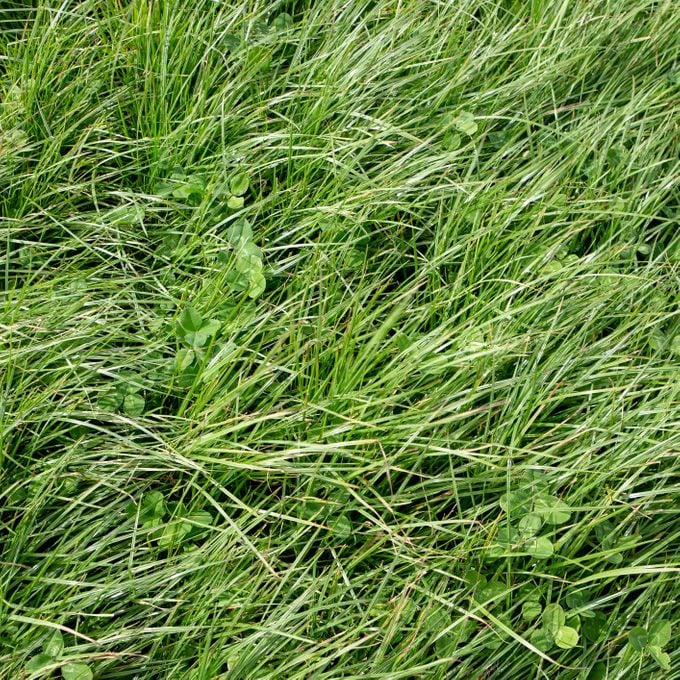
Long before they found a home on suburban lawns, cool-season grasses had their place in history. Archaeological studies of prehistoric cliff dwellings in the Southwestern U.S. show early Native Americans depended on these grasses as a food source, particularly in late spring and early summer before other crops matured.
Today, many of us depend on cool-season grasses for maintaining a green, healthy lawn year-round. Here’s what you need to know about cool-season grasses and whether these varieties are right for your lawn.
What Is a Cool-Season Grass?
While there are all sorts of technical definitions, it’s simpler for homeowners. According to Kris Kiser, president of The TurfMutt Foundation, a non-profit dedicated to the stewardship of green spaces, cool-season grasses are those that grow well in the cool of fall and spring.
“They stay green until the temperatures drop below freezing and can survive colder temperatures,” Kiser says. They typically grow best in the Northern U.S. and four-season climates elsewhere in the world.
What’s the Difference Between Warm- and Cool-Season Grasses?
Cool-season grasses require different optimum growing conditions than warm-season grasses. “Warm-season grasses like hotter weather, so they grow in late spring and go dormant in early to mid-fall,” Kiser says. Conversely, she says, cool-season grasses tolerate cooler weather so they stay green longer.
Another bonus, which those early Native Americans appreciated: Because cool-season grasses tolerate the cold, Kiser says they “green up” much earlier in the growing season compared to warm-season grass. “Cool-season grasses grow the most in the spring and fall when soil temperatures are 65 F or lower,” she says.
Types of Cool-Season Grasses
Joe Churchill, senior turf specialist for turf service and suppliers Reinders, Inc., identifies 13 types of cool-season grasses. Here are the main ones for residential lawns:
Kentucky bluegrass;
Perennial ryegrass;
Creeping red fescue;
Chewings fescue;
Hard fescue;
Tall fescue.
How To Identify Cool-Season Grasses
If you already have a healthy lawn and want to supplement it with more sod or seed, it helps to know what type of grass you’ve got. Here are some characteristics of the most common cool-season grasses.
Kentucky bluegrass. This is dark green and holds up well to foot traffic, says Kiser. Churchill adds that Kentucky bluegrass has a medium texture and a boat-shaped leaf tip. It forms a tightly-knit sod and can be grown from seed or planted as sod.
Perennial ryegrass. This looks a lot like Kentucky bluegrass, and will often be sold with it in a seed mix. Churchill says you can ID by its medium-green color and shiny underside of leaf blades. When it’s freshly mowed, says Kiser, perennial ryegrass shows a whitish cast at the top of the grass blades.
Tall fescue. “Coarse tall fescue tends to have big blades that bunch up,” says Kiser. Thin, needle-like leaves are likely fine fescue. Churchill describes tall fescue as dark green with a medium texture.
When purchased as seed, cool-season grasses are often sold as a seed mix. The label on the bag should indicate what types of grasses are blended in and in what percentages, as well as what zones or climates best suit the grass.
How To Choose the Best Cool-Season Grass for Your Yard
Perennial ryegrass
The first thing to consider when choosing cool-season grass is where you live. Most cool-season grasses can tolerate a cold winter, although some will die in extremely low temperatures, but they don’t do well in a blazing hot summer.
“Cool-season grasses are more commonly planted in the upper tier of the U.S.,” says Kiser. “If you live in the transition zone between warm and cool zones, such as in the middle section of the country, consider using a blend that mixes warm- and cool-season grass seeds.”
Even within the range of cool-season grasses, some grow better than others in certain places. “You should always consider your climate zone and yard conditions,” says Kiser. Your local home and garden store should be able to help, but she also suggests contacting your county extension office for advice on what varieties grow best in your community.
When Is the Best Time To Plant Cool-Season Grass?
Churchill says it’s best to plant cool-season grasses from late summer through early fall. “This is when ambient and soil temperatures are both optimum and weed pressure is the lowest,” he says. “This translates into a higher success rate of getting seeds out of the ground and fully established.”
Can Cool-Season Grass Survive a Hot Summer?
They may prefer to grow in cooler weather, but some varieties of cool-season grass can survive a hot summer.
“Kentucky bluegrass is rated medium for drought and heat tolerance,” Kiser says. “It may turn brown during a hot summer and enter dormancy due to high heat. But it will often green up again once the temperatures go down.” Other varieties, like perennial ryegrass and fescues, have a lower tolerance for heat and drought.
“All of these species are perennials, meaning they will come back year-after-year in the right climate,” Churchill says. “That is, unless something kills them, like high foot or equipment traffic, severe heat, drought, disease or insect infestation.”
Many of us keep appliances we rarely use plugged in out of convenience. You might be wondering, does unplugging appliances actually matter? Yes, absolutely it does.
Unplugging unused appliances can save you from $100 to $200 annually in the U.S., according to Shipley Energy. Large household appliances alone, even when not in use, can eat up a lot of energy. A common phrase for appliances that suck energy in the background is phantom power. This Family Handyman article explains how much electricity each appliance uses.
Saving energy is one reason why you should unplug appliances before you close up your cabin for the season. And there’s more to this than just helping your wallet. Unplugging appliances can prolong their life and protect them from power surges.
So before you leave your cabin for the season, check this list for all the appliances you should unplug.
Large Appliances
For obvious reasons, large appliances add the most to your energy bill, starting with your kitchen or laundry appliances. Besides shutting off the power to those appliances, be sure to cut off running water to them. You don’t want to come back next year to a flooded cabin.
Large appliances to unplug include:
Dryer;
Washing machine;
Dishwasher;
Refrigerator/freezer;
Stove/oven.
Note: When you unplug your refrigerator or freezer, leave the doors open prevent mold or odors from forming. Also remove and dispose of any uneaten food.
Energy.gov recommends buying Energy Star appliances, which collectively can save thousands over the lifetime of the appliances.
Small Appliances
Don’t forget your the small appliances, too. Those include:
Space heater;
Lamps;
Microwave;
Toaster;
Coffee maker;
Blender.
Entertainment Systems
Your favorite entertainment systems drain energy as well, and can be susceptible to a power surge if they are not plugged into a surge protector. These can include:
Television;
Sound systems;
Internet router;
Desktop computer;
Projectors;
Electronic charging devices
Smart power strips, however, are often fine to leave plugged in. Instead of unplugging each device from the power strip, simply turn off the strip.
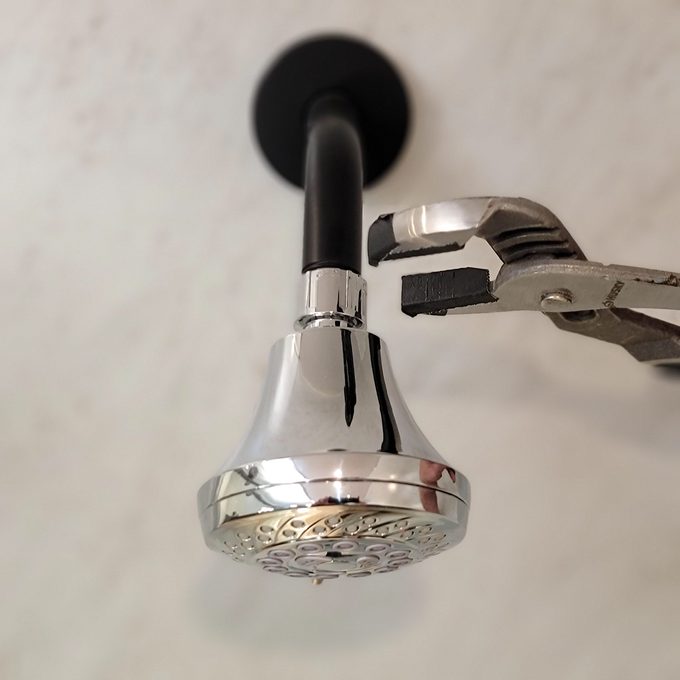
Using a pair of plumbing pliers, remove your old showerhead by turning counterclockwise (to the left) on the coupling that connects the showerhead to the shower arm. (See photo.)
Pro tip: Prevent scratching your new showerhead by covering the jaws of your pliers with tape.
Start by lifting the lid off the top of the toilet tank and peeking inside.
The nut that holds the handle onto the tank could be loose or too tight. See Step 1.
The threads on the nut or the handle housing could be stripped. See Step 2.
The handle arm could be cracked or broken off. See Step 3.
The chain from the handle arm to the flapper could be disconnected or broken. See Step 4.
Loose Handle
If the handle is loose, tighten the nut and washer on the inside of the tank with a pair of pliers. Do not overtighten the nut. You could strip the threads or, worse, crack the porcelain tank.
If the handle is stuck down in the flush position, it may not be installed properly. Loosen the nut washer, reposition the handle so it is parallel with the top edge of the tank and re-tighten the nut.
Subway tile is popular in bathrooms and kitchens but doesn’t really bring a wow factor. To take your space to the next level, pair traditional tile with a bold print like in this cheerful citrus bathroom by @tp.remodeling that’s anything but boring.
Not only will you save time on raking and money on yard care materials, you’ll make a dent in the eight million tons of fallen leaves that end up in landfills every fall.
“It’s doing a good thing for nature,” says David Mizejewski, a naturalist with the National Wildlife Federation. “Typical ways of getting rid of them — mowing them, leaf blowing them, bagging them and sending them to the landfill — have layers and layers of badness when it comes to the health of the planet.”
The good news? Dry leaves are especially useful. Here are some ways to reuse dry leaves.
Shred Dry Leaves With the Lawn Mower
Shred leaves with a mower, then spread them across your lawn to give it a boost of nutrient health when spring comes around. Keep the layer thin enough to see the grass so sunlight can still get through.
“It is good to leave mulched leaves on the ground, but leaving piles of leaves on the ground over winter can be bad for your lawn,” says Tammy Sons, owner of Tennessee Wholesale Nursery. “Too many leaves can smother the lawn and the leaves won’t break down, leaving you with a mess after winter.”
Bonus nature points for using a push mower. Either way, wait until the leaves are dry. Wet leaves are too slippery and heavy to easily distribute and may clog the mower.
Rake Dry Leaves Around Trees and Shrubs
Leaves will help regulate the moisture and temperature of the soil, acting as fertilizer as they break down. Make piles three to six inches high. If they’re not on the grass, simply leave them where they’ve fallen.
“That leaf layer is actually critically important,” says Mizejewski. “The plants lose their leaves, which fall to the root zone of those plants, where they break down and return nutrients to the tree.”
Leave the Leaves for Wildlife
Ecologically, it’s best to leave the leaves whole where they fall, or in piles around the yard.
That leaf layer is an ecosystem critical for all sorts of wildlife, including birds, chipmunks, wood frogs, shrews, salamanders and especially moth caterpillars and other insects. Ninety-four percent of moth species need a leaf layer for their life cycle. And 96 percent of backyard birds rely on moth caterpillars as their primary source for feeding their chicks during nesting season.
“Some animals live their entire life in that leaf litter,” says Mizejewski. “People tend not to care about bugs, but when you know that those insects and spiders are a really important piece of the food web, critically important for those birds you want to attract, it can change your thinking. If you want to see a lot of beautiful birds in your yard, you have to create a space that invites insects.”
Add Dry Leaves to the Garden
Mix whole or shredded leaves into the soil, where they will disintegrate, release nutrients and make habitat for earthworms and other invertebrates. Or use them on top of garden beds to protect roots and suppress weeds.
Shredded leaves are better for this because whole ones create a solid mat. If you live in a windy area, shredded leaves are less likely to blow away.
Add leftover leaves to the compost bin. Alternate layers of grass clippings, food leftovers and dead leaves, and stir them every now and then to help them break down. Shredded leaves will compost faster.
If you have too many leaves for your compost pile, keep them dry in trash cans until the spring, when there are more wet green materials to mix them with. If you can’t compost in your yard, your city might have a place where you can compost your leaves.
Make Leaves Into Leaf Mold
Similar to compost but darker and more crumbly, leaf mold happens when the leaves decompose on their own. It’s what makes forests smell so earthy. Leaf mold improves soil structure and helps it retain more water. Make a big pile of leaves and let it do its thing for six months to a year. If it dries out, add water periodically.
While leaf mold is generally considered safe to handle, it can aggravate allergies in some people. If you’re concerned, wear a mask.
Show Off Artistic Skills with Dry Leaves
Revel in the feeling of fall by creating seasonal leaf decor and maybe a scarecrow. Try leaf nature journaling, or leaf rubbing art. The latter entails putting dried leaves under paper, then shading over them with colored pencils. Or make a scrapbook or photo album.
To preserve leaves, place them between two sheets of wax paper, then put a heavy book on top for a couple of weeks until they dry. Put a towel over the wax paper and briefly iron it.
And don’t forget to let everyone, including the dogs, jump in the leaf piles!
No, patio cushions should not stay outside all year, unless the weather in your area is usually dry. If you live in Arizona with a year-round outdoor pool, your cushions will only need the occasional cleaning, but they may fade more quickly from constant sun exposure.
Conversely, “if rainfall is frequent where you live, you should keep them sneaked away inside a shed or storage closet of some kind,” says Kate Diaz, founder of Swanky Den. Exposure to moisture can degrade cushion fillings over time and encourage mold growth.
Here’s how to clean and store outdoor patio cushions to make them last.
For some, a lawn carpeted with leaves is a perennial hassle of autumn. For others, those leaves offer a windfall of free mulch and fertilizer. Whether you like them or not, fallen leaves play an important role in your yard’s life cycle.
As they gradually break down, they return nutrients to the soil and eventually become soil themselves. Too thick of a layer of leaves can damage your grass, but removing leaves entirely interferes with important ecological processes.
Here are some steps to find the balance and ease your leafy workload.
Has The Thinking About Raking Leaves Changed Over The Years?
“It depends on whose thinking you’re talking about,” says David Mizejewski, a naturalist with the National Wildlife Federation (NWF). “The whole idea about raking the leaves is very much about the lawn, to make sure they don’t smother the lawn. So for grass, fertilizer and lawn machinery companies, their thinking hasn’t changed.”
But ecologically speaking, more people are becoming aware of the role leaves play in maintaining healthy soil and ecosystems. Keeping a thin layer of leaves on your lawn going into winter also saves you money on fertilizer and mulch.
“The benefit of leaving them is they act as a natural fertilizer for your lawn,” says Tammy Sons, the owner of Tennessee Wholesale Nursery. “As they break down, their nutrients are returned to the soil. Another benefit is you don’t have to rake them!”
Adds Mizejewski, who works with NWF’s Garden For Wildlife program: “We are encouraging people to keep as many of those fallen leaves in their property as they can. It’s a real opportunity for regular average citizens to get involved in wildlife conservation literally right outside their door.”
Why Do Leaves Change Colors as the Weather Changes?
Leaves lose their chlorophyll, which gives them their green color. Chlorophyll absorbs energy from sunlight and transforms carbon dioxide and water into sugars and starches. In the fall, other chemical pigments in the leaf become visible. Things like carotenes, which make carrots orange.
The brilliance and length of fall colors depend on temperature, light and moisture. A wet summer and a cool fall create bright colors, but an early frost will turn leaves brown.
Why Do Trees Lose Their Leaves?
Trees ditch their leaves to conserve moisture and other resources.
“Essentially, leaves are there to capture sunlight, so that the plant can use that in photosynthesis to create food for itself,” says Mizejewski. But as the days grow shorter, trees can no longer photosynthesize and need to hold on to moisture, which leaves require. “Trees cut their losses and say we don’t need you anymore to be sucking up our resources,” Mizejewski says.
To discard their leaves, trees grow a layer of cells between the branch and the stem of the leaf, which severs the connection. The tree seals the cut and the leaves fall.
Do Some Trees Lose Their Leaves in One Part of the Country and Not in Another?
Not really. Generally, species of trees that lose their leaves will lose them regardless of location. However, within broader classifications of trees, this will vary. Northern red oaks lose their leaves while live oaks, their southern counterparts, keep them until spring. Then they shed them as new leaves replace the old ones.
Which Trees Keep Their Leaves During Winter?
Many deciduous trees, which generally have broad, flat leaves, lose their leaves during winter, while evergreens stay green all year long. But most evergreens also lose their leaves. It’s just not as noticeable because they keep them until spring, or they replace leaves as they lose them.
“Then there are some kinds of trees that, even though the leaves die, they hang onto them, such as some oaks, beech, willows and hornbeans,” says Mizejewski. There’s no consensus on why. It could be to protect buds from animals like deer, or to direct moisture to the roots, or to hang on to the nutrients for the spring when the roots are most active.
What Happens To Leaves During Winter?
After they fall, they cover the root zone of the tree, creating a natural mulch. Then they slowly break down and turn into compost. “They essentially become the soil,” says Mizejewski. “Then those nutrients become available to the tree to reabsorb.”
Is It Bad To Leave Leaves on the Ground?
No and yes, but mostly no. Fallen leaves are a wealth of free mulch and fertilizer. They’re also good for wildlife, attracting birds and butterflies. Some butterflies and most moths depend on leaf layers for part of their life cycles. And almost all backyard birds depend heavily on the insects and spiders that live in leaf layers to feed their young.
“It takes a lot of these insects,” Mizejewski says. “A nesting pair of chickadees catch between six thousand and nine thousand invertebrates to raise their babies. That means your leaf choices can make the difference for the survival of a nest of baby birds.”
The downside to leaving leaves? A thick layer on the lawn all winter will likely smother the grass so it won’t grow well come spring. So to keep the grassy parts of your yard happy, shred leaves with a mower once they’ve dried out. Then it’s fine to leave them in place, as long as some sunlight can still get through.