Eventually, the time comes when your area rug or removable carpet needs more than just another vacuuming. If stains are piling up or there are deep-rooted problems with dust (or worse, dust mites), it’s time for a full cleaning. Fortunately, you don’t need to hire a professional to fully clean your rug! You just need the right tools, cleaner and approach. Here’s how to clean area rugs:
Note: A true area rug will be far too large for one person to successfully handle. Spare your muscles by getting a couple of other people to help you with this task. It will only take a couple of hours if everything is properly prepared!
Set Up an Outdoor Station
Pick a day when the forecast is clear and sunny (preferably for the next few days), and set up a station to clean your rugs.
Pro tip: Summer is an excellent time to clean your rug because you’ll need to do it outdoors. Try not to set up over the lawn, as you don’t want any cleaners soaking into the grass.
The support system you choose needs to be a lot stronger than a clothesline, as rugs are usually quite heavy.
If you have two trees, you can stretch bungee cords or thick rope between them.
Benches and any sort of sturdy wall can also work.
You don’t need to spend thousands of dollars on new cabinets to give your kitchen a stunning new look. If your cabinets are in good shape, you can give them a fresh face with paint. Everything you need to give your drab cabinets a silky smooth painted finish costs less than $250—including the spray painter.
Professional painters typically spray-paint doors because it produces an ultra-smooth finish. In this article, we’ll show you how to spray-paint your doors and drawers to look like professional kitchen cabinet painting. There’s just a short learning curve to use the spray painter effectively. You could also spray the paint cabinet frames, sides and trim, but masking off the cabinet openings (and the rest of the kitchen) takes a lot of time, so just use a brush for those areas.
Despite our enthusiasm, there are downsides to a painted finish. The paint isn’t as tough as a factory finish, and even if you’re careful, you can still end up with paint runs and have brush marks on your paint cabinet sides.
All the materials you need to paint your cabinets are available at home centers and paint stores. Plan to spend four or five days to complete the job—you’ll have to let the paint dry overnight between coats, and you can only paint one side of the doors per day.
If you prefer the look of stain over paint, watch this video on how to refinish your cabinets with a stain/polyurethane product:
New-Looking Cabinets in Three Steps
Clean the old paint cabinets thoroughly, prime with a stain-blocking primer, and then paint with a high-quality latex enamel.
Is painting right for you?
Not all cabinets are worth painting. They must be structurally sound—paint obviously isn’t a cure for doors that are falling apart or don’t close properly. If your cabinets are oak or some other species with coarse grain and you want a smooth finish, you’ll have to fill the grain on the door panels, cabinet frames and cabinet sides with spackling compound. That nearly doubles the length of this project because sanding the compound takes a long, long time (but if you don’t mind a coarse finish, you can skip this step). If you like the style of your cabinets and they’re in good shape, and you’re willing to invest the time to paint them, this project is for you.
Rust repair isn’t hard, but it is time-consuming (mostly waiting for primer and paint to dry between steps). Plan to spend about $100 on supplies like sandpaper, primer, masking tape and poly sheeting, a tack rag, polishing compound and touch-up paint and clear coat. Choose a calm, overcast day and block out the full day to fix the most common rust spots on the hood and doors.
Go Shopping for Supplies
First, find the car manufacturer’s paint code.
Note: The paint code can be in a variety of places on the body, in the engine compartment or trunk, or other places. Use either of these online resources to find instructions on how to locate your paint code: automotivetouchup.com or duplicolor.com.
Buy automotive touch-up paint in pints and quarts to use in a spray gun, in aerosol cans, or in roller ball applicators.
Pro tip: Even if you know how to use a spray gun, mixing automotive paint with a reducer to match the temperature and humidity conditions can be mighty tricky. We don’t recommend it. Instead, buy aerosol cans for larger repairs and rollerball applicators to fix scratches.
Note: Most late-model vehicles were painted with base coat/clear coat paint. The base coat contains just the pigment and binding resins-the clear coat is just the gloss.
Buy equal amounts of both base coat and clear coat.
You’ll also need an epoxy self-etching primer to bite into the bare metal and a lacquer primer to hold the paint.
Buy 40-, 600- and 1,000-grit sandpaper, a sanding block, grease and wax remover, poly sheeting, painter’s tape, a tack rag and a microfiber cloth.
The plumbing supply shutoff valves behind toilets or under sinks can go for years without being turned off and then reopened again. That inactivity can cause the neoprene washers to become either brittle or crusted up with mineral deposits, and they lose their ability to seal leaks. Fixing the valve is usually pretty simple if you know what to do.
Tighten the Packing Nut
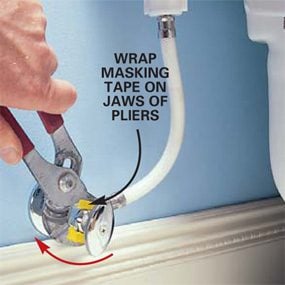
Tighten the packing nut on the toilet shutoff valve one-eighth turn clockwise to try to seal a leak around the nut.
Pro tip: Wrap cloth or masking tape on the plier’s jaws to protect the nut’s finish. Use light, steady pressure so you don’t damage the water lines.
The plumbing supply shutoff valves behind toilets or under sinks can go for years without being turned off and then reopened again. That inactivity can cause the neoprene washers to become either brittle or crusted up with mineral deposits, and they lose their ability to seal leaks. Fixing the valve is usually pretty simple if you know what to do.
Tighten the Packing Nut
Tighten the packing nut on the toilet shutoff valve one-eighth turn clockwise to try to seal a leak around the nut.
Pro tip: Wrap cloth or masking tape on the plier’s jaws to protect the nut’s finish. Use light, steady pressure so you don’t damage the water lines.
Say you need a bright yard light way out in your yard or a remote outlet to power a pond pump or electric tools. By far the best way to get electrical power right where you need it is to run underground ‘line’ voltage (120-volt household current). All it takes is a little electrical moxie and a willingness to dig a shallow trench.
In this article, we show the easiest, quickest and cheapest method to safely run electricity outdoors. Our method involves directly burying UF (underground feeder) plastic shielded cable 12 inches below ground level. We’ll also show you a no-sweat way to run the line under a walkway and how to hook up the wiring at both ends.
For this project, you should have the fundamental wiring skills it takes to make proper connections and the basic electrical and carpentry tools. While they’re not crucial, a trench shovel, a mattock and a sledgehammer will make the trench work easier and faster. Allow about a day to complete this project, assuming you collect all the parts in advance.
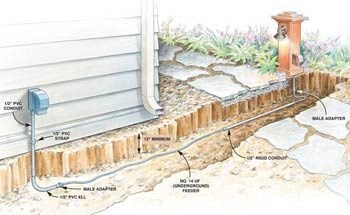
In our project, we run a line from an existing outdoor outlet on the house to a light and receptacle at the edge of a garden path. It incorporates a combination light switch/outlet. The outlet is always hot, and the switch controls only the light. If you don’t have an outdoor box to tap in to, consider installing one on your house.
You can expand the project to include additional outlets, switches and lights. The techniques for running the wire and mounting electrical boxes are the same. However, make sure not to overload the circuit.
While we enclosed the electrical boxes inside a hollow post, you can simply mount a weatherproof box on the side of a 4×4, as long as you protect the cable by running it in conduit from the trench bottom to the box.
Tap into House Wiring
Determine where you want the electrical post positioned and then find the nearest existing outlet to supply the power.
Say you need a bright yard light way out in your yard or a remote outlet to power a pond pump or electric tools. By far the best way to get electrical power right where you need it is to run underground ‘line’ voltage (120-volt household current). All it takes is a little electrical moxie and a willingness to dig a shallow trench.
In this article, we show the easiest, quickest and cheapest method to safely run electricity outdoors. Our method involves directly burying UF (underground feeder) plastic shielded cable 12 inches below ground level. We’ll also show you a no-sweat way to run the line under a walkway and how to hook up the wiring at both ends.
For this project, you should have the fundamental wiring skills it takes to make proper connections and the basic electrical and carpentry tools. While they’re not crucial, a trench shovel, a mattock and a sledgehammer will make the trench work easier and faster. Allow about a day to complete this project, assuming you collect all the parts in advance.
In our project, we run a line from an existing outdoor outlet on the house to a light and receptacle at the edge of a garden path. It incorporates a combination light switch/outlet. The outlet is always hot, and the switch controls only the light. If you don’t have an outdoor box to tap in to, consider installing one on your house.
You can expand the project to include additional outlets, switches and lights. The techniques for running the wire and mounting electrical boxes are the same. However, make sure not to overload the circuit.
While we enclosed the electrical boxes inside a hollow post, you can simply mount a weatherproof box on the side of a 4×4, as long as you protect the cable by running it in conduit from the trench bottom to the box.
Tap into House Wiring
Determine where you want the electrical post positioned and then find the nearest existing outlet to supply the power.
Wood moves as its moisture content changes. When humidity is high, wood absorbs moisture and swells. When humidity drops, wood shrinks. The movement is gradual, but it can cause big problems in your woodworking projects.
Didn’t cover wood movement in shop class? Check out our crash course in wood movement to get all the knowledge you need.
Get more use out of your backyard patio with one of these DIY options for creating shade and blocking rain.
Canopy Patio Awning
One of the most popular patio shade ideas, a canopy patio awning is permanently installed, but the fabric on most shade awnings is removable. Here’s what to know about canopy patio awnings:
A backyard canopy patio awning or patio shade screen is a fabric-roofed structure supported by a freestanding, rigid frame that’s bolted to your deck.
The patio awning frame becomes a permanent part of your deck, and you can either leave the fabric up year-round or remove it seasonally.
The fabric on a backyard canopy like this should last about 15 years.
The shade awnings are available in two roof styles (a hip roof and a pyramid roof) and several colors.
You can install outdoor lighting on the framework to illuminate your deck or patio awning.
Canopies and awnings are sold at most home center and garden supply stores, and are available online.
Pros: A backyard canopy patio awning is also good for full shading of compact decks or partial shading of larger decks. The patio shade cloth is resistant to tears and won’t sag. The fabric and structure can withstand rain, hail and strong winds (although the company recommends removing the shade cloth if a hurricane is imminent). Since it’s a permanent structure that doesn’t retract, the patio canopy has no moving parts that can jam or break.
Cons: Unlike retractable options, a canopy patio shade awning doesn’t offer a convenient way to let in the sun (removing the fabric on shade awnings requires two people and takes a few minutes). Also, the columns may not blend well with the deck style and can become obstructions on some deck layouts.
Few household annoyances are quite as maddening as the sound of a constantly running toilet. If you hear your toilet refilling too often, or if you hear the steady hiss of running water, the flapper may be leaking. The flapper (aka “flush valve seal”) is the plug that falls against the drain hole (flush valve drain seat) on the bottom of the tank and holds water in until the next time you flush. When flappers or flush valve seats wear out, water trickles out, causing the water valve to open to refill the tank.
Replace the Flapper
Remove the old flapper and take it with you to the hardware store or home center to find a matching replacement.
Note: Occasionally a new flapper doesn’t solve the problem. If you’ve tried replacing the toilet flapper but the toilet still runs, the flush valve seat is probably rough or pitted. You can replace the entire flush toilet flapper valve, but it’s a big job.
If you’ve got a door hinge that squeals every time you open the door, we’ve got the fix for you. A little petroleum jelly will rid the hinge of that annoying squeak. The petroleum jelly works its way into the hinge and adheres well, so it won’t run off and make a mess like oil or other lubricants.
Tap Pin Up
Loosen each hinge pin by tapping an 8d nail up from underneath.
Once the pin is loose, pull it out (lift up on the door handle to relieve pressure if the pin binds).
Keep the door closed and work on only one hinge at a time.
You’re surrounded by tools and machines made out of steel. And when the coatings on those products crack, rust starts to bloom and the battle is on. You can attack rust early and nip it in the bud, or you can wait until you have a full-blown war on your hands. Either way, you’ll need a battle plan on how to get rid of rust and a complete list of weapons at your disposal to start the process.
We’re going to show you the five ways how to remove rust from metal—three methods to remove it and two steps to prevent it from coming back, along with the best rust remover.
Grind, Sand or Scour Off the Rust
If you don’t want to use chemicals and you also want to remove the paint along with the rust, use a power tool like a grinder, sander, oscillating tool or drill to remove rust from tools. Whichever tool you choose, always start with the coarsest abrasive to for how to remove rust from metal and pockmarks. Once the rust is gone, switch to a finer grit to smooth out the swirls and grooves caused by the coarse grit. For the smoothest paint job, finish sanding with 400-grit wet/dry paper.
Crown molding can be intimidating, because walls often aren’t flat and nailing is difficult. This three-piece system solves those problems. In this article, we’ll show you how to install trim on the walls and ceiling first, then add the crown.
The built-up crown we chose for this project combines standard crown molding with two pieces of base trim. The result is a large, dramatic crown that’s easier to install and less expensive than single-piece crown molding of similar size.
Experiment with Different Molding Profiles
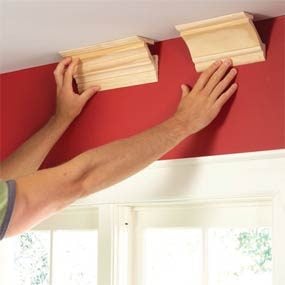
Purchase a few sample pieces of base trim and crown molding.
Nail or glue samples together and hold them against the ceiling in order to decide which combination to go with.
You’re surrounded by tools and machines made out of steel. And when the coatings on those products crack, rust starts to bloom and the battle is on. You can attack rust early and nip it in the bud, or you can wait until you have a full-blown war on your hands. Either way, you’ll need a battle plan on how to get rid of rust and a complete list of weapons at your disposal to start the process.
We’re going to show you the five ways how to remove rust from metal—three methods to remove it and two steps to prevent it from coming back, along with the best rust remover.
Grind, Sand or Scour Off the Rust
If you don’t want to use chemicals and you also want to remove the paint along with the rust, use a power tool like a grinder, sander, oscillating tool or drill to remove rust from tools. Whichever tool you choose, always start with the coarsest abrasive to for how to remove rust from metal and pockmarks. Once the rust is gone, switch to a finer grit to smooth out the swirls and grooves caused by the coarse grit. For the smoothest paint job, finish sanding with 400-grit wet/dry paper.
Crown molding can be intimidating, because walls often aren’t flat and nailing is difficult. This three-piece system solves those problems. In this article, we’ll show you how to install trim on the walls and ceiling first, then add the crown.
The built-up crown we chose for this project combines standard crown molding with two pieces of base trim. The result is a large, dramatic crown that’s easier to install and less expensive than single-piece crown molding of similar size.
Experiment with Different Molding Profiles
Purchase a few sample pieces of base trim and crown molding.
Nail or glue samples together and hold them against the ceiling in order to decide which combination to go with.
Every year, people around the world gather on the night of December 31st to celebrate the start of a new year and commemorate the passing of the old one. While New Year’s Eve is now mainly known for things like its often raucous parties and the ball dropping in Time’s Square, its origins as a holiday actually extend back through history all the way to the ancient Romans. Here’s a rundown of everything you need to know about NYE, including details of the holiday’s history and a look at how it’s celebrated around the world.
Why Do We Celebrate New Year’s Eve?
Ever since humans began to celebrate the holiday, New Year’s Eve has been seen as a time of rebirth. When Roman emperor Julius Caesar introduced the Julian calendar to western civilization in 46 B.C., he made January 1st the official start of the new year in honor of Janus, the Roman god of beginnings. The Romans celebrated the new year by offering sacrifices to Janus and exchanging gifts with each other. As time passed and the influence of Rome grew, New Year’s Eve celebrations began to take root across other countries and cultures, leading to diverse and varied new year traditions around the world.
New Year’s Eve Traditions
Modern New Year’s Eve traditions largely depend on where you are in the world. There are a few commonalities, like the launching of fireworks at midnight, the singing of celebration songs, and the ritual making of resolutions to carry into the new year.
Other traditions are much more specific to the their individual cultures. In Brazil, everyone wears white on New Year’s Eve because the color is meant to bring good luck. On the other side of the world, people in Denmark are known to smash plates and old dishware in order to ward off bad spirits. Most eastern countries celebrate their new year in different times of the year entirely, basing the holiday around their own lunar calendars instead of the Roman calendar. And, of course, there’s New Year’s Eve in the United States, which is mainly known for the aforementioned dropping of the New Year’s Eve Ball in Times and the tradition of kissing a special someone as the clock strikes midnight.
How NYE Might Be Different During the Pandemic
As with everything in 2020, New Year’s Eve is going to look a little bit different than it has in years past. Due to the nature of the coronavirus pandemic, public travel and gathering spaces will be limited if not closed off entirely. That means that celebrations that might have been shared among large groups of people will likely take on a more personal and private tone this year, which may not ultimately prove to be a bad thing at all (sorry, extroverts). Certain aspects of our traditions may have to change, but the enthusiasm for a fresh start in the new year and a willingness to leave the old year behind will be as strong as ever— if not a little stronger.
New Year’s Eve Safety
It’s always important on New Year’s Eve to remember that even though you may be partying responsibly, not everyone will be. Here are some New Year’s Eve safety tips to keep you and your family safe through the holiday season:
If you can, stay home and celebrate with the people you love.
Set up a virtual NYE party to stay connected with the people in your life.
If you have to travel, arrange safe and sober rides.
Be cautious while driving; winter road conditions and drunk drivers are a dangerous combination.
Road tripping across the country with your entire family packed in around you is an American tradition, so it’s no surprise that we ran this story in the late ’80s breaking down everything a person needed to know about choosing the right vehicle for their summer vacation. A few things have definitely changed in the time since this article was published… good luck buying an air-conditioned luxury camper that sleeps eight and has a kitchen, furnace, and bathroom for just $7,000 in 2020.
If you are gardener, educate yourself about the various pests that visit your garden so you can take the necessary steps to avoid problems. And if you do need to use sprays, vow to avoid toxic pesticides and instead opt to use earth-friendly products that are both safe for pets and people.
As hard as you and your loved ones try to pick out the absolute perfect present, you’ll inevitably need to return something. The sweater will be the wrong size, the new coffee maker won’t match your kitchen, or that home décor will be just plain hideous—er, not quite your taste.
Almost everyone is in the same boat, though, with almost two-thirds of shoppers making a return over the holiday season, according to data from the National Retail Foundation. With numbers like that, a “quick” return or exchange can turn into a headache-inducing excursion. Luckily, if you plan correctly, you can be in and out in no time.
To avoid long lines, beat the crowds by arriving right at opening time, typically around 10 a.m., says personal stylist Vanessa Valiente, creator of V-Style. “The vast majority of mornings at a store is the slowest, but the slowest mornings are on Sunday,” she says. “This is true year-round and continues to be true during the holidays.” Find out which 14 stores have the best return policies.
The best time of day to return is:
If you can’t get out on a Sunday, weekday mornings—especially Mondays and Tuesdays—usually have shorter lines too, says Sarah Hollenbeck, a shopping and savings expert at offers.com. Hitting the shops on a weekday afternoon is also better than heading out after work or on a busy weekend, she says, but notes that the week after Christmas tends to be packed no matter what. Stores offer New Year’s and after-Christmas sales, and shoppers flock in for the items that weren’t checked off their Christmas lists.
Best-of-the-best and the worst-of-the-worst
But for the best-of-the-best and the worst-of-the-worst, there are two days to take note of. December 26 tends to be extra-busy with people rushing out to make their Christmas returns immediately, says Valiente. On the flip side, shoppers are more inclined to cozy up at home on New Year’s Day. “If you take it easy on New Year’s Eve, you can be the only one in the stores doing returns on the first of the year,” she says. Now that’s starting the new year off right.
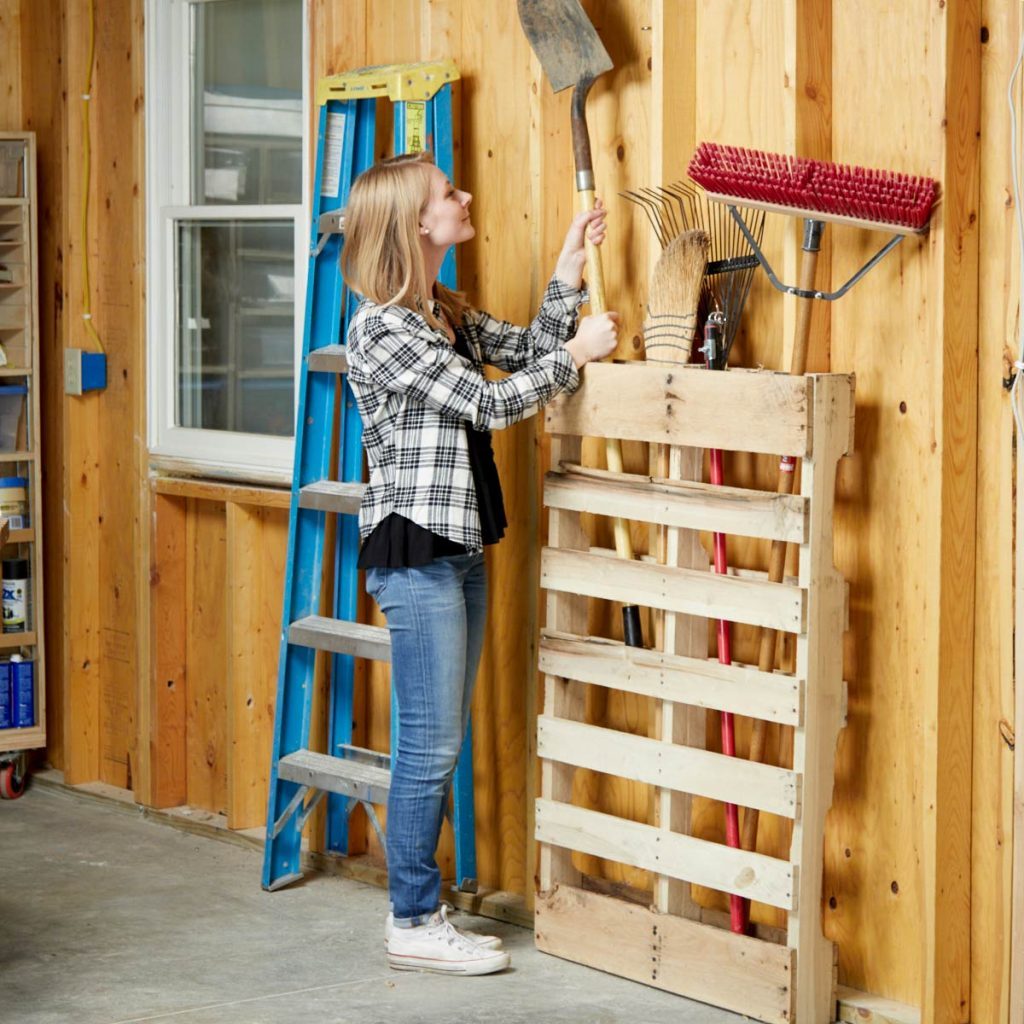
One of the simplest ways to make sure that you start the New Year off on the right foot in your workshop is to create better systems for storing and organizing your tools and materials. While a messy workshop can sometimes just be a sign of someone hard at work, it can also be a barrier that prevents you from getting started on whatever project you want tackle next. Keeping things clean and organized can serve as a great motivator and creates a productive environment to get work done.
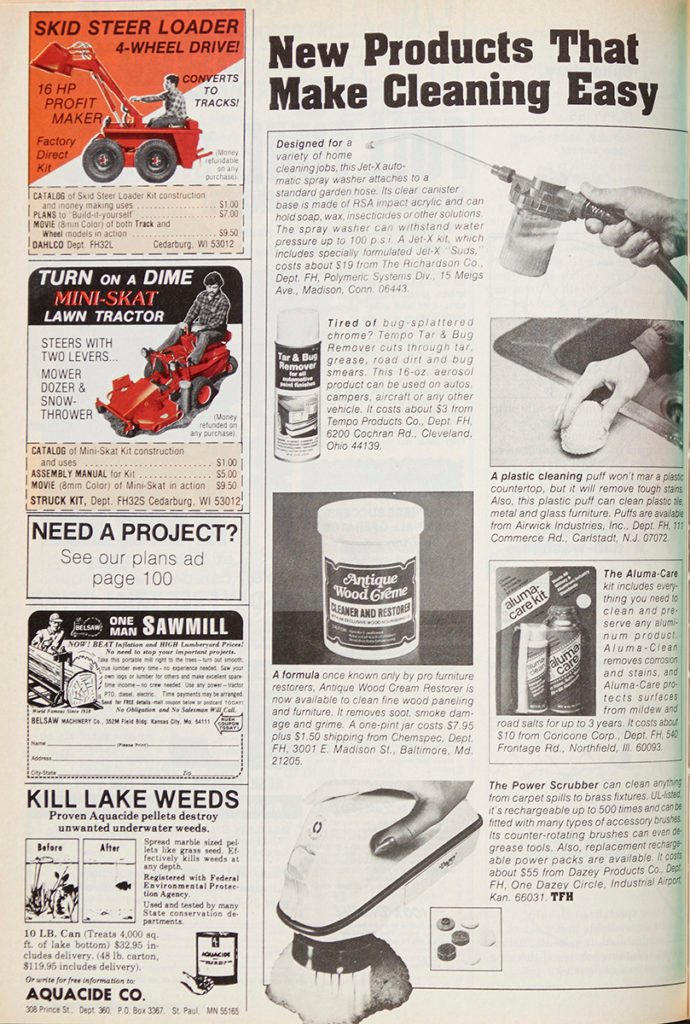
Everybody makes messes. It’s just a part of life. As technology has become more advanced, so have the cleaning tools we use to clean up after ourselves in our daily lives. Cleaning products in the ’80s were starting to get pretty advanced, like the power scrubber pictured above that featured a rechargeable power pack. Still, sometimes it’s the basics that prove to be timeless. The “plastic cleaning puff” on this page certainly wouldn’t look out of place in a modern kitchen.
One of the simplest ways to make sure that you start the New Year off on the right foot in your workshop is to create better systems for storing and organizing your tools and materials. While a messy workshop can sometimes just be a sign of someone hard at work, it can also be a barrier that prevents you from getting started on whatever project you want tackle next. Keeping things clean and organized can serve as a great motivator and creates a productive environment to get work done.
Everybody makes messes. It’s just a part of life. As technology has become more advanced, so have the cleaning tools we use to clean up after ourselves in our daily lives. Cleaning products in the ’80s were starting to get pretty advanced, like the power scrubber pictured above that featured a rechargeable power pack. Still, sometimes it’s the basics that prove to be timeless. The “plastic cleaning puff” on this page certainly wouldn’t look out of place in a modern kitchen.
Gas connections for your oven or dryer are really pretty simple — it’s mostly a matter of screwing stuff together. But knowing which fittings to use where can be tricky, and using the wrong ones can lead to a dangerous leak. This article will show you how to safely connect a gas dryer hookup or gas range.
Kits containing a flexible stainless steel gas line and fittings are available at home centers and hardware stores. The kits usually have everything you’ll need, but in some cases, you may have to buy a few more fittings. But before you start, check with your local building inspections department to see if you’re allowed to do your own gas dryer hookup.
We’ll show you three common gas piping scenarios. We’ll show you one way to make each connection, but there are other equally legitimate ways using common plumbing parts. Don’t be confused by the labels FIP and MIP; they simply stand for female pipe threads and male pipe threads, respectively. And when you buy the parts, don’t hesitate to ask for help. Then screw all the gas line parts together to make sure they fit.
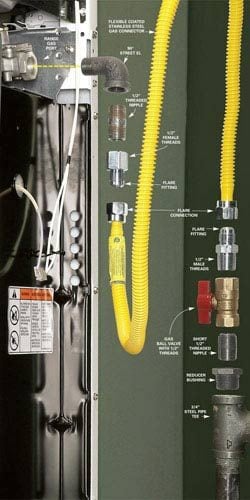
Situation 1: Make Connections to Steel Gas Pipe
If your old appliance is connected with a steel gas pipe and you’re installing a new appliance, buy a gas appliance connecting kit.
Replace the steel gas pipe with the flexible gas supply lines stainless steel tube.
Pro tip: You can’t connect the flare fitting on the flexible gas line supply directly to a steel pipe thread. You have to install the flare fitting that’s included with the kit.
Coat all threaded pipe connections with pipe thread compound before assembly.
If necessary, use a bushing to reduce the existing 3/4-inch female pipe thread to 1/2 inch.
Use a 90-degree elbow at the stove to avoid kinking the gas tubing when you push the stove against the wall.
Before you replace an old valve, find and turn off the main gas valve to the house.
Note: The main gas valve is usually located near where the gas line enters the house.
Replace old-style gas valves (second photo below) with modern ball valves that are labeled for use with gas.
Turn the gas back on when you’re done.
Remember to check all your gas appliances to see if they have pilot lights that need relighting.
Gas connections for your oven or dryer are really pretty simple — it’s mostly a matter of screwing stuff together. But knowing which fittings to use where can be tricky, and using the wrong ones can lead to a dangerous leak. This article will show you how to safely connect a gas dryer hookup or gas range.
Kits containing a flexible stainless steel gas line and fittings are available at home centers and hardware stores. The kits usually have everything you’ll need, but in some cases, you may have to buy a few more fittings. But before you start, check with your local building inspections department to see if you’re allowed to do your own gas dryer hookup.
We’ll show you three common gas piping scenarios. We’ll show you one way to make each connection, but there are other equally legitimate ways using common plumbing parts. Don’t be confused by the labels FIP and MIP; they simply stand for female pipe threads and male pipe threads, respectively. And when you buy the parts, don’t hesitate to ask for help. Then screw all the gas line parts together to make sure they fit.
Situation 1: Make Connections to Steel Gas Pipe
If your old appliance is connected with a steel gas pipe and you’re installing a new appliance, buy a gas appliance connecting kit.
Replace the steel gas pipe with the flexible gas supply lines stainless steel tube.
Pro tip: You can’t connect the flare fitting on the flexible gas line supply directly to a steel pipe thread. You have to install the flare fitting that’s included with the kit.
Coat all threaded pipe connections with pipe thread compound before assembly.
If necessary, use a bushing to reduce the existing ¾-inch female pipe thread to ½ inch.
Use a 90-degree elbow at the stove to avoid kinking the gas tubing when you push the stove against the wall.
Before you replace an old valve, find and turn off the main gas valve to the house.
Note: The main gas valve is usually located near where the gas line enters the house.
Replace old-style gas valves (second photo below) with modern ball valves that are labeled for use with gas.
Turn the gas back on when you’re done.
Remember to check all your gas appliances to see if they have pilot lights that need relighting.
One of the most powerful tools in any pro painter’s arsenal is what goes underneath the paint — primer. Primer is an excellent problem-solver that’s less like paint and more like glue. It sticks to whatever you’re prepping and turns it into a smooth, uniform surface that’s ready for paint.
But if you’ve ever walked down the primer aisle at a home center, you know the primer choices are mind-boggling. To cut through the clutter, we asked three professional painters, each with 20-plus years of experience, to give us their recommendations for the best primers to use for common painting challenges. Their experience will help you choose the best primer for the job, so your paint will look better and last longer.
Problem 1: Interior stains and odors
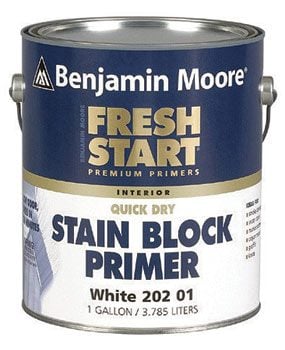
Some stains will bleed right through most primers and paints no matter how many coats you apply. The same goes for severe odors like smoke from fires and cigarettes. The solution is stain-blocking primer, which is available in oil-based (alkyd) and water-based (acrylic-latex) versions.
Oil-based versions give off a nasty smell and require paint thinner for cleanup, but they’re more reliable for blocking water-based odors and stains like rust, nicotine, smoke, wood tannins and, of course, water (see “Shellac: The Original Primer,” below, for dealing with severe stains and odors).
Water-based stain-blocking primers offer easy cleanup and less odor and come in low- and no-VOC (volatile organic compounds) formulations. These work best to block solvent-based stains like crayon, grease, ink and scuff marks.
Both versions are white, so it’s a good idea to tint them gray or close to your topcoat color if they’ll be covered by dark-colored stain block paint.
Do I Always Need to Prime Before Painting?
You don’t have to prime previously painted surfaces if the paint is in good shape—no chipping or peeling. Interior walls usually don’t need priming except in the case of stains, repairs or a paint color that’s drastically different. Interior painted woodwork usually needs spot priming with wood primer at a minimum. Exterior paint takes such a beating that it almost always needs priming with an exterior paint primer.
One of the most powerful tools in any pro painter’s arsenal is what goes underneath the paint — primer. Primer is an excellent problem-solver that’s less like paint and more like glue. It sticks to whatever you’re prepping and turns it into a smooth, uniform surface that’s ready for paint.
But if you’ve ever walked down the primer aisle at a home center, you know the primer choices are mind-boggling. To cut through the clutter, we asked three professional painters, each with 20-plus years of experience, to give us their recommendations for the best primers to use for common painting challenges. Their experience will help you choose the best primer for the job, so your paint will look better and last longer.
Problem 1: Interior stains and odors
Some stains will bleed right through most primers and paints no matter how many coats you apply. The same goes for severe odors like smoke from fires and cigarettes. The solution is stain-blocking primer, which is available in oil-based (alkyd) and water-based (acrylic-latex) versions.
Oil-based versions give off a nasty smell and require paint thinner for cleanup, but they’re more reliable for blocking water-based odors and stains like rust, nicotine, smoke, wood tannins and, of course, water (see “Shellac: The Original Primer,” below, for dealing with severe stains and odors).
Water-based stain-blocking primers offer easy cleanup and less odor and come in low- and no-VOC (volatile organic compounds) formulations. These work best to block solvent-based stains like crayon, grease, ink and scuff marks.
Both versions are white, so it’s a good idea to tint them gray or close to your topcoat color if they’ll be covered by dark-colored stain block paint.
Do I Always Need to Prime Before Painting?
You don’t have to prime previously painted surfaces if the paint is in good shape—no chipping or peeling. Interior walls usually don’t need priming except in the case of stains, repairs or a paint color that’s drastically different. Interior painted woodwork usually needs spot priming with wood primer at a minimum. Exterior paint takes such a beating that it almost always needs priming with an exterior paint primer.
Achieving a lush grass lawn doesn’t have to be a constant struggle. And you don’t have to pay big bucks for a lawn service to douse your yard with chemicals either. Growing healthy, green grass is mainly just a matter of knowing what to give your lawn, and when to give it.
In this story, we’ll show you what to do in the spring, summer and fall to get a grass lawn so nice you could cut it up and sell it as sod. These steps will work for any yard, regardless of climate or soil type. The products shown in this article are available at lawn and garden centers and some home centers.
We worked with lawn care expert George Dege, better known as Mr. Lawn. He has been teaching lawn care classes since the 1970s and has helped thousands of homeowners improve their lawns.
Following Mr. Lawn’s advice, we worked on the lawn shown here from spring to summer. In March, it had dead patches of grass caused by voles. By August, the grass over the entire lawn was so thick we felt like we were walking on a shag carpet. And the grass lawn looked great too (see lead photo). It was noticeably greener than the neighboring yards. We spent about $250 on supplies.
Spring Care: Vacuum the Pebbles
Note: Gravel and sand hinder grass growth, so vacuum them up.
Start along the street and vacuum into the yard until you no longer hear stones getting sucked up.
Freezing temperatures and heavy snow or rain during the winter months force all of us, including our four-legged friends, inside. Just because winter weather makes outdoor play a challenge, doesn’t mean your dog has to sit around and lounge and eat all day.
It’s important to keep dogs active during the winter, even if they can’t play outside. Dogs that remain inactive while inside are not using up all of their energy and can develop behavioral problems, says Dr. Michelle Burch of Safe Hounds Pet Insurance.
“Problems I tend to see are the destruction of household items. I’ve also had owners tell me their pet starts going to the bathroom in the house. Keeping dogs active indoors will also help to burn calories and decrease the risk of weight gain. Weight gain can have detrimental effects on a dog’s health,” Burch says.
Each dog, depending on breed and age, will require different amounts of activity time. Burch says most dogs need a minimum of one to two hours of activity a day, while some breeds, such as Labradors, Jack Russells and Blue Heelers, need up to five or six hours a day. Older dogs will require less activity.
Here are some ways to keep your dog active inside your home during the winter months:
Play “Find It”
Use small dog treats, like Zuke’s Mini Naturals, and hide them throughout the house but somewhere your dog can easily access. Good spots include behind a door, under the coffee table, on the edge of a chair, etc. Let your dog go to town, sniffing his way around the house, finding the treats. Encourage them by saying “find it” and offer praise when each treat is found.
Create an Obstacle Course
Use household items like a foot stool to jump over, a coffee table to crawl under, a hula hoop to jump through and some shoes to weave around. Use your imagination to make the most creative obstacle course for your dog. Or you could splurge on the Cool Runners PVC Dog Training Tunnel or the Midlee Dog Agility Hoop Jump, if you’ve got the space. Activity like this is good for both mental and physical stimulation.
Have a Treasure Hunt
This game involves your dog using their nose to find their favorite treat or toy. Gather up empty boxes or containers. Place them upside down and spread them around a room. Only place their treasure under one or two of the boxes. Your dog will have fun moving around the room trying to sniff out his favorite toy or tasty treat.
Set Up a Play Date
For some indoor fun, invite a friend or neighbor’s dog over for a play date. Play dates are a great way to keep dogs active and help with socialization. You’ll want to designate a play area, like the basement, garage or set up a play pen so the dogs don’t get injured running freely around the house (and so your house doesn’t get trashed).
Play Fetch
Get creative with the space in your home and use a soft ball, like the Chuckit Indoor Ball, This lightweight ball is designed to protect indoor surfaces. You can throw this ball down stairs at let your dog run up and down. A long hallway is also a good space for an indoor game of fetch. If needed, move some furniture around in the living room to create some extra space for play.
Engage in Tug of War
A good round of tug allows your dog to use their whole body and engage muscles to pull with you. Just make sure there’s nothing dangerous your dog may bump into or knock over nearby. The Goughnuts Dog Pull Toy is a good durable toy for dogs looking to get their tug on!
Do Some Training
Being stuck inside is a great opportunity to do some obedience training. Grab your training tools, like treats, a clicker and your patience and work on some commands. Reinforce the essential commands, like Sit, Paw, Down, and then move on to Come, Wait, Drop it and Speak. Training is good for both mental and physical stimulation and is also a good bonding experience.
Practice Doga (Dog Yoga)
Doga is the practice of yoga with your dog. It focuses on meditating, stretching and dog massage. Although your pet might not be getting the same kind of exercise as going for a long walk, doga does have other benefits like teaching them to stay calm, relax and balance. Doga classes may be offered in your city or town. If not, there are instructional YouTube videos.
Splurge on a Doggy Treadmill
Treadmills can be a good option for dogs that need more activity. The dogPACER LF 3.1 is durable, foldable and can accommodate dogs up to 180 lbs. To avoid injury, you will need to properly train your dog to use a doggy treadmill to avoid injury. Start by letting your dog hop on and off. Once they’re comfortable, start your dog at a very low speed and always supervise your dog. Treadmills should not be used with dogs in poor physical condition or those who have a history of joint or hip problems.