Meal Prep Delivery

Friday, June 30, 2023

Solo Stove Pi Fire Review: Transform Your Fire Pit into a Pizza Oven

We’re currently obsessed with our fire pit, and this time we have a game-changing Solo Stove accessory that’s going to turn up the heat on backyard entertaining, camping trips or date nights.

If you’ve been following our Solo Stove review series, you know that we have been testing a variety of products from the brand, including the Bonfire 2.0, Pellet Adapter and Cast Iron Grill Top. Currently, we are testing more products from Solo Stove to ensure the brand lives up to its online reputation.

This brings us to the product we’re focusing on: The Solo Stove Pi Fire, a pizza oven designed to sit on top of your existing Solo Stove fire pit. Keep reading our Solo Stove Pizza Oven review to get the full scoop (or should I say slice?) and find out how this delicious pizza-making accessory performs.

What is the Solo Stove Pi Fire?

Solo Stove Pi Fire

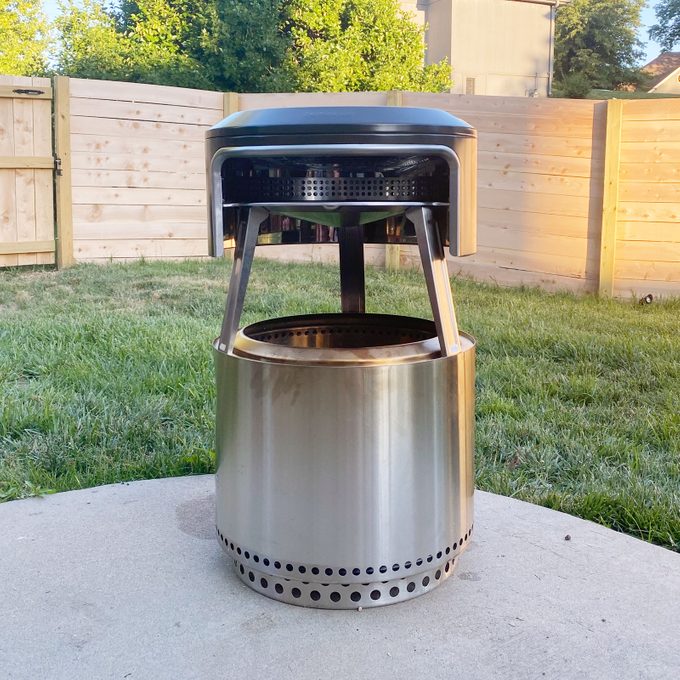
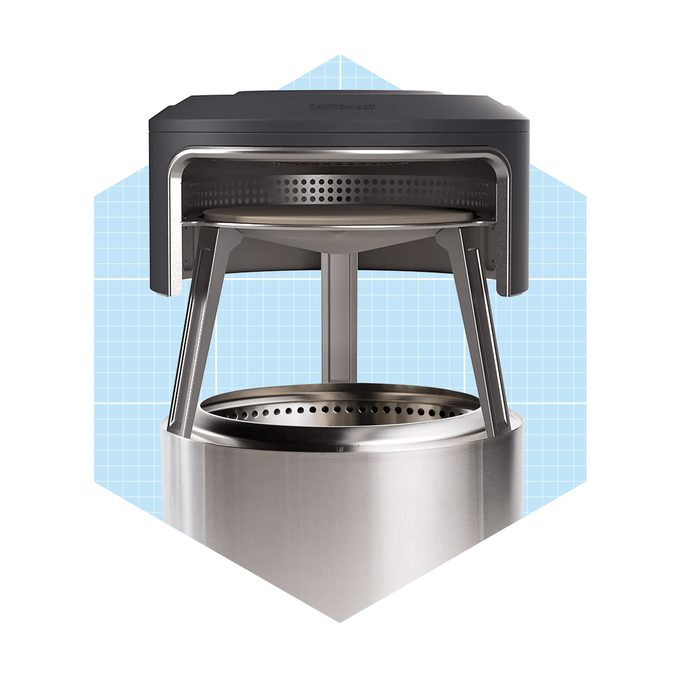
If you’ve been eager to try your hand at wood-fired pizza, the Solo Stove Pi Fire provides the ideal gateway to backyard baking. This portable pizza oven topper is designed to fit on top of your existing Solo Stove fire pit. Unlike traditional pizza ovens that have space for wood at the bottom, the Pi Fire features long legs that elevate it over your smokeless fire pit.

The Pi Fire comes in three sizes to attach to any Solo Stove fire pit you may already own. We specifically tested the classic Bonfire size for our Solo Stove Pizza Oven review, but there are also options available for the larger Yukon stove and the smaller Ranger models.

Weighing in at less than 20 pounds, the Bonfire Pi Fire is lightweight and easily portable. Constructed from the same high-quality, lightweight stainless steel as the Bonfire 2.0, it can withstand the exceptionally high temperatures necessary for creating delicious Neapolitan-style pizzas.

Shop Now

Solo Stove Pi Fire Product Features

accessories for Solo Stove Pi Fire

The Bonfire Pi Fire (quite the tongue twister) is about 19 inches in diameter and 17 inches in height, and the pizza stone that fits inside the oven is exactly 14 inches in diameter (which means you’ll want your pizzas to be 14 inches in diameter or smaller).

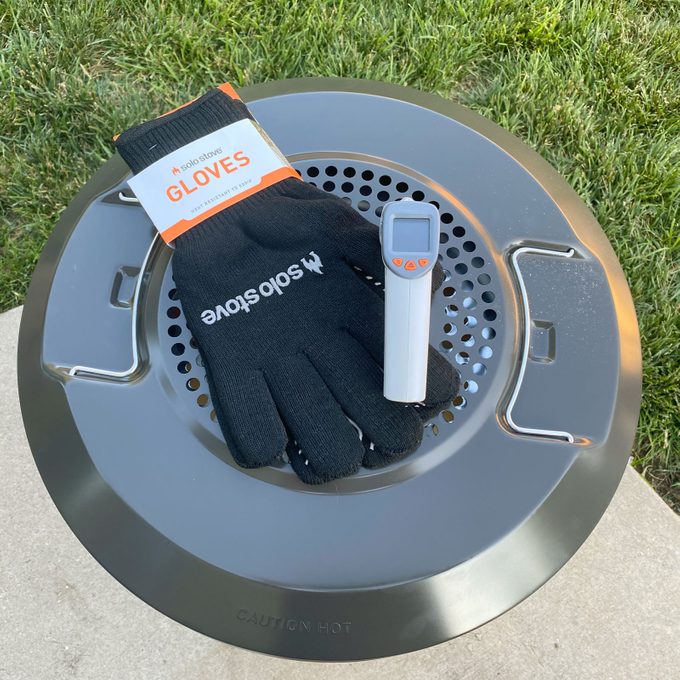
When you purchase a Pi Fire, you also get a travel carrying case and gloves for heat protection (these are necessary, by the way). You can also purchase the Pi Fire + Tools, which is what I recommend doing. That bundle includes a 12-inch bamboo peel for prepping and serving pizza, the Pi Turner 2.0 for launching and turning pizza and an infrared thermometer to gauge the temperature of the pizza oven.

The Pi Fire—and every Solo Stove product—comes with a lifetime warranty that guarantees it is free of manufacturing defects. So, if you have issues with your Solo Stove or any Solo Stove accessories, you should contact customer service.

How We Tested It

putting a pizza in the Solo Stove Pi Fire

For my Solo Stove pizza oven review I tested the Pi Fire with several different pizzas and multiple fuel types. I made my own dough, once with a quick and easy recipe (flour, dry yeast, salt and oil) that didn’t call for rising. Then I tried a more authentic Neapolitan dough recipe (with ‘00’ pizza flour) and I also used pre-made dough. Truthfully, it was easiest with pre-made dough. But, if you want a true artisan pizza taste, I recommend following a recipe that calls for the ‘00’ pizza flour and letting it rise overnight.

If you want the Solo Stove experience through and through, you can order a kit of 24 Neapolitan dough balls from the brand. I did not do that as the dough balls retail for a whopping $110—but if you have the dough for the dough, I’d say go for it!

I also tested the Pi Fire using two different fuel sources: Firewood and wood-burning pellets. If you have the Solo Stove Pellet Adapter, you can use food-safe pellets to build your fire and subsequently cook your pizza. I will say that I preferred the pellet taste and cooking experience more over firewood. The flames were a bit more mellow, which was nice for baking, and I swear the pizza tasted better over logs (maybe it’s just me?).

Assembling the Pi Fire was super easy. It was just a matter of screwing on the legs, placing the pizza stone in the oven and setting the Pi Fire on top of the fire pit. It is easier to have the Pi Fire on your Solo Stove fire pit before starting the fire, that way you’re not trying to place and adjust the pizza oven over live, hot flames.

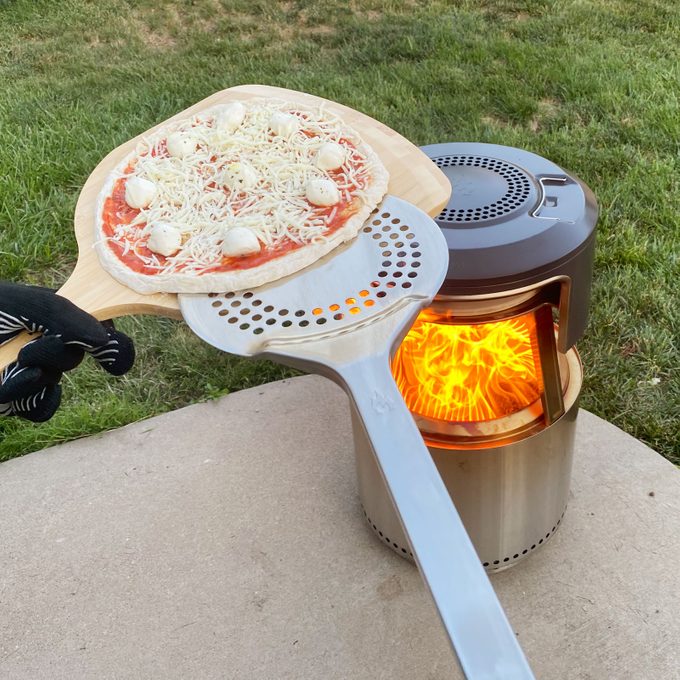
When it comes to cooking the pizza, you want to make sure your fire has had time to reach 500 to 650 degrees Fahrenheit before launching your pie. Smaller pies (under 10 inches in diameter) with fewer toppings (think classic Margherita pizzas) are easier to launch and rotate in the oven, which is something to keep in mind if you’re a novice pizzaiolo.

testing the temperature of the Solo Stove Pi Fire

Compared to some of our favorite outdoor pizza ovens, which typically run around 1,000 degrees Fahrenheit, the Solo Stove Pi Fire offers a more leisurely (and forgiving) cooking experience. If you’re new to the backyard pizza oven game, I’d recommend starting on the lower end of the heat scale (around 500 to 550 degrees) to get your footing.

Cleanup was practically nonexistent! After the pizza oven and fire pit cooled down, I simply wiped down the pizza stone with a towel, and that’s it. There wasn’t any stuck-on mess that required scraping or a deeper clean. Then, I went about cleaning up the Solo Stove fire pit as usual, which involved wiping down the pellet adapter (when I used it) with a dry cloth and emptying the ash pan at the bottom.

Pros

  • Pi Fire fits securely on top of Solo Stove fire pit
  • Ceramic-coated stainless steel can handle extremely high temperatures
  • Hub is lightweight and has handles, so it’s easy to lift and set on the fire pit
  • Compatible with all Solo Stove fire pits (make sure you purchase right size for your fire pit) and most Solo Stove accessories
  • Comes with carrying case and heat-resistant safety gloves
  • Great for backyard cooking or camping trips
  • Reasonably priced compared to other pizza ovens
  • Easy to set up, use and clean
  • Portable
  • Lifetime warranty

Cons

  • Does not come with all cooking tools needed like a Pi Stainless Turner
  • Medium to large pizzas can be difficult to get in and out, we recommend starting with small pizzas (about 10 inches in diameter)

FAQ

pizza slice on a green plate made with the Solo Stove Pi Fire

Is assembly required for the Solo Stove Pi Fire?

Yes, some assembly is required. But it is quick and easy to set up, and the Pi Fire comes with all the tools and parts you need to put it together. You’ll simply attach the legs to the base of the Pi Fire with the included screws and washers.

What temperature should the stone be before you put a pizza in the Pi Fire?

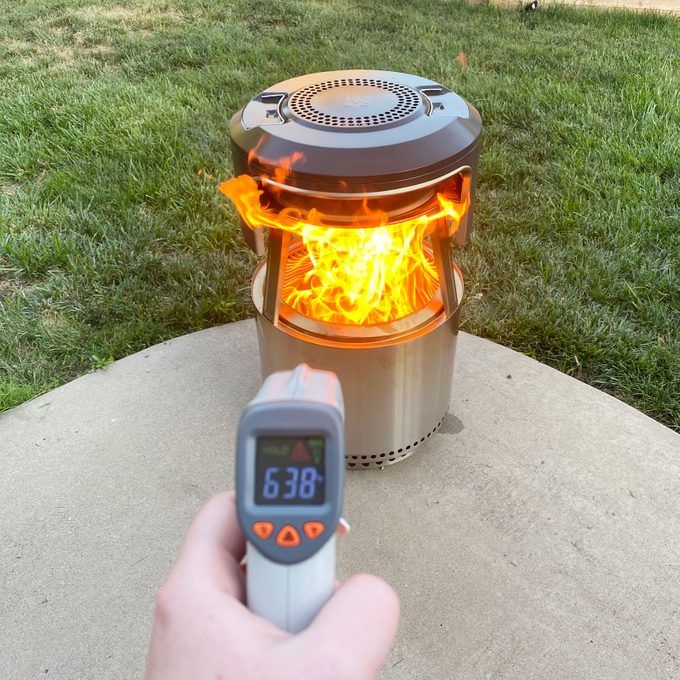
Solo Stove recommends letting the center of the pizza stone reach 500 to 650 degrees Fahrenheit before putting your pizza in to cook.

We recommend using the Solo Stove Infrared Thermometer to gauge the temperature of your pizza stone while your fire pit is roaring. You can use the thermometer to gauge the temperature of your fire while using other Solo Stove cooktops, too!

How long does it take the Pi Fire to bake a pizza?

On average, it will take 5 to 10 minutes to cook a pizza. However, there are many variables that can determine cooking time, such as the temperature of the stone and the thickness of the dough. So it’s important to keep an eye on your pie and turn it 180 degrees during the cooking process.

What Other Reviewers Have to Say

If you aren’t convinced from my Solo Stove pizza oven review, check out what other happy customers thought. With a 4.9-star rating at Solo Stove, here’s what some of the many glowing reviews had to say.

Matthew L. says the Pi Fire makes dinner fun. He writes, “Pi Fire has made pizza night fun for the whole family! I figured there would be a learning curve with several crispy pies before we got it right. Fortunately, I was wrong. It is fun and easy to use and will be a staple of our family weekends for years to come.”

Five-star reviewer Catherine S. says, “Pizza Fridays are next level since we got our Pi Fire. Brings the family together for the evening as we enjoy pizza and s’mores, then add a few more logs to the fire.”

William H. shares his experience, too. “We’ve used it a couple times now and it works great! We did some personal pizzas the first time and learned quickly how fast they cook. By the second or third pizza we were right on target. The next time we had some friends over and tried calzones and pizzas and did much better. Great flavor and fun to do,” he says.

Final Verdict

I’ve said it before, and I’ll say it again: If you’re going to shell out on a Solo Stove fire pit, you’re going to want compatible accessories and add-ons to get the most out of it.

The Pi Fire brings artisan pizza-making to your backyard (and beyond) all while you’re enjoying the light from your smokeless fire pit.

Where to Buy the Solo Stove Pi Fire

Fhm Ecomm Solo Stove Pi Fire Via Solostove.com

The Pi Fire retails for around $300 to $470, depending on what size Solo Stove fire pit you own. The best place to shop the pizza oven is at Solo Stove, where you’ll likely find the best deals and bundles on Solo Stove fire pits and accessories. You can also shop Solo Stove products on Amazon.

Crank up the heat on your backyard cooking with Solo Stove’s favorite fire pit accessory—the Solo Stove Pi Fire is sure to be a hit with friends and family. Shop now, and pizza night is about to get a whole lot more fun.

Shop Now

Shop smarter with our expert recommendations for tools, gear and money-saving deals on can’t miss DIY and home products. Sign up for the Stuff We Love newsletter.


Article source here: Solo Stove Pi Fire Review: Transform Your Fire Pit into a Pizza Oven

Beyond Big Boy: Grow New Types of Tomato Plants

Tomato 'Patio Choice'

Tomato ‘Candyland Red’

This type may be new to you, but current tomatoes prove the adage that good things come in small packages. Their pea-sized fruits, packed with intense flavor, are abundantly borne in trusses, making them exciting additions to flower arrangements. They often sprawl wildly, but not ‘Candyland Red.’

This All-American Selections winner, offering glossy red fruit all season long, grows politely with its neighbors in the vegetable patch.


Article source here: Beyond Big Boy: Grow New Types of Tomato Plants

Wednesday, June 28, 2023

Sunday Citizen Comforter Review: We Tried the All-in-One Bedding with a Hotel Feel

sunday citizen comforter

At Family Handyman, we’ve covered everything from the best heated blankets to the best air mattresses and best mattresses in a box. But now we’re getting into what makes a bed so comfortable that you truly never want to leave—bedding.

The Sunday Citizen Snug Comforter has been gaining rapid popularity, and we wanted to see what the buzz was about for ourselves. So we placed our order to put it to the ultimate comfort test.

Sunday Citizen began as a brand for stylish hotel bedding, and it has transformed into a brand that seeks to elevate your bedroom at home to five-star status. It claims its Snug Comforter is “what dreams are made of.” (We’ll be the judge of that!)

What is the Sunday Citizen Snug Comforter?

The Snug Comforter is an all-in-one bed cover designed to replace your duvet, duvet cover and top sheet. It has a snuggly plush top and a cooling bamboo bottom, so you can use the soft, cloud-like top on colder nights and flip it over to use the hypoallergenic, cool side on warmer evenings.

But it gets better: The comforter is made entirely from recycled plastic bottles and is completely machine washable. What more could you ask for in a comforter?

Shop Now

Sunday Citizen Snug Comforter Features

The Snug Comforter‘s snuggly side is made of soft microfiber while the cooling side is viscose from bamboo. The filling is made of Global Recycled Standard (GRS)-certified recycled polyester, and this label guarantees reduction of the harmful impact of production on people and the environment. So you can rest assured (pun intended) that the Snug Comforter doesn’t only look and feel nice, but it’s good for the environment, too.

It’s not often that we stumble across a luxury home bedding brand that also focuses on sustainability. We love that in 2023. And you don’t have to worry about sacrificing style for sustainability either. The Snug Comforter lays on the bed much like a standard down comforter (although it would be considered a down alternative), and it’s available in 11 classic colors, including sage (a gray-green), sienna (a burnt orangish brown) and purple haze (a cool lavender), as well as limited-edition hues.

It comes in three sizes: twin, full/queen and king/California king. It’s easy to clean and care for the Snug Comforter, too. While you can wash it as much as you like, it’s recommended that you wash the it on a low or no-spin cycle and tumble dry it on low.

How We Tested It

sunday citizen comforter

I tested the Snug Comforter for several nights of sleeping, cozied up in it with my dog and washed it! As far as comfort goes, the feel lives up to its name. It’s snuggly, soft and just heavy enough to provide that hotel comforter feel. You know what I mean—it provides warmth and coziness when the AC is blasting, but it’s not heavy enough to make you sweat under the covers on warmer nights.

I tested the full/queen size on a queen mattress, and I found it to hang just a little shorter on the sides of the bed than I would prefer. Albeit I tend to like oversized, drapey bedding. Regardless, I do think the full/queen size would probably look best on a full-size mattress. If you want an oversized look on a queen mattress, you could opt for the king size. Overall, this is a small detail that I can look past for the comforter’s softness, sustainability and low maintenance.

Another thing I did notice was that the plush side of the comforter seemed to collect animal hair and dust quickly. I have a German Shepherd who sheds quite a bit, and his black hair stood out on the white comforter. Honestly, his hair collects on any type of bedding, but the plush side seems to trap it in a little more than I’d like. However, a lot of the hair did come off in the washing machine. I also think a darker color would have shown less hair, so that’s something to keep in mind when you’re deciding on a color for your Snug Comforter.

As far as washing goes, the Snug Comforter does hold up in the washing machine. In fact, it came out looking almost brand new. Now, I’ve only washed it twice since owning it, so I can’t speak for how the comforter will hold up after months or years of washing, but other reviewers seem to have good experiences tossing it in the washing machine as frequently as they would other bedding.

Pros

  • All-in-one design eliminates need for multi-part bedding
  • Incredibly soft, plush top side
  • Delivers warmth on cool nights and prevents overheating on warmer evenings
  • Machine washable
  • Low maintenance
  • Eco-friendly
  • More than 10 color options
  • Free shipping and returns, plus 90 days to love it or return it

Cons

  • Pricey
  • Pet hair and dander collects in plush top side easily

What Other Reviewers Had to Say

sunday citizen comforter

With nearly 700 reviews from verified purchasers, the Snug Comforter earns an average of 4.8 out of five stars at Sunday Citizen.

Adalaina H. gives it five stars and writes, “This comforter is truly the best. The quality and comfort is unmatched. It’s lightweight but warm and cozy. I’ve washed it [more than three] times already and it still looks brand new.”

Verified buyer, Courtney M., says, “I just love this. It’s a joy to get into bed each night with it. My two Great Danes sleep on it and it doesn’t get scratched up or pulled or even dirty showing. I’m sold for life. I washed it once so far (king) and it did great.”

“I am soooo in love with my comforter,” shares Penny E., a five-star reviewer. “It’s so incredibly soft, has some weight to it and is perfect for all seasons. The only thing I would say is that the fabric will snag if you have a dog that likes to paw at your bed to find it’s spot. I’m so glad I chose the purple haze, but am hoping they come out with sheets and pillow cases with the solid color, as the only color that really matches is the white.”

Final Verdict

After sifting through buyer reviews from people who have owned the Snug Comforter for longer periods of time, I found that a few people said their pet’s nails did eventually snag the comforter. As I said, my large dog cozied up in the comforter with no issues, but I also keep his nails cut. If you have a pet with long nails or some other outside force that would cause bedding to snag, then you may want to be a little more careful with your Snug Comforter. (You could even change out the look of it and add another layer of protection with an added duvet cover. Although, that would defeat the all-in-one purpose of the comforter.)

Based on the overall quality, feel and look of the Snug Comforter, I would still highly recommend it for an all-in-one bedding option that has the bonus of a hotel feel!

Where to Buy the Snug Comforter

Sunday Citizen Comforter

The Snug Comforter retails for $290 to $355, depending on the size. The best place to shop this comforter is directly from Sunday Citizen, because the company offer a 90-day guarantee. So you can test, wash and use it for up to 90 days. If you don’t love your new bedding, you can send it back and they’ll refund your purchase.

That being said, what are you waiting for? If you’re looking for a new comforter, give this one a try—test out a few options if you’d like—and see what you think for yourself!

Shop Now

Shop smarter with our expert recommendations for tools, gear and money-saving deals on can’t miss DIY and home products. Sign up for the Stuff We Love newsletter.


Article source here: Sunday Citizen Comforter Review: We Tried the All-in-One Bedding with a Hotel Feel

Saker Mini Chainsaw Review: A Yards Best Friend

Fh We Tried It 3 2saker Mini Chainsaw

Some mornings, especially after a day of yard work, I feel my age. I’m not as strong as I used to be, but then again, I was never very buff to begin with. Tools generally aren’t made for small hands and some tools require using force, like pruners, loppers, and hand saws. 

And I’ll admit it: I’ve never felt comfortable with power tools like chainsaws. The maintenance of weeding, trimming and removing sucker trees is quite taxing and makes me want to hire a landscape service to do my dirty work. I prefer planting flowers and harvesting vegetables. 

There had to be an easier way instead of struggling with bulky power tools, I thought to myself. Luckily, I found my saving grace: The Saker Mini Chainsaw

What is the Saker Mini Chainsaw?

Img 5694 Saker Mini Chainsaw

The Saker Mini Chainsaw is a powerful battery-operated chainsaw that easily cuts wood up to four inches thick. I found this awe-inspiring because the chainsaw is only 14 inches long and weighs less than 2 1/2 pounds. 

But don’t let its small stature fool you. It slices through green wood like butter with 550 watts of horsepower. It’s effortless to handle and causes zero fatigue (for me, at least). With its sure grip handle, safety trigger and easy-on button, it’s simple to control.

And because the Saker is battery-operated, it requires little maintenance besides keeping the chain oiled and sharp. What could be easier?

Shop Now

Product Features

This Saker Mini Chainsaw is meant to last. It’s outfitted with a pure copper motor and is fast and efficient. The handle has a rubberized grip, and the button is easily reached with your thumb (unless you’re a lefty).

How We Tested the Saker Chainsaw

Img 5698 Saker Mini Chainsaw

In the past, I would never consider buying a chainsaw. To me, power tools are heavy, loud and intimidating. All of my yard tools are electric or battery-powered, so when I discovered that the Saker Chainsaw is suitable for seniors, I was in. When it arrived, I was delighted by the compact size and lightness. 

Luckily, the Saker arrived a few days before a wandering tree trimmer left a mess for me to clean up. What a perfect opportunity to test my new toy! 

The battery quickly charged, and I was ready to tackle the mess. I checked the chain tension, put a few drops of oil on it, and gave it a whirl. Wow, impressive, maybe I should be intimidated by this little powerhouse!

Safety first—goggles, gloves, ready, set, go for it. Honestly, this was so fun, and I didn’t mind that I had a huge pile of debris that needed to be cut into 4-foot lengths for the trashmen.

I was expecting a lot of vibration and noise, both of which were shockingly minimal. The machine felt stable and sturdy, and the cuts were clean. It was much easier to handle than my small corded hedge trimmer.

The little sticks were the most challenging because the Saker needs to grab a steady surface to avoid kickback. I found using two hands on the saw gave me the best control. Since the branches were already downed, I had a hard time stabilizing them (which is no fault of the Saker). Next time, I’ll have to rig up a sawhorse for leverage.

Within an hour, I had the curb lined with brush and had battery life to spare. In the past, I would have been out there all day using loppers. 

Pros

  • Cordless
  • Affordable
  • Lightweight
  • Easy to use
  • Powerful
  • Long battery life
  • Suitable for 4-inch branches or wood
  • Copper wire high-efficiency motor

Cons

  • No battery meters

FAQ

How long does it take to charge the Saker Chainsaw?

I didn’t test if my battery was already partially charged when I took the chainsaw out of the box, but it took less than an hour before the red light turned green. After my first use, I recharged the battery and the light turned green in about 15 minutes. So my hour of intermittent use barely drained my power supply. In general, allow two hours for charging.

What Other Reviewers Had to Say

Over 5000 Amazon customers were motivated to write about their love affair with the Saker Mini Chainsaw

Donna M. gives the Saker chainsaw 5-stars saying, “I’m a senior citizen and have never used a chain saw so I was a little intimidated by the pruning saw and it took me a while to get up the nerve to try it. But, my daughter gave it a go and that inspired me to work on the project for which I purchased this item. It’s great, I cut down, delimbed and sectioned 4 small oak trees in just a couple of hours.”   

“Better than I hoped!” exclaims the Artful Dodger. “This tiny chainsaw really gets the job done! I was shocked at how rugged this little fellow is, he eats wood like that’s what it was made for… I am very happy with this tool and when its time, I’ll buy again and again from this store. The battery’s lasted longer than I thought they would by far. We have a lot of trees and I used to haul out the 18″, fool with it until it started, make one or two cuts then haul it back until next time the wind hurt our trees.

“What’s not to love,” writes M.B. Buffaloe. “Inexpensive, lightweight, long battery life, I love it! I rarely need to cut branches over 3” diameter and this tool cuts those with ease. I ordered 3 extra chains also.”

Final Verdict

First, this mini chainsaw is adorable and powerful. It’s not one bit intimidating or hard to handle. I didn’t feel any fatigue using it, especially compared to cutting branches with a lopper or a hand saw.

I was immediately impressed by the sturdiness of this saw. It didn’t feel like a plastic toy that would disintegrate with pressure. It’s hard-working and smooth. The chainsaw trims my dwarf cherry tree and the unwanted tree growing next to my foundation.

If you have branches bigger than four inches but still like the idea of a battery-powered chainsaw, check out these options or consider the 6-inch Saker Mini Electric Chainsaw.

Finally, a compact tool that is comfortable to use right out of the box. Good things really do come in small packages!

Where to Buy the Saker Mini Chainsaw

Img 4966 Saker Mini Chainsaw

If you need a quick way to cut firewood into kindling, clean up after the storm or trim trees, the Saker Mini Chainsaw is fast, easy and efficient. Save money hiring yard help and feel confident with this user-friendly DIY tool.

Saker Chainsaws are available at Home Depot, Walmart and Amazon. Check out the bundled options for extra savings

Shop Now on Amazon

Shop Now on Walmart

Shop smarter with our expert recommendations for tools, gear and money-saving deals on can’t miss DIY and home products. Sign up for the Stuff We Love newsletter.


Article source here: Saker Mini Chainsaw Review: A Yard’s Best Friend

The 10 Most Common Types of Flies in the U.S.

House Fly

Housefly

Known as a total nuisance in and around the home, the Musca domestica Linnaeus, more commonly known as the housefly, is the most widespread, bi-winged insect in the United States.

What they look like

Typically from one-eighth to one-quarter inch long, the housefly features a hairy, oval thorax bearing black stripes, a yellowish-gray abdomen and two glossy gossamer wings that extend beyond the torso. Their most prominent feature? Their big, bulging red eyes.

Where to find them

The housefly inhabits a wide range of climates and environments, from tropical to arid and urban to rural, all around the world.

What to do if you see one

Apart from vigorously swatting or shooing them away, we recommend setting up traps to keep houseflies from disrupting your fun and cutting down on the potential spread of food-borne diseases.

According to the Centers for Disease Control and Prevention (CDC), “Each housefly can easily carry more than one million bacteria on its body. Some of the disease-causing agents transmitted by houseflies to humans are Shigella spp. (dysentery and diarrhea = shigellosis), Salmonella spp. (typhoid fever), Escherichia coli, (traveler’s diarrhea) and Vibrio cholera (cholera).”

How to prevent them

Attracted to most organic matter from food to feces, hungry houseflies have been known to travel up to 20 miles for a good meal. Removing trash frequently and sealing garbage cans and compost bins goes a long way.

Did you know? The taste receptors of a housefly are in their feet, which are 10 million times more sensitive to sugar than the human tongue.


Article source here: The 10 Most Common Types of Flies in the U.S.

How I Became a Plumber

Driving through southeastern Wisconsin takes you to the heart of Milwaukee and its neighboring suburbs. These areas are speckled with charming older homes like the bungalows of the 1920s, the Tudors of the 1930s, and the minimal, traditional style from the 1940s and 50s.

It’s easy to see why a plumber specializing in older homes, like Jessie Cannizzaro, would have a vibrant, flourishing business here. Cannizzaro hadn’t intended to follow in her father’s footsteps. But plumbing was in her blood, and her hands craved to be worked. Like so many, it just took time for her to find her own path.

Introduction to the World of Plumbing

Jessie Cannizzaro

When Cannizzaro talks about how she started in plumbing, her smile widens. “My dad,” she says.

Her father, Tom Cannizzaro, was a plumber. On weekends and in the summer, Jessie went with her dad to job sites. She was in charge of handing him tools and holding the flashlight. (Jessie says, with a chuckle, her dad often complained she never held the light where he wanted it.) Even today, Tom maintains a passion for his work.

“He’s going to be 80 this year,” she says. “He still keeps his license so he can do repairs and do things for his friends.”

That passion rubbed off on her. Jessie’s eyes light up as she describes a pipe job they did for a hotel in Menomonee Falls, Wis. Every time she drives by it, she’s reminded of the first time he trusted her with a propane torch.

“Of course, I always joke when I tell people that story that OSHA [The Occupational Safety and Health Administration] would have had a fit if they would have seen it,” she says. “This is not what a seven-year-old should be doing.” But it gave her a taste for plumbing.

Initial Career Path

Like many kids trying to find themselves, Jessie Cannizzaro went a different path than her father. She was the first in her family to go to college, majoring in business. But while there, Tom suffered a stroke and lost some of his strength on his left side. This made it difficult for him to do things by himself, so she helped.

Cannizzaro shuttled between assisting her dad on the job and going to class. Back at his side, she realized she “enjoyed working with [her] hands a lot more than doing paperwork.”

So she decided to finish her business degree, then get her plumbing license. This “parallel path” led her to start her own plumbing business. Once Tom approached retirement, she worked for another plumbing company. After five-plus years of that, she knew it was time to go out on her own.

Gaining a Foothold in the Business

Milestone Jessie Cannizzaro 0722 Hires

At first, money was tight. “I bought a used van out of Illinois because it was affordable, and started out of my spare bedroom in the basement and the garage,” she says. Cannizzaro worried her neighbors might freak out about her work truck going back and forth all day. Quite the contrary.

“Most of those people became clients — and still are our clients,” she says.

The business grew. “I was like, Oh my! I can’t keep up with all of this,” she says. “I had so much work coming in.” So Cannizzaro started hiring help. “And we’ve been growing ever since!” she says.

The reason for her success might be her customer service, the thoughtfulness she shows when working with her customers. But a bigger factor might be her deep appreciation for old plumbing. She loves helping her clients take care of their plumbing properly so they can avoid larger disasters — just like her dad did.


Article source here: How I Became a Plumber

Tuesday, June 27, 2023

8 Decluttering Tips for Hoarders

The term “hoarder” usually comes with images of something like what my grandma’s house looked like — stuff piled waist-high, with only a path wide enough to walk through the house. There’s nowhere to sit or do anything enjoyable, with barely enough room to move.

However, there are stages of hoarding. What some may think of as innocent clutter can lead to a much more overloaded and stressful environment.

“Both the difficulty letting go of objects and the inability to resist acquiring new items is often due to anxiety or guilt about missed opportunities that the objects represent to that person,” says Gail Steketee, Ph.D., an emerita member of the Scientific Advisory Board of the International Obsessive Compulsive Disorder (OCD) Foundation. “Unfortunately, that leads to clutter which can also provoke discomfort and feeling overwhelmed.”

If your home is getting stuffed with stuff, try these expert decluttering tips for hoarders to take back your space.

What Is Hoarding?

According to Tina Judge, a nurse practitioner and clinical specialist in psychiatry at Momentum Behavioral Health, “Hoarding refers to a psychological disorder characterized by persistent difficulty discarding or parting with possessions, regardless of their actual value.

“Individuals who hoard typically accumulate an excessive number of items over time, leading to clutter and disorganization in their living spaces,”

What Are the Stages of Hoarding?

“The five stages of hoarding are a conceptual framework that describes the progression and severity of hoarding behaviors,” Judge says. “It is important to note that not all individuals with hoarding tendencies will go through each stage, and the progression can vary from person to person.”

Judge describes the stages this way:

  • Stage 1: Acquisition. Individuals begin acquiring possessions excessively. They may collect items they believe are valuable, useful or sentimental.
  • Stage 2: Clutter. As possessions accumulate, clutter may interfere with the normal use of rooms, causing difficulties with cleaning, organizing and finding necessary items.
  • Stage 3: Difficulty discarding. Individuals experience increased difficulty discarding possessions and may develop strong emotional attachments to items. They fear they might need them in the future, or they’ll regret getting rid of them.
  • Stage 4: Disorganization and impairment. Clutter and disorganization become severe, making navigating or using living spaces as intended challenging. The excessive accumulation of possessions may cause health and safety hazards.
  • Stage 5: Isolation and functional decline. Excessive clutter and disorganization often lead to social isolation, strained relationships and withdrawal from activities. Living conditions may deteriorate to the point where essential utilities are compromised.

If you’re beginning to hoard, use the following tips to take back control of your home.

Seek Help

“You need to be courageous and willing to seek help — not just counseling to help understand and overcome why you feel the need to keep everything but also someone to come alongside you and dig into the mess,” says Carrie Ypma, expert organizer and founder of Clutter Keeper.

Getting a friend, a family member or a professional organizer to help you declutter will make you more accountable so you can make great strides and clear the clutter faster.”

Make a List

“Make a list of all the areas you want to clean and organize,” Ypma says. “As you complete each area or space, check it off the list and celebrate. It’s incredibly rewarding to see how far you’ve come and to cross things off your list,”

Try a Simple Decluttering Method

Clutter can be overwhelming, so choosing an easy decluttering method is best for beginner hoarders. One of the easiest and quickest ways to declutter is with the “Four-Box-Method.” This simplifies the process by categorizing items according to what action you plan to take.

The first box is for things you want to keep, the second for items that go back to where they belong, the third for items you want to donate, and the fourth for trash. For anyone struggling to figure out how to deal with their clutter, this is a great start.

Start With Easy Tasks

Beginning with easy tasks is one of the best tips. “Start small,” Ypma says. “If you try to go after the entire mess at one time, you’ll likely get so overwhelmed that you quit.”

Start with something as simple as collecting and getting rid of all the trash. Then grab your donation box and add any items you find easy to part with. Though it’s not tackling all the clutter, it will clear up much-needed space and motivate you to do more.

Find Ways to Make Decluttering Fun

Play some music, have snacks, get a friend to help and make it fun rather than a boring chore that you dread,” Ypma says. Anytime you take on a sizable project, you’re more likely to do it if you make the process enjoyable.

Use a Timer

Pick one room or even one small area within a room, set a timer and tackle that piece of the mess,” Ypma says. “When the timer is done, keep going if you feel motivated, or stop for the day and start again tomorrow,”

Using a timer can prevent “decluttering paralysis,” Ypma says. It springs you into action and stops you from overthinking.

Take Clutter Out as Soon as Possible

Take trash and donation boxes out of the house as soon as possible so you’re not tempted to take a second look at the items. Out of sight means out of mind. Plus, you’ll have a fresh, more organized home rather than a bunch of boxes in the way.

How to Prevent Future Hoarding?

“Get in the habit of carving out 15 to 30 minutes every day to tidy up and put things back where they belong,” Ypma says. She also advises keeping trash cans and/or recycling bins in every room to make getting rid of clutter easier.

“You can also keep a ‘donate’ box in your closet to put things you’re ready to part with,” she says. “When the box is full, take it to a local nonprofit organization where it can find a new home.”


Article source here: 8 Decluttering Tips for Hoarders

Swiffer WetJet vs. Swiffer PowerMop: Does Old or New Win the Floor-Cleaning Game?

Let’s face it: Mopping is time-consuming and messy. Plus, who wants to wait for the floor to dry afterwards? Not I, said the fly. Luckily, Swiffer has revolutionized the floor-cleaning game with the beloved WetJet, which has been around for over two decades and cuts floor-cleaning time in half. And that isn’t all. In June 2023, Swiffer introduced the PowerMop, which is supposed to eradicate sticky and stuck-on messes with ease, thanks to its specially designed mop head.

But which cleaning apparatus reigns supreme? I put these two Swiffer products to the test in a head-to-head cleaning battle–and I think I have an answer.

What’s the difference between the Swiffer WetJet and the Swiffer PowerMop?

Swiffer WetJet vs Swiffer PowerMop pads

The answer? There aren’t a ton of differences, but there’s a few. Both the WetJet and the PowerMop retail for around $30 and come with one bottle of cleaning solution to get you started. The WetJet gives you five disposable pads to the PowerMop’s two.

Interestingly, the PowerMop itself holds the cleaning solution container in the back while the WetJet’s is in the front. I’m not entirely sure why that is–maybe they found the weight distributes better in the back?

The head of the PowerMop is thinner and a little longer than the WetJet, but both have dual jets where the cleaning solution is released. The real difference in these products is in the pad itself. The PowerMop has over 300 scrubbing strips on each pad and is designed to clean like a mop and bucket without the hassle. This means you can scrub at sticky messes easier than you can with the WetJet, which has pads with a smooth bottom.

All About the Swiffer WetJet

The Swiffer WetJet has been around since the turn of the millennium. No, really. This household staple disrupted the cleaning market in 2001, first making its debut in Canada before coming to the U.S.

The draw? It’s an alternative to a traditional mop and bucket, making cleaning your floors easier than ever. You no longer had to wait an hour for your kitchen floor to dry, and consumers were hooked. Over 20 years later, the WetJet still sells like the day it was released. In fact, the first thing I purchased after buying my condo was a WetJet at Target. Go figure!

I love how easy it is to pop on a disposable pad-like wipe and get to cleaning. Simply press the button on the handle (after you’ve added batteries) and the WetJet sprays a misting of the cleaning solution on your floors. It’s also easy for almost any able-bodied person to use since it’s really lightweight and simple to maneuver.

However, I’d be remiss if I didn’t point out the recurring costs of using a WetJet over a traditional mop and bucket. In order to continue to use the WetJet, you need to buy the disposable cleaning pads (around $10 per pack of 15) and the cleaning solution (around $15 per bottle). This is something to keep in mind if you’re on a tight budget.

I do like that there are multiple cleaning solutions for the WetJet. Whether you have laminate, hardwood or vinyl flooring, there’s a specific option available for you.

All About the Swiffer PowerMop

The Swiffer PowerMop is the newest addition to the Swiffer cleaning family. Similarly to the WetJet, this pseudo mop is designed to make cleaning your floor easier. The long, thin head of the PowerMop swivels and is supposedly able to get underneath couches, tables and fridges without issue.

As someone who is constantly cleaning their floors (thanks, muddy dogs), I was interested to see if the PowerMop delivers on its promises. Luckily, the unboxing and “assembly” (if you can even call it that) was seamless and took under five minutes. Simply snap in the included batteries, add the cleaning solution to the front and connect the handle.

I started scrubbing my floors and immediately noticed how fresh the cleaning solution smelled. It was also evident that the PowerMop cleaned much quicker than the WetJet, thanks to its larger mop head. Better yet, the floor dried in a snap, leaving my kitchen’s hardwood flooring dry and dirt-free.

According to the box, you should vacuum before using the PowerMop in order to get larger pieces of dirt or debris off of the floor. Naturally, I ignored this advice because I was feeling lazy (and I wanted to see how the mop would work without vacuuming). Spoiler alert: The PowerMop still did an excellent job. However, if you have things like Cheerios or dog kibble on the floor, I’d recommend vacuuming ahead of time.

The Bottom Line

Swiffer WetJet vs Swiffer PowerMop wet wood floor

My honest take? You can’t go wrong with either choice. If you tend to have more sticky messes on your floor, I’d probably recommend the PowerMop because of the scrubbing strips. And if you’re someone who just wants to get dust and surface dirt off your floor, go with the tried-and-true Swiffer WetJet.

Where to Buy the Swiffer WetJet

Swiffer WetJet

More into ole reliable? Pick up a Swiffer WetJet (and plenty of dirt) from Amazon, Walmart, Lowe’s or Ace Hardware.

Shop Now

Where to Buy the Swiffer PowerMop

Swiffer PowerMop

Want to try Swiffer’s latest innovation? Grab your own PowerMop for around $30 at your favorite retailers, like Amazon, Walmart and Target.

Shop Now

Shop smarter with our expert recommendations for tools, gear and money-saving deals on can’t miss DIY and home products. Sign up for the Stuff We Love newsletter.


Article source here: Swiffer WetJet vs. Swiffer PowerMop: Does Old or New Win the Floor-Cleaning Game?

Never Worry About Lost House Keys with This Easy-To-Install Smart LockAnd Its On Sale

Few things are as jarring as laying in bed on the brink of sleep, then realizing the front door may not be locked. Ripping off the covers, pattering down the hall and inspecting the lock—only to find that it was indeed secure—is a universal annoyance. So is losing the house keys and inadvertently locking yourself out. Trying to break into your own home is just a headache waiting to happen.

There are other issues with traditional deadbolts, too. The mechanism failing and lock-picking burglars are just a few concerns. Plus, remembering to lock up after leaving relies on a good memory—not something we all have before hitting the morning commute. That’s why keyless entry systems—like the Ultraloq smart lock—are making a big difference in the security of hundreds of homes.

What is the Ultraloq smart lock?

The Ultraloq Smart Lock

The Ultraloq smart lock is a waterproof, app-controlled smart lock that connects with smartphones via Bluetooth. It attaches to nearly any residential door easily and with minimal tools—just a screwdriver, in fact. Not only is this easy-to-use smart lock much more secure than deadbolts—it’s up to 35 times stronger—but there are also a variety of ways to unlock it. Six different entry system settings offer plenty of options for families.

Methods include traditional options, like keys and a numerical code. Less traditional is the fingerprint scanner, which uses a biometric scanner to read the family’s fingerprints to grant access. Using smartphone settings, users can unlock their doors by opening up the app. These smart lock methods leave a lot less room for error, so they’re more secure than regular deadbolts or chain locks.

Other features include the ability to send one-time-use or recurring e-keys to family and friends—a handy security tool for service visits and deliveries. Even better, the app offers an entry log so homeowners can see exactly who entered and at what time. Afraid of forgetting to lock up? Timers automatically lock the door at preset intervals after entry. Better yet, the included batteries last up to one year with regular use.

Our Senior Shopping Editor Cher Checchio owns this lock and appreciates the security it offers her and her family. “I’ve had the Ultraloq smart lock for almost a year now,” she says, “I wanted to upgrade from my regular deadbolt to a smart lock for more security after having a baby. I really love the different ways I can lock and unlock my front door.”

Shop Now on Amazon

How to Use It

Cher notes that the Ultraloq smart lock is more convenient than a standard deadbolt. “We mainly use the fingerprint ID, which is set up for both me and my husband to easily unlock the door with just one touch. But I also love the security of the smartphone app. I can check it from my bedroom to see if the door is locked (no more wondering if I remembered to lock the door at night!).”

She goes on to say that outside of the convenience it affords her family, the keyless smart lock is also useful for visitors. “The code feature is an added bonus as we can share it with family members or friends when we’re out of town. And for those who are old school, it comes with a backup key just in case.”

Similarly to several of the 10,000 reviewers on Amazon, Cher wants to pick up a few more Ultraloq smart locks for other areas of her property. “I can’t wait to get another one for my basement door. The added peace of mind is reason enough to invest in this smart lock!”

The Best Amazon User Reviews

Amazon reviewers praise the smart lock for all of the options it affords, including ease of installation and enhanced security. “We bought five of these for our new house because I just hate having keys in my pocket. The batteries lasted a long time,” writes verified purchaser C.A. Owens. “The thumbprint scan is a nice easy feature if you’re carrying tools around and need to get in quick. Also great if you’re setting up an Airbnb. The phone interface is good.”

“Easy to install, works well and the features are useful. I’ve had no issues with the fingerprint feature, the codes work and you can assign different codes to different profiles, keeping track of who comes in and out that way, which is nice if you’re out of the house and need to let in family and friends,” notes another reviewer.

Where to Buy the Ultraloq Smart Lock

The Ultraloq Smart Lock

The Ultraloq smart lock’s assortment of features do come at a price. Normally, the smart appliance retails for $200. For a limited time, take advantage of Amazon’s coupons and discounts and secure one at a generous savings of $64. That puts the total cost at an affordable $135! Don’t gamble with home security—keep your family safe with the latest smart tech.

Shop Now on Amazon

Shop smarter with our expert recommendations for tools, gear and money-saving deals on can’t miss DIY and home products. Sign up for the Stuff We Love newsletter.


Article source here: Never Worry About Lost House Keys with This Easy-To-Install Smart Lock—And It’s On Sale

How to Make a DIY Indoor Herb Garden

Cut all pieces of wood Cut the wood for the base (A), sides (B), top cap (C), front and back top faces (D) and pot supports (E). All the co...