Add comfortable seating to your dorm with the Urban Shop Faux Fur Saucer Chair, which has a folding metal frame for easy storage. The chair’s plush faux fur cushion comes in 10 colors to match your dorm decor.
“This is best for a dorm room,” says one Amazon reviewer. “You can easily fold and tuck it under your bed if you don’t have that much space and can take out whenever you need it.”
Consult your school’s list of what to bring and what not to bring to campus (available on the college’s website) before heading out on your first college dorm shopping spree. This will also include a list of any items the dorm will supply for the students. For example, some schools provide toilet paper and trash bags, and others have vacuum cleaners and brooms available for checkout.
Once you make your list, coordinate with roommates to spread the cost of high-ticket items like a microwave or TV.
This 12-inch Skip Hop character backpack is the perfect size for your preschooler. It comes in 10 animal shapes so your little one has choices that include bumblebee, dog, dinosaur and cat. We love the insulated front pouch for snacks, and the canvas material is easy to wipe clean — a must-have feature with backpacks for preschoolers.
Did you really need another disposable pen, or did you just grab it from the display table because it was free? Seriously, toss broken chip clips and logo-laden promo items like street fair jar openers and summer concert drink cozies. Then donate festival and arcade prizes, like that oversize teddy bear that’s about to turn into a dust collector—find out where you can donate almost anything. Keep the plush toys you can’t part with fresh and clean by laundering them in the OTraki large mesh washing bag.
Add comfortable seating to your dorm with the Urban Shop Faux Fur Saucer Chair, which has a folding metal frame for easy storage. The chair’s plush faux fur cushion comes in 10 colors to match your dorm decor.
“This is best for a dorm room,” says one Amazon reviewer. “You can easily fold and tuck it under your bed if you don’t have that much space and can take out whenever you need it.”
Consult your school’s list of what to bring and what not to bring to campus (available on the college’s website) before heading out on your first college dorm shopping spree. This will also include a list of any items the dorm will supply for the students. For example, some schools provide toilet paper and trash bags, and others have vacuum cleaners and brooms available for checkout.
Once you make your list, coordinate with roommates to spread the cost of high-ticket items like a microwave or TV.
This 12-inch Skip Hop character backpack is the perfect size for your preschooler. It comes in 10 animal shapes so your little one has choices that include bumblebee, dog, dinosaur and cat. We love the insulated front pouch for snacks, and the canvas material is easy to wipe clean — a must-have feature with backpacks for preschoolers.
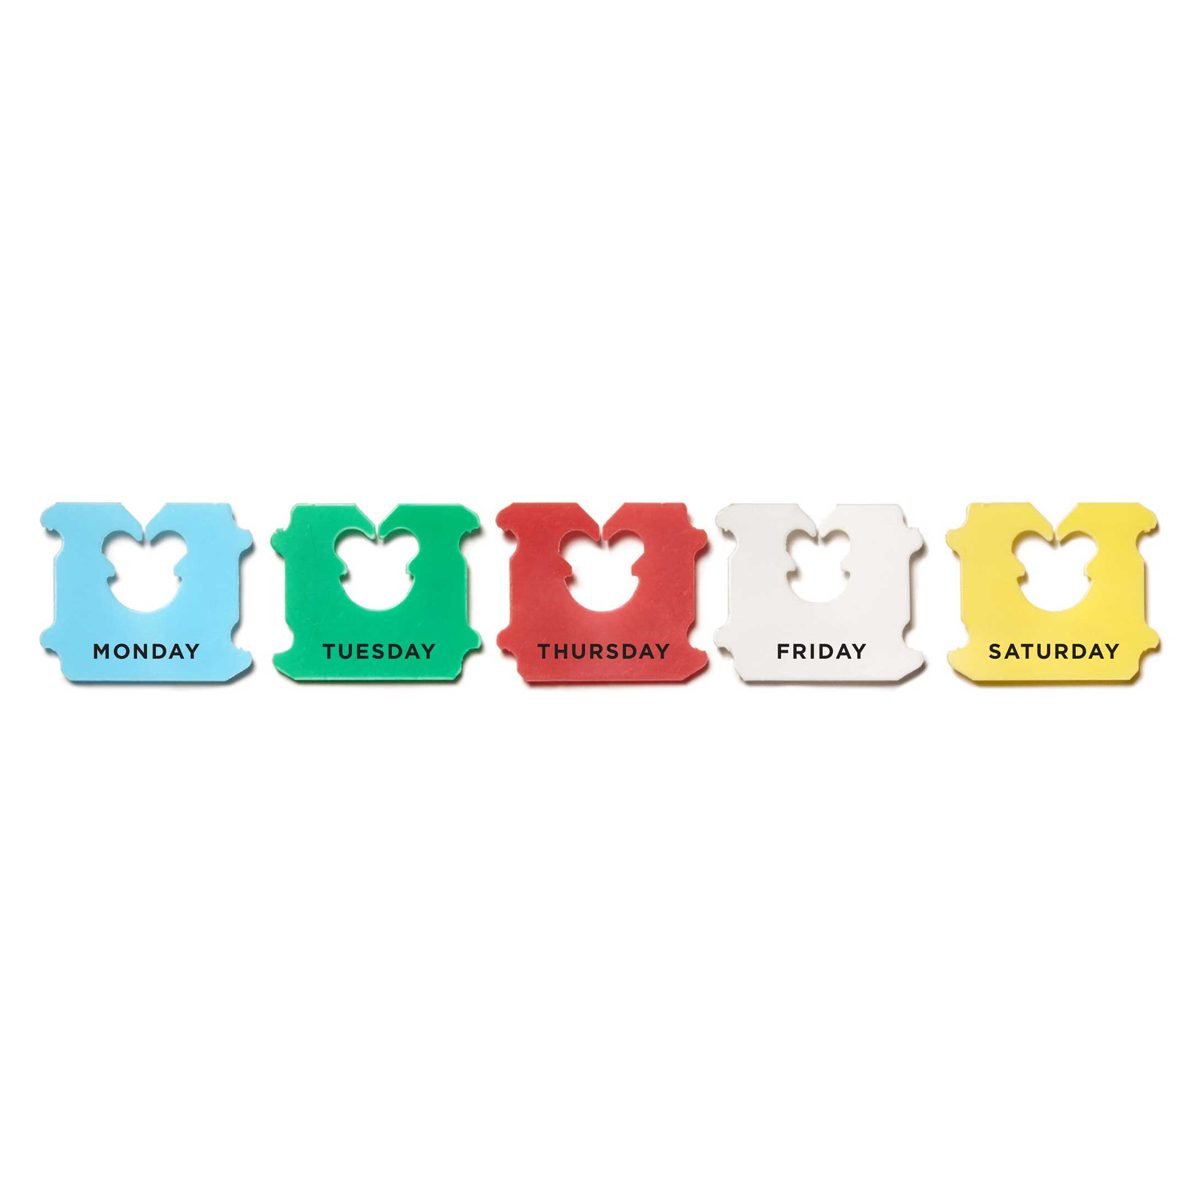
The plastic bread clip on your bread does more than keep your bread fresh, the color of the clip tells grocers what day of the week the bread was shipped. Bread is usually delivered fresh to stores five days a week — Monday, Tuesday, Thursday, Friday, and Saturday — and each day has its own colored tag or twist tie. Though some companies use their own system, this common code is easy to remember: Just as the days of the week proceed in order from Monday to Saturday, their corresponding colors proceed in alphabetical order — blue, green, red, white, yellow. (Psst! Bread tabs can also be used to label cords!) Also, check out these 50 extraordinary uses for ordinary things.
Did you really need another disposable pen, or did you just grab it from the display table because it was free? Seriously, toss broken chip clips and logo-laden promo items like street fair jar openers and summer concert drink cozies. Then donate festival and arcade prizes, like that oversize teddy bear that’s about to turn into a dust collector—find out where you can donate almost anything. Keep the plush toys you can’t part with fresh and clean by laundering them in the OTraki large mesh washing bag.
The plastic bread clip on your bread does more than keep your bread fresh, the color of the clip tells grocers what day of the week the bread was shipped. Bread is usually delivered fresh to stores five days a week — Monday, Tuesday, Thursday, Friday, and Saturday — and each day has its own colored tag or twist tie. Though some companies use their own system, this common code is easy to remember: Just as the days of the week proceed in order from Monday to Saturday, their corresponding colors proceed in alphabetical order — blue, green, red, white, yellow. (Psst! Bread tabs can also be used to label cords!) Also, check out these 50 extraordinary uses for ordinary things.
The instructions in the box with a new faucet tell you everything you need to know for a normal installation. Trouble is, there’s no such thing as a normal installation. Every job has its complications.
To get the solutions to the most common problems, we sat down with a pro plumber who faces these faucet situations every day. Use these expert tips to make your faucet replacement an easy half-day job instead of an all-day ordeal.
A poured concrete patio can transform your backyard. If you’re considering taking on this project, your success depends on preparation. Start by reading this guide.
About Concrete Patios
Durable, attractive, long-lasting and easy to keep clean — these are the advantages of a concrete patio. Unlike paving bricks or patio slabs, a poured concrete patio greatly reduces gaps and cracks that can lead to weed growth and ant infestations.
It’s a big job to pour a patio properly and you don’t want to skimp on quality. Follow these guidelines and your concrete patio will give you years of enjoyment.
How Much Will You Save?
You’ll save 40 percent to 50 percent by pouring your patio yourself. (Taking the DIY route also means you can be sure the technical details are done correctly.) You’ll save even more if you mix your own concrete instead of having a ready-mix truck deliver it.
What to Consider
Size, situation, time and budget are the main things to consider when planning a concrete patio. More specifically, think of these items as you plan:
Is the area level? You may need to add compacted fill to the area to level out a sloped site for a patio.
Will you excavate by hand with a shovel, rent a small excavator or hire a pro to do the digging? Although your patio will sit on top of the ground, you should remove sod and top soil before building forms and pouring concrete. The size of your planned patio, the texture of the soil and your level of physical fitness determine whether you do this digging by hand or not.
How thick will your patio slab be? Four inches is the minimum thickness for a concrete patio. You’ll want to make it six to eight inches thick if the patio will support a structure such as a gazebo or hot tub.
There are several main steps to pouring a concrete patio, including marking and excavating, assembling and leveling forms, mixing and pouring concrete, finishing the concrete and more. Here’s the process in more detail:
Mark your work area: Use spray paint or strings and stakes to mark out your patio. Make this area 18 inches longer and wider than the finished size of the patio you want. You’ll need this room for the forms and the space required for working around them.
Excavate the area: Use a shovel or rented mini-excavator to dig up the sod and top soil in the area of your patio. Aim to go down six to eight inches below the current soil level.
Assemble forms: Join 2×6 or 2×8 lumber to form the outer shape of your patio. Use #10 x 3-½-in. deck screws to join the corners, three screws per corner.
Square the form: If opposite sides of your form area are the same length (and they should be), then equalizing diagonal measurements taken corner to corner automatically makes the corners square. Pound one stake into the ground at each corner to hold the form square after it has been adjusted.
Straighten the form: You can never trust lumber to be straight. That’s why you must use strings along the sides of the form as a straight reference line. Place stakes every 36 inches along the outside face of the form to hold the edges of the form straight.
Level the form: Determine the highest corner you want for your patio, raise the top of the form to that level, and then drive a deck screw through the stake and into the form to lock it in position. This is your starting reference point. Use a 48-in. level or a laser level to raise the entire perimeter of the form to a level height, then drive a single deck screw through the stake and into the wood form. Double-check that the entire top edge of all form boards are level with each other.
Saw the stakes: When it comes time to level your concrete you’ll be drawing a long, straight piece of wood across the top edges of the form as you’re finishing the concrete. This is called “screeding” and it’s why you need to saw the stakes flush with the top edges of the form. Do this step now using a handsaw.
Add crushed stone: Shovel in and level crushed stone to make the bottom of the excavation more uniform and to create a space for water drainage. Rake the crushed stone so it’s a consistent depth down from the top edge of the form boards. This depth determines the thickness of concrete of your completed patio.
Add reinforcement: Concrete should be reinforced to minimize patio cracking. Some people use reinforcing steel mesh, but ½-in. rebar on a 12-in. x 16-in. grid does a better job. Place the mesh or rebar on the bottom of the form, then lift it up during the pour so the reinforcement is two inches off the bottom.
Formula for determining concrete quantity: (Thickness x width and length of patio in feet) divided by 27 = Concrete volume required in cubic yards.
Pour and finish the concrete: If your patio is tiny you can buy bags of just-add-water concrete mix. Add this to a portable drum-type concrete mixer with a quantity of water to create a uniform blend that’s the consistency of stiff cake batter.
You can save money on large patios by buying Portland cement, sand and crushed stone separately, then mixing all these components yourself in the mixer at a ratio of one part cement, two parts sand and two parts crushed stone.
Ordering ready-mixed concrete delivered by truck is the most costly option, but it makes sense for patios that require more than one cubic yard of concrete. Concrete reinforcing fibers will make your patio more durable and crack resistant. You can buy reinforcing fibers to add to site-mixed concrete, or you can ask for fibers to be added to ready-mixed concrete. I never pour concrete without using this fiber in addition to reinforcing rod.
Fill the forms with concrete, then use a straight piece of wood drawn across the top edges of the form to smooth and level the concrete. Leave the concrete alone until the surface water dries but the concrete itself is still soft, then immediately continue smoothing the surface with a trowel. A special trowel for edges lets you make the concrete look like the edges of a sidewalk.
If you want a rough, high-friction surface, use a broom to texture the concrete before letting it harden. Keep the surface damp with periodic use of a garden hose or wet sheets and blankets.
Remove forms: Let the concrete cure for three days, then remove the deck screws, pull the stakes, remove the lumber than scrape and clean off the concrete residue from the wood, if you want to reuse it. Back fill around the patio with top soil to fill in the space left by the removal of the forms.
Make crack control cuts: Even with reinforcing rods or mesh in place, concrete slabs tend to crack over time. Crack control cuts direct this cracking along a single line, so the results look better. Let the concrete cure for two weeks, then rent a masonry cut-off saw and create cuts 1-½-in. to two inches down in a grid of about 10 feet x 10 feet.
Things I Wish I Would Have Known Before Pouring My Concrete Patio
It’s easy to mix concrete so it’s too wet;
Concrete cures much quicker during hot weather — too quick sometimes;
Concrete slabs crack unless you go all out to prevent and control those cracks;
If something is worth pouring, it’s worth using reinforcing fibers in the concrete.
Choose the right grass seed with your particular lawn in mind and you’ll get a beautiful expanse of green. Unwittingly go with a mixture containing incompatible, obsolete or subpar-performing varieties, or one that’s cheapened with annual ryegrass or even pasture grasses, and you could be headed for something else altogether — possibly even diseased, damaged or dead grass.
Unfortunately, the choice isn’t always easy. All the grass seed options can feel endless and confusing.
I’m a big fan of local garden centers that offer grass seed purchased from bulk dispensers similar to the ones you find at your local food co-op. You can buy as little or as much as you want, and chances are these grass seed mixtures are formulated specifically for your area. When in doubt, seek help from experts at university extension services, local seed suppliers or reputable, impartial online sources.
You’d hardly be alone in opting for a name-brand bulk seed mixture, however. If buying in person, your options will naturally narrow by region, which is a good thing. Seed mixtures sold in Minneapolis should not be the same as those sold in Omaha or Tallahassee. To help further narrow the field when purchasing bulk seed mixes, we’ve outlined descriptions of grass seeds to match the type of lawn you have or are trying to achieve. And we’ve provided some readily-available, highly-rated options to help you succeed.
The amount of water your lawn actually needs depends on a mix of factors including grass type(s), sun and shade conditions, soil composition and the time of year. Strike the right balance for your personal green space by factoring in your yard’s special considerations.
When Should I Water My Grass?
Timing is important when it comes to watering your grass. You’ll save water (and money) and have a better looking lawn if you water at the right times.
Grasses should be watered in the warm seasons or summer months, Mann says. When the temperature is cooler, water less.
In the winter, grass goes dormant and doesn’t require watering. “If you maintain your lawn during the warm months with proper watering, mowing, aerating and fertilizing, your grass should be strong enough to withstand the winter and grow back strong in the spring,” Mann says.
How Much Water Does My Grass Need?
Generally, grass needs one- to 1-½-in. of water each week, whether from natural rainfall or watering. This amount can rise in extremely hot, dry weather and decrease when the temperature is cooler.
For How Long and How Often Does Grass Need to Be Watered?
Water your grass until there is one- to 1-½-in. of water in a rain gauge placed in the lawn where you are watering. Do this once per week. High activity areas will require more water.
“The principal hydrozone is the area of your lawn where there is the most activity and therefore will require the most water, such as your backyard,” Mann explains. “High traffic areas should receive routine weekly watering, and areas that are visually important to your lawn but don’t have much activity should receive reduced irrigation.”
Mann adds that minimal hydrozones are the areas of the yard that receive little or no human use. Those should be watered only if they start to look dry because natural rainfall should be enough.
The Lawn Institute also advises that the healthiest lawns are watered thoroughly at infrequent intervals. “Professionals recommend a deep watering compared to daily watering because it’s more efficient,” says Mann. “Most lawns are able to sustain five to seven days between watering, so if you deeply water on a weekly basis, your grass should thrive.”
If you notice that water is puddling or runoff occurs, turn the sprinkler off for a few minutes so that the water can soak into the ground. Allow the grass and soil to completely dry out before watering again.
How to Know When Grass Needs Water
If your lawn is getting one to 1-½-in. of water per week, it will likely remain healthy.
Two surefire signs that your grass needs more water than it’s getting:
Soil Probe Test. According to The Lawn Institute, if a probe such as an old screwdriver or large metal spike can easily be pushed into the soil, the soil is still moist and the grass doesn’t need watering. “Water only when the probe is difficult to push into the ground, or shows that the soil is dry at a depth of four to six inches,” according to the institute.
Grass Color. Grass that needs to be watered will have a gray-blue cast to it. On an adequately-watered lawn, footprints will disappear within minutes. If they can still be seen after 30 minutes or more, your lawn needs water.
Benefits of Watering Grass
One obvious benefit of watering your grass is beauty; a lush, green lawn looks much better than a dry, brown lawn. And a healthy lawn requires less effort to control weeds and insects. The benefits continue, Mann says: “Healthy lawns also act as natural coolants, noise minimizers, and play vital roles in cleaning the air.”
If you’re shopping for a new home fridge, you’ve probably heard about smart refrigerators. These high-tech wonders are internet compatible. They can send you a message when the fridge door is left open, keep track of what food items you have on hand, and tell you when the milk is past its expiration date.
You’ll pay more — in some cases, a lot more than the cost of a regular fridge — but smart fridge devotees say the convenience and smart technology is worth it. Find out about the myriad features of these mega-fridges, and find the best smart refrigerator for your household based on user reviews.
As temperatures cool and the sun sticks around for less and less time, people are going to need additional lighting in their outdoor spaces. This week on Deals We Love we’re highlighting two great pieces of technology designed to provide unparalleled illumination to those darkened corners of any homeowner’s yard. Whether it’s needed for security, family entertainment or simply to pick up where the street lights leave off, you won’t be disappointed with either of these options.
Ring Floodlight and Motion-Activated Security Cam
The folks from Ring have upped their game again with this combo floodlight/security camera/speaker/alarm. It’s a backyard security workhorse that allows users to see, hear and speak to visitors from their phones, tablets or PCs. Homeowners can toggle between infrared night vision or Live View as they enjoy the 1080HD video that Ring has made customary on all its devices.
The unit also includes ultra-bright floodlights and a siren. And if the security precautions become a bit too intense, users can customize privacy zones and activate audio privacy. If users connect the Ring camera to their Alexa, the device will make announcements and alert when motion is detected. All video can be recorded with a Ring subscription (sold separately) and the unit requires a hardwired installation.
Why We Love It: The brand name Ring has become synonymous with home safety and security, and this offering is just more evidence of how Ring is changing the game. The unit is also being offered at a significant discount — regularly retailing for $250 but on sale for $210 for a limited time.
The ultra-slim LED flood lights from Solla provide high performance, quality craftsmanship and energy savings in a simple and stylish looking fixture. The product features die-cast aluminum housing and tempered glass for versatility of installation and all-weather durability.
It’s easy to install using the 180-degree adjustable mounting bracket, and features a 140-degree wide beam angle that illuminates the same square footage as an 800W halogen bulb. It’s IP66 rating means the light is waterproof and dust-proof, which makes it a perfect lighting solution for your backyard, rooftop, garden or parking garage. That rating even qualifies it to be used in heavy seas, if that’s your thing.
Why We Love It: By using LED lights, Solla claims it can save consumers up to 82 percent off their electricity bill. Not only that, the company stands behind its product with a 24-month replacement guarantee and a 60-day money-back warranty. The light usually retails for $50 but the company is providing a 10 percent discount coupon at checkout.
The instructions in the box with a new faucet tell you everything you need to know for a normal installation. Trouble is, there’s no such thing as a normal installation. Every job has its complications.
To get the solutions to the most common problems, we sat down with a pro plumber who faces these faucet situations every day. Use these expert tips to make your faucet replacement an easy half-day job instead of an all-day ordeal.
A poured concrete patio can transform your backyard. If you’re considering taking on this project, your success depends on preparation. Start by reading this guide.
About Concrete Patios
Durable, attractive, long-lasting and easy to keep clean — these are the advantages of a concrete patio. Unlike paving bricks or patio slabs, a poured concrete patio greatly reduces gaps and cracks that can lead to weed growth and ant infestations.
It’s a big job to pour a patio properly and you don’t want to skimp on quality. Follow these guidelines and your concrete patio will give you years of enjoyment.
How Much Will You Save?
You’ll save 40 percent to 50 percent by pouring your patio yourself. (Taking the DIY route also means you can be sure the technical details are done correctly.) You’ll save even more if you mix your own concrete instead of having a ready-mix truck deliver it.
What to Consider
Size, situation, time and budget are the main things to consider when planning a concrete patio. More specifically, think of these items as you plan:
Is the area level? You may need to add compacted fill to the area to level out a sloped site for a patio.
Will you excavate by hand with a shovel, rent a small excavator or hire a pro to do the digging? Although your patio will sit on top of the ground, you should remove sod and top soil before building forms and pouring concrete. The size of your planned patio, the texture of the soil and your level of physical fitness determine whether you do this digging by hand or not.
How thick will your patio slab be? Four inches is the minimum thickness for a concrete patio. You’ll want to make it six to eight inches thick if the patio will support a structure such as a gazebo or hot tub.
There are several main steps to pouring a concrete patio, including marking and excavating, assembling and leveling forms, mixing and pouring concrete, finishing the concrete and more. Here’s the process in more detail:
Mark your work area: Use spray paint or strings and stakes to mark out your patio. Make this area 18 inches longer and wider than the finished size of the patio you want. You’ll need this room for the forms and the space required for working around them.
Excavate the area: Use a shovel or rented mini-excavator to dig up the sod and top soil in the area of your patio. Aim to go down six to eight inches below the current soil level.
Assemble forms: Join 2×6 or 2×8 lumber to form the outer shape of your patio. Use #10 x 3-1/2-in. deck screws to join the corners, three screws per corner.
Square the form: If opposite sides of your form area are the same length (and they should be), then equalizing diagonal measurements taken corner to corner automatically makes the corners square. Pound one stake into the ground at each corner to hold the form square after it has been adjusted.
Straighten the form: You can never trust lumber to be straight. That’s why you must use strings along the sides of the form as a straight reference line. Place stakes every 36 inches along the outside face of the form to hold the edges of the form straight.
Level the form: Determine the highest corner you want for your patio, raise the top of the form to that level, and then drive a deck screw through the stake and into the form to lock it in position. This is your starting reference point. Use a 48-in. level or a laser level to raise the entire perimeter of the form to a level height, then drive a single deck screw through the stake and into the wood form. Double-check that the entire top edge of all form boards are level with each other.
Saw the stakes: When it comes time to level your concrete you’ll be drawing a long, straight piece of wood across the top edges of the form as you’re finishing the concrete. This is called “screeding” and it’s why you need to saw the stakes flush with the top edges of the form. Do this step now using a handsaw.
Add crushed stone: Shovel in and level crushed stone to make the bottom of the excavation more uniform and to create a space for water drainage. Rake the crushed stone so it’s a consistent depth down from the top edge of the form boards. This depth determines the thickness of concrete of your completed patio.
Add reinforcement: Concrete should be reinforced to minimize patio cracking. Some people use reinforcing steel mesh, but 1/2-in. rebar on a 12-in. x 16-in. grid does a better job. Place the mesh or rebar on the bottom of the form, then lift it up during the pour so the reinforcement is two inches off the bottom.
Formula for determining concrete quantity: (Thickness x width and length of patio in feet) divided by 27 = Concrete volume required in cubic yards.
Pour and finish the concrete: If your patio is tiny you can buy bags of just-add-water concrete mix. Add this to a portable drum-type concrete mixer with a quantity of water to create a uniform blend that’s the consistency of stiff cake batter.
You can save money on large patios by buying Portland cement, sand and crushed stone separately, then mixing all these components yourself in the mixer at a ratio of one part cement, two parts sand and two parts crushed stone.
Ordering ready-mixed concrete delivered by truck is the most costly option, but it makes sense for patios that require more than one cubic yard of concrete. Concrete reinforcing fibers will make your patio more durable and crack resistant. You can buy reinforcing fibers to add to site-mixed concrete, or you can ask for fibers to be added to ready-mixed concrete. I never pour concrete without using this fiber in addition to reinforcing rod.
Fill the forms with concrete, then use a straight piece of wood drawn across the top edges of the form to smooth and level the concrete. Leave the concrete alone until the surface water dries but the concrete itself is still soft, then immediately continue smoothing the surface with a trowel. A special trowel for edges lets you make the concrete look like the edges of a sidewalk.
If you want a rough, high-friction surface, use a broom to texture the concrete before letting it harden. Keep the surface damp with periodic use of a garden hose or wet sheets and blankets.
Remove forms: Let the concrete cure for three days, then remove the deck screws, pull the stakes, remove the lumber than scrape and clean off the concrete residue from the wood, if you want to reuse it. Back fill around the patio with top soil to fill in the space left by the removal of the forms.
Make crack control cuts: Even with reinforcing rods or mesh in place, concrete slabs tend to crack over time. Crack control cuts direct this cracking along a single line, so the results look better. Let the concrete cure for two weeks, then rent a masonry cut-off saw and create cuts 1-1/2-in. to two inches down in a grid of about 10 feet x 10 feet.
Things I Wish I Would Have Known Before Pouring My Concrete Patio
It’s easy to mix concrete so it’s too wet;
Concrete cures much quicker during hot weather — too quick sometimes;
Concrete slabs crack unless you go all out to prevent and control those cracks;
If something is worth pouring, it’s worth using reinforcing fibers in the concrete.
Choose the right grass seed with your particular lawn in mind and you’ll get a beautiful expanse of green. Unwittingly go with a mixture containing incompatible, obsolete or subpar-performing varieties, or one that’s cheapened with annual ryegrass or even pasture grasses, and you could be headed for something else altogether — possibly even diseased, damaged or dead grass.
Unfortunately, the choice isn’t always easy. All the grass seed options can feel endless and confusing.
I’m a big fan of local garden centers that offer grass seed purchased from bulk dispensers similar to the ones you find at your local food co-op. You can buy as little or as much as you want, and chances are these grass seed mixtures are formulated specifically for your area. When in doubt, seek help from experts at university extension services, local seed suppliers or reputable, impartial online sources.
You’d hardly be alone in opting for a name-brand bulk seed mixture, however. If buying in person, your options will naturally narrow by region, which is a good thing. Seed mixtures sold in Minneapolis should not be the same as those sold in Omaha or Tallahassee. To help further narrow the field when purchasing bulk seed mixes, we’ve outlined descriptions of grass seeds to match the type of lawn you have or are trying to achieve. And we’ve provided some readily-available, highly-rated options to help you succeed.
The amount of water your lawn actually needs depends on a mix of factors including grass type(s), sun and shade conditions, soil composition and the time of year. Strike the right balance for your personal green space by factoring in your yard’s special considerations.
When Should I Water My Grass?
Timing is important when it comes to watering your grass. You’ll save water (and money) and have a better looking lawn if you water at the right times.
Grasses should be watered in the warm seasons or summer months, Mann says. When the temperature is cooler, water less.
In the winter, grass goes dormant and doesn’t require watering. “If you maintain your lawn during the warm months with proper watering, mowing, aerating and fertilizing, your grass should be strong enough to withstand the winter and grow back strong in the spring,” Mann says.
How Much Water Does My Grass Need?
Generally, grass needs one- to 1-1/2-in. of water each week, whether from natural rainfall or watering. This amount can rise in extremely hot, dry weather and decrease when the temperature is cooler.
For How Long and How Often Does Grass Need to Be Watered?
Water your grass until there is one- to 1-1/2-in. of water in a rain gauge placed in the lawn where you are watering. Do this once per week. High activity areas will require more water.
“The principal hydrozone is the area of your lawn where there is the most activity and therefore will require the most water, such as your backyard,” Mann explains. “High traffic areas should receive routine weekly watering, and areas that are visually important to your lawn but don’t have much activity should receive reduced irrigation.”
Mann adds that minimal hydrozones are the areas of the yard that receive little or no human use. Those should be watered only if they start to look dry because natural rainfall should be enough.
The Lawn Institute also advises that the healthiest lawns are watered thoroughly at infrequent intervals. “Professionals recommend a deep watering compared to daily watering because it’s more efficient,” says Mann. “Most lawns are able to sustain five to seven days between watering, so if you deeply water on a weekly basis, your grass should thrive.”
If you notice that water is puddling or runoff occurs, turn the sprinkler off for a few minutes so that the water can soak into the ground. Allow the grass and soil to completely dry out before watering again.
How to Know When Grass Needs Water
If your lawn is getting one to 1-1/2-in. of water per week, it will likely remain healthy.
Two surefire signs that your grass needs more water than it’s getting:
Soil Probe Test. According to The Lawn Institute, if a probe such as an old screwdriver or large metal spike can easily be pushed into the soil, the soil is still moist and the grass doesn’t need watering. “Water only when the probe is difficult to push into the ground, or shows that the soil is dry at a depth of four to six inches,” according to the institute.
Grass Color. Grass that needs to be watered will have a gray-blue cast to it. On an adequately-watered lawn, footprints will disappear within minutes. If they can still be seen after 30 minutes or more, your lawn needs water.
Benefits of Watering Grass
One obvious benefit of watering your grass is beauty; a lush, green lawn looks much better than a dry, brown lawn. And a healthy lawn requires less effort to control weeds and insects. The benefits continue, Mann says: “Healthy lawns also act as natural coolants, noise minimizers, and play vital roles in cleaning the air.”
If you’re shopping for a new home fridge, you’ve probably heard about smart refrigerators. These high-tech wonders are internet compatible. They can send you a message when the fridge door is left open, keep track of what food items you have on hand, and tell you when the milk is past its expiration date.
You’ll pay more — in some cases, a lot more than the cost of a regular fridge — but smart fridge devotees say the convenience and smart technology is worth it. Find out about the myriad features of these mega-fridges, and find the best smart refrigerator for your household based on user reviews.
As temperatures cool and the sun sticks around for less and less time, people are going to need additional lighting in their outdoor spaces. This week on Deals We Love we’re highlighting two great pieces of technology designed to provide unparalleled illumination to those darkened corners of any homeowner’s yard. Whether it’s needed for security, family entertainment or simply to pick up where the street lights leave off, you won’t be disappointed with either of these options.
Ring Floodlight and Motion-Activated Security Cam
The folks from Ring have upped their game again with this combo floodlight/security camera/speaker/alarm. It’s a backyard security workhorse that allows users to see, hear and speak to visitors from their phones, tablets or PCs. Homeowners can toggle between infrared night vision or Live View as they enjoy the 1080HD video that Ring has made customary on all its devices.
The unit also includes ultra-bright floodlights and a siren. And if the security precautions become a bit too intense, users can customize privacy zones and activate audio privacy.If users connect the Ring camera to their Alexa, the device will make announcements and alert when motion is detected. All video can be recorded with a Ring subscription (sold separately) and the unit requires a hardwired installation.
Why We Love It: The brand name Ring has become synonymous with home safety and security, and this offering is just more evidence of how Ring is changing the game. The unit is also being offered at a significant discount — regularly retailing for $250 but on sale for $210 for a limited time.
The ultra-slim LED flood lights from Solla provide high performance, quality craftsmanship and energy savings in a simple and stylish looking fixture. The product features die-cast aluminum housing and tempered glass for versatility of installation and all-weather durability.
It’s easy to install using the 180-degree adjustable mounting bracket, and features a 140-degree wide beam angle that illuminates the same square footage as an 800W halogen bulb. It’s IP66 rating means the light is waterproof and dust-proof, which makes it a perfect lighting solution for your backyard, rooftop, garden or parking garage. That rating even qualifies it to be used in heavy seas, if that’s your thing.
Why We Love It: By using LED lights, Solla claims it can save consumers up to 82 percent off their electricity bill. Not only that, the company stands behind its product with a 24-month replacement guarantee and a 60-day money-back warranty. The light usually retails for $50 but the company is providing a 10 percent discount coupon at checkout.
While parts of the construction industry remain sluggish, the home building sector has been on something of a hot streak in recent months. Despite the complications stemming from the coronavirus pandemic, housing has ramped up production to meet increasing demand in the market.
In response to these high levels of activity, the NAHB/Wells Fargo Housing Market Index — a metric that gauges how builders view the current and near-future housing market — rose six points to a score of 78 in August. That matches the highest HMI score ever recorded, set in December 1998. (Scores can run from zero to 100.)
“The demand for new single-family homes continues to be strong, as low interest rates and a focus on the importance of housing has stoked buyer traffic to all-time highs as measured on the HMI,” said Chuck Fowke, chairman of the National Association of Home Builders.
While the high levels of demand and favorable interest rates are not expected to drop off any time soon, other factors could limit housing’s potential for continued growth.
“The V-shaped recovery for housing has produced a staggering increase for lumber prices, which have more than doubled since mid-April,” said Fowke. “Such cost increases could dampen momentum in the housing market this fall, despite historically low interest rates.”
Despite these concerns, the surge in home building has been a definite boost for the construction industry and U.S. economy at large.
“Housing has clearly been a bright spot during the pandemic,” said Robert Dietz, chief economist for the NAHB. “The sharp rebound in builder confidence over the summer has led NAHB to upgrade its forecast for single-family starts, which are now projected to show only a slight decline for 2020.”
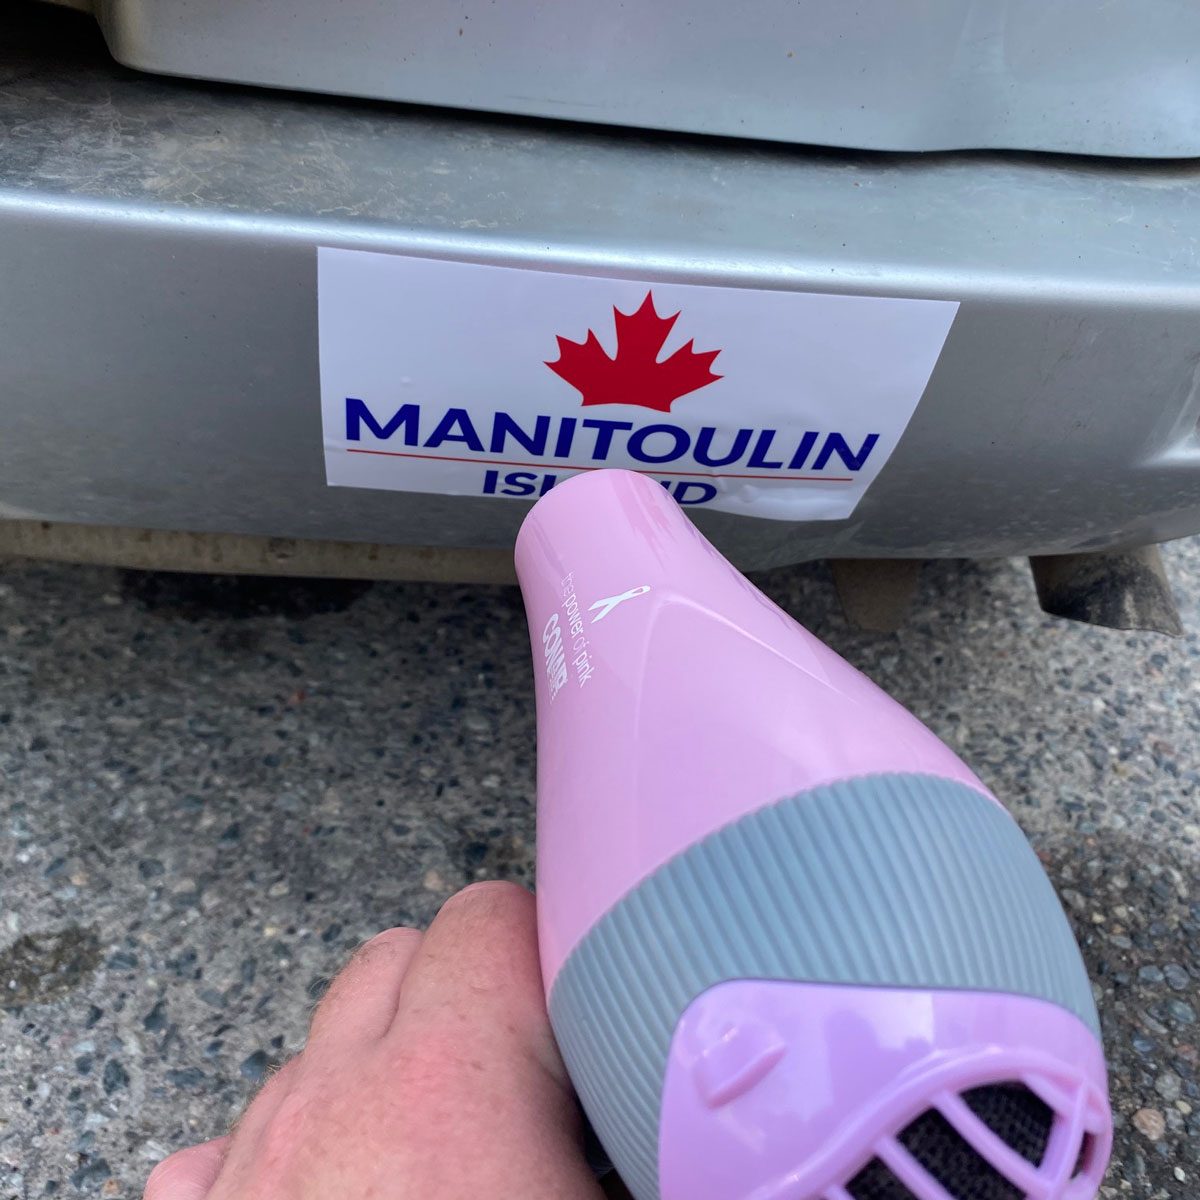
Use a hair dryer or heat gun to warm the bumper sticker at a medium to low temperature. Use an extension cord for power if needed. Keep the end of the dryer or gun about six inches from the bumper, moving it slowly from side to side, warming the entire sticker evenly.
Test one corner of the sticker with your fingernail after warming for several minutes. If it starts to peel easily, you’re ready for the next step. If not, warm it a little more.
Pro Tip: Never warm the area hotter than you can stand to touch with your fingers. Today’s plastic bumpers are damaged by too much heat.
There are multiple reasons why cars leak oil. Losing too much oil too quickly can seriously damage your engine, so it’s vital to deal with this problem ASAP.
What Can Cause an Oil Leak?
The main reasons for oil leaks are failed engine gaskets and worn O-rings and seals that shrink and harden due to age, heat and pressure. That produces the perfect environment for an oil leak. The oil pan drain plug, oil filter or rocker (valve) cover gaskets are the most likely culprits, so let’s look at these and other possible reasons why a car might be leaking oil.
The most common cause of gasket and seal failure is lack of maintenance. Going too long between oil changes causes oil to break down, allowing old oil to become contaminated from condensation and combustion by-products. Once saturated with contaminates, acids develop in the oil. These acids attack and degrade gaskets and seals, leading to oil leaks. Always have any leak checked out by your mechanic. Repairing leaks will save you from costly repairs down the road.
Gaskets, Seals and O-rings
Gaskets and seals are designed to keep oil in your engine where it belongs, while keeping out dust, dirt and moisture that lead to oil breakdown and premature engine damage.
These gaskets and seals will leak oil if they fail. Here’s where you’ll see the leaking oil:
Rocker (valve) cover gaskets: Look for dirt and gunk buildup at the top of the engine and small puddles of oil around the cylinder head indents and spark plugs. Also check for oil spots or drip stains under the center of the engine, as well as a burning oil smell. These leaky gaskets are a common cause of an oil leak and are easy to identify and repair yourself.
Front and timing cover gasket and seal: You’ll see oil leaking from the front or center of the engine.
Front main seal, timing cover gasket or seal: When these seals or gasket fail, you’ll see oil slung all over the drive or timing belt.
Rear main oil seal: If the top of the engine is dry, you’ll see oil dripping from between the engine and transmission, and the flywheel is covered in oil. In this case, removing the transmission inspection cover is necessary to confirm the leak.
Camshaft seal: Located at the rear of the cylinder head, a bad camshaft seal will leave oily residue below the rocker cover.
An oil pan gasket: This gasket can leave drops anywhere under an engine, which means diagnosing a bad oil pan gasket can be tricky. Oil from just about any other leaking engine gasket or seal will drip over the oil pan. It’s important your mechanic verifies the leak is from the oil pan gasket and not just oil from a different source.
Oil filter adapter mounting gasket: If you see oil dripping from the oil filter area, check the filter and the filter mounting adapter gasket. Over-tightening can not only damage the oil filter gasket, it can damage the adapter gasket as well.
Head gasket; Although rare, a head gasket can cause an external oil leak and is often misdiagnosed as a rocker cover or camshaft seal leak. More likely, you’ll see white smoke coming from the tailpipe signaling coolant from a bad head gasket is burning in the combustion chamber.
Dip stick tube O-ring: A dip stick tube that is loose, wobbly or cracked can result in a significant oil leak. If your dip stick is loose, or its mounting bracket is broken or missing, make it a priority to get it repaired so that you can check your oil.
Other Causes of Oil Leaks
Oil pressure sending unit. Oil sending units can commonly cause a slow leak or, because they are screwed directly into the engine’s oil pressure system, a gusher. A telltale sign that an oil sending unit is failing will be the oil light flashing, or erroneous oil pressure readings. On newer cars, a bad sending unit can send false low oil pressure data to the engine computer, which in turn will shut off the engine for no apparent reason.
Oil pan: The oil pan can leak if road debris or driving over a curb has caused a puncture.
Oil pan drain plug: Over-tightening the oil pan drain plug or oil filter during an oil change can crush the gaskets, creating a gap for oil to leak out. Over-tightening the oil pan drain plug can also strip the threads on the drain plug. Replacing the drain plug is a simple fix, although you may need all new oil. However, if the threads inside the oil pan are stripped, then you’re looking at a costly repair.
A bad, stuck or clogged PCV valve: This can cause all kinds of headaches. One is increasing internal engine pressure, which results in the failure of one or more engine O-rings, gaskets or seals.
Poor Installations
Improper part installation: If you over-tighten and crush a gasket, or if you don’t tighten bolts tight enough or in the correct sequence, those gaskets and bolts can leak oil.
Oil filter “double gasket”: This is a common mistake that happens when replacing an oil filter. The old filter gasket sticks to the engine, and the new filter and gasket are installed on top of the old gasket. This often results in catastrophic engine oil loss.