Wireless smart home devices are convenient to install, but rely on battery power. If you’re constantly replacing batteries, you may have a battery drain issue.
How to fix
Check your Wi-Fi connection: Move your devices closer to the router, or update your router. Constantly searching for an internet connection drains battery life.
Close unused features: Running optional devices you don’t need wastes energy.
Reduce motion detection settings: For security cameras, Rodriguez says “try to set the device settings to their minimum.” Less sensitive cameras use less energy.
Switch to hard-wired: “Try to avoid using batteries,” Garvey says.
Small solar panels: For outdoor devices that cannot be hard-wired, Garvey suggests installing a small solar panel to extend battery life.
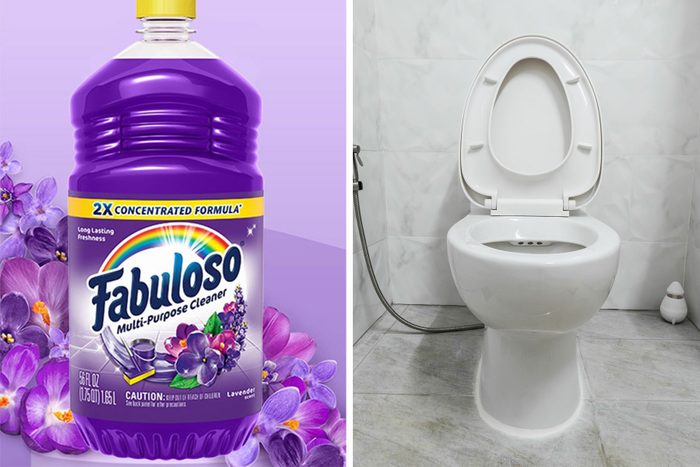
Who doesn’t love a time-saving cleaning hack? The internet is full of tips and tricks that promise to save time and energy. One that became popular a few years ago was using the cleaning product Fabuloso in the toilet tank.
With the help of two experts, Justin Carpenter from Modern Maids and Alexander Siv from Amherst Plumbing and Heating, I’ll explain what Fabuloso is, why people are putting it in their toilet tanks and whether that’s a good idea or not.
What Is Fabuloso?
Fabuloso is a well-loved all-purpose cleaner for hard surfaces like toilets, showers, counters, floors and windows. It comes in original, antibacterial and professional formulas. It can be diluted with water or applied directly to a sponge.
Especially revered in the Latino community, Fabuloso is probably best known for its pleasant scent. Fans of the product say it leaves rooms smelling fresh long after you’re done cleaning. Its colorful labeling and creative scent names helped it stand out among other cleaning brands.
“It comes concentrated in a variety of fragrances, so the user can choose a scent they find appealing,” Carpenter says.
Since its modest beginnings in Venezuela in the 1980s, Fabuloso has become a staple of American cleaning products. It was the most popular all-purpose cleaner of 2019, and regularly competes for the top spot with industry heavyweights like Pine-Sol and Lysol.
Why Put Fabuloso in the Toilet?
Fabuloso can clean and disinfect toilets. “You can use it to clean all areas of your toilet from inside the toilet bowl to the seat and outer surfaces,” Carpenter says.
Carpenter recommends a higher concentrated strength of the antibacterial formula for the toilet bowl to kill germs and bacteria. The Fabuloso product site recommends diluting one-quarter cup Fabuloso with a gallon of water for milder cleaning, but it can also be used at full strength.
Fabuloso can also be used inside the toilet tank to remove mineral buildup. Pour some Fabuloso in the toilet tank and scrub the sides with a toilet brush to remove any residue.
Some people take this process one step further and keep a bottle of Fabuloso in their toilet tank all the time.
In 2021, TikTok user Sheiksd_ posted a video where she placed a full bottle of Fabuloso in the corner of her toilet tank. She cut a small hole cut in the bottom so Fabuloso slowly flowed into the tank and mixed with the water. After every flush, the bowl refilled with Fabuloso-infused water, a practice she claimed kept her toilet clean and fresh smelling.
The video went viral and quickly racked up millions of views and more than 30,000 comments, many expressing an intention to try it. That’s a lot of people putting Fabuloso in their toilet tank.
Does Fabuloso in the Toilet Tank Work?
It depends.
Several video commenters complained their bottle of Fabuloso emptied in a few days and abandoned the idea, citing the expense and constant upkeep. Others claimed their bottle floated and never dispensed Fabuloso like the original poster’s did, or disrupted their toilet’s flushing mechanism.
Other commenters wrote this could cause plumbing issues. Siv agrees. “Having an all-purpose cleaner in your toilet tank all the time will wear out the flush valve hardware,” Siv says. “Rubber gaskets and plastic parts are not manufactured to withstand that type of environment.”
Adding the bottle of Fabuloso also displaces normal water amounts used for flushing. “If your toilet is designed to use 1.28 gallons of water, and it’s now using less than that because the bottle volume has displaced some of it, this will weaken your flushing power,” Siv says.
So your toilet may smell like tropical fruit, but there could be some visible remnants of the last user left behind. You’ll have to decide if it’s worth it.
“The best use for Fabuloso is cleaning inside your toilet bowl,” Carpenter says. He suggests adding an extra dash of Fabuloso to the bowl after cleaning for a longer lasting smell. “We advise this over adding any products inside the toilet tank,” he says.
Also, skip this trend if you own cats or dogs who could drink from the bowl. They can get sick from drinking Fabuloso.
About the Experts
Alexander Siv is the owner of Amherst Plumbing and Heating in Amherst, Massachusetts. He holds a master plumber’s license in Massachusetts and has more than 10 years of experience.
Justin Carpenter is the CEO of Modern Maids, a leading national house cleaning provider since 2017.
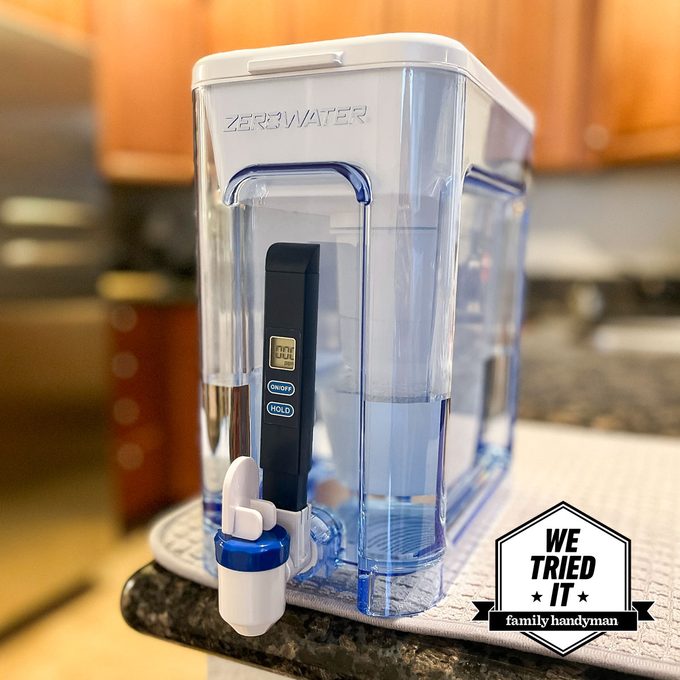
At the top of our list is the ZeroWater Filtration Dispenser, a great-tasting filter that truly removes pollutants from your tap water. Senior Shopping Editor Nancy Snyder says, Ive always relied on pure hope that my water filter is doing what its intended to do. But Ive had no way of really knowinguntil now.
The ZeroWater Water Filtration Dispenser not only comes with the promise of filtering your tap water, but its own water testing meter that beckons you to see for yourself. So thats exactly what we did. I first tested my tap water, which resulted in a reading of 569 TDS (total dissolved solids), Nancy says. Then I tested the filtered water from my ZeroWater dispenser. The result? 0 TDS!
Plus, Nancys personal taste test confirmed that all metals and impurities had been removed, resulting in clean, pure drinking water. But she didnt stop there. I next tested water filtered from my pre-existing water dispenser that I purchased from a competitor brand (and to level the playing field, I did so just after replacing it with a new water filter). The results were hard to swallow: The TDS meter read well over 300. I think it’s safe to say Ill be using my ZeroWater filter from here on out.
Certified by NSF (National Sanitation Foundation) standards to reduce lead, chromium and PFOA/PFOS, the ZeroWater filter is our top choice. Featuring BPA-free materials, it sits directly on your countertop without the need of a plug and comes in multiple size options, so you can choose what’s best for your counter (or fridge) space.
Pros
Easy assembly with no need to pre-soakfilter
Comes with TDS (total dissolved solids)watertesting meter to provide instant results every pour
Filteredwatertastes noticeably clean and pure (even when compared to a competitor brand)
Holds 32 cups ofwater, but is compact enough to fit inside fridge
ZeroWatersfilteredwaterresulted in 0 TDS compared to competitors 316 TDS
Craving some color and warmth in her living room, @paintedfarmhouse painted her fireplace this beautiful moody blue color (Arabian Night by Sherwin-Williams).
Notice the paint extends to the crown molding on the wall. This technique makes a bigger impact and draws the eye up, creating the illusion of a taller fireplace.
This tree by @bowsbybarth proves you can never have too much ribbon on your tree! Especially when the ribbon is as beautiful as these gold and white ribbon styles.
Here’s how Barth describes her technique: “I make a few loops and use the branches of the tree to secure them, then I go down [the tree] and let the ribbon flow naturally. I find the next connection point and secure the ribbon again to make it look like the ribbon is weaving in and out of the tree.”
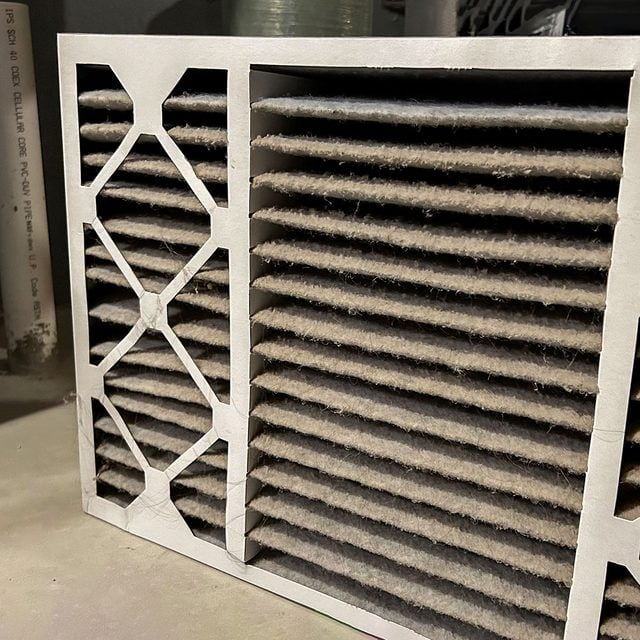
If youre thinking you only have to change your furnace filter once a year, you may be shortening the life of your furnace. Many costly furnace repairs can be avoided with regular filter changing. If you dont change the filter, lack of airflow will cause the furnace to overheat and shut down. Similarly, a dirty filter can stop an air conditioner because the coils freeze up due to inadequate airflow. Both issues stress the system.
Check your filter
Check your furnace filter monthly and change it every three months, depending on the type of filter you use. To do this:
Turn off the furnace by flipping the furnace switch. It should be on or next to the furnace, and looks like a standard light switch.
Find the filter service rack or door. This is most likely on the side with the intake and outtake blower fan. Remove the cover.
Slide out the existing filter and hold it up to the light. If you can no longer see light through it, it’s time for a new one.
Our phones accompany us everywhere, from the living room to public gyms and transportation. Most of us, myself included, are guilty of not wiping off our phone cases on the regular because we have a million other things racing through our minds.
Truth is, it’s easy to do and doesn’t take much time. We gathered some effective and quick methods for keeping your phone case clean so even the busiest human can fit this into their demanding schedule.
There are many types of phone cases out there, made from plastics, silicones or both. The cleaning methods we used are safe for all.
To disinfect the case, spray rubbing alcohol onto a clean microfiber cleaning cloth and rub the cloth onto the surfaces of the case. Alcohol wipes are also available with the same effectiveness as the alcohol spray. Make sure to cover all areas of the case.
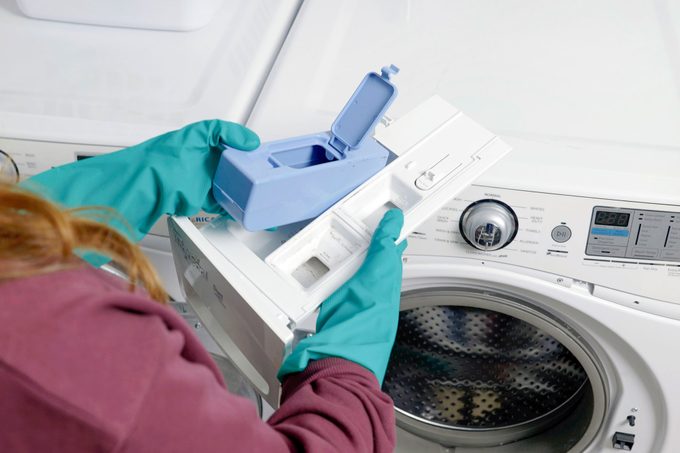
You may not even realize you should clean your washing machine, regardless of whether it’s front loading or top loading. But the truth is that grime and bacteria can build up quickly in your laundry appliances. Front loading washing machines in particular need to be cleaned about once a month to ensure that they remain mold and odor-free.
Here’s the process for cleaning a front-load washer.
Cleaning a Front Load Washer With Bleach
Clean the detergent dispenser
First, empty out the drum. Then remove the detergent dispenser and clean the tray and any attachments. Replace the items when theyre cleaned.
I recently moved into a newer home and one of the first things we needed to do was turn on the water heater. The good news was that most newer homes with a gas water heater use an electric ignition that sparks the pilot light so there wasnt a need to light it manually. But thats just newer gas water heaters, of course there are also electric and even tankless water heaters you might encounter as a renter or homeowner.
The type of water heater you have will determine which steps you take to turn it on or reset it. Make sure to review your water heaters manual or its instructions, which are most likely located on the water heater itself.
Whether you are turning on a water heater or are trying to reset it because of hot water issues, make sure the water tank is full.
Before getting started, check that the tank is full. If its not, the tank could get damaged when the heating system starts up. To do this, simply turn on a hot water faucet, and if it sputters air, the tank isnt completely full. Following a recent water heater installation, or one that has just been flushed, check that the water supply valve is open.
If you are having issues with hot water and residual air is coming out of the faucet, this might mean there is a leak, or something isnt working correctly. If this is the case, call a service technician to come out and evaluate your water tank.
If the faucet runs smoothly, go through the following steps to turn on or reset the water heater.
How To Turn On or Reset a Gas Water Heater With an Electric Ignition
Review the safety information
Be sure to review the safety information that is located on your water heater. Those instructions may differ from what is listed here. This kind of water heater has an ignition device that automatically lights the pilot light.
CAUTION: Never attempt to light the pilot light by hand on a water heater with an electric ignition.
That tree outside your window might look leafless and dormant, but chances are its roots are still active, gathering nutrients and keeping tissues hydrated and healthy. But just like with humans, cold winters can be a challenge for trees.
“A combination of winter’s dry air, little soil moisture and fluctuating temperatures can be hard on trees and shrubs,” says Ryan Statham, district manager with Davey Tree. “With strong winter winds pushing dry air over them, insufficient moisture levels cause them to lack the structure they need to support themselves.”
That means that often, trees do need a little water in the winter. “Their water requirements are generally reduced compared to the growing season,” says Kathy Glassey, arborist and senior consultant at Inspire Green.
With October through March being drier months in much of the U.S., winter watering can become all the more important. However, watering requirements vary depending on the local climate, tree species and soil types.
Here’s what to know about when to water trees during winter.
Why Do Trees Need Water in Winter?
Sometimes, yes. Roots continue to grow, even when soil temperatures drop below 40 degrees. So giving them enough water is vital to help them overwinter and prevent root damage.
Water can also help:
Springtime growth: Tree roots still absorb water and nutrients from the soil when it’s cold out, albeit more slowly, says Glassey. “The water they store in their roots during winter becomes vital for leafing out with new growth once everything warms up,” she says.
Prevent dehydration: Lack of water can desiccate tree tissues. This is especially important for evergreens, Glassey says, because they continue to lose water through transpiration. That’s the passage of watery vapor from a living body through a membrane or pores.
Protect from ice and freezing: Hydrated soil insulates roots from extreme cold. Plus, water-saturated plant cells are less likely to freeze.
When To Water Trees in Winter
If it’s a mild winter and the ground isn’t frozen, continue to water your trees like normal, says Statham. “Evergreens, especially, can get thirsty in the winter, which is why you’ll sometimes see them with brown needles,” he says. “So give your evergreens some extra attention.”
Woody plants with shallow root systems maples, fruit trees, lindens, honey locusts, hawthorns, oaks and mountain ash also benefit from winter watering during dry periods. For evergreens, that list includes pine, spruce, fir, arborvitae, juniper, Oregon grape-holly, boxwood and Manhattan euonymus.
“Typically, native trees and shrubs that have adapted to the local climate are often better equipped to handle winter conditions without requiring supplemental watering,” says Statham.
When Not To Water Trees in Winter
Proper winter tree watering can be a tricky balance in areas with freezing temperatures since overwatering can lead to root rot and other diseases. So it’s important to assess the condition of the tree and monitor soil moisture. When in doubt, consult a local arborist.
Other winter circumstances in which you might not want to water include:
If the soil is already frozen. “Instead, the trick is ensuring your tree has enough water before the ground freezes,” says Statham.
If the air or soil temperatures are below 40 degrees, or there’s snow cover.
If you get regular snow or rain (the soil might already be moist enough).
Use mulch. “Trees obtain water best when the water can be easily soaked into the soil, such as when mulch is applied correctly or before the ground freezes,” says Statham.
Water under the whole drip line, i.e. the outermost edge of the foliage, or the circumference out to where it sheds rain. Never water the trunk or foliage, Glassey says.
In general, apply 10 gallons of water for each inch of tree diameter.
Follow local irrigation ordinances.
Avoid watering during midday, when much of the water may evaporate.
Taking your soil composition into account is also vital, says Glassey. “It’s been said that 80% of urban trees do not have proper soil composition or quality, and this increases water needs for trees,” she says.
Glassey recommends consulting a professional arborist and soil health program to evaluate your soil’s porosity and nutrient, water and oxygen levels. “And as your soil becomes better, as nature intended, your trees will need less help from you,” she says.
About the Experts
Kathy Glassey is an International Society of Arboriculture (ISA) certified arborist, certified soil microscopy technician, senior consultant and plant care expert at Inspire Green. She’s worked for numerous landscaping companies, including Monster Tree service.
Ryan Statham is district manager for The Davey Tree Expert Company, a company with roots going back almost 100 years. He provides research-driven services and sustainable solutions for tree enthusiasts across the continent.
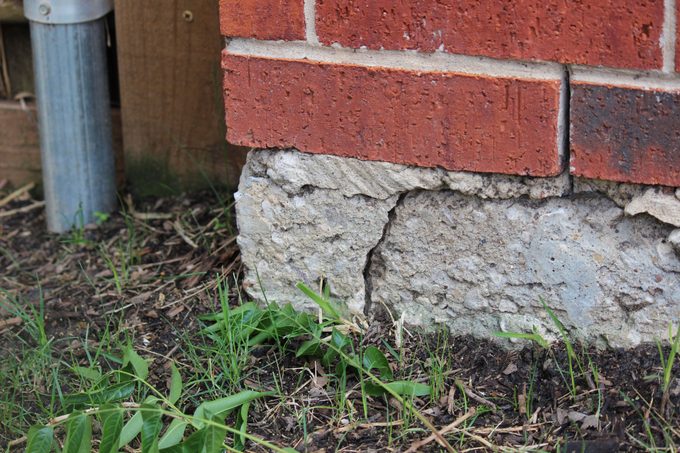
A problematic foundation can have bowing walls, horizontal cracks or sinking corners. While these may be due to age or improper installation, Saltzman finds soil and drainage issues are often to blame.
“If you have a bunch of water that pools around the foundation, that can exert a tremendous amount of pressure on the foundation,” Saltzman says. “You end up with walls bowing in, and you end up with cracks.”
Adds Towne: “Horizontal cracks are a big red flag. There’s something structurally not right if you’re getting that type of crack or that type of movement.”
While Saltzman admits it’s unusual to have to entirely rebuild a foundation, even specialized reinforcements and repairs can cost in the tens of thousands of dollars.
This fluted wainscoting by @hotpinkpineapples gives a modern twist to an often more traditional element. She made it by attaching wooden half-round dowels to a piece of plywood and attaching it to the wall.
The whole thing is removable and renter-friendly! Leaving the wood tone exposed warms up the space and provides nice contrast against the white walls.
For centuries, asbestos was considered a magic material. This fibrous silicate mineral is abundant, it won’t burn, and it’s unaffected by corrosive chemicals.
In ancient times, the Greeks spun it into cloth and the Romans used it to make candle wicks. Because the fibers are strong and add reinforcement, potters incorporated it into clay goods. When large deposits were discovered in parts of Canada and the Northern U.S. in the 1800s, manufacturers used it for construction materials, including insulation.
But in the 20th century, asbestos was recognized as a health hazard. Since then, it’s been mostly banned. Houses built prior to the 1980s may still contain asbestos insulation in walls and attics, around pipes and in other places.
“Asbestos-containing insulation cannot be identified visually,” says Michelle Whitmer, an asbestos expert with The Mesothelioma Center. “Homeowners should hire professionals to test suspicious materials instead of using DIY testing kits.”
But Reuben Saltzman, CEO of Structure Tech, disagrees. He says the most common materials with asbestos vermiculite loose-fill and pipe insulation aren’t that difficult to identify.
When Was Asbestos Insulation Banned?
Researchers linked asbestos to disease in the early 1900s. Efforts by the U.S. government to regulate its use began in the 1930s, despite opposition by various manufacturers. Congress passed laws in the 1970s that empowered federal agencies to impose restrictions.
Acting under the auspices of one such law, the Occupational Safety and Health Administration (OSHA) declared asbestos to be carcinogenic in 1975.
Similarly, after passage of the Toxic Substances Control Act of 1976, the Environmental Protection Agency (EPA) made efforts to ban asbestos from building materials. While neither constituted an outright ban, they marked the beginning of the end for asbestos insulation.
Asbestos use continued into the 1980s, however, until the EPA issued a ban and phase-out rule in 1989 to prohibit the manufacture, importation, processing and sale of asbestos-containing products. The U.S. Court of Appeals for the Fifth Circuit overturned the rule in 1991, however. as a result, asbestos continues to be allowed in certain products, like automobile brake linings and gaskets.
New legislation increased the EPA’s authority, and it issued a final rule in 2019 banning asbestos in new construction materials.
What Does Asbestos Insulation Look Like?
“Asbestos insulation may look like wrapping material or loose-fill material that is fluffy or stony in appearance,” says Whitmer.
“The types of insulation in homes most likely to contain asbestos include loose-fill vermiculite insulation and wrap insulation commonly found around pipes and A/C units. Some homes may have spray-on or block insulation containing asbestos, but these materials were most common in commercial buildings.”
Asbestos pipe insulation
Asbestos pipe insulation is often white and may be taped in place, says Whitmer. She notes many types of wrap insulation don’t contain asbestos, so this material needs testing the most.
Adds Saltzman: “If you look at a cross-section of the pipe, it’s going to look like cardboard. When you see that, it’s almost a guarantee that it contains asbestos.”
Fibrous loose-fill insulation
Your chances of coming across fibrous loose-fill insulation containing asbestos is slim, according to Saltzman. However, Whitmer says small amounts of loose-fill containing asbestos fibers may still be out there. “Some loose-fill asbestos insulation appears whitish or gray and fluffy,” she says.
Fiberglass, on the other hand, is usually yellow or pink, while cellulose looks like little pieces of paper.
Whitmer adds whitish insulation is mainly composed of amphibole asbestos varieties like chrysotile and tremolite, which can also appear greenish. The grayish loose-fill contains crocidolite, a serpentine asbestos with a bluish tinge. Other types of asbestos that may be in loose-fill, like amosite and anthophyllite, may turn it brown.
Vermiculite
“The one big type of insulation that contains asbestos is vermiculite,” says Saltzman. He describes it as light, fluffy stuff that looks like little rocks but weighs about as much as Styrofoam. Vermiculite derived from a mine in Libby, Montana and marketed under the brand name Zonolite is the main offender.
If you find this in your walls or attic, says Saltzman don’t just send it to a lab for testing, because the asbestos content is below the EPA’s threshold level of one percent. “This particular material is still very, very dangerous,” he says.
The best course of action? Contact the Zonolite Attic Insulation Trust for a test kit. And after you collect a sample and mail it back, they’ll determine whether it came from the Libby mine. “My advice is to treat is like it does contain asbestos until proven otherwise,” he says.
Asbestos block insulation
Block insulation isn’t actual blocks, but rather rectangular batts, or panels, from one to four inches thick. They’re usually made from a combination of foam, fiberglass and asbestos. The asbestos is often visible as small, hairlike fibers extending from the surface.
Asbestos foam insulation
Asbestos spray foam, often found in basements of older homes, resembles polyurethane foam, except it’s gray instead of yellowish with a bumpy, fibrous texture. If it’s in good condition, Saltzman recommends leaving it alone. If some of it has frayed, encapsulate it with an elastomeric or plastic coating.
How To Tell the Difference Between Cellulose and Asbestos Insulation
After 1976, cellulose became the most common substitute for loose-fill asbestos. In some really old homes, the two might be mixed together in wall or attic cavities.
Cellulose isn’t fibrous like asbestos. “If it looks like fiberglass or cellulose, it will not contain asbestos,” Saltzman says.
The best way to distinguish one from the other is by color. Cellulose is typically a pastel white, yellow or gray. Asbestos loose-fill may be also white or gray, but it often has tinges of blue, brown or black.
What To Do if You Find Asbestos Insulation
If you suspect the presence of asbestos insulation, get it tested ASAP. You can buy kits that let you collect a sample and send it to a lab. Or, if you follow Whitmer’s advice, have pros come into your home to do the testing. That’s probably safer, although considerably more expensive.
Kits cost from $10 to $35 with postage included. The cost for an in-home evaluation runs from $200 and $800, depending on the size of the home and how much asbestos may be present.
If the insulation tests positive for asbestos, you don’t necessarily need to remove it. If it’s in a sealed cavity, or locked into a solid form so the fibers can’t become airborne, it’s safe to leave it in place.
However, when you’re remodeling, disturbing the insulation and filling the air with asbestos fibers is unavoidable. In that case, you should test it and remove it.
No federal law prohibits you from removing asbestos insulation yourself, but some state regulations do. The task is extremely dangerous because microscopic fibers that you inhale can settle in your lungs and cause a serious form of cancer called mesothelioma.
No matter where you live, it’s best to call an asbestos abatement company and have the insulation professionally removed.
About the Experts
Michelle Whitmer is a writer and asbestos expert at The Mesothelioma Center at Asbestos.com. She has more than 14 years of experience covering medical and environmental issues.
Reuben Saltzman is CEO of the Minnesota-based home inspection service Structure Tech. He teaches home inspection seminars across the country.
You wouldn’t think of going outside in freezing weather without the proper gear. But when you come home and switch into lighter clothing, what’s protecting you from the elements? That’s right … your home’s insulation.
It’s no secret home insulation keeps you comfortable while reducing your heating and cooling bills. That’s why it’s a must when building a new home or renovating an existing one. In most cases, installing insulation is a DIY job.
But Reuben Saltzman, CEO of the Minnesota-based home inspection service Structure Tech, says insulation by itself won’t work if you have gaps in your building envelope where air can pass through. “Air leaks are the cause of 70% of problems in attics, and are more important to address than insulation,” he says.
Once you’ve taken care of the gaps, it’s time to decide which type of insulation to use, how much you need and where to put it. Here’s a primer to get you headed in the right direction.
Types of Insulation
As counterintuitive as it seems, air is one of the best insulators there is, as long as it remains static and isolated. That’s why most insulation products are lightweight, porous and even fluffy. They hold small cells of air, separated from each other so heat can’t pass from one cell to another.
Fiberglass: Available in pre-cut batts, rolls or loose fill, fiberglass insulation is spun from ultra-thin glass fibers. Faced batts and rolls come covered with a fire-resistant Kraft paper backing, which acts as a moisture barrier; unfaced batts lack this backing. Batts are cut to fit standard stud spacing (16 inches) and joist/rafter spacing (24 inches).
Cellulose: Available only as loose fill, cellulose is manufactured from bits of recycled newsprint and other paper and treated with boric acid to resist insects and fires. You need special equipment to blow it, which is usually available to rent.
Mineral wool: Also known as rock wool, mineral wool comes only in unfaced batts. It’s fire- and mold-resistant, insulates as well as fiberglass and installs easier, but it’s heavier. It’s a good choice for basements, especially furnace rooms and subfloors.
Rigid foam: Made of polystyrene, this comes in four-by-eight-foot sheets of thicknesses ranging from one-half to two inches. A reflective foil coating on both sides prevents heat from radiating through. It’s most often used to insulate cement walls in basements.
Polyurethane spray foam: Inch-for-inch, this is the best insulator of all. It’s available in open-cell or denser closed-cell formulas and acts as its own moisture barrier. Installation requires special equipment, and it’s messy, so it’s best left to pros.
Pipe insulation: This consists of foam-rubber tubing with a split along its length that lets you easily fit the insulation around the pipes.
What to use where
Attics: You can use pretty much any type of insulation in an attic except for rigid foam, but Saltzman recommends blown cellulose. “It’s the most cost-effective for new construction in Minnesota,” he says. That’s no doubt true in other states as well.
Walls: Fiberglass batts are sized to fit exactly between wall studs, so installing them is easy. The paper backing of faced batts extends an inch beyond the insulation, making it easy to staple to stud faces. Saltzman, however, has two reasons for recommending the unfaced variety and covering it with a plastic moisture barrier: The moisture barrier will be tight and continuous, and you’re more likely to fill the entire cavity and leave no gaps.
Basements:Basement insulation needs to be moisture-resistant, so mineral wool and rigid foam are the best choices. Use mineral wool to fill wall cavities, rigid foam to insulate bare concrete walls and pipe insulation to cover exposed water pipes.
How Much Insulation Do I Need?
The R-value of an insulation product measures its resistance to heat transfer, and it’s usually measured per inch. The R-value for cellulose is roughly 3.5 per inch, so you’ll need four inches of material to achieve a total R-value of 14.
The R-values you need for your walls and attic depend on your climate. Energy.gov publishes a chart that details recommended wall and attic R-values for every climate zone in the U.S.
It’s best to stick to these numbers and not overdo it. Adding more insulation than you need can lock in moisture by preventing air flow and do more harm than good.
Installation Tips
Seal gaps
Before you add any insulation, be sure to seal gaps with caulk or spray foam from a can. It’s especially important to seal gaps in attic floors, especially near walls and around lighting fixtures.
Batts are pre-cut to fit exactly between studs with standard spacing, but you may have to squeeze them into smaller spaces in corners and around windows and doors. The insulation works best if it fits without being compressed and stuffed. You can cut batts with a utility knife.
Install attic baffles
When you blow insulation into the attic, avoid covering the soffit vents or the attic won’t breathe, causing mold and moisture problems. Baffles are simple cardboard or plastic barriers stapled to the rafters above each vent to keep insulation away.
Don’t Cover Attic Insulation
You need a moisture barrier (typically plastic sheeting) between attic insulation and the ceiling drywall, but you should never cover the insulation from the top. If you do, it won’t breathe and condensation will form, causing it to clump and become moldy.
About the Expert
Reuben Saltzman is CEO of Structure Tech, a home inspection company serving Minneapolis/St. Paul, Minnesota and surrounding areas. He’s been remodeling homes for most of his life.
If youre lucky enough to have natural gas or propane, youll love having a Mr. Heater garage heater. The Big Maxx model is a popular option for heating large open spaces because of its efficient performance, quiet operation, compact design and powerful, even airflow.Another thing to love? This best garage heater can be controlled by a Wi-Fi-compatible smart thermostat. Imagine warming up the garage on your device without getting out of bed!
Wondering if a gas heater is right for you? Our digital editor, Ethan ODonnell, says,I have found that gas heaters are more efficient at heating up a cold space, areless expensive to operateand require less maintenance and repair than electric garage heaters.
What is a Mr. Heater garage heater?
The Mr. Heater garage heater is a powerful 50,000-British thermal unit (BTU) natural gas heater, which includes an liquified petroleum (LP) gas conversion kit. It has an impressive 82% thermal efficiency rating, and it’s designed to heat a 1,250- to 1,667-square-foot space. In other words, the Big Maxx (model#MHU50NG) will easily heat your three-car garage. The unit is 15 inches deep by 29 inches wide by 26 inches tall, with a black finish and three adjustable air louvers.
If the 50,000-BTU unit isnt right for your space, the Mr. Heater Big Maxx series is also available in80,000 BTUand125,000 BTUmodels. All three models have LP conversion kits, spark ignition, high-velocity fans and aluminized tubular heat exchangers included.
Before deciding on the size you need, ODonnell offers a tip. You should assess the level of insulation in your garage. If your garage will lose a substantial amount of heat through its ceiling, walls andgarage door, it somewhat defeats the purpose of heating it and, therefore, requires a much larger heater,” he says.
Mr. Heater offers a three-year warranty on parts and burners, and a 10-year warranty on the heat exchanger.
Grab this 50,000-BTU garage heater for your shop, barn or warehouse. Add a smart thermostat and control the heat from anywhere.
How to Install and Use a Mr. Heater Garage Heater
Once the unit is installed, operation is as easy as adjusting the thermostat. Users have reported that set-up is relatively simple because the connectors are located on the outside of the unit.
If you love the idea of a warm garage and plan toinstall a garage heater, ODonnell offers some advice.Though it is possible to DIY, gas garage heaters are difficult to install due to venting and plumbing requirements,” he explains. “A professional will know all the building codes, permits and regulations applicable to different types of garage heating systems. Professionals will also test the heater for functionality and provide optimal operational instructions, ensuring that the garage is heated safely and efficiently as the system is used.
The Mr. Heater Big Maxx is designed to be mounted from the ceiling and includes two angle brackets. To add to its versatility, the exhaust can be vented vertically or horizontally. If youre tight on space, this gas-forced air heater only needs 1-inch of clearance from the ceiling and requires a standard 120-volt power outlet. However, be aware that it needs to have at least 8 feet of clearance from the floor to the base of the unit.Another thing to consider is that the venting is not included with the unit, since venting will need to be customized depending on the space and building codes. Again, we recommend calling in a professional when it comes to installation.
Once the unit is installed, pair it with a smart thermostat or simply choose the bundle with the analog thermostat included. Easy as pie!
This was a great purchase for the money. Works good. Operates quietly. As a professional HVAC service tech, this is as good as major name brand products,” says Derek, a five-star reviewer.
Verified purchaser, Joe Peacock, writes, Well worth my money.This unit heater fits my needs quite well. It is well built and works great. It is a bit heavy to install by one person, but a strong back and careful planning can get it done safely. The venting and fuel supply is well placed. The instructions are easy to read and follow. I converted this unit to LP gas with the included kit and have it supplied with a 500 gallon LP tank outside my wood shop. The initial start-up went flawlessly. It worked exactly as the instructions stated.
I love having a heated three-car garage, and this heater is just the right size,” writes G. Preston, another verified buyer. “The packaged thermostat is a plus, although it is old-fashioned analog instead of digital. For a few more bucks a digital option would have been nice. The heater itself is reasonably quiet and very efficient. Installation is standard and requires a full day or a professional installer. At this price point, you won’t find a better heater.
FAQ
What size Mr. Heater do I need for my garage?
To give you a rough idea of the best BTU output needed for your garage, grab yourlaser tapemeasuring tool to calculate the cubic feet of the space.
First, multiply the length and width of the garage to calculate the square footage. Then, measure the ceiling height and multiply it by the square footage number to determine the total cubic feet.
Next, calculate the temperature rise by subtracting the coldest average low winter temperature in your region from the temperature youd like to keep in the garage. For instance, if you want to keep the temperature at 70 degrees Fahrenheit and the average low temperature is 10 degrees Fahrenheit, your temperature rise rate is 60 degrees Fahrenheit.
Finally, to calculate the BTUs needed to heat a garage, multiply the cubic feet by 0.133. Multiply that number by the temperature rise.
However, this is where you need to consider how well your space is insulated and adjust accordingly. An HVAC professional can better advise you on sizing, building code regulations and venting requirements.
Does Mr. Heater need to be vented?
Yes, since the Mr. Heater garage heater is a natural gas and LP-burning heater, venting is necessary to avoid deadly fumes and gasses, like carbon monoxide, from being released into the space. So make sure the placement is convenient to an outside wall (or ceiling, if local code allows) that can accommodate proper venting.
Product Comparison
The 50,000 BTU Big Maxx gas heater is currently priced at around $430, compared to the popular Hot Dawg 45,000-BTU heater by Modine which is around $1,000. Both units are low-profile, ceiling-mounted units and require outside venting. The Hot Dawg doesn’t include an LP conversion kit, but one can be bought separately. Modine offers a 10-year manufacturer’s warranty on the Hot Dawg, similar to the 10-year heat exchanger warranty and three-year warranty on parts and burner like the Mr. Heater Big Maxx.
Enjoy trouble-free warmth with a three-year warranty on parts and burners, and 10-year warranty on the heat exchanger.
Don’t let the cold keep you out of your garage. Once you grab the Mr. Heater garage heater you’ll wish you would have made the decision long ago. You can snag this life-changing workshop addition on Amazon, Walmart, The Home Depot, Tractor Supply Co. and Farm & Fleet.
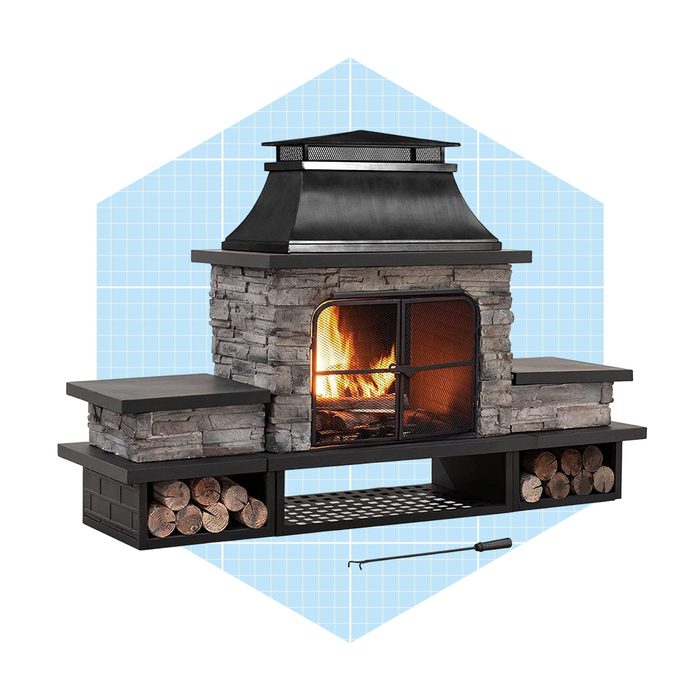
If you’re looking for an absolute stunner of a fireplace that you can install on your own, this large Sunjoy outdoor fireplace kit is worth a look. We’ve deemed it the best overall outdoor fireplace kit due to its appealing design, integrated storage for firewood and decor and attractive price point.
But what we love about this fireplace is that it looks as sleek as a permanent outdoor installation, but it’s notthough heavy at nearly 400 pounds total, it could be disassembled and moved if necessary. Speaking of the product weight, this is a DIY kit, but you may consider professional moving and assembly assistance if you’re not confident in your ability to lift and move the heavy pieces.
Once assembled, the Sunjoy fireplace heats an area of up to 10 square feet and, like all good fireplaces, the chimney funnels the smoke up and away from your gathering area. Locking mesh doors keep sparks from going rogue, and the included fire poker makes it easy to tend to your burn.
Another one of our favorite features about is the integrated storage. There are two cubby holes for storing extra firewood, plus two shelves lateral to the chimney for decor or other items.