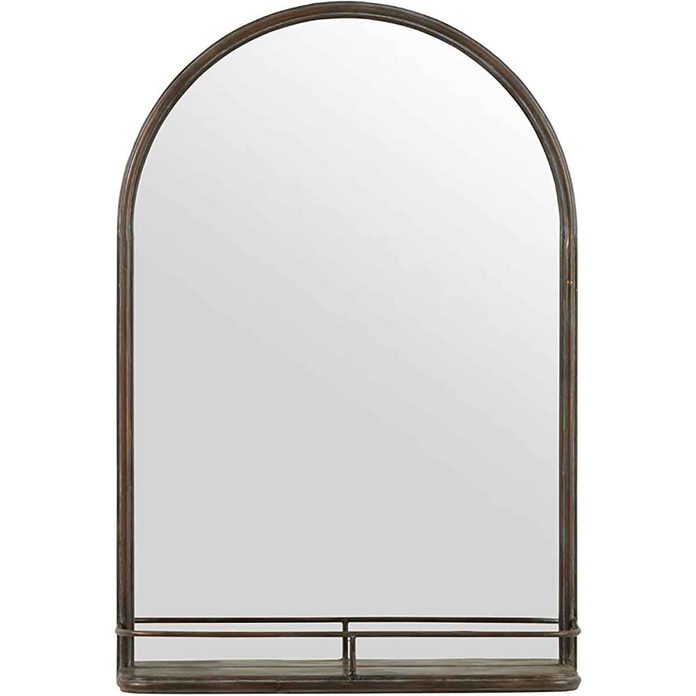
A vanity mirror that doubles as storage, like this mirror with a built-in shelf, will help you get the most out of every inch of wall space. The approximately 5-inch-deep shelf can hold toiletries or decorative accessories, clearing up the vanity top. Plus the stylish dark bronze finish and rounded shape have that chic boutique hotel bathroom vibe.
The best way to maintain the beauty and luster of your laminate wood floors is by caring for them correctly. Over time, and with normal wear and tear, your laminate floors could fade and dull, and cleaning them with whatever is under the sink won’t do. You need to use the right product made for the floors you have.
What to look for when choosing a laminate floor cleaner
A product specifically designed for use on wood or laminate
Natural, non-abrasive, pH-balanced ingredients. Read the label before buying.
What to avoid
Heat or polishing machines
Oil-based cleaners — they’ll leave streaks and residue
Waxes or varnishes
Bleach, ammonia or chlorinated cleaners
Fabric softener sheets. They contain chemicals that leave a film.
According to the North American Laminate Flooring Association (NALFA), when choosing a safe laminate floor cleaner, first and foremost, “never use any type of cleaner that works by excessive amounts of liquid or uses steam.”
Other laminate cleaning tips to live by
Sweep or vacuum floors regularly
Use a damp, soft cloth or mop (microfiber)
The less water, the better; never soak the floors
Avoid abrasive scrubbers or rough pads
Wipe up spills immediately.
By following these simple rules, you’ll preserve your laminate flooring for years to come.
Supersized puffs of hydrangea blooms and a dash of hocus-pocus with color-changing petals make this one of the most sought-after flowering shrubs for home landscaping. A University of Tennessee Extension Service study estimates more than 10 million hydrangea plants are sold each year, accounting for more than 13 percent of U.S. shrub sales.
How to Plant and Grow Hydrangea
If you’re ready to jump on the hydrangea bandwagon, these tips will help ensure success.
Climate and Location
Hydrangea can thrive in a wide range of climates from U.S. Department of Agriculture Plant Hardiness Zones 3 to 11, but verify the specifics for the variety you choose.
Make sure you have a location that allows the hydrangea shrub to expand by several feet and reach its top height without blocking walkways or windows. Some are tall plants, growing six to 10 feet wide or tall.
Sun and Shelter
Most hydrangea require at least six hours of sunshine a day. Check the tags for your specific variety. Ideally, most prefer sun in the morning and cooling shade in the afternoon. Plant your hydrangea in a spot where it won’t get battered by branch-snapping winds.
Soil Preparation
If you have a gallon-sized plant, dig a hole about two feet across and one- to two-feet deep, so the soil is nice and loose. Make sure you read the tag for your hydrangea’s height and width. For the best success, add organic matter, such as compost, to the soil to help retain moisture.
How to Care for Hydrangea
Watering
Hydrangea shrubs like to be watered thoroughly at least once a week or more frequently in hotter, drier stretches. If you see leaves start to droop, water right away.
Fertilizing
Pick a good all-around fertilizer and apply in early spring (usually March) when hydrangeas are starting to leaf out. Follow instructions and don’t over-fertilize or you may have more leaves than flowers. Apply fertilizer again in May and July.
Removing Spent Blossoms
With a mophead hydrangea, you can remove the blooms after they’re spent in the summer. This encourages blooms for the next year. For some varieties, such as the Endless Summer line, wait until late winter or early spring to trim the spent flowers.
Pruning
To prune a hydrangea that’s losing its shape or is less prolific in blooms, remove older branches by cutting them close to the ground and giving the shrub some more air circulation. This lets more light reach the younger blooming branches. You can also trim any branches to reshape a shrub that’s getting gangly or lopsided.
Winter Preparation
Mound up leaves or other mulch about eight inches around the shrub after the first frost. If you have a young hydrangea, you can encircle it with a screen or fencing that protects it from nibbling critters. That also allows you to build up a higher level of leaves for better winter insulation. If there’s a sudden cold snap in the fall or spring, you can also cover your shrub with an old sheet to protect it overnight.
How to Get Blue Hydrangea Flowers
Pick the Right Variety
The first step to achieving coveted blue hydrangea blossoms is to make sure you choose a bigleaf variety that will be pink or blue, depending on your soil pH. Look for choices such as Nikko Blue, Blauer Prinz or varieties with the Endless Summer line of hydrangeas.
No matter which color you achieve, hydrangea shrubs add a splash of beautiful blooms — even the cream-colored ones — and raise the curb appeal of your home.
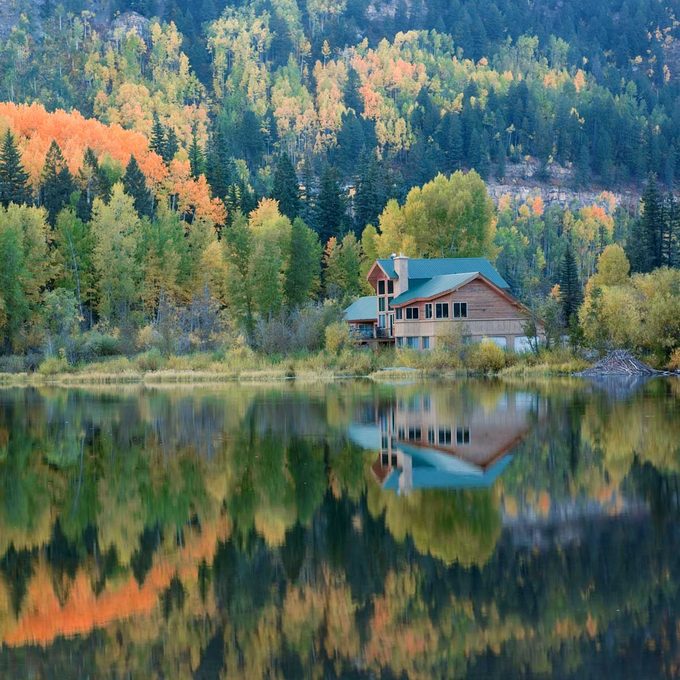
If you’re thinking about building an off-grid second home or cabin as a rustic getaway, you probably don’t expect it to have all the comforts of your primary home. But, living off-grid doesn’t mean you have to give up every modern convenience. A number of different power sources permit you to run basic household appliances without having to connect to a municipal power grid.
Practical power sources for off-grid appliances include:
Gas-powered generator. This power source may be the simplest option, but gas-powered generators are noisy and they smell bad. They also emit carbon monoxide, so make sure there’s no way the fumes can enter your home. And, make sure you don’t run out of gas!
Propane tank. Propane is a good option when renewable sources (like sun or wind) let you down or aren’t viable in your location. If you’ll be relying on propane, you can have a stationary tank installed and filled by a propane delivery service. If you don’t have a stationary tank, you’ll have to haul heavy portable tanks back and forth.
Solar panels. If your cabin is in a spot that gets a lot of sun, solar power might be your solution. The size of the photovoltaic system you need depends on how many kilowatts you require. The initial cost is high but afterward, solar is a green, virtually cost-free solution.
Hydroelectric power. If you’ve got some fast-moving water with sufficient “head” (vertical drop) on your property, you may be able to harness some of that energy to create hydroelectric power — not unlike old-fashioned watermills. Like solar, a hydroelectric system can be a big investment, but it allows you to store energy for when you need it.
Wind turbine. If your rural getaway is in a windy location, a wind turbine system is another green option — although also costly at the outset. According to the U.S. Department of Energy’s website, a turbine needs an average annual wind speed of 9 mph for a turbine to be a practical option for your home. Wind also needs to be “clean” for a turbine to work, with the air moving in a fairly consistent direction. “Dirty wind” moves erratically in multiple directions and doesn’t work well for harnessing electricity.
Solar, hydroelectric and wind-generated power is stored in batteries to which off-grid appliances can be connected.
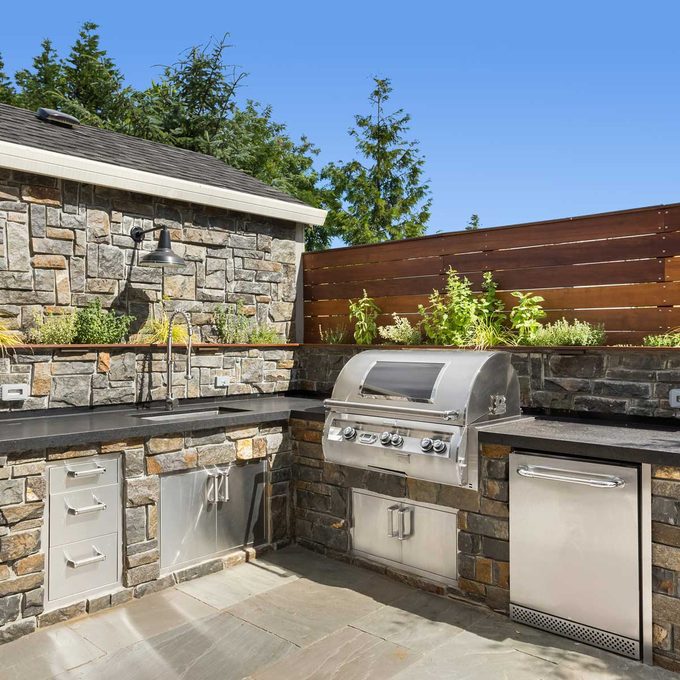
For many people, a freestanding grill is enough. But if cooking outdoors is your favorite summer activity, a fully equipped outdoor kitchen may be worth the investment. Consider these things when shopping for outdoor kitchen appliances:
Which foods you like to cook;
How much space you have;
How much you want to spend;
Utility access;
How many people you’ll be serving.
There are plenty of splurge-worthy outdoor kitchen appliances to create your dream grilling area. These are some of our top picks.
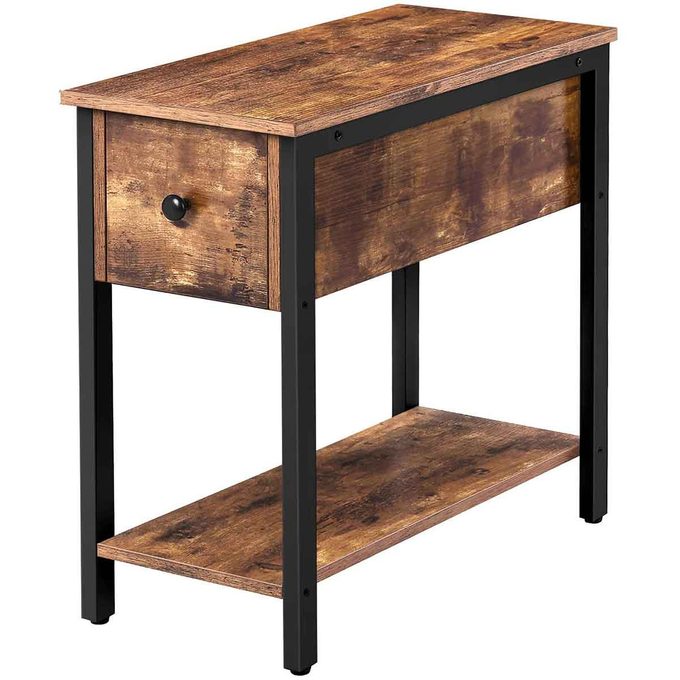
If you don’t have a lot of floor space next to your bed, this narrow nightstand is the perfect choice. At only about 12 inches wide, you’ll likely be able to squeeze in one or two of these tables, even in the smallest bedroom. And, with its drawer and lower shelf, this tiny bedside table provides bonus storage opportunities.
You may be excited to get your hydroponic garden up and running, but take time to research the different types of hydroponic systems available, how they work and the best plants to grow within each specific system.
“There’s no such thing as knowing too much about the plants you are going to grow,” says The Bumper Crop Times gardening expert Bryan McKenzie. “Your mission is to figure out as many facts about each plant as possible to be able to provide them with enough nutrition, proper humidity and temperature regimes and water pH.”
The National Association of Home Builders (NAHB) has announced that it will be hosting two webinars in May that will seek to educate home builders on the potential ways they can build homes without relying as heavily on lumber products.
The NAHB estimates that the currently inflated price of lumber now adds up to $36,000 to the price of a new home build. With market experts predicting that the lumber price problem will get worse before it gets better, exploring alternatives to lumber may be one of the best ways for home builders to continue building at a sustainable level.
“Home builders are not likely to leave behind traditional “stick-built” homes without good reason,” reads the webinar announcement. “But with lumber prices now adding nearly $36,000 to the price of an average single-family home and with recent advancements in building technology in other areas, certain framing methods at least deserve a look.”
The webinars are free to NAHB members and cost $39.99 for non-members. Here is more information on what exactly each of the two webinar sessions will cover:
“The Business Case for Building With Concrete Forms”
Wednesday, May 5, 2021, 1–2 p.m. ET
This webinar will be centered around insulated concrete forms (ICFs) and how they are quickly becoming one of the most popular alternatives to traditional lumber framing. Praised for their energy efficiency and durability, ICF walls present an intriguing option for any home builders looking to use less lumber in their builds. The webinar will feature insight from a builder and a developer with experience using ICFs as well as a representative from the concrete industry.
“Affordable Lumber Alternatives: Framing with SIPs and Steel”
Wednesday, May 12, 3-4 p.m. ET
The second of the two webinars will take a look at a couple of other alternative framing materials: structural insulated panels (SIPs) and steel frame construction. These two “traditional” house framing methods may not be used as much as they were in the past, but with the current state of lumber prices they are definitely worth revisiting. The webinar will include a look at exactly how framing with SIPs and steel works as well as testimonials from builders who have successfully employed these methods in the past.
DIY home projects aren’t slowing down any time soon. Whether you’re finishing the basement, landscaping the yard or just giving the living room a much needed deep clean after a year spent mostly inside, you need the right tools to do the job right. That’s where HART comes in.
Last year, HART launched their line of affordable DIY-friendly battery-operated power tools and storage solutions at Walmart. And they were just getting started. This week, HART announced they’re slated to add another 100+ tools to their lineup available online and at Walmart stores across the country.
What’s the Deal With HART’s New DIY Tools?
Walmart’s HART line was specifically designed with DIYers in mind, so each tool is designed to be easy to use and versatile. The newly expanded 20 volt system offers a longer run time and optimized performance.
A majority of HART tools run off of a universal 20-volt battery platform, so you can power your string trimmer with the same battery you use to run your drill. The new HART line includes tools from a variety of categories, including power tools, lawn and garden tools, protective gear and accessories — everything from lawnmowers to stick vacuums to glue guns and circular saws.
Prices generally range in the low-triple digits — a steal for power tools and high quality cleaning equipment. And yes, all Hart power tools, lawn and garden and automotive tools are covered by a three-year warranty.
Check out the full line of HART products and see them in action here.
Where Can You Buy HART’s New DIY Tools?
We’ll announce when you can get your hands on the new tools as soon as they hit Walmart’s shelves and website. We know you have a long list of DIY projects to tackle.
An attic can be much more than a dusty storage space. The angled ceilings and often quirky shape of the overall space has endless potential to become a gorgeous and unique bedroom retreat. Here are a few things to keep in mind when decorating your attic bedroom. (Then read on to see beautiful examples of these ideas in action!)
Embrace the Pitch
The signature pitch of an attic room is what makes it such a special space. So highlight the angles of the ceiling with a feature wall. Use wood paneling, a bold paint color or wallpaper to draw attention and show off the unique shape of the room.
Preserve Character
Attic rooms often have features that standard bedrooms do not, like angled sky lights, exposed beams or odd pop-outs. Preserve as many of these idiosyncrasies as you can, keeping the character of the room intact. An attic bedroom is often bursting with personality, so let the room speak for itself.
Consider Layout
In most of the following bedrooms, you’ll notice the bed is placed against one of the non-sloped walls. This gives you the most height above your bed and keeps the space from feeling cramped. Use the sloped walls’ awkward recesses for storage, perhaps a low dresser or shelving unit.
Supersized puffs of hydrangea blooms and a dash of hocus-pocus with color-changing petals make this one of the most sought-after flowering shrubs for home landscaping. A University of Tennessee Extension Service study estimates more than 10 million hydrangea plants are sold each year, accounting for more than 13 percent of U.S. shrub sales.
How to Plant and Grow Hydrangea
If you’re ready to jump on the hydrangea bandwagon, these tips will help ensure success.
Climate and Location
Hydrangea can thrive in a wide range of climates from U.S. Department of Agriculture Plant Hardiness Zones 3 to 11, but verify the specifics for the variety you choose.
Make sure you have a location that allows the hydrangea shrub to expand by several feet and reach its top height without blocking walkways or windows. Some are tall plants, growing six to 10 feet wide or tall.
Sun and Shelter
Most hydrangea require at least six hours of sunshine a day. Check the tags for your specific variety. Ideally, most prefer sun in the morning and cooling shade in the afternoon. Plant your hydrangea in a spot where it won’t get battered by branch-snapping winds.
Soil Preparation
If you have a gallon-sized plant, dig a hole about two feet across and one- to two-feet deep, so the soil is nice and loose. Make sure you read the tag for your hydrangea’s height and width. For the best success, add organic matter, such as compost, to the soil to help retain moisture.
How to Care for Hydrangea
Watering
Hydrangea shrubs like to be watered thoroughly at least once a week or more frequently in hotter, drier stretches. If you see leaves start to droop, water right away.
Fertilizing
Pick a good all-around fertilizer and apply in early spring (usually March) when hydrangeas are starting to leaf out. Follow instructions and don’t over-fertilize or you may have more leaves than flowers. Apply fertilizer again in May and July.
Removing Spent Blossoms
With a mophead hydrangea, you can remove the blooms after they’re spent in the summer. This encourages blooms for the next year. For some varieties, such as the Endless Summer line, wait until late winter or early spring to trim the spent flowers.
Pruning
To prune a hydrangea that’s losing its shape or is less prolific in blooms, remove older branches by cutting them close to the ground and giving the shrub some more air circulation. This lets more light reach the younger blooming branches. You can also trim any branches to reshape a shrub that’s getting gangly or lopsided.
Winter Preparation
Mound up leaves or other mulch about eight inches around the shrub after the first frost. If you have a young hydrangea, you can encircle it with a screen or fencing that protects it from nibbling critters. That also allows you to build up a higher level of leaves for better winter insulation. If there’s a sudden cold snap in the fall or spring, you can also cover your shrub with an old sheet to protect it overnight.
How to Get Blue Hydrangea Flowers
Pick the Right Variety
The first step to achieving coveted blue hydrangea blossoms is to make sure you choose a bigleaf variety that will be pink or blue, depending on your soil pH. Look for choices such as Nikko Blue, Blauer Prinz or varieties with the Endless Summer line of hydrangeas.
No matter which color you achieve, hydrangea shrubs add a splash of beautiful blooms — even the cream-colored ones — and raise the curb appeal of your home.
If you’re thinking about building an off-grid second home or cabin as a rustic getaway, you probably don’t expect it to have all the comforts of your primary home. But, living off-grid doesn’t mean you have to give up every modern convenience. A number of different power sources permit you to run basic household appliances without having to connect to a municipal power grid.
Practical power sources for off-grid appliances include:
Gas-powered generator. This power source may be the simplest option, but gas-powered generators are noisy and they smell bad. They also emit carbon monoxide, so make sure there’s no way the fumes can enter your home. And, make sure you don’t run out of gas!
Propane tank. Propane is a good option when renewable sources (like sun or wind) let you down or aren’t viable in your location. If you’ll be relying on propane, you can have a stationary tank installed and filled by a propane delivery service. If you don’t have a stationary tank, you’ll have to haul heavy portable tanks back and forth.
Solar panels. If your cabin is in a spot that gets a lot of sun, solar power might be your solution. The size of the photovoltaic system you need depends on how many kilowatts you require. The initial cost is high but afterward, solar is a green, virtually cost-free solution.
Hydroelectric power. If you’ve got some fast-moving water with sufficient “head” (vertical drop) on your property, you may be able to harness some of that energy to create hydroelectric power — not unlike old-fashioned watermills. Like solar, a hydroelectric system can be a big investment, but it allows you to store energy for when you need it.
Wind turbine. If your rural getaway is in a windy location, a wind turbine system is another green option — although also costly at the outset. According to the U.S. Department of Energy’s website, a turbine needs an average annual wind speed of 9 mph for a turbine to be a practical option for your home. Wind also needs to be “clean” for a turbine to work, with the air moving in a fairly consistent direction. “Dirty wind” moves erratically in multiple directions and doesn’t work well for harnessing electricity.
Solar, hydroelectric and wind-generated power is stored in batteries to which off-grid appliances can be connected.
For many people, a freestanding grill is enough. But if cooking outdoors is your favorite summer activity, a fully equipped outdoor kitchen may be worth the investment. Consider these things when shopping for outdoor kitchen appliances:
Which foods you like to cook;
How much space you have;
How much you want to spend;
Utility access;
How many people you’ll be serving.
There are plenty of splurge-worthy outdoor kitchen appliances to create your dream grilling area. These are some of our top picks.
If you don’t have a lot of floor space next to your bed, this narrow nightstand is the perfect choice. At only about 12 inches wide, you’ll likely be able to squeeze in one or two of these tables, even in the smallest bedroom. And, with its drawer and lower shelf, this tiny bedside table provides bonus storage opportunities.
You may be excited to get your hydroponic garden up and running, but take time to research the different types of hydroponic systems available, how they work and the best plants to grow within each specific system.
“There’s no such thing as knowing too much about the plants you are going to grow,” says The Bumper Crop Times gardening expert Bryan McKenzie. “Your mission is to figure out as many facts about each plant as possible to be able to provide them with enough nutrition, proper humidity and temperature regimes and water pH.”
The National Association of Home Builders (NAHB) has announced that it will be hosting two webinars in May that will seek to educate home builders on the potential ways they can build homes without relying as heavily on lumber products.
The NAHB estimates that the currently inflated price of lumber now adds up to $36,000 to the price of a new home build. With market experts predicting that the lumber price problem will get worse before it gets better, exploring alternatives to lumber may be one of the best ways for home builders to continue building at a sustainable level.
“Home builders are not likely to leave behind traditional “stick-built” homes without good reason,” reads the webinar announcement. “But with lumber prices now adding nearly $36,000 to the price of an average single-family home and with recent advancements in building technology in other areas, certain framing methods at least deserve a look.”
The webinars are free to NAHB members and cost $39.99 for non-members. Here is more information on what exactly each of the two webinar sessions will cover:
“The Business Case for Building With Concrete Forms”
Wednesday, May 5, 2021, 1–2 p.m. ET
This webinar will be centered around insulated concrete forms (ICFs) and how they are quickly becoming one of the most popular alternatives to traditional lumber framing. Praised for their energy efficiency and durability, ICF walls present an intriguing option for any home builders looking to use less lumber in their builds. The webinar will feature insight from a builder and a developer with experience using ICFs as well as a representative from the concrete industry.
“Affordable Lumber Alternatives: Framing with SIPs and Steel”
Wednesday, May 12, 3-4 p.m. ET
The second of the two webinars will take a look at a couple of other alternative framing materials: structural insulated panels (SIPs) and steel frame construction. These two “traditional” house framing methods may not be used as much as they were in the past, but with the current state of lumber prices they are definitely worth revisiting. The webinar will include a look at exactly how framing with SIPs and steel works as well as testimonials from builders who have successfully employed these methods in the past.
DIY home projects aren’t slowing down any time soon. Whether you’re finishing the basement, landscaping the yard or just giving the living room a much needed deep clean after a year spent mostly inside, you need the right tools to do the job right. That’s where HART comes in.
Last year, HART launched their line of affordable DIY-friendly battery-operated power tools and storage solutions at Walmart. And they were just getting started. This week, HART announced they’re slated to add another 100+ tools to their lineup available online and at Walmart stores across the country.
What’s the Deal With HART’s New DIY Tools?
Walmart’s HART line was specifically designed with DIYers in mind, so each tool is designed to be easy to use and versatile. The newly expanded 20 volt system offers a longer run time and optimized performance.
A majority of HART tools run off of a universal 20-volt battery platform, so you can power your string trimmer with the same battery you use to run your drill. The new HART line includes tools from a variety of categories, including power tools, lawn and garden tools, protective gear and accessories — everything from lawnmowers to stick vacuums to glue guns and circular saws.
Prices generally range in the low-triple digits — a steal for power tools and high quality cleaning equipment. And yes, all Hart power tools, lawn and garden and automotive tools are covered by a three-year warranty.
Check out the full line of HART products and see them in action here.
Where Can You Buy HART’s New DIY Tools?
We’ll announce when you can get your hands on the new tools as soon as they hit Walmart’s shelves and website. We know you have a long list of DIY projects to tackle.
An attic can be much more than a dusty storage space. The angled ceilings and often quirky shape of the overall space has endless potential to become a gorgeous and unique bedroom retreat. Here are a few things to keep in mind when decorating your attic bedroom. (Then read on to see beautiful examples of these ideas in action!)
Embrace the Pitch
The signature pitch of an attic room is what makes it such a special space. So highlight the angles of the ceiling with a feature wall. Use wood paneling, a bold paint color or wallpaper to draw attention and show off the unique shape of the room.
Preserve Character
Attic rooms often have features that standard bedrooms do not, like angled sky lights, exposed beams or odd pop-outs. Preserve as many of these idiosyncrasies as you can, keeping the character of the room intact. An attic bedroom is often bursting with personality, so let the room speak for itself.
Consider Layout
In most of the following bedrooms, you’ll notice the bed is placed against one of the non-sloped walls. This gives you the most height above your bed and keeps the space from feeling cramped. Use the sloped walls’ awkward recesses for storage, perhaps a low dresser or shelving unit.
Magnolia trees are ancient, with fossilized specimens as old as 20 million years. They’re so ancient in fact that they predate bees and other winged pollinators and relied on pollination from beetles.
In more recent times, magnolia trees have been valued for their large, fragrant, gorgeous flowers, but also for their culinary and medicinal uses in some cultures. They’re low maintenance, resistant to most pests and diseases and offer year-round beauty. Here’s how to bring these gorgeous flowers to your landscape.
What Is a Magnolia Tree?
Magnolia trees are a genus of over 200 flowering trees that are prized for their large, fragrant and stunning bowl- or star-shaped flowers that bloom sporadically, but prolifically, from mid-March to April. Depending on the specific type of magnolia tree, the flowers can be white, green, yellow, purple or pink, and may not bloom until the tree is at least 15 years old.
Their large, glossy, green leaves also offer aesthetic value, with some types of magnolia trees shedding every fall (deciduous Magnolia trees), while others keep their leaves all year (evergreen Magnolia trees). Both types can grow anywhere between 10 to 100 feet tall, depending on the specific variety.
Where Do Magnolia Trees Thrive?
Most magnolia trees thrive in the hot, south and southeast regions of the United States (USDA Plant Hardiness Zones 7 through 10). However, some types are hardy down to Zone 3, making it possible to find a suitable variety for practically any region. Magnolia trees prefer full sun, but can also tolerate partial shade. They prefer slightly acidic, loose, moist, well-draining soil. Their flowers and branches are fragile and susceptible to wind damage, so they should be sheltered from exposure to strong winds.
How to Care for a Magnolia Tree
Magnolia trees (especially the evergreen varieties) are notoriously trouble-free and low-maintenance, but there are considerations to keep in mind.
Water. Water newly planted trees two to three times per week for the first three to six months. Mature, established trees should be watered once per week. Irrigate with two to three gallons for every inch of trunk diameter.
Mulch. Lay a two- to four-inch layer of mulch around the tree’s base for moisture retention.
Fertilize. Newly planted magnolia trees shouldn’t be fertilized for the first year. After a year, feeding your tree a balanced fertilizer every spring can promote flower production.
How to Prune a Magnolia Tree
Pruning a magnolia tree isn’t required, and some horticulturalists advise against it. Magnolia trees don’t heal from pruning cuts as well as most other trees, and this is especially true of mature magnolia trees. That said, trimming young trees can promote healthy and aesthetic growth. Pruning mature trees mostly consists of removing dead and damaged branches.
It’s best to trim evergreen magnolias in late spring or summer, and deciduous magnolias between midsummer and early fall. Perform the following steps with bypass pruning shears or a pole pruner.
Remove stems or branches growing out of the trunk or around the base of the tree (aka suckers).
Remove dead branches.
Trim back branches that detract from the desired appearance and balance of the canopy.
How to Propagate a Magnolia Tree
Magnolia trees can be propagated from semi-hardwood cuttings. Some common magnolia varieties like the Majestic Beauty are patented, and cannot be legally propagated at home. Before you begin, it’s wise to verify the legality of propagating that specific variety. Begin the propagation process during summer, after the tree’s spring growth has matured.
Fill a small nursery pot with equal parts sand and peat moss.
Soak the peat moss in water and allow excess water to drain out.
Cut a four- to six-inch section, that’s roughly 1/4 inch in diameter at the base, off the tip of a branch from the magnolia tree. Avoid sections with solid green bark because these are not mature enough to propagate.
Scrape the bark off the bottom 1/2 inch of the cutting to expose the cambium layer.
Place the pot in a protected area outside that is lightly shaded and receives morning sun.
Keep the sand and peat moss mixture moist by watering when the top inch feels dry.
After about a month, check for root development by gently tugging on the cutting and feeling for resistance.
After roots have formed, transfer the cutting into a nursery pot filled with potting soil mix and place it in the same protected location. Continue growing in this pot for a full year, until the following fall.
Transplant the cutting into the ground in an area with the ideal environmental conditions.
Magnolia trees are ancient, with fossilized specimens as old as 20 million years. They’re so ancient in fact that they predate bees and other winged pollinators and relied on pollination from beetles.
In more recent times, magnolia trees have been valued for their large, fragrant, gorgeous flowers, but also for their culinary and medicinal uses in some cultures. They’re low maintenance, resistant to most pests and diseases and offer year-round beauty. Here’s how to bring these gorgeous flowers to your landscape.
What Is a Magnolia Tree?
Magnolia trees are a genus of over 200 flowering trees that are prized for their large, fragrant and stunning bowl- or star-shaped flowers that bloom sporadically, but prolifically, from mid-March to April. Depending on the specific type of magnolia tree, the flowers can be white, green, yellow, purple or pink, and may not bloom until the tree is at least 15 years old.
Their large, glossy, green leaves also offer aesthetic value, with some types of magnolia trees shedding every fall (deciduous Magnolia trees), while others keep their leaves all year (evergreen Magnolia trees). Both types can grow anywhere between 10 to 100 feet tall, depending on the specific variety.
Where Do Magnolia Trees Thrive?
Most magnolia trees thrive in the hot, south and southeast regions of the United States (USDA Plant Hardiness Zones 7 through 10). However, some types are hardy down to Zone 3, making it possible to find a suitable variety for practically any region. Magnolia trees prefer full sun, but can also tolerate partial shade. They prefer slightly acidic, loose, moist, well-draining soil. Their flowers and branches are fragile and susceptible to wind damage, so they should be sheltered from exposure to strong winds.
How to Care for a Magnolia Tree
Magnolia trees (especially the evergreen varieties) are notoriously trouble-free and low-maintenance, but there are considerations to keep in mind.
Water. Water newly planted trees two to three times per week for the first three to six months. Mature, established trees should be watered once per week. Irrigate with two to three gallons for every inch of trunk diameter.
Mulch. Lay a two- to four-inch layer of mulch around the tree’s base for moisture retention.
Fertilize. Newly planted magnolia trees shouldn’t be fertilized for the first year. After a year, feeding your tree a balanced fertilizer every spring can promote flower production.
How to Prune a Magnolia Tree
Pruning a magnolia tree isn’t required, and some horticulturalists advise against it. Magnolia trees don’t heal from pruning cuts as well as most other trees, and this is especially true of mature magnolia trees. That said, trimming young trees can promote healthy and aesthetic growth. Pruning mature trees mostly consists of removing dead and damaged branches.
It’s best to trim evergreen magnolias in late spring or summer, and deciduous magnolias between midsummer and early fall. Perform the following steps with bypass pruning shears or a pole pruner.
Remove stems or branches growing out of the trunk or around the base of the tree (aka suckers).
Remove dead branches.
Trim back branches that detract from the desired appearance and balance of the canopy.
How to Propagate a Magnolia Tree
Magnolia trees can be propagated from semi-hardwood cuttings. Some common magnolia varieties like the Majestic Beauty are patented, and cannot be legally propagated at home. Before you begin, it’s wise to verify the legality of propagating that specific variety. Begin the propagation process during summer, after the tree’s spring growth has matured.
Fill a small nursery pot with equal parts sand and peat moss.
Soak the peat moss in water and allow excess water to drain out.
Cut a four- to six-inch section, that’s roughly ¼ inch in diameter at the base, off the tip of a branch from the magnolia tree. Avoid sections with solid green bark because these are not mature enough to propagate.
Scrape the bark off the bottom ½ inch of the cutting to expose the cambium layer.
Place the pot in a protected area outside that is lightly shaded and receives morning sun.
Keep the sand and peat moss mixture moist by watering when the top inch feels dry.
After about a month, check for root development by gently tugging on the cutting and feeling for resistance.
After roots have formed, transfer the cutting into a nursery pot filled with potting soil mix and place it in the same protected location. Continue growing in this pot for a full year, until the following fall.
Transplant the cutting into the ground in an area with the ideal environmental conditions.
When the plants, flowers, fruits and vegetables growing in your garden are healthy and flourishing, that means they’re absorbing enough nutrients from the soil they’re planted in. But that’s just the thing — they’re absorbing nutrients. Most plants need a mix of nitrogen, phosphorus and potassium to thrive and, over time, those nutrients in the soil are depleted. And as soil quality goes, so goes your garden. That’s why many home gardeners choose to add fertilizer to boost the soil’s nutrient content and keep their garden plants looking healthy, year after year.
However, not every fertilizer is right for every plant or climate. Read on for our picks for the best fertilizers for your garden.