Meal Prep Delivery

Tuesday, April 30, 2024

Hack Your Car Top Carrier: Loading Tips and Safety Smarts

Hack Your Car Top Carrier Loading Tips And Safety Smarts Fh16jau 570 13 023 Ksedit Ft

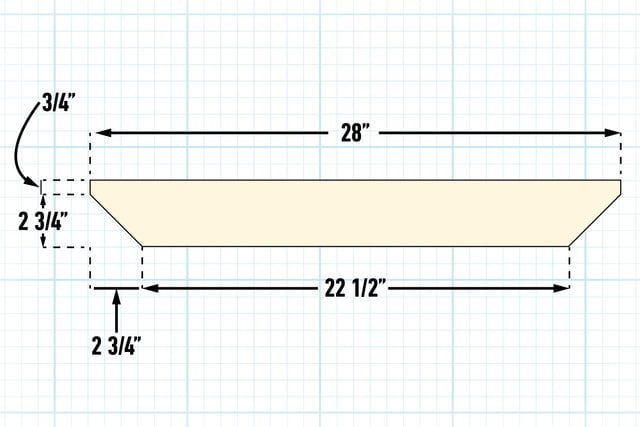
Upgrade a Factory Roof Rack

The roof rack that came with your car may look rugged, but most have a load rating of only 100 lbs., the equivalent of just nine 8-ft. 2×4 studs. If that’s all you plan to haul, you don’t need to modify your factory rack.

But if you plan to haul more than 100 lbs., buy a set of heavy-duty crossbars to retrofit your factory rails. Retrofit crossbars are wider than the factory units, are flat instead of curved, and carry more weight, as much as 200 lbs., depending on the vehicle. The factory roof racks on some cars have convertible crossbar/side rails. If that’s the style you have, just switch them into side rails as shown. Otherwise, remove your factory crossbars and install the new ones on the factory rails.

Install a Removable Roof Rack

Hack Your Car Top Carrier Loading Tips And Safety Smarts Fh16jau 570 13 035 Ksedit

Open all four doors and locate the crossbars and rubber-cushioned feet in the recommended locations. Then swing the locking lever down to secure the clamp to the roof. Lift the front and back crossbars onto the factory side rails. Space them according to the crossbar manufacturer’s instructions. Then secure the feet to the rails using the wrench provided.

If your car doesn’t have a roof rack, you can add one without drilling any holes in your roof. Buy a set of universal crossbars and towers and a set of vehicle-specific clamps to attach it.

The best part about buying universal crossbars is that you can use them on more than one vehicle. Just buy the vehicle-specific clamps and install them in the towers. If you want to leave the crossbars on your car, buy a set of lock cylinders and install the towers to prevent theft. Otherwise, remove the crossbars to increase your gas mileage.

To install the crossbars, just locate them according to the directions that came with the clamps. Adjust the tension screw on the tower, then snap the lever down to lock in place.

How to Safely Load Your Roof Rack

Hack Your Car Top Carrier Loading Tips And Safety Smarts Fh16jau 570 13 025 Ksedit

Many DIYers don’t think about how they’ll secure the load once they get the items onto the roof. So they rely on the free twine provided at checkout. Or they buy inexpensive bungee cords at the store. That’s a big mistake.

A roof rack’s load rating is based on a ‘static load’the weight of the load when the vehicle isn’t moving. But once you hit the road, turn, encounter bumps and dips, or slow down, inertia multiplies the weight of your load by four to five times. So your tie-downs must be strong enough to keep the items from shifting or flying off. You’ll need a minimum of four 14-ft., 1,000-lb.-rated ratchet straps to get your load home safely.

Secure the load to itself

Hack Your Car Top Carrier Loading Tips And Safety Smarts Fh16jau 570 13 027 Ksedit

This three-point tie-down and bundling method may seem like overkill, but it’s really the only safe way to get material home without damage or injury. Start by loading dimensional lumber onto the rack with the narrow edges resting on the crossbars. Then secure the front and back ends of each lumber bundle to prevent movement. Wrap the straps around the lumber bundle at the front and rear. Then tighten until you can’t move the middle pieces.

Hack Your Car Top Carrier Loading Tips And Safety Smarts Fh16jau 570 13 029 Ksedit

Secure the load to the rack

Hack Your Car Top Carrier Loading Tips And Safety Smarts Fh16jau 570 13 034 Ksedit

Hook a ratchet strap to the front bundle strap. Then wrap this strap around both crossbars and tighten. Repeat for the rear end of the bundle.

Open the rear doors and run a ratchet strap over the top of the rack and through the rear seat area of the passenger compartment. Make sure the strap is behind the driver’s headrest and tighten. This important step counteracts the ‘lift’ created by air coming off the windshield and is especially important if you have a factory roof rack that’s held in place only with small rivets.

Tips for Using Your Car Top Carrier

Plan your trips

Overloading a roof rack (even heavier-duty crossbars) is the single biggest hauling mistake DIYers make. So get your shopping list and search the home center’s website and online to find the weight of lumber and other construction materials you intend to haul on your rack. Then plan what you’ll carry on each trip, because big projects will require several trips.

Tape the lighter items

Hack Your Car Top Carrier Loading Tips And Safety Smarts Fh16jau 570 13 032 Ksedit

Start the duct or nylon filament tape about 6 in. back from the end of the bundle and wrap it around to the opposite side. Repeat to cover the end of each item. Then wrap tape tightly around the entire bundle at the front and rear, making sure you cover the pieces of tape applied earlier. Then secure the bundle to the rack with ratchet straps.

Secure the overhang

Hack Your Car Top Carrier Loading Tips And Safety Smarts Fh16jau 570 13 038 Ksedit

If your load extends over the hood of the car, secure it with hood loops and cinch straps. Pop the hood and drop in temporary hood straps. Or mount the straps permanently under a fender bolt. Run a rope or cinch strap through them and over and around the leading edge of the overhanging load. Snug the cinch strap just enough to prevent upward movement, but not enough to bend the hood.

Fhm Grid Hack Your Car Top Carrier Loading Tips And Safety Smarts Fh16jau 570 13 039 Ksedit

Roof rack safety tips

  • Special items require special rack attachments. Contact the rack manufacturer to buy attachments for bikes, boats and camping gear. Never jury-rig those items to a standard roof rack.
  • Roof loads change the dynamics of your vehicle, and the extra weight increases stopping distances. So stay off the highway whenever possible, drive slower, brake sooner and make wider, slower turns.
  • Pay attention to overhead clearances, especially when entering your garage.
  • Sometimes it’s just notworth it to haul it yourself. Heavy-duty crossbars, add-on racks and ratchet straps often cost more than the store charges for a delivery right to your door, especially when you add in the risk factor!
  • Never connect hooks, rope or straps to a bumper or fenderwell. A shift in weight can crack the plastic, scrape the paint or bend the body panels, costing hundreds to repair.
  • A bare roof can’t carry a load because it can’t distribute the weight out to the pillars and door frames. If you place a load on a bare roof, you’ll damage it.
  • Never haul sheet goods or mattresses. The huge surface area can create enough lift to rip the entire rack off your vehicle.


Article source here: Hack Your Car Top Carrier: Loading Tips and Safety Smarts

9 Simple Kitchen Cabinet Repairs You Can DIY

Adjusting Hinges On Misaligned Doors

Adjust Hinges on Misaligned Doors

When it comes to kitchen cabinet repair, hinges are a common issue. Euro hinges are designed for easy adjustment. If the door isnt flush with the doors next to it, adjust the depth screw. This screw moves the door in or out. Some depth screws move the door as you turn them.

But with most, you have to loosen the screw, nudge the door in or out and then tighten the screw. If your hinges dont have depth screws, start with the side screws. These move the door from side to side. In some cases, you have to loosen the depth screw slightly to adjust the side screw.

Leveling Misaligned Doors

If the door is flush and parallel with other doors but too high or low, use the mounting screws to raise or lower the mounting plates. Loosen the screws at both hinges, slide the door up or down and tighten the screws. Some mounting plates adjust by turning a single screw. Check the fit of the door after each adjustment. With double doors like these, perfect the fit of one door first, then align the other door.


Article source here: 9 Simple Kitchen Cabinet Repairs You Can DIY

Monday, April 29, 2024

How to Choose Carpet

Shopping for carpet is a lot like shopping for a car. It involves a huge financial investment; all the different types of carpet, styles, colors and brands can make your head spin; and you often end up dealing with high-pressure salespeople. The experience can be so overwhelming that its tempting to shop with only a basic color and style in mind and rely on salespeople for recommendations.

Carpeting is one of the largest investments youll make in your home. By doing some basic homework, comparison shopping and working with a reputable retailer, youll be able to understand the types of carpet that will work best for your home and buy carpeting that fits your needsand gives you confidence that youre getting a quality product for a good price.

Here, we’ll give you basic background information on several types of carpet and carpet styles. We’ll go over how to look for quality and discuss the primary things to think about when youre shopping for new carpeting.

Editor’s Note: Were going to focus on synthetic fibers in this article. Natural fibers like wool are gorgeous, but theyre out of most peoples price range.

Types of Carpet

Nylon

Nylon

It outperforms all other fibers in durability, resilience and easy maintenance. This is a good choice if you want your carpet to last a decade or longer, for high-traffic areas, and in homes with kids and pets. Higher quality nylon fibers are branded, and the carpet label will use terms like 100% Mohawk Nylon or 100% Stainmaster Tactesse. Lower-quality, unbranded nylon fibers are listed simply as 100% nylon. The strongest and softest type (and most expensive) is 6.6 nylon. Nylon carpet cost is $10 to $45 per sq. yd.

Triexta

Triexta

It is a newly classified fiber derived partly from corn sugar. It has excellent, permanent anti-stain properties (nylon must be treated with stain protectors over its life span). It also has good resilience, but its too soon to tell whether it will match the durability of nylon in high-traffic areas. Because of its superior stain resistance, this is a good choice if you have young kids or pets. Triexta carpet cost is $20 to $45 per sq. yd.

Polyester

Polyester

Also called PET, polyester is stain resistant, very soft and luxurious underfoot, and is available in deep and vibrant colors. However its harder to clean, tends to shed and isnt as durable as nylon. Its best used in low-traffic areas (like bedrooms) and in households without kids or pets. A nice, cushy choice if you like to exercise on the carpet. Polyester carpet cost is $8 to $18 per sq. yd.

Olefin

Olefin

It is an attractive, inexpensive fiber thats strong and resists fading, but its not as resilient as nylon. Its most often made into a looped Berber with a nubby weave that conceals dirt. It has good stain, static and mildew resistance. Olefin carpeting is often selected for high-traffic clean areas such as family rooms and play areas. Olefin carpet costs $8 to $25 per sq. yd.

Common Carpet Styles

Saxony

Saxony

Also called velvet or plush, it is a cut pile that works well in formal dining rooms, living rooms and bedrooms. It shows footprints and vacuum marks and is not a good choice for high-traffic areas and active kids. The basic grade lasts about five years.

Textured

Textured

Textured cut pile has more than one color of yarn and varying tuft heights. Its two-toned appearance hides dirt and reduces footprints and vacuum marks, making it one of the best types of carpet for active lifestyles. It’s similar to Saxony in life expectancy and cost.

Frieze

Frieze

Frieze (“fri-zay”) is the most durable and most expensive of the three cut pile styles. Its tightly twisted tufts give the surface a nubby texture that covers footprints. It wears better than Saxony and textured, can be used in heavy traffic areas and can last 20 years or more if well maintained.

Sculptured

Sculptured

Sculptured, or cut-and-loop, made with looped and non-looped tufts, is economical and durable. The varied shading hides dirt well, but the seams can be more visible. Prices for sculptured carpet start at about $6 per sq. yd. for 26- to 30-oz. face weight. Price and durability increase with higher face-weight yarns.

Looped or Berber

Looped Or Berber

Looped or Berber is popular for its elegant appearance. Berbers with smaller loops wear better than large-looped Berbers, which mat down quickly and are harder to clean. Not good if you have small children or pets (toys and claws) because they snag and run easily and are tough to repair.

Quality Carpet Signs

Quality Carpet Signs

A salesperson might tell you that certain types of carpet are a good deal, but dont rely on his or her word alone. Check the label, handle the carpet and ask the salesperson about these signs of quality.

At least a 34- to 40-oz. face weight

This is the number of ounces of fiber per square yard. The range is generally from 20 to 80, and the higher the number, the heavier and more resilient the carpet.

A tuft twist of 5 or higher

Twist is the number of times the tufts are twisted together in a 1-in. length. The higher the number, the more durable the carpet.

A density rating of 2,000 or more

Density is determined by the thickness of the fibers and how tightly packed they are. The thicker and heavier they are, the better quality the carpet and the less susceptible to crushing. Bend the carpet sample backward. If you can see the backing easily, its a low-density (lower quality) carpet.

Is it BCF or staple fiber construction? Carpet fibers can be either Bulked Continuous Filament (BCF) or staple. Staple fibers shed more than BCF fibers. This doesnt affect the long-term quality of the carpet, but it does mean youll have to vacuum more often until the initial shedding stops (which can take up to a year), and it can also be an issue for allergy sufferers.

At least a 10-year texture retention warranty. This covers how well the fibers return to their original shape after being walked on. Although manufacturers tout their 15- and 25-year warranties, salespeople caution that warranties are seldom honored except in cases of obvious product defects.

How to Get the Best Deal

Salespeople have a tendency to overmeasure your carpet needs. This means you pay for carpet and pad you dont use. Get several estimates, compare the yardage numbers, and consider paying an independent carpet installer to measure your home.

A lot of carpet problems stem from poor installation. Bad seaming, a too-thin pad and inadequate stretching can make a carpet look terrible within a few years. If you or a friend knows a great carpet installer, use that person instead of one provided by the carpet dealer. The installer will measure your house, tell you exactly how much carpet and pad to get, recommend a quality dealer, and pick up the carpet and deliver it on installation day. You can save yourself some money on the installation by removing the old carpet and pad yourself. Ask your installer how much youll save to see if its worthwhile.

Get at least three estimates before settling on the types of carpet that will work best for you. Tell every salesperson that youll be getting several estimates, and dont discuss details about other carpet bids youve received.

Have each carpet estimate include a flooring diagram that shows measurements and seam locations.

Get an individual price quote for each aspect of the job, including carpet, pad, delivery, installation, transition metal pieces, furniture moving, stairs, and old carpet and pad removal and disposal. Its easy to be overcharged if you just get an overall price for the job.

Make sure youre home on installation day. Get a sample of the carpet and pad youve ordered and compare them with the carpet and pad that show up on the truck. In some instances, retailers deliver a lower quality pad or carpet than youve paid for.

Buy the Right Carpet Pad

The quality of carpet pad is determined by density, not thickness. The right pad will extend the life of your carpet. The wrong pad can cut the life of your carpet in half. A good-quality pad will be 3/8 to 1/2 in. thick and have a density/weight rating of at least 6 lbs. (the residential standard). In most cases, cheap, low-density pad will only last a few years before it needs to be replaced. For high-traffic areas, get a thinner pad with a density of 8 lbs. or more.

Some carpet manufacturers require a specific type of pad in order to maintain your carpet warranty (such as when the carpet is laid over heated floors). Check the carpet warranty before you buy padding.

DIY vs Professional Carpet Installation

DIY carpet installation offers a cost-effective approach for those adept at home improvement, fostering a sense of accomplishment and customization. However, it demands meticulous attention to detail and a willingness to invest time in preparation and execution. Conversely, professional installation ensures expertise and efficiency, sparing homeowners from potential errors and ensuring optimal longevity and appearance.

While DIY projects can save money, they may lack the finesse and warranty that professionals provide, making the choice between the two dependent on individual skill level, time constraints, and desired outcome.


Article source here: How to Choose Carpet

Here Are All The Quick, Easy DIY Projects Featured on “Saturday Morning Projects”

outdoor brick pizza oven

Build a Brick Pizza Oven

Make artisan pizzas and more right in your backyard with this brick pizza oven project that takes about one week to complete.


Article source here: Here Are All The Quick, Easy DIY Projects Featured on “Saturday Morning Projects”

Friday, April 26, 2024

How to Make a DIY Indoor Herb Garden

Cut all pieces ofwood

Cut the wood for the base (A), sides (B), top cap (C), front and back top faces (D)andpot supports (E). All the components are straightforward, square cuts on the miter saw,exceptthe front and back top faces (D)that havea miter cut on each end.

Cut All Pieces Ofwood


Article source here: How to Make a DIY Indoor Herb Garden

Thursday, April 25, 2024

I Tried BruMate’s MagPack—And It’s the Best Soft Cooler I’ve Tested

Weve tested a range of coolers, comparing the classic Yeti Roadie vs the Oyster Tempo and rounding up our all-time best coolers for camping. Now, weve tested the newest lightweight, soft cooler from BruMate, one of our favorite cooler brands.

To cut to the chase, we love that the new BruMate MagPack Soft Cooler is made for easy carrying and travel. You can pack it in the backseat of your car or sling it over your shoulder for cold refreshments wherever, whenever. Above all, we love its second-to-none ice retention abilities. This sleek, portable cooler will be your favorite cooling accessory for sporting events, springtime picnics and day trips.

What is the BruMate MagPack Soft Cooler?

I Tried Brumates Magpackits The Best Soft Cooler Ive Tested Ssedit A

Made for on-the-go adventures, the new MagPack Soft Cooler from BruMate is lightweight, durable, leakproof and insulated to keep things cold for days. It has a magnetic lid to seal in the cold instead of a cumbersome zipper top, and its soft outer shell is waterproof and punctureproof. This small but mighty cooler keeps things cold for24 hours and sometimes longer.

Each cooler has straps and handles for easy carrying and waterproof pockets for storing a few essential items when needed. The tough insulated lining is antimicrobial, so your drinks stay cold and fresh (free of mold and mildew).

The BruMate MagPack Cooler comes in three sizes and four colorways. Keep reading for all the specs and features.

I Tried It

BruMate MagPack Soft Cooler

A sleek, ultra-portable soft cooler with maximum ice retention

BruMate MagPack Soft Cooler Features

I Tried Brumates Magpackits The Best Soft Cooler Ive Tested A

The BruMate MagPack comes in three sizes: 12-can, 18-can and 24-can. The two smaller sizes have shoulder straps, while the largest size is designed as a backpack. Each size is available in four contemporary colors: graphite, lilac, sage and nightfall blue. The largest weighs under eight pounds, and the smallest weighs six pounds.

We tested the smallest cooler in lilac. The interior of the 12-can cooler is 8-1/2 inches tall, 11 inches wide and 6-1/4 inches long. Outside, the mini cooler is 13-1/2 inches wide, 9 inches long and 11-1/2 inches tall.

The smallest 12-can cooler fits most of my daily needs. It can fit, as it says, 12 standard 12-ounce cans with ice, 8 pounds of ice only or two bottles of wine and liquor plus ice. Itll hold multiple drinks and a large meal for a long workday or overnight shift.

How We Tested It

I Tried Brumates Magpackits The Best Soft Cooler Ive Tested Ssedit

I tested the BruMate MagPack for several months before writing this review. Off the bat, I noticed the cooler is beautiful. It looks and feels like its made of quality materials and performs like it, too. Its incredibly durable, easy to carry and well-insulated (cold cans alone will keep their temperature, even without ice). I love the lilac and sage colorsthe lilac is even prettier in person than online.

I used the cooler to carry evening drinks to gatherings with friends, my partner used it to pack his lunch for the workday, and as a new mom, I even used it to carry milk for the baby when we had to spend whole and half days going to appointments. Its excellent because its lightweight and keeps things dependably cold. Should there be a spill, it will be contained within the coolers leakproof seal. Plus, the inside is made of hard, BPA-free plastic, and the soft interior lining is easy to wipe clean.

Regarding storage space, I found that you can fit 12 cans snuggly with ice packs by lining four cans along the bottom and stacking two more rows of cans on top. Taller cans (larger than 12 ounces) must be turned the other way, but they fit in the smallest MagPack cooler. Standard wine bottles also fit; I could pack three in the smallest cooler. However, taller wine bottles do not fit in the 12-can cooler.

When keeping things cold, I prefer coolers with ice packs instead of real, meltable ice. With quality ice packs, I found the cooler keeps items cold all day long. With enough ice packs, packed items stayed cold overnight and well into the following day. To be safe, after 24-36 hours (depending on the coolers internal and external environments), I recommend repacking this cooler if what youre carrying needs to be preserved at freezing temperatures.

To put this coolers ice retention into perspective, most soft coolers cant last two days before their inner contents become lukewarm or soggy. With this cooler, drinks remained cold past the 48-hour mark. It has a similar ice retention rate to Yetis Hopper.

I only found two issues with the cooler while I was using it. For a cooler of this quality and price, I would expect it to come with its reusable ice packs. However, BruMate sells its signature Black Ice separately, but I did not have those to test the cooler. To get the most out of your BruMate cooler, Id recommend buying the brands reusable ice packs. However, they do come at a relatively high price.

The second issue I had with the cooler is minor. I found that the lid handle isnt easy to open. It latches well (you can hear it clicking into place when sealed shut). Sometimes, however, it takes me a few squeezes to get the lid to unlatch and open. Again, this is minor and only delays opening by a few seconds, but as a parent to a newborn, those few seconds can be crucial, so I think its worth mentioning.

Pros

  • Well-made and durable, holds shape
  • Can keep ice for 24+ hours
  • Leakproof and waterproof
  • Stylish
  • Lightweight
  • Adjustable and removable carrying strap
  • Side handles
  • UPF coating
  • Puncture-resistant
  • Easy to clean
  • BPA, BPS and BPF free
  • Limited 5-year warranty

Cons

  • Can be awkward to open
  • Doesnt come with reusable ice packs
  • Storage pockets are small

Final Verdict

We recommend the BruMate MagPack if youre shopping for a soft cooler with the best ice retention. It is expensive and can be tricky to open, but it also holds ice just as long (if not longer) than competitor brands like Yeti. Its also incredibly durable. The MagPack survived many drops and throws into the backseat of the car during testing without a scratch or dent. If you want the best soft cooler to keep things cold, this one is it.

Where to Buy BruMate MagPack Soft Cooler

I Tried It

BruMate MagPack Soft Cooler

A soft cooler with maximum cooling powers made for on-the-go adventures

You can shop the BruMate MagPack Soft Cooler directly from BruMate and on Amazon. The 12-can cooler retails for $200, the 18-can for $250 and the 24-can for $275. FYI: BruMate frequently runs sales and deals, and you can score 10% off your first order by signing up for emails. Snag one now in time for Mothers Day!


Article source here: I Tried BruMate’s MagPack—And It’s the Best Soft Cooler I’ve Tested

8 Ideas for Building a DIY Flagstone Patio

Fire Pit Flagstone Patio

Fire Pit Flagstone Patio

Flagstone comes in various colors, and the hues in the stone depend upon the area of the country where it was quarried. This fire pit from @cascapes_landworks was made with Mahogany Blue Brown flagstone that has a gorgeous combination of blues, grays and browns on each piece.

What We Like About It: The perfect layout of stones. I use three-way joints, meaning no more than three stones are fit together,” says Taube. “This forms consistently irregular series of Y’s and T’s in the joinery pattern. That visual repetition is very important for looks, but it’s also easier to level.”


Article source here: 8 Ideas for Building a DIY Flagstone Patio

Patio vs. Porch: What’s the Difference?

Patio and Porch in split screen

Most of my homes out west have included a large outdoor living space in the backyard perfect for barbecues, fire pits and social gatherings. But when I moved to Florida, where mosquitoes and rainstorms are prevalent, I soon came to appreciate the perks of fresh air combined with greater weather and pest protection.

If you’re trying to decide whether to build a porch vs. a patio, here’s how to figure out which is right for your home.

What is a Porch?

front porch of yellow house with American flag in summer

By definition, porches are architectural structures connected directly to a home and accessible through a door. They are almost always covered by a roof and often located at the front of the house, with stairs leading down to ground level. Sometimes, they are also enclosed with screens or windows.

“Most have wood floors, though concrete floors are not unheard of,” says Rafi Friedman, the president of Coastal Luxury Outdoors. “These can be anything from a small shelter over your door all the way up to large outdoor living spaces that wrap around your home.”

How Much Does a Porch Cost to Build?

The cost of building a porch varies depending on the location, size, intricacy of features and how it attaches to your house. But nationwide, the average 200-square-foot porch runs around $14,500, according to Angi’s statistics.

“For a small porch under 100 square feet, without many features, it can cost about $4,500,” says Angie Hicks, cofounder of Angi. “For a larger 600-square-foot wraparound porch with features like lighting, heaters, fans and other elements it could cost up to $90,000.”

Porch Pros and Cons

Pros

“A porch is a great way to expand the space of your home,” says Hicks. “It can provide a relaxing, sheltered outdoor space that can be great for sitting out and enjoying a cup of coffee, even in the rain.”

Other benefits of porches include:

  • Curb appeal
  • Protecting outdoor furniture from the elements
  • Psychological and health benefits from being outdoors
  • Screens to protect from insects

“Porches are ideal for small, intimate gatherings and sitting quietly to watch the world go by,” says Friedman.

Cons

“Perhaps the most expensive part of building a porch is extending the roof out to cover it,” says Friedman. “This requires modifications to your home and specialized contractors to make sure the work is done correctly.”

Other cons of porches include:

  • More expensive than patios
  • More permit-intensive than patios
  • Can be difficult to install
  • Not safe for fire pits and fireplaces
  • Cramped for larger gatherings and parties

“With a porch, it’s important to understand its limitations,” says Hicks. “Many people might add a porch thinking it can provide more entertaining space, but it is generally a smaller space that can’t accommodate larger groups, so is a bit more difficult for entertaining.”

What is a Patio?

Outdoor Garden Patio With Garden Furnitures, Coffee Table, Parasol And Plants

Different from a porch, a patio is a freestanding structure built next to your home, such as a concrete pad. They are often located in the backyard and are simpler than porches, with minimal railing, covering and other structures.

“They can be made of pavers, flagstones or gravel, but concrete is by far the most common material choice,” says Friedman. “They’re large, open, flexible spaces that are good for everything from lounging, dining and grilling to quiet nights around the fire and a play space for kids.”

How Much Does a Patio Cost to Build?

Again, it varies according to size, materials, complexity, and whether you need to remove an existing patio or deck. However, the average price is around $4,000, according to Angi’s statistics.

“A good cost estimate for patios is around $15 to $25 per square foot, including labor and materials,” says Friedman. “So a 400-square-foot patio would cost around $8,000.”

Patio Pros and Cons

Pros

“Patios are a great way to entertain large groups of guests,” says Hicks. “They’re great places to set up tables and chairs, a movie projector or anything else you might dream up.”

Other benefits of patios include:

  • Less maintenance than decks and porches
  • More affordable
  • Easier to install
  • More open feeling
  • More flexible use

Cons

  • Don’t protect from weather
  • Don’t protect from outdoor pests
  • Accumulate dust and dirt faster
  • Need more maintenance

“You’ll also need to do more accessorizing of your patio,” says Friedman. “Furniture, umbrellas, fire pits and grills can quickly add to the cost of your project.”

Porch vs. Patio: Which is Right for My Home?

Choosing between a porch vs. patio all comes down to what you want to do with the space. If you want a more intimate place to get fresh air that’s protected from bugs and weather, a porch is your go-to solution. But if want to entertain larger groups of people, or your budget is smaller, then a patio is the better option.

FAQ

What are the most common types of porches?

  • Portico: a covered porch or walkway leading to an entrance of a building, often with support columns.
  • Sunroom: a closed porch, usually enclosed by glass or plastic panels.
  • Wraparound porch: a porch that wraps around multiple sides of a home, with doors accessing it from various rooms.
  • Veranda: an open-air space protected by a roof and usually partly enclosed by a railing; common in the south, especially New Orleans.
  • Back porch: an extension of the house into the backyard, sometimes connecting a kitchen to the backyard.

What are the most common types of patios?

“The thing that differentiates patios the most is the material used to build them,” says Hicks. The most common patio materials include:

  • Concrete
  • Brick pavers
  • Gravel
  • Natural stone or flagstone
  • Permeable pavers

About the Experts

Angie Hicks is cofounder of Angi (formerly Angie’s List), where she also works as the Chief Customer Officer. Through her roles there, she’s helped guide people through home maintenance decisions for more than 25 years.

Rafi Friedman is president of Coastal Luxury Outdoors, in Jacksonville, Florida. He and his team have a collective 100 years of experience building backyard living spaces, including more than 100 pools annually.


Article source here: Patio vs. Porch: What’s the Difference?

Wednesday, April 24, 2024

5 Best Dishwasher Brands to Invest In, According to Experts

Pros:

  • Highly-rated and reliable dishwasher
  • Energy efficient
  • CrystalDry function won't melt plastics
  • Two handle options

Cons:

  • One-year warranty

Along with being recommended by every appliance expert we spoke to, Bosch was also the top brand in a Consumer Reports survey of more than 75,000 people, according to consumer trends analyst Nguyen Huy.

“Bosch emerged as a leader, earning top marks for predicted reliability over five years,” Huy says. “This aligns with Bosch’s reputation for quality engineering and thoughtful design.”

Drew Hamblan has used several appliance brands in new builds and renovations and says Bosch offers the best value due to their reliability.

“Bosch models, particularly those in the 800 Series, provide an excellent user experience with features like quiet operation, energy efficiency and advanced drying technologies that employ Zeolith (a chemical compound) for perfect, spotless results,” Hamblan says. “These dishwashers are designed to fit seamlessly into any kitchen design, from traditional to modern, without being a distraction.”

The Bosch 800 series is a 24-inch dishwasher available with a pocket or bar handle, comes with a third rack for utensils and has five wash cycle settings. Here’s how to get the most out of your dishwasher.


Article source here: 5 Best Dishwasher Brands to Invest In, According to Experts

Monday, April 22, 2024

12 Drop Ceiling Installation Tips from a Pro

Fhm Grid 12 Drop Ceiling Installation Tips From A Pro Fh12jun 529 10 T01 Ksedit

Lay Out the Ceiling Grid on Paper

Even the pros use graph paper to lay out the ceiling grid for each room. It helps not only with your materials list but also with getting equal-sized panels at each side of the room. Include items like light fixtures and heat registers. The room should be bisected at the center by either a main tee or a centered row of ceiling tiles. Wades tip on ordering materials: order by even numbers. If a room is 9 x 11 ft., order enough for a 10 x 12-ft. room.


Article source here: 12 Drop Ceiling Installation Tips from a Pro

Friday, April 19, 2024

8 Patio Extension Ideas for Outdoor Living

Covered Patio Extension

Covered Patio Extension

This gorgeous patio extension by @jstreeservicetx involved a bigger patio and a roof extension, creating a seamless transition between the indoor and outdoor living spaces. The planked ceiling and columns and made of sustainable cedar; and is big enough to house a sitting area and outdoor kitchen.

What We Like About It: The covered design and sustainable materials promote a cozy gathering space while letting in loads of natural light and preserving the connection to nature.


Article source here: 8 Patio Extension Ideas for Outdoor Living

Thursday, April 18, 2024

7 Indoor Garden Ideas To Elevate Your Home

View this post on Instagram

A post shared by Hatty Parker (@hatty_parker)

Wall Garden

Transform a blank wall into an indoor herb garden like @ht_creative with wall-mounted rails and containers. Make sure the wall gets plenty of sunlight before installing your garden. What’s great about this herb garden is how it’s completely customizable. If you want a larger garden, keep stacking on more rails the plants can be rearranged on the rails as needed.

What we like: “I love creating wall gardens and vertical growing setups as space-saving solutions,” says Eichhorn.


Article source here: 7 Indoor Garden Ideas To Elevate Your Home

Tuesday, April 16, 2024

The Best Snow Blowers to Get You Through Winter

Best Overall Snow Blower

EGO 24 XP Cordless Snow Blower

Pros:

  • Sturdy construction
  • Quiet
  • No gas, oil or hard starts
  • Long throwing distance

Cons:

  • Expensive
  • Overkill for some users

The EGO 24″ XP cordless snow blower is my new bestie for snow blowing. As a long-time fan of powerful, gasoline-powered snow blowers, Ive been constantly amazed by the power produced by battery-powered machinesparticularly snow blowers that require an enormous amount of power. The Ego delivers the kind of power found in a gasoline-powered snow blower.

This machine comes with a variety of batteries but two 56v, 10Ah are standard. A rapid charger gets you quickly to your task. Variable speed forward and reverse are accessed from the handle. Headlights on the deck and handle allow you to see what you’re doing and allow you to be seen.

To hear more, check out my full review of the EGO 24″ XP here.


Article source here: The Best Snow Blowers to Get You Through Winter

Monday, April 15, 2024

Can Paint Freeze? Here’s What to Know

Every spring, an annual ritual is re-enacted in garages and sheds all across America: the opening of old paint cans. You may have lived through this before gingerly pulling the top off an old paint can and peering inside, hoping it’s still usable. These days, it’s often accompanied by frantic internet searches for “Can paint freeze?”

But we’ve got you covered! Here’s the lowdown on whether paint freezes, what kinds of paint are most vulnerable to freezing, and how to deal with frozen paint.

Can Paint Freeze?

The short answer is yes. The more nuanced answer is that it depends on the paint, and how cold it gets inside your garage.

Home paints can generally be divided into latex or oil-based paints. Latex paints contain water, while oil paints contain an alkyd resin and a petroleum product, such as naphtha. These two types of paint react very differently to cold weather.

“For the most part DIYers only really need to worry about water-based paint freezing,” says Brandon Walker, Superintendent with ASAP Restoration. “Oil-based paint will freeze, but only in extreme conditions like the Alaskan tundra during winter.”

At What Temperature Does Paint Freeze?

Water-based paints freeze at or below 32F. The specific temperature at which a given paint will freeze will depend on the ingredients of the paint. A water-based paint’s blend of ingredients can lower its freezing point in the same way salt lowers water’s freezing point. It’s not a dramatic change, but it can give you a little leeway in a mild cold snap.

Oil-based paint is extremely unlikely to freeze in your garage. Unlike oil-based craft paint (which often uses a linseed oil base, and freezes around -4F), oil-based house paints can withstand almost any recorded temperature in the continental US.

Does Paint Get Ruined if It Freezes?

In almost all cases, yes, paint does get ruined if it freezes.

“All paint will be denatured if it freezes,” says Walker. “When water-based paint freezes it ruins the texture and consistency of the paint. This means that even when it thaws out again, it won’t work the way it did before the freeze occurred. It’s a lot like freezing milk when it thaws out, you have milky water, and a lot of clumps that don’t look right. Paint will do the same thing.”

Making things worse is that the paint will likely go through many freeze/thaw cycles over the course of a winter. The best way to deal with frozen paint is to keep it from freezing in the first place.

How To Keep Paint From Freezing

The easiest way to keep paint from freezing is to store your paint inside, or in a temperature-controlled garage.

The pros I spoke with suggested taking a few simple steps, such as fully closing the lid to prevent evaporation and storing paint in a temperature-controlled room such as a basement or closet, to avoid freezing.

“We always recommend inside the house and never in the garage or a storage shed unless they are heated,” says Anthony Kulikowski, Franchise Owner of Five Star Painting of South Bend Indiana.

Can You Use Paint That Has Frozen?

First and foremost, it’s important to emphasize that most paint that has frozen will be ruined. “Frozen paint will be denatured and clumpy even after it thaws,” says Walker, who compares thawed paint to “applying cottage cheese to your walls. If you don’t mind bubbles, inconsistencies, and defects, then it’ll work but not look good.”

In other words, nothing’s stopping you if you want to take the chance on frozen paint, just know that you’re risking quality. If you want to roll the dice, allow the paint to warm up to room temperature slowly, then stir it well. If it looks like cottage cheese, it’s a loss, and you should dispose of it properly. If the paint color and consistency appear normal, you can give it a try.

Even then, it may not perform as expected. “Once a paint has frozen,” cautions Kulikowski, “the color and sheen may not match any longer, and you may have issues with getting it to bond properly as well.”

In short, if you don’t want to throw away your thawed paint, it’s best to use it on projects where appearance and durability aren’t as important.

FAQ

Are there any types of paint that won’t freeze?

Oil-based paints are very unlikely to freeze. However, do get thicker (more viscous) and are often unusable in freezing conditions. “When oil-based paint gets too cold,” explains Walker, “the viscosity of the paint is affected, and it starts to run more like molasses than syrup. Additionally, there are temperature ranges in which paint dries and cures.”

Does wood stain freeze, too?

Absolutely, says Scott Paul, Owner of DeckStainHelp.com. He advises looking for the following signs that your wood stain has gone bad: “excessive thickening, jelling/clumping of the material or skinning on the top portion.”

About the Experts

Anthony Kulikowski has been a painter since high school, working as a contractor just before opening Five Star Painting, a Neighborly company, in 2017. He loves seeing his team succeed, giving back to the community, and working with his mentors, gathering knowledge he can share with future franchise owners.

Brandon Walker has been in the painting and construction industry for more than 20 years. After running his own company, he decided to advance his skills as a Superintendent with ASAP Restoration. Brandon cut his teeth as a teenage painter working for Walker Paint Masters doing commercial projects for Planet Hollywood and Elizabeth Arden’s Red Door Spa among others.

Scott Paul has used and sold enough decking and wood stain to cover over 100 million square feet. The owner of DeckStainHelp.com, he started his first decking company in 1993. That business evolved into exterior wood and deck restoration, and today Scott and his companies have restored over 10,000 decks in the Metro Detroit area. He is an authority in the deck restoration industry and has contributed to numerous wood restoration forums and informative sites.


Article source here: Can Paint Freeze? Here’s What to Know

Thursday, April 11, 2024

What Is the Cost of a Home Security System?

Walking into your home after a long day should bring a sigh of relief. Kick your feet up! You’re home. But opening the door to find the aftermath of a break-in? There’s nothing more unsettling. Increasing your home security is a great way to keep intruders out. But how? There are a lot of choices out there.

“Before diving into home security considerations, it’s essential to identify your primary concern: safeguarding your property when you’re at home, or protecting it when you’re away,” says Kirk MacDowell, home security expert at Batten, a company that advises consumers on security needs. Do you have young children? Multiple access points? Valuable tools or art? And what about the cost of home security systems? Can that play a role?

Of course, it can and it should. Ahead, we explore home security with MacDowell and ADT expert Andrea Barge to help you navigate your options.

How Much Does a Home Security System Cost?

It depends on several factors, including the size of your home, the number of windows and doors you need to protect, and whether you get cameras and specialized sensors. “I’d estimate the cost at roughly $1 per square foot,” MacDowell says, so for a 2,000 square foot house, plan to spend “around $2000 for a comprehensive system, although costs can vary.”

Barge agrees that costs are variable, and points to ADT’s starter kit, with a hub, two sensors, app access and a Google Nest doorbell for under $400. “The pricing of security system installations can vary significantly, largely depending on the type of installation and the specific features or packages you choose,” Barge says.

Home Security System Cost Breakdown

The devil’s in the details, and security systems are no different. Here’s a breakdown of average costs, according to our experts and SafeWise’s research of national companies (in parentheses, rounded to the nearest dollar).

  • Equipment: In addition to the hub, which is generally included, you can get contact sensors ($28), motion detectors ($40), glass-break sensors ($62), indoor/outdoor cameras ($164/$174) and video doorbells ($168). Packages may incorporate all or some of this equipment in a single fee.
  • Installation: “While many national security companies offer free installation, there are some that charge, with costs typically ranging from $100 to $400,” Barge says.
  • Monitoring: Self-monitoring ($24) costs less than live monitoring ($43), per month, according to Safewise.
  • Permits: Some cities, like Dallas, where I live, require you to get a permit if your alarm could trigger a police call or be heard by neighbors. This fee helps offset nuisance alarm calls.

If you have a smaller budget, it’s still possible to get a good security system. MacDowell says “the absolute must-haves would be safeguarding doors and windows against intrusion, along with potentially incorporating at least one camera for added surveillance.”

Types of Home Security Systems

Cost isn’t your only consideration when it comes to choosing a home security system. Another choice? Wired or wireless. “You can still get either a hard-wired or wireless system, depending on your preference though both types have their advantages and disadvantages,” Barge says.

Wired Home Security Systems

Wired systems have fewer components, which reduces complexity, Barge says. Wired systems are also “less prone to power depletion, not as susceptible to electrical interference, and video recording persists even during internet disruptions,” Barge says. They’re reliable and permanent.

But, wired systems are harder to install, and they demand precise execution, MacDowell says: “This entails drilling holes, extensive wiring and meticulous installation procedures.” Unless you’re a dedicated DIYer, this may be a hurdle.

Wireless Home Security Systems

Barge points to many benefits of wireless security systems: portability, battery operation, firmware upgrades and seamless integration with other smart home devices.

Hybrid Home Security Systems

Then there’s a third option: a hybrid. “[H]omeowners may already have a pre-existing wired security system they wish to enhance with wireless elements, such as integrating interactive services,” Barge says. Hybrid feasibility is highly dependent on your current setup, and the components you want to add.

DIY Home Security Systems

So, is installing a home security system a job best left to the pros, or can you handle it? “Homeowners can certainly DIY a home security system,” Barge says. “This option is great for those who enjoy hands-on projects, and prefer to have immediate control over the placement and setup of their security devices.”

What about monitoring? If you DIY your security system, will someone be there to help you when you need it? Yes. “DIY systems can absolutely have live monitoring, which is highly recommended for comprehensive security coverage,” MacDowell says. Barge says professional (live) monitoring offers peace of mind, while self-monitoring gives you more control.

DIY vs. Traditional Home Security Systems: Which Is the Best?

So, which system feels right? It’s really a matter of personal preference.

“DIY security systems are generally the easiest to install for most homeowners,” Barge says. “They come with clear instructions, and can typically be set up without any specialized tools or technical expertise.” There’s no poking around in your attic, or cutting holes in your walls, or having an installer out to your house.

Both options offer monitoring by you or a live person. Self-monitoring is generally less expensive, but it puts the onus on you to call for help. With professional monitoring, someone is watching at all times. Barge says this is a good option for someone who is not always on their phone, or goes out of town frequently.

One note from Barge, if you do go the DIY route: “When selecting smart home devices to integrate into your household, ensure they are compatible with your existing smart home security system.” The last thing you want to do is spend a bunch of time installing things yourself, only to find the devices don’t communicate.

FAQ

What’s the best type of home security system?

It depends on your preferences, but as far as popularity goes, wireless gets the nod. User-friendly, portable and customizable, “wireless systems have become the norm in residential settings, reflecting their ease of installation and heightened security features,” MacDowell says.

And wireless is getting better every day, by enhancing sensor range and “incorporating encrypted sensor technology to thwart unauthorized access attempts,” MacDowell says.

Are home security systems worth it?

The experts say yes. Burglary is a crime of opportunity, and burglars are less likely to target a house with a security system. The average loss from a burglary in 2019 was $2,661, according to the FBI, so if your home security system costs less than that, it pays for itself every time a burglar decides your house isn’t worth the trouble.

Does having a home security system reduce home insurance rates?

Generally, yes. Check with your insurance company to see how much. Many large and small companies, including Progressive, State Farm and Hippo, offer discounts for installing smart devices, security cameras and monitors. Your savings (up to 20% according to Safewise) depends on your insurance company and the security components you choose.

About the Experts

  • Kirk MacDowell is home security expert at Batten, a group of security industry professionals helping consumers navigate the world of at-home, online and emergency security needs. MacDowell is a former law enforcement officer and the founder and CEO of MacGuard Security Advisors.
  • Andrea Barge is director of product management at ADT, a leader in home security for nearly 150 years.

Sources


Article source here: What Is the Cost of a Home Security System?

How Much Does a Whole House Surge Protector Cost?

Electricity is the miraculous force of nature upon which modern civilization is built, but too much of it can be a bad thing. Imagine what would happen if the high-voltage signal in the power lines, or the immense energy of a lightning bolt, were to pass directly into your home appliances.

Such an electrical surge would be a disaster, but it’s one you can prevent with a surge protector. The big question is: “How much does a whole-house surge protector cost?” The answer is anywhere from $70 to $700, not including installation.

I can attest to the damage a power surge can cause. Years ago, a lightning strike destroyed our solar energy system, knocking out the inverter and the control panel for the generator. Would a surge protector have saved our system? I consulted Jay Sanders, a Batimore-based general contractor, and Kent Boll, who founded his own electrical company in 2005 and is now CEO of a multi-trade home-maintenance company based in Minnesota, for the answer. Here’s what they told me.

What Is a Whole House Surge Protector?

A whole-house surge protector is a device that detects an unsafe electrical surge and diverts it away from your home’s service panel. “Like a bouncer for your home’s electrical system, it stands guard, ready to block or redirect any sudden spikes in electrical current that could harm your appliances and gadgets,” says Sanders.

“It’s a crucial piece of equipment in regions susceptible to lightning or frequent power surges, offering an additional protective measure for precious electronics and appliances,” adds Boll.

Types of Whole House Surge Protectors

Sanders and Bell identify three types of surge protectors:

Type 1

Installed between the power meter and the grid, this type protects your electrical system from external surges that might be caused by lightning or a malfunction in the power lines.

Type 2

This is the more common type. Installed directly in the panel, this surge protector protects your electrical system from both external surges and internal surges, which might occur when a large appliance switches on.

Type 3

Besides the two main types, Boll also identifies a third type that may be installed on an electric outlet or power cord. “While they are not technically whole-house protection devices,” he says, “they are often used with Type 2 protection devices to provide a layered approach to surge protection, protecting susceptible electronics such as televisions, computers, and gaming consoles.”

How Does a Whole House Surge Protector Work?

Sanders puts this in simple terms: “It is like a filter. When it senses too much voltage, it channels the excess away from your home’s circuits, preventing damage to your electronics.”

Boll explains in more detail:

“The surge protector persistently oversees the voltage entering the home’s electrical panel. If the voltage surpasses the standard threshold (usually 120V in the U.S. for residential settings), the device recognizes this as a power surge and promptly diverts the surplus voltage away from the home’s electrical circuits, typically by grounding it (discharging it into the earth), where it poses no risk. Once the overvoltage has ceased, the device automatically resets, and normal electrical flow is restored without interrupting the power in the home.”

How Much Does a Whole House Surge Protector Cost?

The cost to purchase a whole-house surge protector ranges from $70 to $700, with the national average being around $300, according to Sanders. On top of this are installation costs, billed at a typical rate between $50 to $100 per hour (depending on the installer).

Whole house surge protector cost breakdown

  • Device: $70 to $700
  • Installation: It takes a licensed electrician about two hours to install a whole-house surge protector, with labor costs typically between $150 and $200.

Type 3 surge protectors are far less expensive, costing $20 to $30 and requiring no professional installation.

Can You Install a Whole House Surge Protector Yourself?

Installing a whole house surge protector isn’t a DIY job, according to Sanders. “It involves messing with your home’s main electrical panel, which can be dangerous if you’re not a pro. So, it’s a solid “no” for DIY and a “yes” for calling in a licensed electrician.”

Boll concurs: “Only a professional electrician is familiar with local building codes and electrical standards to ensure that the installation meets all regulatory requirements and does not void warranties or insurance policies.”

Benefits of a Whole House Surge Protector

  • They protect your appliances: Even small power surges can damage expensive appliances, particularly those with sensitive control boards, such as refrigerators and air conditioners.
  • They protect your electronic devices and data: Laptops, computers and other devices can lose valuable information when a power surge forces them to shut down.
  • They prevent fires: Power surges cause overheating, electrical arcing and fires.

Are There Rebates or Tax Breaks for Whole House Surge Protectors?

“Depending on the location, there are indeed certain state incentives available,” says Boll. “Some regions may offer incentives as part of broader initiatives to promote energy efficiency or electrical safety in homes. To find out if there are any incentives available in your area, check with local utility companies, state departments of energy, or energy conservation and efficiency websites.”

When Should You Replace a Whole House Surge Protector?

The metal oxide varistors inside whole-house surge protectors tend to corrode and wear out fairly quickly. Online experts tend to recommend replacement after two to three years, and the longest you should wait is five years.

Is a Whole-House Surge Protector Worth It?

When you compare the whole-house surge protector cost to that of losing your essential appliances in a power surge, the surge protector wins by a mile, especially if you live in an area with higher-than-average electrical storm activity.

About the Experts

  • Jay Sanders is a licensed contractor. He’s been working on construction for more than 10 years and is CEO of Maryland Contractors, which offers building and renovation services in the Baltimore area.
  • Kent Boll entered his family electrical business and founded Boy’s Electric in 2005. In 2017, he founded Airtech, which offered HVAC and plumbing as well as electrical services. He is currently CEO of Service Today!, which adds pool maintenance to its list of services.


Article source here: How Much Does a Whole House Surge Protector Cost?

5 Best Mini Chainsaws, Tested and Reviewed

PAMELA BONDURANT/FAMILY HANDYMAN Shop on Home Depot Best Overall Mini Chainsaw Dewalt Cordless Battery Powered Chainsaw Shop on...