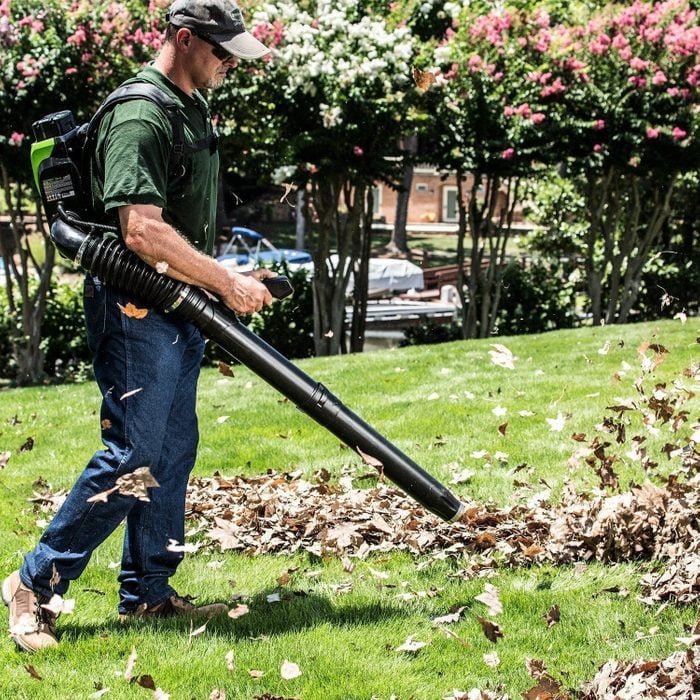
If you have a large property or lots of wet, heavy leaves to clear, you could benefit from a backpack blower. These deliver more power to finish the job faster than handheld leaf blowers. And while backpack blowers often weigh more than their handheld counterparts, they feel lighter due to better weight distribution across the user’s chest, back and hips.
There are plenty of high-end backpack blowers built (and priced) for commercial operators who’ll strap them on them for multiple hours every day. For this list, we focused on models targeted to DIYers.
If you’re ready to start shopping for a backpack leaf blower, here are a few factors to consider:
CFM and mph: You’ll see these two figures on every blower. Manufacturers rate leaf blowers by the amount of air they move and the speed the air travels. Air volume is measured in cubic feet per minute (CFM) and air speed in miles per hour (mph). So which one is more important? It depends on the material that you’re trying to move. A higher CFM will move large amounts of light, dry debris. But wet leaves or heavier debris require more force, so mph matters more.
Power source: Backpack leaf blowers can be gas-powered or battery-operated; there are essentially no corded models. Gas motors will be two-stroke (requiring a gasoline/oil mixture) or four-stroke (gas only). Two-stroke motors are lighter and easier to repair, while four-stroke motors are quieter, more efficient and more environmentally friendly.
Padding and vibration reduction: A backpack leaf blower should be comfortable to use. Look for a padded, adjustable harness to reduce weight and vibration reduction on the engine. This is especially true if you’ll be using it for long stretches, or if you have a medical condition that makes you more sensitive to the vibrations.
Noise: Leaf blowers are noisy, even the “quiet” ones. Electric leaf blowers are quieter than gas-powered models. All blowers list their operating noise in decibels (dB). Some manufacturers use weighted decibels (dBA), a measurement adjusted for the range of human hearing. It’s not a one-to-one ratio between dB and dBA, but for our purposes we’ll use them interchangeably.
Weight: Generally speaking, the lighter the blower, the better. The average weight of a backpack blower is around 23 pounds.
Price: Most consumer backpack leaf blowers cost between $150 and $500.
Maintenance:Gas leaf blowers require more maintenance than electrical ones, but all blowers require the occasional clean out.
Warranty: Many manufacturers offer different warranty periods for commercial and residential use. Always check the consumer use period to make sure you’re comparing apples to apples.
Electric screwdrivers are incredibly useful tools, combining the compact size and functionality of a screwdriver with the time-saving efficiency of a power drill. They’re small enough to stash in a kitchen drawer or toolbox, and perfect for light-duty tasks like tightening hinges and replacing anything with pre-threaded holes.
I’ve used an electric screwdriver for assembling particleboard furniture, which a larger power drill would easily damage.
To ensure that you choose the best electric screwdriver for your needs, keep these considerations in mind:
Handle style: Some electric screwdrivers with a pistol grip resemble a smaller version of a power drill. Others, with straight handles, look more like a regular screwdriver. Pistol-grip electric screwdrivers provide more control and can be more comfortable for people used to a regular drill. However, I find straight-handle models better for reaching into tight or awkward areas where a pistol-grip tool can’t fit. A third option is a pivoting handle that transforms from a pistol to straight grip with a twist. I’m a fan of pivoting handle versatility, helpful for all kinds of tasks.
Speed: If you’re concerned about how fast your electric screwdriver can work, choose a tool with higher revolutions per minute (RPM). The lower end is around 130 to 200 RPM, while more powerful options can generate up to 600 RPM. Some feature a variable speed control, allowing you to adjust the speed to the task at hand. These are expensive, but if you can afford it, go with a variable speed option.
Battery type: While all the options here are cordless, there is some variety in the type of battery. Most have a power cord that can be plugged into a wall socket for recharging. Others have a detachable battery with a separate charging station. Detachable batteries can also be used in other tools from the same brand, convenient if you own a large collection of battery-operated tools. Extra-light-duty electric screwdrivers require AA batteries.
Clutch settings: While some electric screwdrivers only have a single setting for torque (the rotational energy applied to the screw), more powerful models offer multiple settings. The more torque you can apply, the denser the material you can work with. While most four-volt electric screwdrivers only offer one clutch setting, more powerful options include up to 15 volts.
Flat tires come with little or no warning. Knowing how to change a tire is an essential life skill for anyone who regularly gets behind the wheel of a car or light truck.
But that’s not the only time it can be useful. If you’re considering rotating your tires, swapping them out for winter tires or even replacing brake pads and rotors, think of the money you can save by doing those things yourself.
The tire changing tools that come with your vehicle are barely adequate. They’re intended for emergency situations only, not to perform service and repairs. And cars with run-flat tires as standard equipment typically don’t come with any tools at all.
Here are the tools needed to safely change a tire or work on your vehicle. You may already have some in your home toolbox or garage.
Hydraulic floor jack: Rated in tons, you’ll need a jack rated greater than one-half your vehicle’s weight. (Remember, you’re only jacking up one wheel or one side of your car at a time.) Check the owner’s manual or manufacturer’s site to find the weight of your vehicle. Jacks should have smooth-rolling wheels; a wide, sturdy base for better stability; a saddle (the part that contacts the car) low enough to slide under your car; and a long handle for ample leverage when pumping the jack.
Jack stands: Lowering your vehicle onto jack stands significantly increases safety, security and stability when changing a tire. Never work on or under a car raised in the air without a sturdy pair of jack stands.
Lug wrench: For greater leverage when removing lug nuts, get a cross-shaped lug wrench. It’s better than the L-shaped tire iron that probably came with your vehicle.
Wheel chocks: These wedge-shaped blocks prevent accidental movement while jacking up your vehicle. Jam them against the wheels on the side opposite the one you need to lift.
Torque wrench: Never underestimate the value of a torque wrench. Loose lug nuts can fall off, causing all kinds of issues. Consequently, over-tightened lug nuts can damage the wheel or distort brake rotors.
The following are also nice to have:
Wheel cover remover/rubber mallet: Quickly remove and reinstall wheel covers or hub caps without hurting your hand.
Cordless impact wrench: Much quicker than a lug wrench to remove and install lug nuts on a tire.
Torque limiting sticks: If using an impact wrench, torque limiting sticks prevent over-tightening lug nuts.
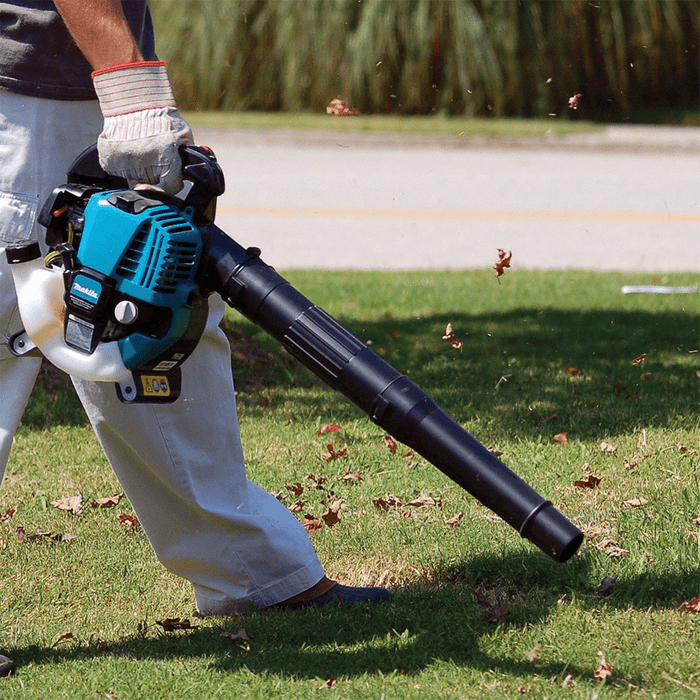
Gas leaf blowers are a good fit for DIY homeowners with large yards who value long-lasting power over lighter weight and noise reduction. Though electric leaf blowers have become more popular, gas blowers offer a proven track record and remain the tool of choice for landscaping professionals.
Note, California has banned the sale of gas-powered lawn equipment as soon as 2024, and several states and localities are expected to follow suit. California also offer a rebate program to help with the purchase of zero-emission equipment. Be sure to check your local laws and regulations regarding this type of equipment before purchasing.
Here are some factors to consider when shopping for a gas-powered leaf blower:
Style: There are three basic styles of gas-powered leaf blowers: handheld, backpack and walk-behind. Handheld models are the most common choice for urban and small suburban lawns, while backpack models are better for lots of an acre or more. Walk-behinds are something of a specialist machine, best for large, flat yards with lots of leaves. Many walk-behind blowers are commercial models; we only have one walk-behind model on our list.
Weight: Backpacks are a good choice for consumers with grip-strength issues. Although backpack blowers generally weigh around 23 pounds versus a typical handheld’s 10 pounds, that weight is better distributed across the body via the backpack’s shoulder harness. Walk-behind models require the least effort. Note that blower weights shown are with an empty fuel tank.
Engine:Gas-powered leaf blowers come with two-stroke or four-stroke engines. Two-stroke motors require a gasoline/oil mixture, while four-stroke motors run only on gas. Two-stroke motors are lighter and DIY-friendly for repairs, while four-stroke motors run quieter and more efficiently with fewer emissions.
Mulch capability: Any fan or blower must also have an intake. Some leaf blowers can work in reverse, sucking leaves through the hose and into the fan/shredder. Mulchers are described by a “reduction ratio” that shows how finely the leaves are shredded. A ratio of 10:1 means that 10 gallons of leaves are shredded into one gallon of mulch.
CFM vs. mph:Leaf blowers are rated by the volume of air they move and the speed that air travels. Air volume is measured in cubic feet per minute (CFM) and air speed in miles per hour (mph). The higher numbers in these categories, the better, but which matters more depends on the type of debris. A higher CFM will move large amounts of light, dry debris like grass clippings, while wet leaves or heavier trash require more force and thus a higher mph..
Vibration reduction: Vibrations from the blower motor and fan may fatigue many users, especially those with arthritis. If you’re concerned with vibration, look for an engine with spring mounts and vibration-dampening in the handle or backpack.
Right or left intake: The air intake can be on either side. Most users find it more comfortable for the intake to be outside of their body. (This isn’t a concern for backpack models; their intake is on the back.)
Noise: All leaf blowers are noisy. Gas-powered models are noisier, with two-cycle engines the loudest. Operating noise is rated in decibels (dB). Some manufacturers use weighted decibels dBA, adjusted for the range of human hearing; for our purposes we’ll use dB and dBA interchangeably. It’s always a good idea to wear hearing protection when operating a leaf blower, no matter how “quiet” it claims to be.
Maintenance: Gas-powered tools require regular maintenance. Follow the manufacturer’s recommendations for changing the air filter and spark plug. For a two-cycle engine, be sure to use the proper gas/oil blend of fuel mixture.
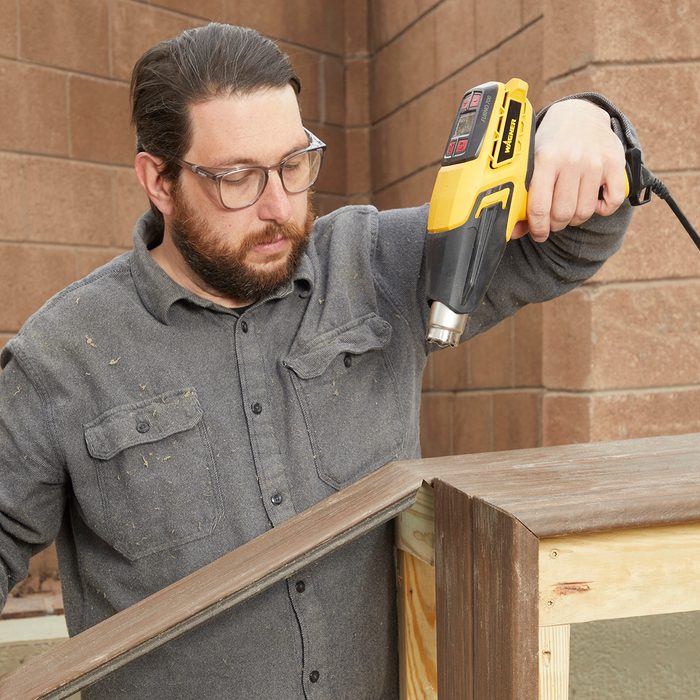
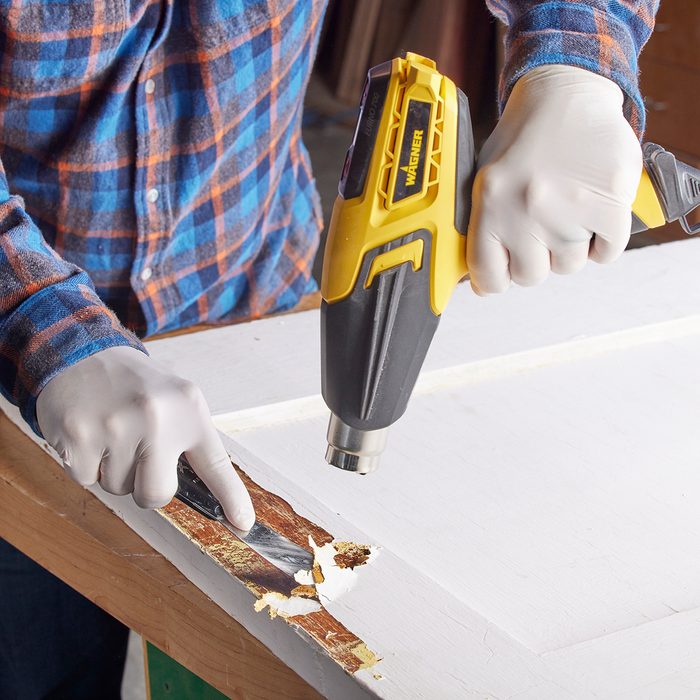
There are few tools as versatile and dependable as a quality heat gun, and I’d argue the Wagner Furno 700 is one of the best! Heat guns can be used for a wide range of jobs — removing flooring, refurbishing woodwork, thawing frozen pipes and much, much more.
What is the Wagner 700 Furno Heat Gun?
It’s a state-of-the-art heating tool. This electric heat gun features an LCD display, push button controls and six fan settings including a cool down mode. Its 1,500 watt heating element puts out 5,100 BTUs with temperature settings from 125 F to 1,300 F. Weighing just two pounds, it feels comfortable while in use. It also includes a glass protector and flare attachment.
How We Tested It
We put the Wagner Furno 700 heat gun through common real-world tests — scraping paint from an old door, bending some PVC and composite decking, shrink wrapping and even making a couple of s’mores!
Performance Review
This is no garden variety heat gun. The Wagner Furno 700 is loaded with innovative features, starting with its creative design.
I love that the tool balances vertically, which comes in handy for shrink wrapping, bending PVC or running the cool down mode. Even if you accidentally knock it over or leave it on its side, the hot nozzle stays elevated and can’t burn or char your work surface.
Cool down mode is great! With the push of a button the gun automatically circulates room temperature air over the heating coils, expediting cooling. The simple four-button design makes this tool nearly foolproof. It’s got a power button, plus and minus buttons to adjust your temperature, and a mode selector which changes the fan speed.
Gone are the days of guessing your heat gun’s temperature. The clear LCD readout and pinpoint temperature adjustment offer clear improvements over heat guns of the past.
The Wagner Furno 700 excelled at all the tasks I put in front of it, including making a s’more! After setting it to 950°, it quickly bubbled and lifted the layers of old paint off the door making it easy to remove. The process for bending the composite decking was a bit different. We set the gun at a much lower temperature and took a low-and-slow approach, bending it ever so slightly as we heated up around the bend radius, as not to burn or mar the finish. Moving the adjustable fan setting to high worked fantastic for shrink wrapping large objects, while lower settings were adequate for heat shrinking small items and the electrical connections.
Wagner has been making reliable and durable home improvement products since the 1950’s, and the 700 feels sturdy and well-built. Though the Wagner 700 comes in at a middle-of-the-road price, I believe the long list of features and included attachments, as well as a one-year warranty, are well worth the extra dollars.
Why You Should Buy This
I purchased my current heat gun nearly 15 years ago to remove some flooring. Since then I’ve used it to strip paint, free seized bolts, thaw frozen pipes, shrink wrap, fix laminate countertops, remove window glazing and even melt wax for decorating Easter eggs!
A heat gun is an essential tool for any homeowner. The artful design, ease of use and fantastic features make the Wagner Furno 700 a top-notch choice.
Got gophers? If so, that’s one reason why you might want to level your yard. Those pesky little critters can wreak havoc, turning flat earth into an obstacle course of dirt mounds and caved-in tunnels.
And if your ideal is a nice flat yard covered with healthy turf, you’ve got some work to do before you plant any grass seed. That is, of course, assuming you first get rid of the gophers.
There are plenty of other reasons why you might want to level your yard. Perhaps you need to solve a drainage issue, like a depression that fills with water when it rains, creating a mosquito breeding ground.
If the slope around the house directs water toward the foundation instead of away from it (AKA a negative slope), re-grading can stop basement flooding and prevent the foundation from settling. Or maybe you just want to spot-fill depressions to make mowing easier.
To accomplish any of these tasks, you’ll need to move some dirt around. While renting earth-moving equipment is always an option, Tim Gillett, the founder of Santa Cruz, California-based pond installation service Pond Magic, says he and his crew usually opt for the less costly shovels-and-wheelbarrows method.
Those two methods are your only choices for moving dirt. But there are several more ways to measure slope and determine where the dirt should go.
The String Method Is Most Common
To level a large area, Gillett pounds stakes into the ground around the perimeter, stretches strings between them and levels the strings with a line level. It’s a great way to measure slope as well as identify high and low areas between the stakes.
On sloping ground, tie the string close to the ground on the high side and stretch it as tightly as you can before tying it the stake at the low side. Make sure there’s no sag in the middle. Hang the line level on the string and move the end on the low side up or down as needed to center the bubble.
The difference in measurements from the string to the ground at both ends tells you how much dirt you need to bring the low end level.
You can also use a variation of this method to correct a negative slope around the house. Instead of leveling the ground, you want a slope in the opposite direction. So set the string to the slope you need. When you add dirt with a shovel or earth mover, keep the surface a uniform distance away from the string.
Go High-Tech with a Laser Level
A laser level works like an invisible string. Here’s how to use it: Set the transmitting unit on the highest ground, then set a 2×4 on the lowest end. Both need to be vertical or it won’t work. The difference in heights between the two indicates the slope. Then add the amount of fill needed to correct it.
Use a Water Level for Large Areas
Water seeks its own level, a characteristic used for centuries to measure ground elevation. If you fill a transparent plastic tube with water (preferably dyed so it’s easier to see) and leave a small amount of air in each end, the water levels at the ends will always rise to the same height relative to the earth’s center of gravity.
One advantage of this method over strings and lasers: It works when vegetation obstructs the two areas you want to measure. It’s a good way to identify a gradual slope that directs water in a direction you don’t want it to go, and tells you how much fill you need to correct it.
Use the Screed Method for Depressions
When you fill sunken areas of the yard, use a length of 2×4 as a screed to bring the added dirt level to the surrounding ground. Use a straight 2×4 that’s long enough to span the depression, and drive two lengths of rebar on one side to hold the end and act as a pivot.
When you add dirt, overfill the depression slightly. Then lay the 2×4 on its edge and draw it over the depression to create a flat surface, moving excess dirt out of the way.
When you fill a depression, the fresh dirt will settle, so you usually need to wet down the first load to compact it. Then add a second load. You can also compact the soil with a lawn roller.
Spot Leveling
Divots, gopher holes and other depressions make mowing a pain and create tripping hazards.
If the depressions are more than two or three inches deep, don’t dump dirt directly into them or it will probably wash away. Instead, cut the turf around the holes with a shovel, remove it, fill the holes with a soil/compost mixture and replace the turf. The roots will stabilize the fill dirt and hold it in place.
As a pet care expert, I get to share my work day and office with Shadow, who loves our daily car rides to the post office. He’s too big to fit in a carrier, so he rides in the safest place for dogs in the car — the back seat, with his harness clipped to the seat belt. When rain, shedding season, or car sickness strike, my dog car seat cover has saved the upholstery (and my sanity) more than once.
The best dog car seat covers protect upholstery and carpet, making it easier to keep the interior of your vehicle clean and manage pet messes. Of course, I keep other important items in my car just for the pets.
What to Look for When Buying a Dog Car Seat Cover
Design: Not all dog car seats fit every vehicle. Look for one that best fits your vehicle, whether a bench back seat, bucket front seat or combination of styles.
Water resistant: If you have a water-loving dog or a pup that gets carsick, get water-resistant or waterproof covers.
Easy on-off: That way you can remove the liner for cleaning without a lot of hassle.
Secure nonslip options: Look for nonskid covers that don’t let your dog slip and slide during rides.
Washable: Products that clean up quickly and easily are a must.
Non-absorbent: Fabric should repel and not absorb dust and dirt, reducing routine cleanup to a quick vacuuming or a wipe with a damp cloth.
Comfort level: Plastic repels water but isn’t comfortable for a resting dog. Look for padded covers.
Safety features: Can your dog be belted in? What options prevent them from climbing into the driver’s lap? Safety earns bonus points.
Evaluation Criteria
Here’s what I looked for when choosing the best dog car seat covers:
As someone who regularly works with cement, Andrea Harris knows what separates a high-quality cement tool from one you should never see your collection. With more than ten years of experience as a cement mason in New York City, Harris knows what it takes to make it as a tradesperson in the concrete jungle.
We talked to Harris about her life as a cement mason and the tools she uses on the job. To learn more about her and her story, check out this profile.
Andrea’s Cement Tools
Here are some of the essential tools Harris brings with her to every job:
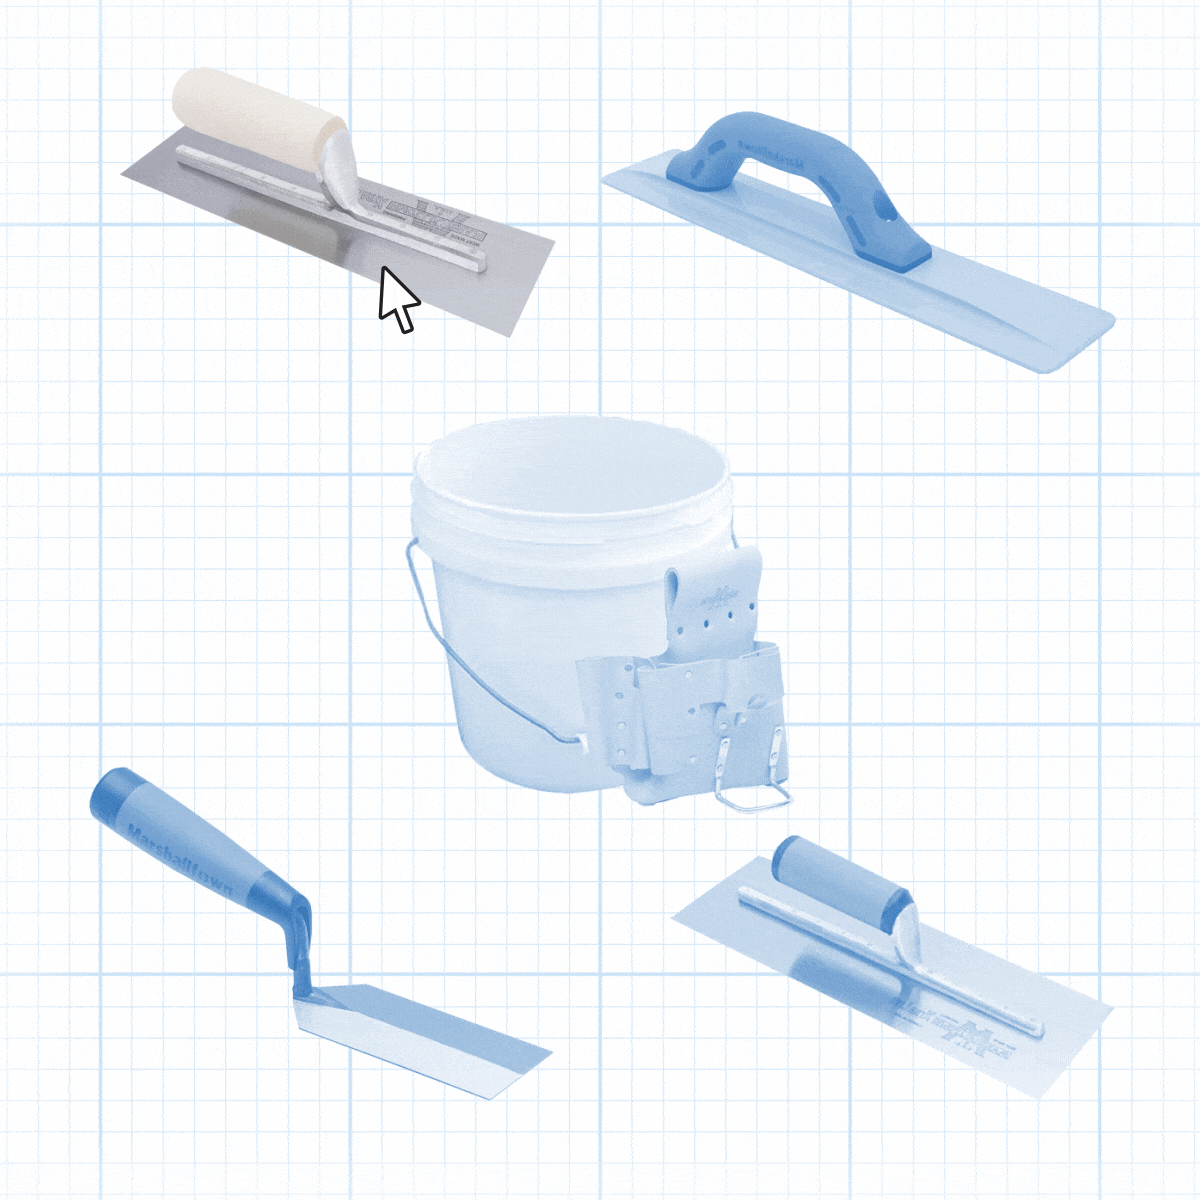
Margin Trowel
Margin trowels are made with thin, flat noses so that they can fit into tight spaces and corners. Her favorite margin trowel is this one from Marshalltown, which she says has a quality rubber handle and works well in both summer and winter.
When Harris needs to pull up concrete, she reaches for a finishing trowel made with a 9-5/8-in. x 4-in. high carbon steel blade and a straight wooden handle.
Nothing takes a cement project from good to great like an exceptional finish job. Harris uses a patch trowel with a 12-in. x 4-in. stainless steel blade and a DuraSoft straight handle to achieve a smooth surface.
Cement masons use special tools called floats to level ridges and smooth the surface of a cement pad. Her go-to is this rubber float that comes already broken in so it’s ready for immediate use.
Cement mason tools don’t really fit well in a traditional tool bag. Harris carries her tools in a large bucket and keeps a few essentials handy in this specialized tool pouch.
When Judaline Cassidy set her sights on a trade school education in her home country of Trinidad and Tobago, the not-quite-five-foot-tall young woman first had to convince the instructor she could hack it as a plumber.
“I literally dropped down and was doing push-ups and saying, ‘I got this!’ ” she says. “And that’s how I got accepted into the program.”
After school, Cassidy moved to New York City, where she worked as a nanny, housekeeper and personal shopper. Once she dug into plumbing, she quickly excelled, becoming one of the first women accepted into Plumbers Local No. 371 on Staten Island.
Twenty-five years later, she is still passionate about the trade and her union while mastering her craft for the New York City Housing Authority.
“Jobs don’t have genders and the trades can be your ticket from poverty to middle class. Plumbing did that for me. I grew up not loving myself, not having any self-confidence. But when I picked up a tool, it changed the way I viewed myself and how great I was. It’s empowering.”
Black & Decker (now Black+Decker) invented the first portable electric drill in 1917, and the first electric screwdriver in 1923. The first models were clunky and required both hands to operate. Now thanks to cordless technology, contemporary models from a variety of manufacturers are compact, lightweight tools that DIYers wouldn’t want to be without.
Because their functions overlap, anyone who does a lot of home repair and owns a cordless drill isn’t likely to need an electric screwdriver. Look inside the toolbox of a homeowner who only does occasional repair, however, and you’re more likely to find an electric screwdriver than a drill. Why? Because it’s easier to use and takes up less space.
This doesn’t mean a dedicated DIYer would never opt for an electric screwdriver over a drill. Although the electric screwdriver is underpowered compared to a drill, its ergonomic design makes it more suitable for light-duty tasks like tightening shelf brackets and certain electrical repairs. An extensive tool collection would include both. But if you only want one, a drill is more versatile and probably the better choice.
What Is an Electric Screwdriver?
An electric screwdriver, as the name suggests, has one function: driving screws. Some models offer the same pistol-grip handle as a drill. Others are barrel-shaped, and still others feature handles that swivel into either position. Instead of an adjustable chuck, an electric screwdriver has a slotted drive shaft (SDS) chuck that accepts only driver bits with hexagonal shafts.
Electric screwdrivers with replaceable AA batteries were popular in the past. Today, these tools all have rechargeable batteries. The battery may be permanently installed and chargeable through a wall outlet, or it may be removable and chargeable via a separate station.
Battery voltage, which regulates driving torque and rotational speed, typically runs from four to 10 volts. Battery capacity, measured in amp-hours (a measure of how much amperage the battery can deliver in one hour), is around 1.5 Ah.
What Is a Drill?
A drill is a pistol-shaped power tool primarily for boring holes. Because its adjustable chuck accepts driver bits, it also can double as a screwdriver. Drill are corded or cordless, with cordless models comparing more closely to electric screwdrivers.
Cordless drills feature removable batteries with ratings between 12 and 24 volts and capacity from 1.0 to 4.0 Ah. The bit spins at speeds up to 2,000 revolutions per minute (rpm), and it develops more torque than an electric screwdriver (about 400 rpm). It can handle tough jobs like drilling large diameter holes, as well as light-duty tasks like driving screws.
Uses for Electric Screwdrivers and Drills
An electric screwdriver is less versatile than a cordless drill, but its design makes it more suitable in certain circumstances:
It can drive screws in tight spaces where a drill can’t fit. Its size also makes it easier to store.
Because it doesn’t develop as much torque as a drill, it can drive screws into soft wood without sinking the heads deep enough to split it.
For seniors or anyone with gripping issues, it’s easier to hold and operate an electric screwdriver.
Because of the adjustable chuck and extra power, drills can be used with attachments for purposes other than boring holes and driving screws.
Besides screw bits, drills also accept hexagonal sockets to drive hex-head bolts. You can also use a drill to bore pilot holes for large and small fasteners.
With the proper attachment, a drill can be used as a sander, grinder or paint mixer. It can also operate a suitably equipped drain auger.
Drills can free stuck screws and bolts and drive screws into dense materials like hardwood and masonry.
Comparing Cost
Cost shouldn’t be the driving factor in your decision about which tool to buy. On the whole, electric screwdrivers are cheaper. But a good one, like the two-speed Milwaukee 4V Cordless Screwdriver, can cost more than a high-quality cordless drill. At the low end, the 3.6V Black+Decker Cordless Screwdriver costs less than $16.
You probably won’t find a cordless drill that costs as little as the cheapest electric screwdriver, but few are as expensive as the top-end screwdrivers.
On average, cordless drills run between $50 and $100. Models that cost more are usually packaged with extras like an additional battery, a drill and driver bit set or an extra drill. You can buy a drill for less than $35 with many of the same extras, so the versatility of a drill doesn’t necessarily come with a higher price.
Trailing plants come in many shapes and sizes. Some, like string of hearts, hang straight down, while others have, like spider plant, have volume around the base. That means there’s something for every space and every planter.
These gorgeous trailing plants have enough character to stand alone, and some are perfect for adding dimension to a mixed container. Whether you’re planting a hanging basket, placing a pot on a high shelf or adding a wall planter to your backyard fence, these trailing plants are sure to add plenty of texture and color to your space.
Property taxes are taxes on real estate levied by state and sometimes local governments. They’re a major source of revenue for these government entities, and go to pay for services that most state residents need, such as schools, public transportation, emergency services, parks and recreation, and public health services.
Property taxes are determined by the assessed value of your property, including land value. So even in a state with low tax rates, the owner of a $600,000 home will pay more in property taxes than the owner of a $250,000 home. In states and municipalities where there are state, local, and sometimes even hyper-local property taxes — say, for example, a school district tax — the tax rates are combined as a single rate. WalletHub’s most recent analysis of property tax rates is based on figures from the 2019 census, and calculates the per-state tax rate on a home valued at $217,500. Rates range from 0.28 percent of home value, or $606 in Hawaii, to 2.49 percent, or $5,419, for a $217,500 home in New Jersey, the state with the highest property tax rates.
Below, we take a look at the states with the highest and lowest property tax rates and evaluate median home prices and some quality of life indicators.
I’ve worked as an appliance technician for more than 30 years and have been asked this question hundreds of times. The short answer is, there’s something wrong with the dryer’s airflow.
Here’s the way it’s supposed to work: The heated air mixes with the wet laundry, then that moist air is carried outside via the dryer vent tube. There are a number of things along the way that can derail this process and leave your clothes damp.
Fortunately, there are seven DIY fixes you can try when your dryer’s airflow isn’t optimal. If none solves the problem, you’re probably got a blown hi-limit, failed element, broken igniter or bad coils. You’ll need to hire a pro to fix those.
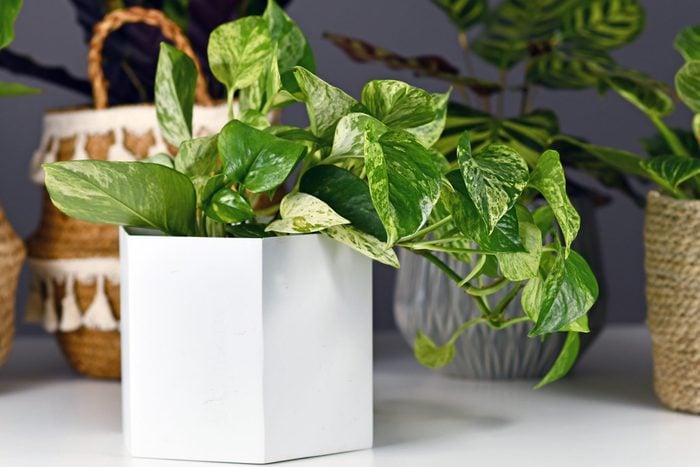
Often hailed as the easiest plant to propagate, pothos is great for first-timers. This beautiful trailing vine can be propagated through stem cutting, one of the most common forms.
“To make a stem cutting, choose a section of stem containing at least two leaves,” says Stephanie Turner, a horticulture agent with Clemson Cooperative Extension. “Make a clean cut right above a leaf with a sharp pair of scissors or clippers. Insert the stem of the cutting in water or moist growing medium promptly.”
Whether you have a new nursery plant or an old one in an overgrown container, repotting is a big part of being a plant parent. Learning when and how to repot ensures new plants start in the right environment and old plants continue to grow.
Here’s what you need to know about when to repot houseplants, how to choose a new container and how to move the plant from one to the other.
When To Repot a Houseplant
You won’t have to repot houseplants often — once a year at the most. The frequency depends on the plant’s species, age and growth rate.
“For instance, fast-growing species (Begonia, Epipremnum, Tradescantia) should be repotted every year,” says Julia Omelchenko, a resident botanist expert for the NatureID app. “And slow-growing ones (Aloe, some species of cacti, Ficus) need to be moved to a new pot once every two to three years.”
Younger plants grow more rapidly and will need more frequent repotting. Mature plants, on the other hand, may be perfectly happy in the same pot for four years.
Spring is ideal for repotting a houseplant. Plants often go dormant in the winter and begin growing again as daylight hours increase in the spring. Repotting gives them the room they need to grow. But that doesn’t mean you have to wait for spring. If a plant is showing signs of stress or poor health, go ahead and repot any time of year.
Try to repot in the evening if possible. “At night, in the absence of bright sunlight, the plant’s metabolism slows down, so it has a chance to recover from repotting stress,” Omelchenko says.
How to tell when it’s time to repot a plant
You don’t have to follow a strict repotting schedule. Plants will tell you when they’ve outgrown their container. Chris Satch, Horti’s plant doctor (@botanictonic), says to keep an eye out for these symptoms:
Plant may stop growing;
Roots may poke out from the bottom;
New leaves will grow, but an equal number may drop;
Plant above ground height is higher than twice the pot’s height.
Other symptoms include small or stunted growth, yellow leaves, roots growing above the surface and poor water retention. Many of these symptoms can also be attributed to pests, disease or dormancy, though. Check the roots if you suspect it might be time to repot.
You might see roots coming out of the drainage hole. That’s a sure sign the plant needs repotting. “But it’s best to repot the plant before that happens,” Omelchenko says. “Otherwise, it’ll be impossible to extract the plant without damaging its roots.”
If roots aren’t coming out of the drainage hole, you can still check them. “Carefully remove the plant together with the substrate from the pot,” Omelchenko says. “If you can see the roots but not the soil, then the plant needs to move to a bigger pot.”
This is also a good time to check the health of the roots. They should be light-colored and plump, not dark and crumbly. Rotting roots are a sign of overwatering, but pests or disease can also affect root health.
How To Choose a New Pot
Once you’ve identified the need to repot a plant, it’s time to choose the right pot. Finding the right size, material and design, then filling it with the right soil, are major factors in your plant’s health and growth.
Plant pot size
Jumping up in pot size is not recommended; better to take small steps. Too much extra space means too much empty soil, which means too much water retention, leading to root rot. You want the pot to have just enough free space for the plant to grow, but not so much that the pot is half full of soggy soil.
“Ideally, the new pot should be one to 1.5-inches (three to four centimeters) larger than the previous one,” says Omelchenko. However, for a large or especially fast-growing plant, you could increase by up to four inches. A three- to four-inch increase in diameter is fine for plants in 12-inch diameter pots or larger, according to Satch.
Plant pot features
Drainage is the most important feature to look for in a new pot. Some people put horticultural charcoal or lava rocks at the bottom of pots, but it’s not nearly as effective as a drainage hole.
If you fall in love with a pot without drainage holes, you can still use it, but don’t plant directly into it. Instead, use it as a cache pot and plant into a plastic nursery pot, then set the plant into the cache pot.
Using a cache pot has a few bonuses. First, it’s easier to switch out pots as your home décor style evolves. Second, it’s easier to remove plants and repot them from softer plastic containers. Third, plastic pots with plenty of drainage holes are good for plants that prefer bottom watering.
In addition to drainage, the material of the pot matters. “If you water frequently, or the plant likes to be dry, opt for terra-cotta,” says Satch. “Otherwise, glazed ceramic or plastic/fiberglass is fine.”
Metal pots aren’t recommended for cold climates. “Metal cools down fast, so even the slightest draft coupled with excessive watering can lead to the overcooling of the root system,” Omelchenko says.
Most indoor pots are shaped about the same, though some may be tall and narrow or shallow and wide. Research how your plant grows before choosing a pot. Succulents with their shallow roots and can thrive in shallower containers, like this wood log planter. Plants with deep roots, like an indoor lemon tree, prefer a deep container. And trailing plants like wide containers. You might even want to hang your plant.
How To Repot a Houseplant
Repotting a plant is quick and easy. The most difficult part is often getting the plant out of its old pot. It’s a delicate process and takes a gentle hand to avoid damaging the plant.
Prepare the new container
Start by preparing the new container. Research the type of potting soil that is best for your specific plant, and add some to the bottom of the container. A potting mat is helpful for containing the mess when mixing soil and repotting plants.
Remove the plant from the old container
Removing a plant from a plastic nursery container is easiest. Simply place a hand over the soil around the base of the plant and flip the container sideways into that hand. The plant will often slide right out. If it doesn’t come out with a gentle wiggle of the base, try squeezing the sides of the container. If it’s still stuck, use a chopstick to loosen the soil, or cut off the plastic container.
Removing a plant from a ceramic pot is more difficult since you can’t squeeze the sides of the pot. Pushing a chopstick around the edge of the container helps to loosen the soil and unstick the plant.
Repot the plant
After removing the plant from its old container, massage the bottom of the roots. They’ll be tightly bound from the old, small pot and need to be loosened a little before replanting. This is also the time to brush off excess soil to make room for fresh, nutrient-packed soil.
Place the plant into the new pot. If it seems too deep, take it out and add more soil to the bottom. Then fill in the space around the edges with fresh soil. Be sure to keep the plant centered as you add the new soil. Don’t pack the soil down too much. You want it loose enough for air and water to flow down and reach the roots.
Repotting a plant can cause it to go into shock, so don’t fertilize right away or move it to a new spot. Instead, water lightly and leave it alone to get settled into its new home.
There’s one unavoidable fact in gardening and landscaping: No matter how modest your task, at some point you’ll need to move large amounts of heavy stuff. Maybe you’re that rare person with the time and patience to move a pile of rocks from the driveway to the backyard stone by stone. Props. But what do you do with a one-ton load of topsoil?
The point is, if you’re going to tackle any kind of landscaping or gardening project, you’ll need a wheelbarrow to move heavy loads more efficiently. And for that, we highly recommend the Gorilla Carts Poly Garden Dump Cart.
Gorilla Carts Poly Garden Dump Cart is FHM Approved
Rather than wobble over the contours and around the obstacles of your yard with a single-wheel wheelbarrow, the poly garden dump cart from Gorilla Carts lets you navigate those tricky spaces with ease. With four wheels for balance and a simple steering system, it’s easy to use over hill or dale. It also holds a lot of weight and features a quick-release dump system.
What Is the Gorilla Carts Poly Garden Dump Cart?
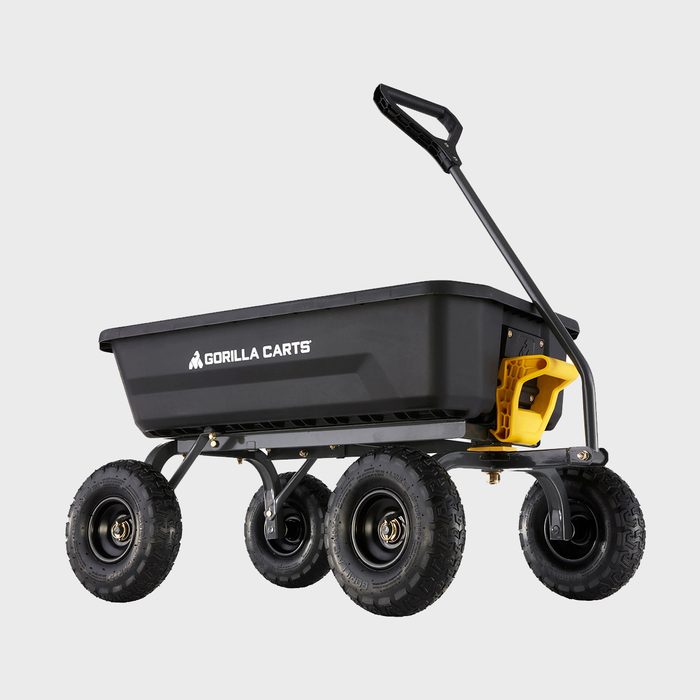
Based out of Minnesota, Gorilla Carts makes a range of garden carts. This one is from their line of quick-release dump carts. It’s available in 4- and 7-cu. ft. models. We used the 4-cu. ft. version for this review.
The business end features a 35-in. x 22-in. x 8-in. durable poly bed that holds up to 600 pounds. (The 7-cu.-ft. version can handle twice that.) It sits on a steel frame that rides high on four, 10-in. pneumatic tires, offering plenty of clearance.
The long handle and front wheels connect in a zero-turn steering system. A quick-release handle lets you dump the entire cart in one simple motion. Assembled, it weighs about 37 pounds.
How We Tested It
We put it to work for the Family Handyman backyard build project. We started off using it to haul dirt we dug out of a 6-in. deep trench, then to carry and dump pea gravel into that trench. We also moved large, heavy round stones we used for building gabions.
Performance Review
The first step is putting it together. All you need are a couple of wrenches. I used a socket wrench on the stainless steel hardware, and it only took about 20 minutes to have it ready to roll. It comes with easy-to-follow instructions, and the hardware needed is attached to the instruction sheet with the corresponding step — a nice touch.
A side bonus for me: Gorilla doesn’t overdo it with packing materials, so you don’t need to haul away a mound of Styrofoam and plastic.
When you put a lot of weight into a standard wheelbarrow, it can be hard to lift off the ground, even if you’re not skipping leg day at the gym. Wheelbarrows can also be difficult to steer with a quarter ton of cargo in it, especially over bumpy terrain. And dumping hefty cargo an inexact science, adding more shoveling or raking to your to-do list.
None of that is an issue with the Gorilla Cart.
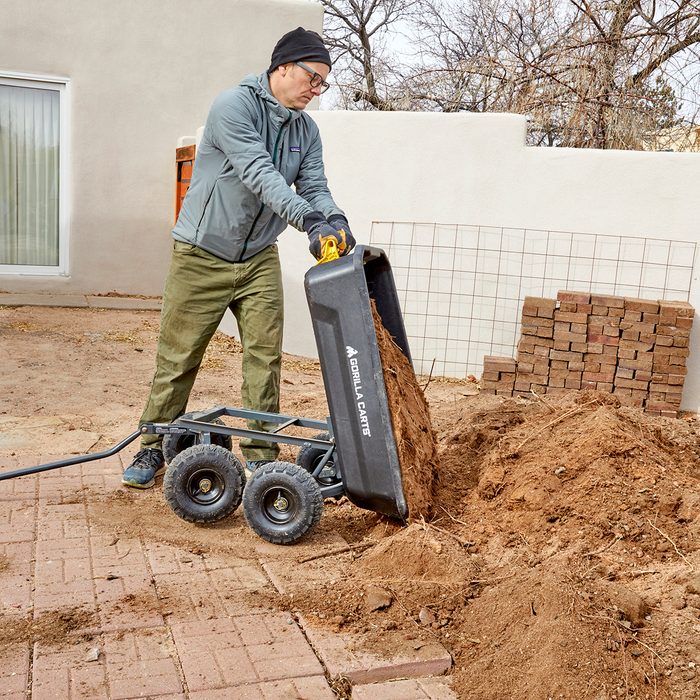
The four rubber tires can navigate all kinds of terrain. I pulled it over scattered flagstones and divots, and even through a 6-in. deep trench, without a single worry that the dirt or rocks would fall out. The zero-turn steering helps a lot, too. You can bob and weave through obstacles, and easily position it to dump your load in the perfect spot.
The longer pull handle means taller people can use it without straining their back, but it’s not so long that it’s awkward for someone of average height, like me (I’m 5-9).
Loading it was a snap, too. The cart sits lower than a standard wheelbarrow, so you don’t have to throw stuff as high to fill it up. That’s also nice when you’re piling a lot into it. The poly sides flexed outward a bit with the heavy gabion rocks, but there was never a doubt about its structural integrity with the big, round stones in there.
What I liked most about the Gorilla Cart is how it dumps. There’s a spring-loaded handle that latches to the steel frame. When you’re ready to empty the cart, just reach down, pull the sturdy handle to unlatch it, and lift it up.
The handle and a pivot point in the back half of the cart let you dump even the heaviest load with one hand. And with the zero turn steering, you can line it up to put the contents exactly where you want it to go, avoiding shoveling and raking.
Anyone can use these carts. For hauling mulch to heavy duty landscaping work, this cart can get it done. I really love it. And at a little more then $100, it’s a great value. (The 7-cu. ft. model costs more, but it’s still less than $200.)
The main downside? Because it’s a four-wheeled cart, it can’t handle a path narrower than 20 inches. However, because it can roll over so many obstacles, you can use it just about anywhere. For storage, the cart style means you just tilt it up against the wall in the shed, like a wheelbarrow.
Why You Should Buy This
The Gorilla Cart makes it easy to move, dump and manipulate heavy loads. For most users, the 4-cu. ft. model will be more than enough. But if you’ve a landscaping pro or manage a lot of land, the 7-cu. ft. model might be a better fit for your needs.
Where to Buy This
The latest model of the Gorilla Dump cart is available at Lowe’s and The Home Depot.