Meal Prep Delivery

Friday, February 28, 2020
19 Home Mistakes You Can’t Afford to Make

Never Changing the Furnace Filter
Clogged air filters are usually to blame when a furnace stops working. Dirty air filters are also hard on blower motors and heat exchangers, so it's a good idea to replace your air filter before there's a problem. It can be hard to remember to check it regularly. That's where an air filter gauge can help; it eliminates guesswork by measuring airflow and telling you exactly when it's time to change your air filter. Plus: You really need to know these 21 air conditioner maintenance and home cooling tips.
Article source here: 19 Home Mistakes You Can’t Afford to Make
How to Organize a Small Bedroom to Maximize Space

If you have a small bedroom and you’ve run out of ideas to keep it tidy and organized, don’t worry, we’re here to help! We’ve consulted organizing experts to get some great tips for how to organize a small bedroom and create the serene space you need to recharge.
Here are smart ways to fit more storage in your bedroom without making it feel too cramped.
Step One: Declutter
According to professional organizer and owner of Time to Organize Sara Pedersen, the first step to organizing a small bedroom is decluttering. Put away everything that is out of place, then take a fresh look at what’s left and pare down.
“Take stock of items you’re storing in your bedroom that could be stored elsewhere,” organizing expert and owner of simplify 101 Aby Garvey says. For example, photo albums or other keepsakes and clothing you’re holding onto for sentimental reasons or that’s seasonal could be stored in another area of your home, freeing up precious space in your small bedroom.
Find Hidden Storage Space
Once you’ve decluttered, “look for open areas in your bedroom or closet, and brainstorm storage solutions that could transform these areas into additional storage space,” Garvey says. Do you have extra wall space for more shelves or space for a storage trunk at the end of your bed? If so, use it to your advantage.
Two jackpot bedroom storage spots: behind the door and under your bed. The door can hold hooks and vertical organizers for items such as shoes, scarves or jewelry, while under-the-bed space is great for off-season clothing storage, extra blankets and sentimental items.
“If your bed is low to the ground, purchase some inexpensive bed risers,” Pedersen says. Raising your bed allows under-bed plastic, cardboard or DIY storage drawers to slide in easily. You can hide the bed risers with a bed skirt or with your comforter.
Make Your Nightstands Work
According to professional organizer at Order. and author of Crush Your Clutter Mary Carlomagno, if you do need a little extra storage space, select a nightstand with drawers. A small three-drawer dresser makes your nightstand do double duty, gaining more space for bedside necessities and then some.
Max Out Your Closet
The more you can store in your closets, the less that has to be stored in your main bedroom area, making it feel more spacious. And contrary to what you may believe, it’s not impossible to eke more storage space out of your closet. Consider smart floor storage, double-hang bars, hooks on closet walls and more. These simple, inexpensive DIY closet storage updates will help, too.
Make Your Small Room Look Bigger
A few tips beyond organization to help create the illusion of space:
Leave Room
Empty space is essential for making a small bedroom look bigger because it helps the room breathe a bit. Plus, one additional item won’t result in overflow—and therefore more space-hogging clutter.
Consider Light
“Lighting makes a big difference in a small room as it immediately makes the room feel bigger,” Pedersen says. Add different types of light fixtures throughout the room, including ambient, task and accent lighting.
Hang Curtains
A rule of thumb (from Architectural Digest) is that curtains should be hung between four to six inches above the window frame. When you hang the curtain rod high, the window appears taller, making your room look bigger than it actually is.
Article source here: How to Organize a Small Bedroom to Maximize Space
Article source here:
8 Garage Paint Ideas to Consider Inside and Out

Garage Paint Ideas
Your garage is an extension of your home and serves many functions. Often, a garage is a storage space, a workshop and a hangout space. Many garages are mostly unfinished spaces but this doesn’t mean they should stay that way. Not only do painted walls and floors look better, they’re easier to clean, make the inside of your garage look brighter and allow you to add some easy customization.
Article source here: 8 Garage Paint Ideas to Consider Inside and Out
Article source here:
11 Things You Should Never Clean with Baking Soda
It’s still a great cleaner
 Baking soda is a great multi-purpose cleaner with all kinds of clever uses. It can be handy when you cook, to heal ailments, even to make crafts for your kids. But there are a few instances where baking soda causes more harm than good. While it can help with most of your chores around the house, make sure avoid using it when cleaning these products.
Article source here: 11 Things You Should Never Clean with Baking Soda
Article source here:
Deal of the Week: 5-Drawer Mechanic’s Cart
Streamline your workshop with this rolling five-drawer mechanic’s cart from Harbor Freight. It’s similar to the Snap-on four-drawer service cart in style but not price—the Harbor Freight version will save you more than $700. The built-in toolbox and five drawers make this heavy duty service cart the perfect rolling workstation. Here’s what you need to know about this sale ASAP.
Plus, whether your garage is small or simply cluttered, these cheap garage storage projects will save the day!
What’s on Sale
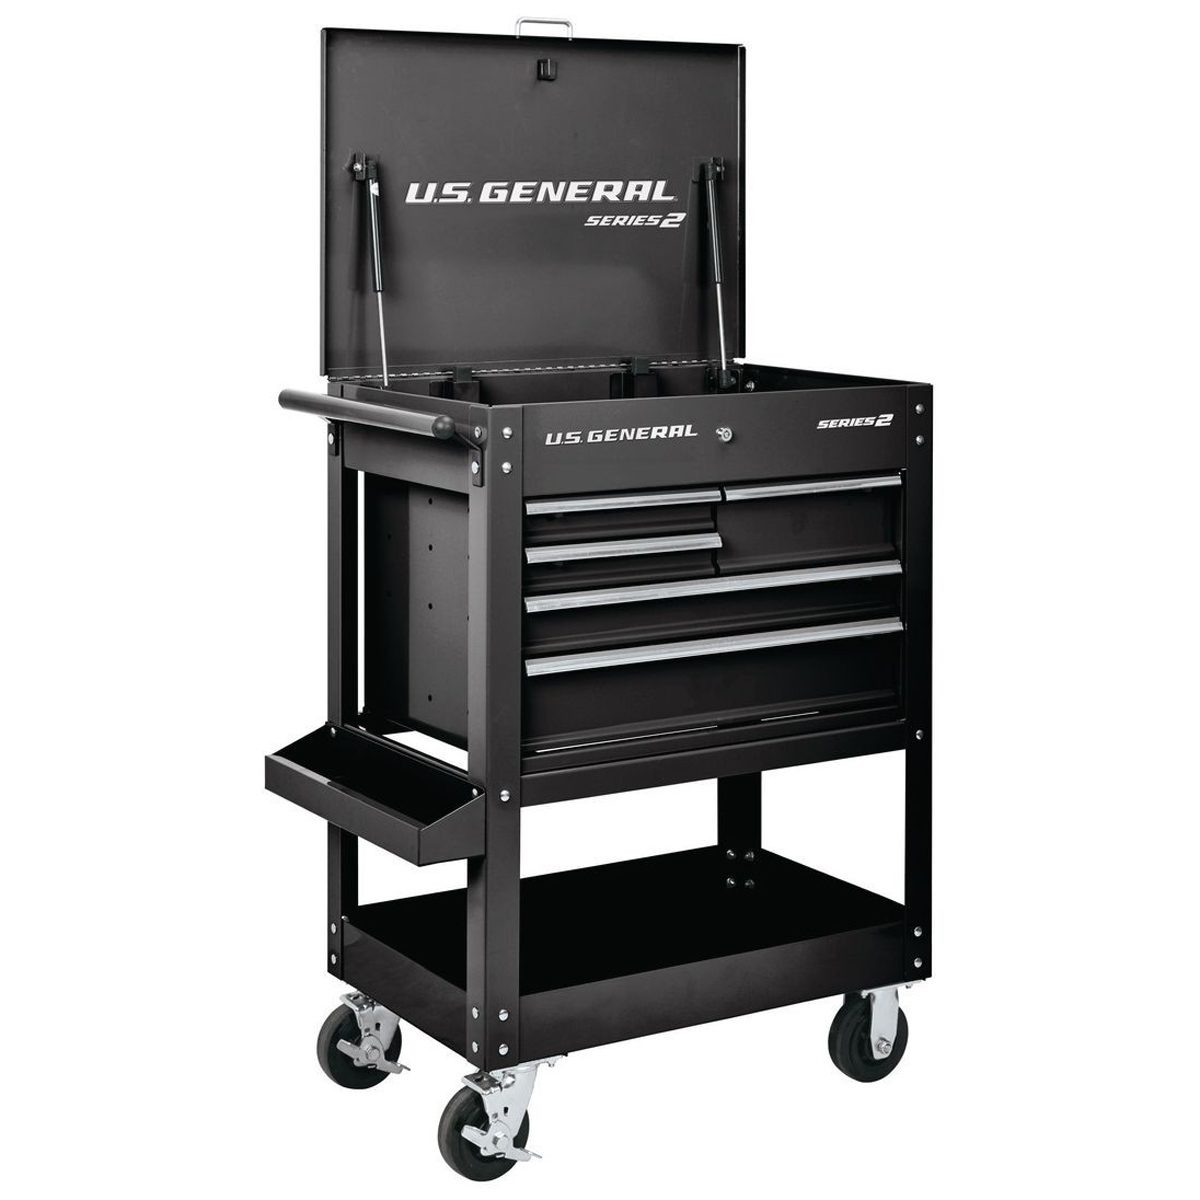
This industrial grade U.S. General 5-drawer mechanic’s cart doubles as a rolling workstation with a built-in, barrel-locking toolbox. It has quality features like rolled drawer edges; non-slip, pre-cut drawer liners; 90-degree gas struts on the lid and spring-loaded drawer latches to hold drawers shut. You can store over 15,000 cu. in. and 700 lb. worth of equipment. Additionally, the smooth, heavy duty swivel casters provide easy movement around your work area. The durable glossy powder coat finish prevents rust and looks great.
Plus, tame the clutter and work smarter with these ingenious (and inexpensive!) workshop DIY storage tips.
When’s the Sale?
It runs now through March 31, but it’s always better to shop early.
Make the best use of your space with these best-ever workshop storage tips.
*Deals were live at press time but are subject to change.
Want more deals and product picks sent directly to your inbox? Sign up for the Stuff We Love newsletter.
Article source here: Deal of the Week: 5-Drawer Mechanic’s Cart
Article source here:
Are Remote Car Starters Bad for Your Vehicle?

In theory, the ability to remotely start your car without leaving your home by pressing a few buttons on your key fob seems like a win-win proposition. But like many things that seem too good to be true, remote starters are not without their detractors.
There are a few negative perceptions around the idea of starting a car remotely, with some people believing it puts unnecessary strain on engines and others saying it can prematurely drain batteries. But is any of that actually true? And if so, do the harmful effects outweigh the convenience offered by remote starters?
Are Remote Starters Bad for a Vehicle’s Engine?
There are two schools of thought on whether remote starting can damage an engine. The main difference boils down to whether you believe you should run your car for a short period before driving it in the winter.
In cold climates with long winter months, letting a vehicle warm up sounds like a good strategy for driver comfort and vehicle performance. But some automotive experts believe that pre-heating your car does more harm than good and can actually wear down an engine over time.
“In general, using a remote start to warm your car up in cold weather can bring unnecessary wear on your engine,” said Jake McKenzie of Auto Accessories Garage. “Your engine works its hardest when the weather is cold, and nothing will warm it up more efficiently than driving it. When you remote-start your vehicle while you’re still getting ready for work, you greatly prolong the warm-up period. And over time, all of this unnecessary strain on your engine can be damaging.”
Other automative professionals are less convinced.
“Even though there might be a stigma around remote car starters, there’s no hard data to support such claims,” said Bryan Rodgers, owner of Rodgers Performance. “People may argue that consistently pre-heating your car can put a certain amount of added wear and tear on your engine. But in reality, it actually allows your engine’s oil to heat up, allowing your vehicle to run smoother — limiting the strain on your engine.”
Ultimately, it’s important to note that neither of these arguments are for or against remote car starters. The concern over engine wear — regardless of whether or not that concern is warranted — stems from a debate over starting your car in general, not of how you start your car.
If you believe that running your car in the winter before you drive is bad for the engine, don’t do it. But if you like preheating your car, there’s truly no difference — at least to the engine — between getting in and turning the key and doing the same thing remotely.
Are Remote Starters Bad for a Vehicle’s Battery?
The other knock on remote car starters is that they can damage a vehicle’s battery. This seems to be based on urban myths and bad science. Starting a car is starting a car, and the process of engine ignition doesn’t change when you do it remotely.
There is one instance, however, where a remote starter could needlessly tax your battery. If your car did not come with a remote starter and you want to install an aftermarket model, improper installation could lead to issues with your battery and electrical systems.
“Factory installed starters should not be a problem,” said Lauren Fix of CarCoachReports.com. “Aftermarket starters needs to be installed professionally. If there are not installed properly it’s easy to ground out one of the wires and drain your battery prematurely. [The starter] also needs to have a safety switch so that there’s no damage to the electrical system.”
How hard is it to install an aftermarket starter? “It’s a simple as following the directions if you have electrical experience,” Fix said. “If you don’t, have a professional install it.”
Article source here: Are Remote Car Starters Bad for Your Vehicle?
Article source here:
Wednesday, February 26, 2020
Spring Cleaning Checklist: How to Maintain Home Security Equipment
When it’s time to create a spring cleaning checklist, many of us will add everything to it but our home security and smart home equipment. This isn’t hard to believe. Most people don’t think these items need as much attention as, say, their toilet bowl or hardwood floors. But the truth is, for your equipment to stay highly-functioning it will need a little maintenance. Keep scrolling to learn how you can give your entire home a fresh start this season with a few easy-to-follow tips and tricks.
How to Maintain Your Home Security Equipment
As homeowners, we install home security equipment to protect our loved ones. And the only way our home security equipment can keep us safe is when it’s properly functioning. Make sure the most important equipment in your home is in tip-top shape by adding them to your spring cleaning checklist and following these suggestions.
- Test your equipment
- Clean your equipment
- Replace batteries

Smoke Detectors
The last thing any homeowner wants is to have their smoke detector not work when they need it. These detectors hang on our ceiling, forgotten and unnoticed until they chirp to warn us of danger. Because of the critical role they play in our home, we must set aside some time this spring to keep the smoke detector as good as new.
Test Your Smoke Detector
You can maintain your smoke detector by testing the life safety device. Ideally, you should test your detector weekly. However, sometimes life happens and we humans forget to do things. If this is the case for you, then try to conduct a test at least once a month to make sure everything works properly. If you can’t test weekly, then aim for once a month.
Clean Your Smoke Detector
Unlike other household items, our smoke detectors don’t call for an elaborate cleaning. Instead, a gentle wiping is all it needs to relieve it from clunky debris. If left unaddressed, debris can keep your smoke detector from working when you need it most.
For the best results, take a look at your device’s user manual to review the preferred cleaning methods. However, if you’re unable to find your user manual, the most common cleaning procedure includes vacuuming out the detector and wiping the outside vents.
Replace Your Smoke Detector’s Batteries
If you want your smoke detector to stay alert, then you’ll need to replace the batteries. It’s as simple as that. We recommend switching out your smoke detector’s batteries twice a year. An easy way to track the maintenance is to align the replacement with the seasonal time change. So change the smoke detector’s batteries once for fall back and again when it’s time to spring ahead.

Carbon Monoxide Detectors
Test Your Carbon Monoxide Detector
Similar to a smoke detector, you need to test your carbon monoxide detector so it can stay in tip-top shape. We suggest testing your carbon monoxide detector once a month to keep it closely monitoring the air in your home.
Clean Your Carbon Monoxide Detector
Dust and debris is your carbon monoxide detector’s worse enemy. These particles clog the detector and make it difficult to get a clear reading of your home. To cleaning your CO detector most efficiently, we recommend using the methods provided in your CO detector’s user manual. If the manual is unavailable, then you can try to remove dust and debris with a soft cloth and the gentle brush attached to your vacuum cleaner.
Replace Your Carbon Monoxide Detector’s Batteries
A carbon monoxide detector can’t work properly without functioning batteries.
Make sure you replace your batteries twice a year. Similar to smoke detectors, you can keep track of when you need a new set of batteries with the seasonal time change.

Security Cameras
Our security cameras are the eyes, and sometimes ears, of our home while we’re away. We rely on these compact cameras to capture crystal clear footage of movement so we can stay up-to-date on important activity. But if a security camera has a dirty lens from a storm or sticky fingerprints, we won’t be able to see what’s happening. That’s why you should take some time this spring to whip out your microfiber cloth and clean your security camera’s lens. A gentle wipe is all they need.
How to Maintain Your Smart Home Security Equipment
Smart home security merges automation with protection. When you connect your smart home products with your home security system, you’re creating an environment where locking the doors, arming your panel and even closing your garage can be done from the sound of your voice using a smart speaker. In many cases, we can call on Alexa to enact important safety features. However, Alexa won’t be able to hear if her speakers are covered in crumbs and debris.
Yes, You Can Clean Your Amazon Echo Dot
Yes, your smart speaker deserves a little attention this spring, too. So find a microfiber cloth and get to wiping. But first, you can make the overall cleaning experience easier by gently tapping your Echo Dot’s speaker to remove the light debris sitting on its surface. For the harder-to-reach bits of dirt tucked within a crevice, use toothpick to dig away and clean.
Is your Alexa looking drab from collecting pet hair? You can get away with using a lint roller to keep Alexa’s fabric looking nice. For the lint that’s tough to remove, try using a vacuum cleaner’s brush.

Go Beyond Spring Cleaning
As we’ve mentioned throughout this article, your home security and smart home equipment deserve routine maintenance. And by routine we mean more than just once a year when spring is on the horizon. But you can start by adding them to your spring cleaning checklist.
Make it a priority to check in on some of your home’s most important items throughout the year. This will ensure it’s working when you need it.
The post Spring Cleaning Checklist: How to Maintain Home Security Equipment appeared first on Protect America Blog.
Article source here: Spring Cleaning Checklist: How to Maintain Home Security Equipment
Article source here:
Spring Cleaning with Kids: Harmful Household Cleaning Products To Avoid
Spring is nearly here and that means a couple of things. First, warm weather is on the horizon. Second, many of us will suddenly feel the need to clean each and every corner of our home. If you belong to the latter, and if you have little ones running around, then this is the article for you. Why? Because we’re going to discuss which harmful household cleaning products you should avoid.
While it’s always nice to strip our homes of dust and dirt, it’s equally important to make sure the products we’re using are kind to our kids. As parents, the last thing we want is for our child to get their hands on chemicals that can harm their bodies. And household cleaners can be damaging. For example, studies from the Official Journal of the American Academy of Pediatrics suggest that even though the rates of injuries related to household cleaners among children has decreased, the number of injuries remains high. Keep reading to find out what harmful household cleaning products you should leave at the store. Then we’ll discuss what alternatives you can use to keep your home neat and shiny instead.

What are the Most Harmful Household Cleaning Products?
You might think all harmful cleaners have a frightening or hard-to-pronounce name. Or perhaps you assume they’re only in the rare products we use every so often for obscure cleaning procedures like chipping away at strange gunk building up on the garage floors. But, this certainly isn’t the case. Some of the most dangerous chemicals for your youngsters are the ones we use most frequently. These cleaners include:
- Bleach
- Dishwasher detergent
- Window/glass cleaners
- Laundry detergent pods
Bleach
Bleach, one of our most beloved cleaning products is also the most problematic. It topped the American Academy of Pediatrics list of products most associated with an injury. The cleaner families rely on for clearing out germs, eating away at stains and brightening clothing can also bring an extremely unpleasant experience for your little one if they were to unscrew the cap and take a sip. Ingesting bleach can cause vomiting, burning in the esophagus and stomach and throat irritation. In more severe cases, sources suggest ingesting bleach can lead to death.
In other cases, mixing bleach with ammonia to clean your home can release chloramine gas. This substance is responsible for creating burning and irritation within the respiratory tract and eyes. Other symptoms include headache, coughing, wheezing, and tightness in the chest.
Dishwasher Detergent
Many of us keep our dishwasher detergent in a cabinet under the sink. This is great for convenience but bad for our little ones. Why? Because it’s a hiding spot that any tot can find.
And we don’t want our kids getting their hands on dishwasher detergent because the cleaner may contain bleach which, as you know by now, is a harmful chemical. Other dishwasher detergents might contain chlorine, which can irritate your eyes or skin and trouble your respiratory system. Another common substance in automatic dishwashing detergents is phosphate. According to the Cleveland Clinic, this can produce skin irritations, burns and can is even poisonous if swallowed.
Window/Glass Cleaners
Window and glass cleaners made the list because they often contain ammonia. Ammonia is a foul smelling alkaline agent that can put your little ones at risk of a severe eye injury. The agents in ammonia are so strong they can continue to burn your child’s eyes even after you’re done cleaning; the most severe symptoms can result in blinding.
Outside of eye injury, window and glass cleaners can also irritate the nose, throat and skin. The most severe cases can result in death.
Laundry Detergent Pods
Laundry detergent pods haven’t been on the market for very long, yet they’re already causing distress among homeowners.
First introduced in 2012, these tiny packets are designed to provide a powerful clean. Unfortunately, they’ve also caught the attention of small children thanks to their squishy design, bright colors and small size that’s easy for a youngster to grab and play with. But laundry pods are certainly not a toy.
These cleaning products are highly-concentrated with toxic chemicals. And the only thing concealing these chemicals within a pod is a thin surface coating that dissolves from moisture. So if your child sticks the pod in their mouth, the coating will break apart and release the chemicals. Or if a child squeezes at the pods, the coating can easily burst and release chemicals that way.
If consumed, a laundry detergent pod can cause a variety of symptoms ranging from eye damage, drowsiness and vomiting to mouth burns, skin burns and throat swelling making it difficult to breathe.

How Can I Keep Cleaning Products out of My Kid’s Reach?
If you choose to continue purchasing cleaners from the store or if you already have them at home, lock them away in a child-proof container. A good child-proof container is one that’s stored someplace that’s too high for a child to get to. An even better step would be to keep all cleaning products in a locked cabinet in a space your children don’t use.
If you insist on storing your products under the sink (it is convenient after all) then you’ll need to baby-proof the cabinet.


Products from Amazon.com

 29% Off
What are the Alternatives? Tips for Making Your Own Household Cleaning Products
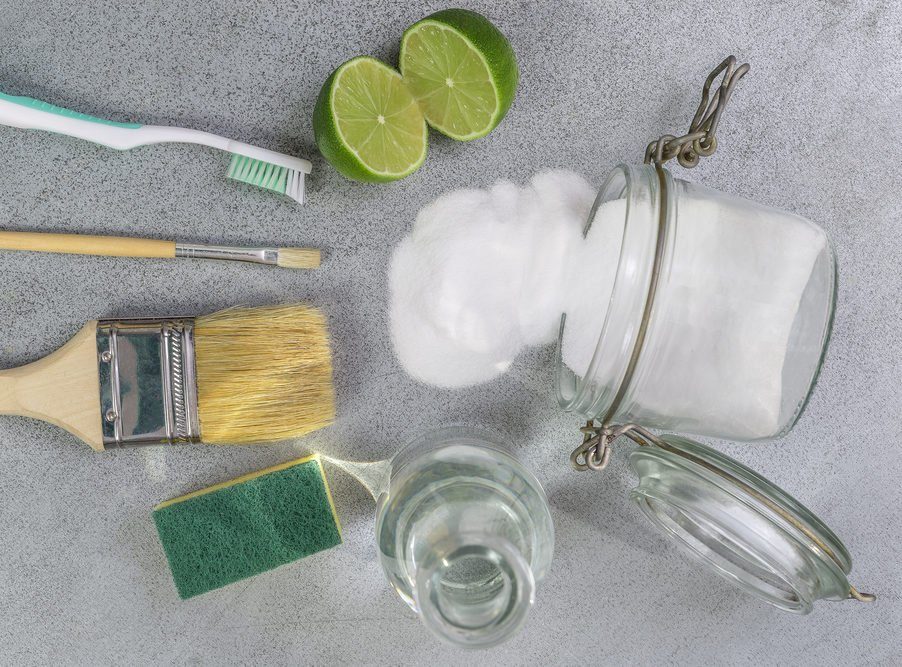
Now that we’ve named the harmful household cleaning products you should avoid, you’re probably wondering “well, what can I use to clean my home?” Believe it or not, chances are you already have a top notch, multi-purpose cleaner in your home. These items include:
- Vinegar
- Baking soda
- Non-gel toothpaste
Vinegar
Families with vinegar tucked away in their pantry are in luck. This liquid can serve as a gentle and safe natural fabric whitener. So say bye-bye to bleach and use this instead.
Pour some vinegar inside your favorite spray bottle and use it to clean surfaces around your home. This includes floors, microwaves, windows and dishes.
Baking Soda
This affordable, non-toxic powder can clean just about anything around the house. Some of the powder’s hidden talents include:
Oven Cleaner
When combined with white vinegar, you can use baking soda as a natural oven cleaner. Just spray white vinegar around the inside of your oven. Then, pour some baking soda over the vinegar. Let the baking soda and vinegar sit for about 30 minutes and then rub away for a thorough clean.
Fabric Whitener
For brighter clothing, add about half a cup of baking soda into your laundry load.
Toilet Bowl Cleaner
If your bathroom needs some refreshing, drop a cup of baking soda into your toilet bowl. Next, pour in a cup of vinegar. Let the natural cleaners sit for about 30 minutes to lift away the residue before brushing with a toilet brush.
Toothpaste
Do you have non-gel toothpaste and baking soda lying around? Good. Because when you pair the two products together they can combat tough water ring stains. Just apply the toothpaste mixture on a damp cloth and rub against the grain of your wood surface. Have a softer cloth on hand to make the surface sparkle. Avoid using this mixture on unfinished wood or fragile antiques.

Let’s Get to Cleaning
It’s always nice to pull the curtains back, open the windows and wipe away at all of the dust and grime that’s built up over winter. After all, that’s where the phrase “spring cleaning” originates. Hopefully, after reviewing this article, you’re able to disinfect and spritz safely. To avoid harmful household cleaning products, remember to check the labels before making purchases. Or sort through your cabinets and pantry to see what natural cleaners you already have.
Happy cleaning!
The post Spring Cleaning with Kids: Harmful Household Cleaning Products To Avoid appeared first on Protect America Blog.
Article source here: Spring Cleaning with Kids: Harmful Household Cleaning Products To Avoid
Article source here:
Spring Cleaning Checklist: How to Maintain Home Security Equipment
When it’s time to create a spring cleaning checklist, many of us will add everything to it but our home security and smart home equipment. This isn’t hard to believe. Most people don’t think these items need as much attention as, say, their toilet bowl or hardwood floors. But the truth is, for your equipment to stay highly-functioning it will need a little maintenance. Keep scrolling to learn how you can give your entire home a fresh start this season with a few easy-to-follow tips and tricks.
How to Maintain Your Home Security Equipment
As homeowners, we install home security equipment to protect our loved ones. And the only way our home security equipment can keep us safe is when it’s properly functioning. Make sure the most important equipment in your home is in tip-top shape by adding them to your spring cleaning checklist and following these suggestions.
- Test your equipment
- Clean your equipment
- Replace batteries
Smoke Detectors
The last thing any homeowner wants is to have their smoke detector not work when they need it. These detectors hang on our ceiling, forgotten and unnoticed until they chirp to warn us of danger. Because of the critical role they play in our home, we must set aside some time this spring to keep the smoke detector as good as new.
Test Your Smoke Detector
You can maintain your smoke detector by testing the life safety device. Ideally, you should test your detector weekly. However, sometimes life happens and we humans forget to do things. If this is the case for you, then try to conduct a test at least once a month to make sure everything works properly. If you can’t test weekly, then aim for once a month.
Clean Your Smoke Detector
Unlike other household items, our smoke detectors don’t call for an elaborate cleaning. Instead, a gentle wiping is all it needs to relieve it from clunky debris. If left unaddressed, debris can keep your smoke detector from working when you need it most.
For the best results, take a look at your device’s user manual to review the preferred cleaning methods. However, if you’re unable to find your user manual, the most common cleaning procedure includes vacuuming out the detector and wiping the outside vents.
Replace Your Smoke Detector’s Batteries
If you want your smoke detector to stay alert, then you’ll need to replace the batteries. It’s as simple as that. We recommend switching out your smoke detector’s batteries twice a year. An easy way to track the maintenance is to align the replacement with the seasonal time change. So change the smoke detector’s batteries once for fall back and again when it’s time to spring ahead.
Carbon Monoxide Detectors
Test Your Carbon Monoxide Detector
Similar to a smoke detector, you need to test your carbon monoxide detector so it can stay in tip-top shape. We suggest testing your carbon monoxide detector once a month to keep it closely monitoring the air in your home.
Clean Your Carbon Monoxide Detector
Dust and debris is your carbon monoxide detector’s worse enemy. These particles clog the detector and make it difficult to get a clear reading of your home. To cleaning your CO detector most efficiently, we recommend using the methods provided in your CO detector’s user manual. If the manual is unavailable, then you can try to remove dust and debris with a soft cloth and the gentle brush attached to your vacuum cleaner.
Replace Your Carbon Monoxide Detector’s Batteries
A carbon monoxide detector can’t work properly without functioning batteries.
Make sure you replace your batteries twice a year. Similar to smoke detectors, you can keep track of when you need a new set of batteries with the seasonal time change.
Security Cameras
Our security cameras are the eyes, and sometimes ears, of our home while we’re away. We rely on these compact cameras to capture crystal clear footage of movement so we can stay up-to-date on important activity. But if a security camera has a dirty lens from a storm or sticky fingerprints, we won’t be able to see what’s happening. That’s why you should take some time this spring to whip out your microfiber cloth and clean your security camera’s lens. A gentle wipe is all they need.
How to Maintain Your Smart Home Security Equipment
Smart home security merges automation with protection. When you connect your smart home products with your home security system, you’re creating an environment where locking the doors, arming your panel and even closing your garage can be done from the sound of your voice using a smart speaker. In many cases, we can call on Alexa to enact important safety features. However, Alexa won’t be able to hear if her speakers are covered in crumbs and debris.
Yes, You Can Clean Your Amazon Echo Dot
Yes, your smart speaker deserves a little attention this spring, too. So find a microfiber cloth and get to wiping. But first, you can make the overall cleaning experience easier by gently tapping your Echo Dot’s speaker to remove the light debris sitting on its surface. For the harder-to-reach bits of dirt tucked within a crevice, use toothpick to dig away and clean.
Is your Alexa looking drab from collecting pet hair? You can get away with using a lint roller to keep Alexa’s fabric looking nice. For the lint that’s tough to remove, try using a vacuum cleaner’s brush.
Go Beyond Spring Cleaning
As we’ve mentioned throughout this article, your home security and smart home equipment deserve routine maintenance. And by routine we mean more than just once a year when spring is on the horizon. But you can start by adding them to your spring cleaning checklist.
Make it a priority to check in on some of your home’s most important items throughout the year. This will ensure it’s working when you need it.
The post Spring Cleaning Checklist: How to Maintain Home Security Equipment appeared first on Protect America Blog.
Article source here: Spring Cleaning Checklist: How to Maintain Home Security Equipment
Spring Cleaning with Kids: Harmful Household Cleaning Products To Avoid
Spring is nearly here and that means a couple of things. First, warm weather is on the horizon. Second, many of us will suddenly feel the need to clean each and every corner of our home. If you belong to the latter, and if you have little ones running around, then this is the article for you. Why? Because we’re going to discuss which harmful household cleaning products you should avoid.
While it’s always nice to strip our homes of dust and dirt, it’s equally important to make sure the products we’re using are kind to our kids. As parents, the last thing we want is for our child to get their hands on chemicals that can harm their bodies. And household cleaners can be damaging. For example, studies from the Official Journal of the American Academy of Pediatrics suggest that even though the rates of injuries related to household cleaners among children has decreased, the number of injuries remains high. Keep reading to find out what harmful household cleaning products you should leave at the store. Then we’ll discuss what alternatives you can use to keep your home neat and shiny instead.
What are the Most Harmful Household Cleaning Products?
You might think all harmful cleaners have a frightening or hard-to-pronounce name. Or perhaps you assume they’re only in the rare products we use every so often for obscure cleaning procedures like chipping away at strange gunk building up on the garage floors. But, this certainly isn’t the case. Some of the most dangerous chemicals for your youngsters are the ones we use most frequently. These cleaners include:
- Bleach
- Dishwasher detergent
- Window/glass cleaners
- Laundry detergent pods
Bleach
Bleach, one of our most beloved cleaning products is also the most problematic. It topped the American Academy of Pediatrics list of products most associated with an injury. The cleaner families rely on for clearing out germs, eating away at stains and brightening clothing can also bring an extremely unpleasant experience for your little one if they were to unscrew the cap and take a sip. Ingesting bleach can cause vomiting, burning in the esophagus and stomach and throat irritation. In more severe cases, sources suggest ingesting bleach can lead to death.
In other cases, mixing bleach with ammonia to clean your home can release chloramine gas. This substance is responsible for creating burning and irritation within the respiratory tract and eyes. Other symptoms include headache, coughing, wheezing, and tightness in the chest.
Dishwasher Detergent
Many of us keep our dishwasher detergent in a cabinet under the sink. This is great for convenience but bad for our little ones. Why? Because it’s a hiding spot that any tot can find.
And we don’t want our kids getting their hands on dishwasher detergent because the cleaner may contain bleach which, as you know by now, is a harmful chemical. Other dishwasher detergents might contain chlorine, which can irritate your eyes or skin and trouble your respiratory system. Another common substance in automatic dishwashing detergents is phosphate. According to the Cleveland Clinic, this can produce skin irritations, burns and can is even poisonous if swallowed.
Window/Glass Cleaners
Window and glass cleaners made the list because they often contain ammonia. Ammonia is a foul smelling alkaline agent that can put your little ones at risk of a severe eye injury. The agents in ammonia are so strong they can continue to burn your child’s eyes even after you’re done cleaning; the most severe symptoms can result in blinding.
Outside of eye injury, window and glass cleaners can also irritate the nose, throat and skin. The most severe cases can result in death.
Laundry Detergent Pods
Laundry detergent pods haven’t been on the market for very long, yet they’re already causing distress among homeowners.
First introduced in 2012, these tiny packets are designed to provide a powerful clean. Unfortunately, they’ve also caught the attention of small children thanks to their squishy design, bright colors and small size that’s easy for a youngster to grab and play with. But laundry pods are certainly not a toy.
These cleaning products are highly-concentrated with toxic chemicals. And the only thing concealing these chemicals within a pod is a thin surface coating that dissolves from moisture. So if your child sticks the pod in their mouth, the coating will break apart and release the chemicals. Or if a child squeezes at the pods, the coating can easily burst and release chemicals that way.
If consumed, a laundry detergent pod can cause a variety of symptoms ranging from eye damage, drowsiness and vomiting to mouth burns, skin burns and throat swelling making it difficult to breathe.
How Can I Keep Cleaning Products out of My Kid’s Reach?
If you choose to continue purchasing cleaners from the store or if you already have them at home, lock them away in a child-proof container. A good child-proof container is one that’s stored someplace that’s too high for a child to get to. An even better step would be to keep all cleaning products in a locked cabinet in a space your children don’t use.
If you insist on storing your products under the sink (it is convenient after all) then you’ll need to baby-proof the cabinet.
Products from Amazon.com
What are the Alternatives? Tips for Making Your Own Household Cleaning Products
Now that we’ve named the harmful household cleaning products you should avoid, you’re probably wondering “well, what can I use to clean my home?” Believe it or not, chances are you already have a top notch, multi-purpose cleaner in your home. These items include:
- Vinegar
- Baking soda
- Non-gel toothpaste
Vinegar
Families with vinegar tucked away in their pantry are in luck. This liquid can serve as a gentle and safe natural fabric whitener. So say bye-bye to bleach and use this instead.
Pour some vinegar inside your favorite spray bottle and use it to clean surfaces around your home. This includes floors, microwaves, windows and dishes.
Baking Soda
This affordable, non-toxic powder can clean just about anything around the house. Some of the powder’s hidden talents include:
Oven Cleaner
When combined with white vinegar, you can use baking soda as a natural oven cleaner. Just spray white vinegar around the inside of your oven. Then, pour some baking soda over the vinegar. Let the baking soda and vinegar sit for about 30 minutes and then rub away for a thorough clean.
Fabric Whitener
For brighter clothing, add about half a cup of baking soda into your laundry load.
Toilet Bowl Cleaner
If your bathroom needs some refreshing, drop a cup of baking soda into your toilet bowl. Next, pour in a cup of vinegar. Let the natural cleaners sit for about 30 minutes to lift away the residue before brushing with a toilet brush.
Toothpaste
Do you have non-gel toothpaste and baking soda lying around? Good. Because when you pair the two products together they can combat tough water ring stains. Just apply the toothpaste mixture on a damp cloth and rub against the grain of your wood surface. Have a softer cloth on hand to make the surface sparkle. Avoid using this mixture on unfinished wood or fragile antiques.
Let’s Get to Cleaning
It’s always nice to pull the curtains back, open the windows and wipe away at all of the dust and grime that’s built up over winter. After all, that’s where the phrase “spring cleaning” originates. Hopefully, after reviewing this article, you’re able to disinfect and spritz safely. To avoid harmful household cleaning products, remember to check the labels before making purchases. Or sort through your cabinets and pantry to see what natural cleaners you already have.
Happy cleaning!
The post Spring Cleaning with Kids: Harmful Household Cleaning Products To Avoid appeared first on Protect America Blog.
Article source here: Spring Cleaning with Kids: Harmful Household Cleaning Products To Avoid
The 5 Worst Places to Install Hidden Outdoor Security Cameras
So you want to monitor the exterior of your home, but you don’t want people to know they’re on camera? There’s an easy solution for that–hidden outdoor security cameras. Sure, leaving a camera out in the open can immediately grab the attention of unwanted guests, but concealing a camera reduces the odds of a burglar tampering with your device.
Prime hiding techniques include sticking your camera in a birdhouse, a fake rock or within camouflage skins to help your camera naturally blend into its outdoor environment. But not all hiding spots are created equal. Some block your camera’s field of vision or damage the camera itself.
Considering how useful it is to use surveillance cameras to deter burglars, it wouldn’t hurt to take a minute to review where they shouldn’t be. Continue reading to learn about the five worst places you can install your outdoor security cameras.
1. Close to a Nest or Tree Branch
It makes sense that a homeowner would want to install their security cameras on a tree. Most trees are tall enough to permit a wide range for viewing important activity around the house. Another benefit is that most houses have trees at the front of their property, making it easy to quickly detect unwanted visitors and take action before they even make it to the front door.
However, trees also have branches with leaves that are surrounded by other branches with leaves. This foliage can get in the way of your camera’s field of view, making it difficult to distinguish faces and objects. And if you can’t see who broke into your home or trespassed on your property, then what purpose is your camera really serving?
Additionally, the tree you decide to mount your hidden outdoor security cameras on might also be where the neighborhood bird lays its nest. The mud, twigs and leaves hanging from the nest can create a barrier from your camera’s field of vision.
2. On Eaves that are Too High or Too Low
Avoid installing your outdoor security cameras on your home’s eaves (or on your roof for that matter). Eaves, otherwise known as the tips of your home’s roof, are usually too high above the ground to provide a clear visual of the movement happening around your home. So before lugging the ladder out from the attic, remember that cameras installed over 10 feet high do a poor job of recording faces; and cameras installed lower than 8 feet are within reach for the wrong people to grab and tamper with.

3. Behind a Window
It’s easy to understand why a homeowner would want to install a security camera behind a window–especially a window at the front of a house.
A burglar is likely to scope the windows to see if anyone’s home; or they’ll use a window to break into your property. But if they see a security camera, they may get scared and retreat. And if they don’t get scared and decide to break your window, well, you’ll have the footage on camera.
Unfortunately, depending on the security camera you use, a window can work against your device. For example, cameras with IR lights will reflect off your window’s glass and back into your camera. This will leave you with an unpleasant glare that blocks out important footage.
4. Facing the Sun
Few objects benefit from getting too much sunlight. This includes your security cameras.
Therefore, keep your security camera from directly facing the sun. The sunlight makes it difficult for the camera to capture your subject. While facing the sun, the camera’s field of vision will become silhouettes, casting a black shadow around your subject. This happens because, like us humans, it’s hard for a camera to see past a sun’s glare.
Additionally, if your security camera isn’t weather resistant, then too much sunlight can damage the device.
5. Far From The Front of Your Home
What do a front door, garage door and first floor window each have in common? Aside from being unique points of entry, they’re also usually found at the front of a home. What’s another fun fact? Burglars like to use these to enter a home.
Therefore, we encourage you to keep your hidden outdoor security cameras as close to the front of your home as possible. That way your camera can record and keep track of who’s coming and going at all times.

Looking For the Right Outdoor Security Cameras?
Now that you know where to keep your security cameras outdoors, it’s time to make sure you’re monitoring with the right equipment. It doesn’t matter how well you’ve hidden your camera, if the equipment is low-quality it will be difficult to protect your home. With Protect America you have access to best-in-class outdoor cameras with night-vision, 1080p HD recording and weather resistance that offers complete exterior protection. Another huge benefit to using Protect America is that you’re investing in a home security system that goes beyond just a camera.
When you join our family, you’ll get to enjoy the peace of mind that comes from having a professionally monitored system that’s ready to keep your home and loved ones protected at all hours of the day. If you’re ready to start monitoring your home with a company that’s been protecting families for over 25 years, then contact us today for a free quote.
The post The 5 Worst Places to Install Hidden Outdoor Security Cameras appeared first on Protect America Blog.
Article source here: The 5 Worst Places to Install Hidden Outdoor Security Cameras
Article source here:
The 5 Worst Places to Install Hidden Outdoor Security Cameras
So you want to monitor the exterior of your home, but you don’t want people to know they’re on camera? There’s an easy solution for that–hidden outdoor security cameras. Sure, leaving a camera out in the open can immediately grab the attention of unwanted guests, but concealing a camera reduces the odds of a burglar tampering with your device.
Prime hiding techniques include sticking your camera in a birdhouse, a fake rock or within camouflage skins to help your camera naturally blend into its outdoor environment. But not all hiding spots are created equal. Some block your camera’s field of vision or damage the camera itself.
Considering how useful it is to use surveillance cameras to deter burglars, it wouldn’t hurt to take a minute to review where they shouldn’t be. Continue reading to learn about the five worst places you can install your outdoor security cameras.
1. Close to a Nest or Tree Branch
It makes sense that a homeowner would want to install their security cameras on a tree. Most trees are tall enough to permit a wide range for viewing important activity around the house. Another benefit is that most houses have trees at the front of their property, making it easy to quickly detect unwanted visitors and take action before they even make it to the front door.
However, trees also have branches with leaves that are surrounded by other branches with leaves. This foliage can get in the way of your camera’s field of view, making it difficult to distinguish faces and objects. And if you can’t see who broke into your home or trespassed on your property, then what purpose is your camera really serving?
Additionally, the tree you decide to mount your hidden outdoor security cameras on might also be where the neighborhood bird lays its nest. The mud, twigs and leaves hanging from the nest can create a barrier from your camera’s field of vision.
2. On Eaves that are Too High or Too Low
Avoid installing your outdoor security cameras on your home’s eaves (or on your roof for that matter). Eaves, otherwise known as the tips of your home’s roof, are usually too high above the ground to provide a clear visual of the movement happening around your home. So before lugging the ladder out from the attic, remember that cameras installed over 10 feet high do a poor job of recording faces; and cameras installed lower than 8 feet are within reach for the wrong people to grab and tamper with.
3. Behind a Window
It’s easy to understand why a homeowner would want to install a security camera behind a window–especially a window at the front of a house.
A burglar is likely to scope the windows to see if anyone’s home; or they’ll use a window to break into your property. But if they see a security camera, they may get scared and retreat. And if they don’t get scared and decide to break your window, well, you’ll have the footage on camera.
Unfortunately, depending on the security camera you use, a window can work against your device. For example, cameras with IR lights will reflect off your window’s glass and back into your camera. This will leave you with an unpleasant glare that blocks out important footage.
4. Facing the Sun
Few objects benefit from getting too much sunlight. This includes your security cameras.
Therefore, keep your security camera from directly facing the sun. The sunlight makes it difficult for the camera to capture your subject. While facing the sun, the camera’s field of vision will become silhouettes, casting a black shadow around your subject. This happens because, like us humans, it’s hard for a camera to see past a sun’s glare.
Additionally, if your security camera isn’t weather resistant, then too much sunlight can damage the device.
5. Far From The Front of Your Home
What do a front door, garage door and first floor window each have in common? Aside from being unique points of entry, they’re also usually found at the front of a home. What’s another fun fact? Burglars like to use these to enter a home.
Therefore, we encourage you to keep your hidden outdoor security cameras as close to the front of your home as possible. That way your camera can record and keep track of who’s coming and going at all times.
Looking For the Right Outdoor Security Cameras?
Now that you know where to keep your security cameras outdoors, it’s time to make sure you’re monitoring with the right equipment. It doesn’t matter how well you’ve hidden your camera, if the equipment is low-quality it will be difficult to protect your home. With Protect America you have access to best-in-class outdoor cameras with night-vision, 1080p HD recording and weather resistance that offers complete exterior protection. Another huge benefit to using Protect America is that you’re investing in a home security system that goes beyond just a camera.
When you join our family, you’ll get to enjoy the peace of mind that comes from having a professionally monitored system that’s ready to keep your home and loved ones protected at all hours of the day. If you’re ready to start monitoring your home with a company that’s been protecting families for over 25 years, then contact us today for a free quote.
The post The 5 Worst Places to Install Hidden Outdoor Security Cameras appeared first on Protect America Blog.
Article source here: The 5 Worst Places to Install Hidden Outdoor Security Cameras
Tuesday, February 25, 2020
How To Install Electric Heaters
How to Install an Electric Heater with Thermostat: The big picture
Does your home have a room or two that just don’t stay warm in cold weather? If you can’t adjust the central heating system to warm the room, consider adding an electric heater. You can conveniently mount electric heaters in walls, in floors (between joists), or along the baseboard.
While electric heat is more expensive than gas, the heaters and materials for installation are much less expensive. Keep in mind that these are for auxiliary heat, not the main source. We recommend that you put the heater on a separate setback thermostat that automatically turns it on when you’re home and using the room.
DIY Wall Mounted Electric Heater with Thermostat
In this article, we’ll show you how to hard-wire a heater, which means you have to run a separate circuit to the main panel. This is safer than using a plug-in portable heater, which can overload an existing circuit. We’ll show you how to size the heater, run a new, safe 240-volt circuit and install a programmable thermostat. We won’t show you how to hook the circuit into the main electrical panel. Hire a licensed electrician for that step.
Most homes have sufficient capacity for the new circuit in the service panel for an electric heater with thermostat. If you have circuit breakers, you’ll need two empty breaker spaces. A fuse box can be more difficult to read. Have the electrician you hire check your panel before you start the project and confirm the planned hookup. Be sure to apply for a local electrical permit so an inspector will check your work.
Electric heaters are sized by wattage. See “Sizing Your Heater, below” to determine the right one for your space. For a heater up to 2,880 watts, run a cable with two 14-gauge wires and one ground wire (called 14-2 with ground); run 12-2 cable with ground to handle up to 3,840 watts.
Figure A: Typical Wiring Plan
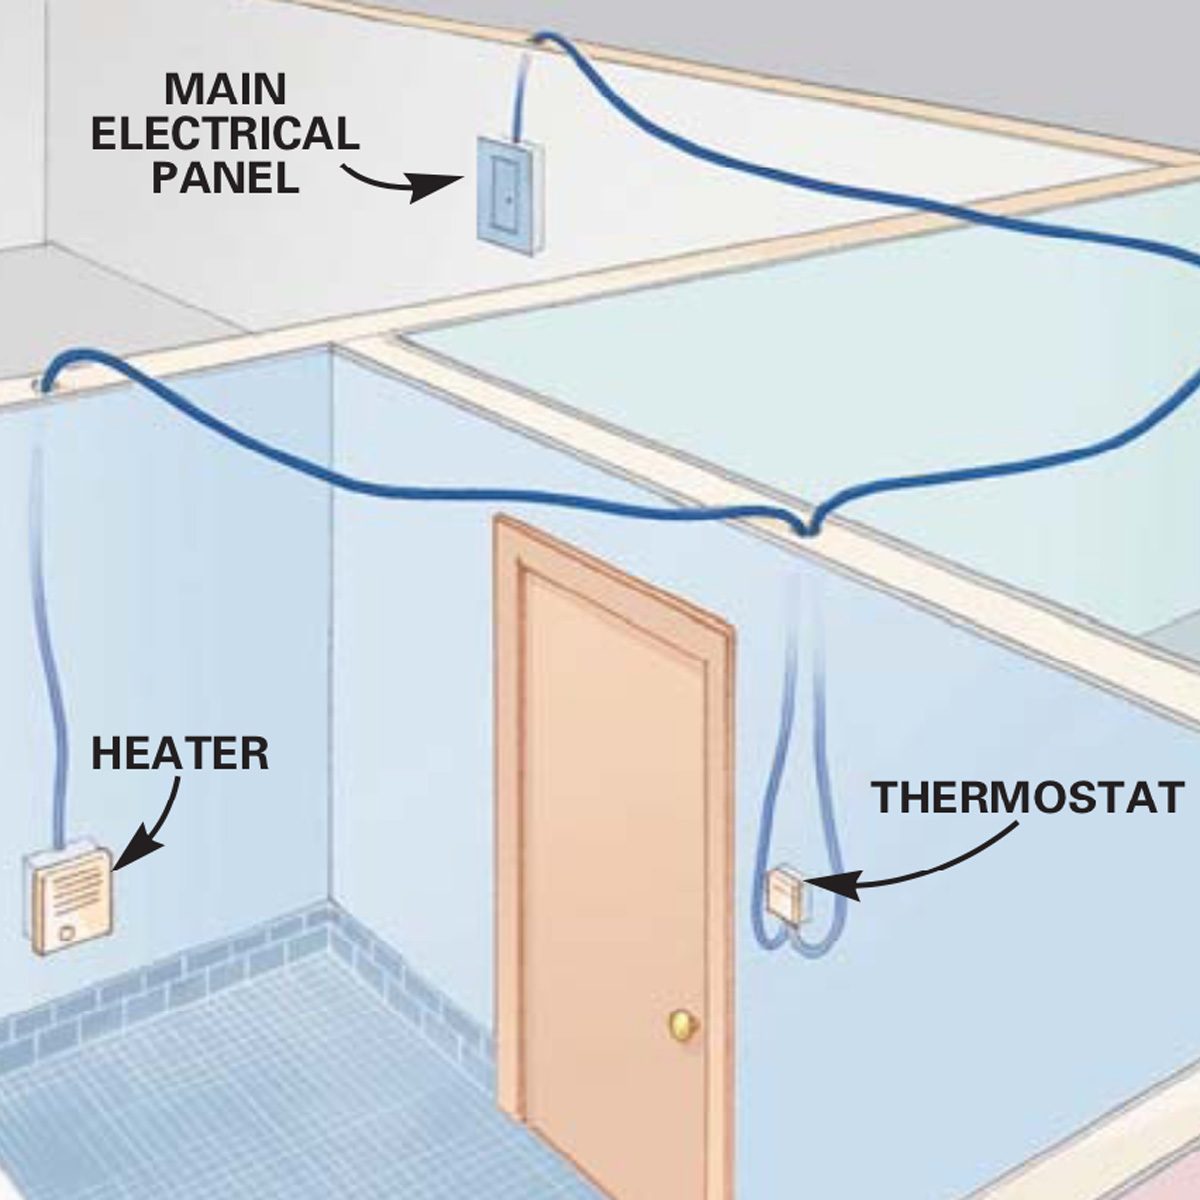
This is a standard, simple plan for wiring an electric heater.
Find the easiest cable route: Locate the heater
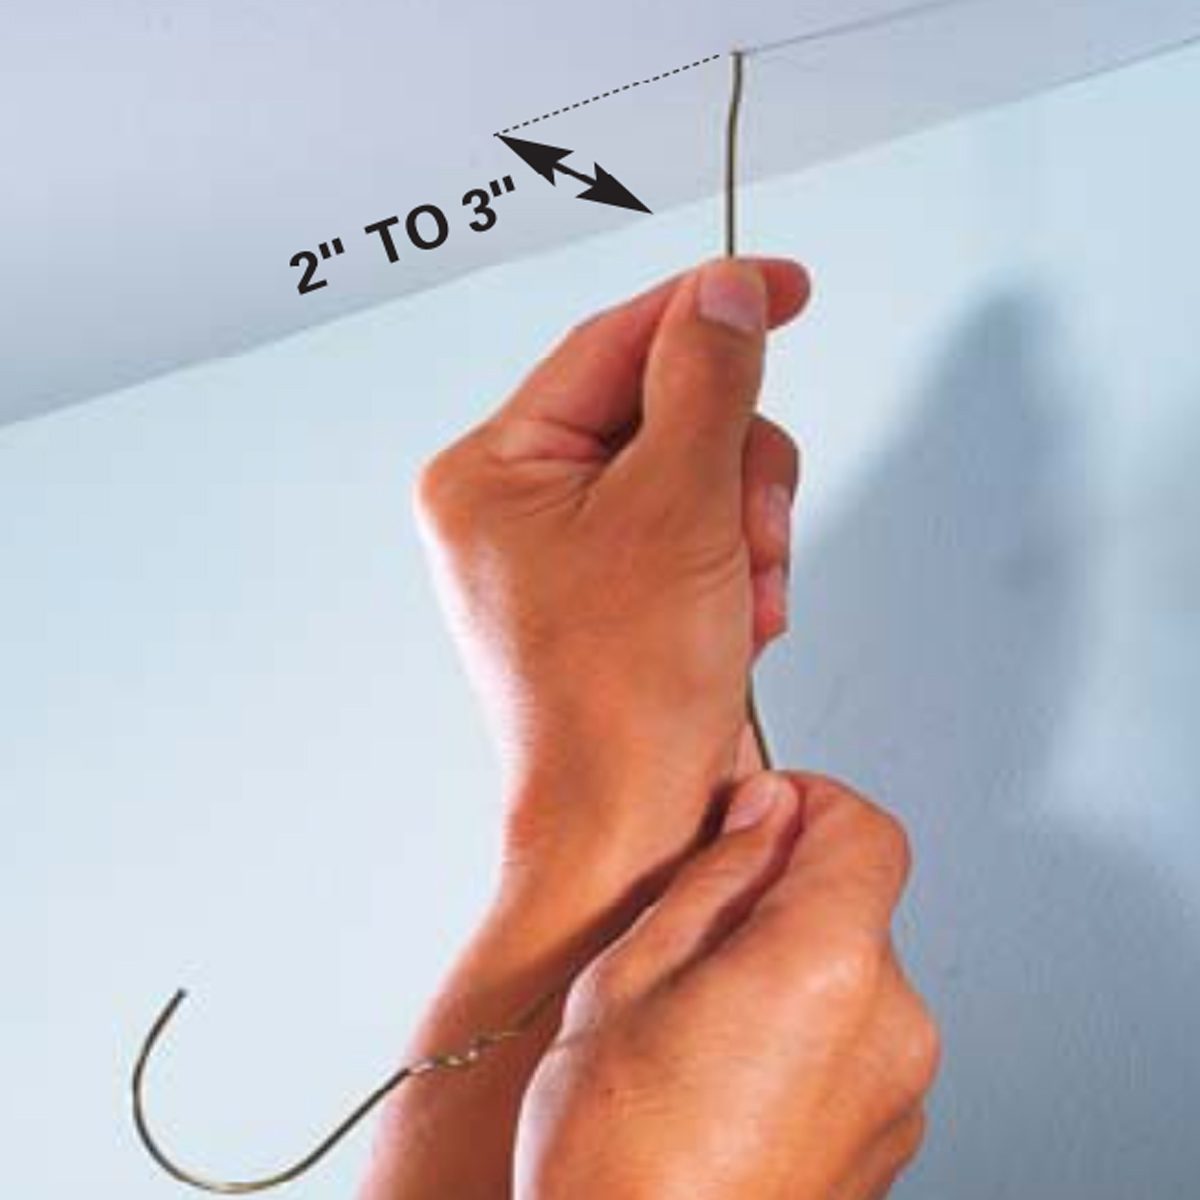
Find a location for the heater and thermostat on the wall. Push about 12 in. of wire, such as a coat hanger, through the ceiling drywall directly above the heater and thermostat locations.
Article source here: How To Install Electric Heaters
Article source here:
Subscribe to:
Posts (Atom)
My Brand New Basement Smelled Like a Sewage — You’ll Never Guess What Caused It
Welcome to Domestic Disasters, where we take a look at some of your worst mess-ups and grossest finds. We take them to the experts to find o...
