Meal Prep Delivery

Saturday, November 30, 2019

15 Incredible Tiny Homes You Can Buy Now

Brevard Tiny HomesPhoto: Courtesy of Brevard Tiny Homes

Brevard Tiny Homes

Brevard Tiny Homes offers four types of design tiny homes — single level options, ladder living, climbing stairs and a 8x18 ft. model. Brevard features seven different models like Keep on the Sunny Side, a 8x24 ft. ladder living home, with a cost of $44,000. Plus, the name comes from a Carter Family song, what better way to harken back to simpler living. Plus: Fix Slippery Stairs Photo: Courtesy of Brevard Tiny Homes


Article source here: 15 Incredible Tiny Homes You Can Buy Now

How to Install a Thermostat

You can reduce your home’s heating and cooling costs by about 15 percent with a programmable thermostat. It automatically keeps the temperature at a comfortable level when you’re home, but switches to an energy-saving level when you’re away or asleep. Programmable thermostats are available from home centers and hardware stores. The higher-priced models provide more programming options.

Programmable thermostats will work with most gas or oil furnaces and central air conditioners. However, heat pumps, electric baseboards, and a few other systems require special features. Read the package to make sure the programmable thermostat you buy is compatible with your heating and cooling system. If you are unsure, call your local utility or a heating and cooling contractor.

Should you get a Wi-Fi thermostat? Click here to find out more.

Remove the old thermostat

removing thermostat

To begin, turn off power to the heating and cooling systems at the main panel. Then remove the old thermostat. If your old thermostat contains mercury, you’ll see a small glass tube with a shiny silver ball inside. Mercury is toxic. Take this type of thermostat to a hazardous waste disposal site.

There will be anywhere from two to five wires hooked up to the old thermostat. Label the thermostat wiring with marking tabs using the letters on the old screw terminals as reference. If your new thermostat doesn’t come with marking tabs, use masking tape. Remove and discard the old thermostat.


Article source here: How to Install a Thermostat

10 Household Items That are Extremely Flammable

flour

Flour

Yes it’s true! Flour can be a fire hazard, especially flour dust in the air. In fact, many powdered foods, such as non-dairy creamer, spices and dried milk, will ignite readily. This is because they can burn easily from all sides, so they flare up quickly when exposed to a naked flame. So beware when you’re using dried, powdery foods like flour.

If you should be unlucky enough to suffer a house fire, a smoke alarm could save your life. So always be sure yours is properly maintained.


Article source here: 10 Household Items That are Extremely Flammable

Metal Roofing Installation: How to Install Metal Roofing Over Shingles

Can you put steel roofing over asphalt?

Can you avoid tearing off your old asphalt shingle roof by putting a steel roof over it? Maybe. Most codes now allow no more than two layers of roofing before requiring a complete tear-off. So, if your roof has two layers, it may require a complete tear-off, even though steel is lighter than asphalt. Codes vary, so call your local building department to know how to install metal roofing over shingles properly, code-wise.

What’s involved in how to install metal roofing

metal roof installation

Anatomy of a steel roof

This is what it looks like when you install a steel shingle roof system over an existing asphalt shingle roof.

metal roof installation

Detail 1: Venting—the eaves

To vent the roof, holes are cut in the old roof above the soffit, which pulls air through the soffit vents underneath.

metal roof installation

Detail 2: Venting—the ridge

Cool outside air travels under the shingles to the vented ridge, pulling out moisture and heat.

A steel roof is a lifetime investment, lasting 50 years or more if it’s a good one. Asphalt roofs typically last 20 to 30 years, depending on the installation and shingle quality. So, the investment might be worth it, but the range of choices makes shopping for a steel roofing system more complicated than you might think.

If you want to install steel over asphalt, your best choice for installing metal roofing is to use a steel shingle system like the one shown instead of the more common (and more expensive) standing seam steel. In a standing seam roof, long, single panels run vertically all the way from the eave to the ridge. In contrast, steel shingles are small panels installed in horizontal rows much like other shingles.

Better steel shingle systems, like the one shown, install over a framework of 2x2s. This framework has three big advantages. First, because the frame is screwed directly to the rafters and the interlocked shingles are screwed to the frame, the roof can withstand winds of up to 120 mph without damage. Second, the frame creates a flat and straight surface even when the shingles are badly curled or the roof ridge is bowed.

Finally, the frame creates a ventilation gap that helps prevent ice dams in the winter and cools the roof and the house in the summer. To vent the roof, holes are cut in the old roof (Detail 1) above the soffit, which pulls air through the soffit vents underneath. Cool outside air then travels under the shingles to the vented ridge (Detail 2), pulling out moisture and heat.

Pros and cons for metal roofing installation

metal roofing installation

Stone-coated steel shingles

Material cost per 100 sq. ft.: $200 to $350
Labor cost per 100 sq. ft.: $150 to $450
Weight per 100 sq. ft.: 120 to 140 lbs.
Wind resistance: 120 mph
Resistance to hail damage: Excellent
Over an asphalt roof? Yes
Do it yourself? No

metal roofing installation

Painted steel shingles

Material cost per 100 sq. ft.: $125 to $250
Labor cost per 100 sq. ft.: $150 to $650
Weight per 100 sq. ft.: 65 to 85 lbs.
Wind resistance: 120 mph
Resistance to hail damage: Very good
Over an asphalt roof? Yes
Do it yourself? Yes

metal roofing installation

Standing seam steel

Material cost per 100 sq. ft.: $300 to $550
Labor cost per 100 sq. ft.: $400 to $1,200
Weight per 100 sq. ft.: 140 to 160 lbs.
Wind resistance: 80 mph
Resistance to hail damage: Good
Over an asphalt roof? No
Do it yourself? No

Metal Roofing Installation: How to Install Metal Roofing Over Shingles

Standard asphalt shingles

Material cost per 100 sq. ft.: $30 to $85
Labor cost per 100 sq. ft.: $75 to $250
Weight per 100 sq. ft.: 240 to 300 lbs.
Wind resistance: 60 to 80 mph
Resistance to hail damage: Good
Over an asphalt roof? Yes
Do it yourself? Yes

Steel roofs can be noisy and unattractive in residential settings. However, if the steel roof is installed over an existing asphalt roof, noise shouldn’t be a problem. And, as you can see from the photos, if you pick a good-looking style from the many choices available, your house definitely won’t look like a cattle barn.

A steel roof is expensive, but if it lasts the life of your home, it might be worth it. The type we show here costs about twice as much to have installed as a new asphalt roof. But some steel shingle manufacturers offer do-it-yourself systems that cost about the same as an installed asphalt roof for those who want to learn how to instal a metal roof on their own. These systems aren’t attached to a frame, but instead install directly on the old roof. Consequently, they don’t have the same ventilation advantages.

Additional Information for how to install a metal roof


Article source here: Metal Roofing Installation: How to Install Metal Roofing Over Shingles

How to Clean a Chimney

Intro to chimney maintenance: Meet the pros

Jim Smart has owned Smart Sweep Chimney Service for 14 years. He and his son Jesse are certified professional chimney sweeps. Together, this father/son team inspect, clean and repair chimneys in the Minneapolis/St. Paul area. Jim also holds a certificate in forensic chimney fire analysis. If you use your fireplace or woodstove regularly but can’t remember the last time your chimney was cleaned, it’s probably overdue. In many cases, you can clean the chimney yourself and save a few hundred dollars.

Removing ordinary chimney soot is pretty simple. But if you have heavy creosote buildup, you’ll have to call in a pro. We’ll show you how to inspect yours to see if it qualifies as a DIY job. If it does, just follow these steps. Otherwise, hire a certified chimney sweep.

Is fireplace cleaning a DIY job?

Figure A: Chimney cutaway

Clean creosote buildup from all parts of the chimney. Most chimney fires start in the smoke chamber/smoke shelf area, so it’s the most important area to clean (Figure A). Since that area is hard to reach in some fireplaces, check yours to see if you can reach into it and still have room to maneuver a brush. If you can’t reach it, this isn’t a DIY project.

Next, see if you can access the chimney crown. If you have a very steep roof pitch or aren’t comfortable working on your roof, then this isn’t a job for you. Call a certified chimney sweep. If you decide you can handle the heights, make sure to wear a safety harness.

Chimney Fires Destroy Homes

Creosote buildup may not look dangerous, but it ignites at a mere 451 degrees F, and once it starts burning, it expands like foam sealant. In less than a minute, it builds to more than 2,000 degrees F and can engulf your entire chimney and destroy your home.

Even if you clean your chimney regularly, you should still have it inspected by a qualified chimney sweep once a year. Certified chimney sweeps are trained to recognize chimney deterioration and venting problems and can assess your chimney’s condition.

If you burn mostly green (wet) logs, have your chimney cleaned or inspected every 50 burns. If you see moisture bubbling out the ends of the logs when they’re burning, the wood is wet. This green wood doesn’t burn cleanly and sends a lot of unburned particles (smoke) up the chimney, where they build up as creosote and soot. Dry hardwoods, such as oak and birch, burn hotter and cleaner. With them, have your chimney cleaned or inspected every 70 burns.

A quick way to tell if your chimney needs cleaning is to run the point of your fireplace poker along the inside of your chimney liner. If you find a 1/8-in. or more layer of buildup (the thickness of a nickel), call a chimney sweep. Chimney sweeps may see 40 to 50 chimney fires a year, and more than half of the chimneys they service require extra cleaning because the homeowners wait too long before calling. In extreme cases, the hardened layer of buildup requires cleaning with special tools or chemicals.

A professional cleaning includes an inspection for soot buildup, obstructions, cracks in the chimney liner and signs of water damage. Older chimneys often have gaps between clay liner sections where the mortar has fallen out.

When hiring a chimney sweep, look for someone who’s certified and insured and will provide an upfront cost estimate. (For a list of certified chimney sweeps, contact the Chimney Safety Institute of America at csia.org.)

Do an inspection

Strap on goggles and a respirator, clean the ashes out of the firebox and remove the grate. Then open a door or window and wait a few minutes before opening the damper so the pressures equalize. Then open the damper and wait a few more minutes for heat to rise from the house.

Grab your brightest flashlight and a fireplace poker and lean into the firebox. Shine your light into the smoke chamber and flue and use the poker to scratch the surface. If the soot has a matte black finish and the scratch is 1/8 in. deep or less, it’s a DIY job. But if the buildup is deeper or has a shiny, tarlike appearance, you have heavy creosote buildup. Stop using your fireplace immediately and call a professional chimney sweep.

Get the right cleaning tools: Match the brush to the flue liner

Buy a metal bristle brush for a clay flue liner and a brush with plastic bristles for a metal liner. Buy enough rods to handle the entire height of your chimney.

How to Stop Chimney Water Leaks


Article source here: How to Clean a Chimney

15 Crazy Attempts at Preventing Squirrels From Reaching Bird Feeders

Twirl-a-Squirrel

Droll Yankee’s squirrel-proof bird feeder has provided plenty of material for YouTube, and it’s an interesting contraption. It holds a battery powered motor that gets activated when a squirrel hops on and starts spinning. Check out this sure-fire method to prevent squirrels from digging in your potted plants.


Article source here: 15 Crazy Attempts at Preventing Squirrels From Reaching Bird Feeders

CFL Bulbs: Here’s What You Need to Know

CFL Bulbs: An overview

Compact fluorescent bulbs—usually referred to by the initials “CFL”— have come a long way. Early versions were expensive (as much as $15 apiece) and plagued with problems (they appeared dim, flickered, didn’t come on instantly and burned out sooner than promised).

But that was then. New technology has solved most of the old problems. Today, using CFLs is one of the easiest and most effective ways to save money on energy. It’s as easy as screwing in a bulb and flipping a switch. Many CFLs can be purchased for about $3 or less, and some utility companies offer discounts or rebates to customers who buy them.

That said, buying and using CFLs can still be confusing. The answers to these common questions will help you put these great energy-saving bulbs to best use.

How to choose CFL bulbs

CFLs

Question

I’ve looked at compact fluorescent bulbs at the home center, but I’m not sure what to buy. How do I know which CFLs provides as much light as a regular 60- or 100-watt bulb?

Answer: Look at the lumen rating, not the bulb wattage, to compare real light output. Then buy a CFL with 20 percent more lumens than the incandescent bulb you want to replace has. For example, to replace a 60-watt incandescent bulb that has 870 lumens, buy a CFL with at least 1,050 lumens. If you follow wattage guidelines on the package, you may not be satisfied with the light output. Be wary of CFLs that don’t list the lumens on the packaging. Their claims that the light output matches a certain incandescent wattage are sometimes misleading or wrong.

Another reason you need more lumens is that a CFL will dim over time. It will lose 20 to 25 percent lumen power after 4,000 hours (40 percent of a CFL’s 10,000-hour-rated life). Incandescent bulbs also lose lumens, but the life of these bulbs is extremely short compared with that of CFLs.

Best (and worst) places to use CFL Bulbs

Question: Are there some places where using a CFL makes more sense than others?

Answer: Since many CFLs last up to 10 times as long as incandescents, consider placing CFLs in difficult-to- reach fixtures. It may mean climbing the ladder once every five years instead of every year. It also makes sense to use CFLs in light fixtures that are continuously “On” more than three hours per day.

CFLs save energy in any location, but there are some circumstances that can reduce their lifespan:

  • Frequent on-off switching, as in a hallway.
  • Excessive vibration near doors or stairways.
  • High-humidity areas such as a damp basement.
  • A CFL that’s not rated for use in an enclosed light fixture might burn out prematurely if enclosed.

Payback: How long? How come?

CFL Bulbs: Here’s What You Need to Know

Question

CFLs cost five or six times as much as regular bulbs. How long do I need to use CFLs before I recoup my investment?

Answer: Although CFLs have come down dramatically in price, their electronic ballast and other features do make them more expensive to manufacture than incandescent bulbs. The payback period will vary with the cost of electricity in your area. However, based on a cost of 10¢ per kWh, a 15-watt CFL will cost about $12 to operate over its 8,000-hour projected lifespan. Burning a 60-watt incandescent bulb with equivalent light output for the same length of time will cost about $48; a cost difference of $36 (and you’ll need to buy four to eight bulbs since they have a much shorter lifespan). Based on those numbers, a CFL will pay for itself in about 500 hours (in about four months if the bulb is used four hours per day).

Lights Out

There is a small power surge and a small spike in electrical usage when most lights are turned on, but as a rule of thumb, you’ll save money by turning off lights that will remain off for more than five minutes.

CFLs vs. incandescent bulbs

CFL Bulbs: Here’s What You Need to Know

Question

How do compact fluorescent lights work and how do they differ from standard bulbs?

Answer: Standard incandescent bulbs work by using electricity to heat up a thin filament inside the bulb. As the filament heats up, it glows, producing light. The drawback to standard bulbs is that most of the energy consumed—over 80 percent—goes into creating heat, not light.

CFLs work on a totally different principle. They consist of two basic parts: a gas-filled tube (what many of us would call the “bulb”) and a ballast that contains the electronics. In simple terms, electricity from the ballast excites phosphors on the inside surface of the bulb; these phosphors in turn glow, producing light. Since CFLs don’t waste as much energy creating heat, they’re much more energy efficient. You see the savings when you compare the wattages; a 15-watt CFL provides about as much light as a 60-watt incandescent bulb.

What a Watt Costs

The cost of electricity in the United States ranges from less than 10¢ per kilowatt hour to nearly 40¢ per kilowatt hour. The more expensive your electricity, the faster you’ll recoup the extra money you pay for CFLs.

The ‘quality of light’ factor

CFL Bulbs: Here’s What You Need to Know

Question

I stopped buying CFLs because the first few I bought years ago seemed dim and the color of the light was weird. Are CFLs more like “normal” incandescent bulbs these days?

Answer: Because CFLs last so long, some of the first-generation bulbs are still burning and giving people the wrong impression of the newer CFLs.

The newer bulbs flicker less, make less noise, start up faster and emit light very similar to that of standard (“Type A”) incandescent bulbs. The spiral shape, which is often used in CFLs, casts light more like a standard incandescent bulb. The color of the light has improved dramatically. If you couldn’t see the bulb, you wouldn’t know whether the light was incandescent or fluorescent. “Daylight” bulbs, which broadcast a whiter light, are available for those desiring a cooler, less yellowish light.

Dim the lights

CFL Bulbs: Here’s What You Need to Know

Question

Can I install CFLs in fixtures that operate on a dimmer switch?

Answer: Yes—but only if you buy the right ones. Look for CFLs that are labeled “dimmable” on the package; they have special ballasts that allow them to be operated using a standard incandescent dimmer switch. Expect to pay more for a dimmable CFL bulbs than for a regular CFL.

Outside in the cold

CFL Bulbs: Here’s What You Need to Know

Question

Can I use CFLs outside and in my garage during the long, cold winter?

Answer: Yes, they’re great energy savers outdoors, but beware. Older fluorescent lights—both compact and tubular—are powered using magnetic ballasts. The lower the temperature, the more difficult it is for these bulbs to “get up to speed” and operate evenly. However, most CFLs made today have electronic ballasts that are much less sensitive to the cold.

If you’re planning to use a CFL in an area exposed to the elements, purchase one designated for “exterior” or “outside” use. These usually have an extra translucent shell surrounding the fluorescent bulb for additional protection. Specialty bulbs like the “bug light” shown and exterior floodlights are also available.

New CFLs on the block

CFL Bulbs: Here’s What You Need to Know

Question

I’ve seen smaller fluorescent bulbs that don’t screw in. What’s the story on pin-type fluorescent bulbs?

Answer: The pin-type fluorescent bulb familiar to most of us is the classic circular kitchen bulb. These aren’t considered true CFLs since the ballast is in the fixture, not built into the bulb itself.

But there is a new generation of pin-type bulbs, like the bulb shown at the top of the photo. These are true CFLs, but they have a base designed to fit only into fixtures made specifically for these pin-type bulbs. Another unique feature of these bulbs is that the ballasts and tubes are separate. One of the reasons behind this modular design is that a typical ballast can last 30,000 hours, while a typical CFL bulb lasts 10,000. Because the parts are independent, you only need to change the bulb part that fails. These bulbs also meet the strict energy code in California.

CFLs Reduce Cooling Costs, Too

Since CFLs generate less heat than standard incandescent bulbs, your air conditioner won’t have to work quite as hard in the summer.

Three-way bulbs

CFL Bulbs: Here’s What You Need to Know

Question

Are there three-way CFL bulbs, and if so, do they require a special lamp or light fixture?

Answer: Yes, three-way CFLs are available, and no, you usually don’t need a special lamp. The three-way bulbs that ramp up to the equivalent of a 150-watt incandescent can be either circular or spiral. Both shapes are quite large. For bulbs in that range, check to be sure they’ll fit the harp and shade of your lamp.

Also make certain your three-way bulb is screwed in snugly. Unless the contacts on the bottom of the bulb make solid contact, your three-way bulb may work like a single-output bulb.

Plugging Electrical Leaks

Even when your appliances and electrical equipment are turned “Off,” the truth is, they’re still “On.” One-fifth of the energy used by televisions, stereo equipment, computers and even answering machines is consumed while they’re in standby mode. One solution to the leaking electricity problem is to physically unplug appliances or turn them off via a power strip when they’re not in use.

Required Materials for this Project

Avoid last-minute shopping trips by having all your materials ready ahead of time. Here’s a list.

  • CFLs


Article source here: CFL Bulbs: Here’s What You Need to Know

5 Best Knots to Know

10 Ways to Heat Your House in an Emergency

Fire Up a Kerosene Heaterakocharm/Shutterstock

Fire Up a Kerosene Heater

Kerosene is a traditional fuel used for heating for many years. And it can make a suitable alternative for emergency heating —but only with the right precautions. You will need to choose a smaller radiant heater designed for indoor spaces, preferably a "ventless" model that releases as few fumes as possible. Also it's a good idea to position the heater next to a window and open the window slightly. This helps get rid of fumes and the powerful smell.


Article source here: 10 Ways to Heat Your House in an Emergency

100 Plumbing Goofs and Other Scary Stuff

That's Not PEXPhoto: Courtesy of Structure Tech

That's Not PEX

Here's a perfect illustration of just about everything that shouldn't be used for plumbing repair. What do you think? ShooGoo? Regardless, this tops the charts for home inspector nightmares and plumbing fails.  


Article source here: 100 Plumbing Goofs and Other Scary Stuff

15 Incredible Gourmet Foods You can buy at Costco

Artisan Cheese & Cracker Selection costco

Artisan Cheese & Cracker Selection

If a 72-lb wheel of cheese seems more likely to end up as a family heirloom than on your dinner plate, consider the more modest portions found in this cheese and cracker selection. Made up of high-quality samples of American and international products, this selection pack includes five different cheeses, two meats and artisan crackers.

This pack makes a fantastic larder stock, and takes up so little space that it’s perfect for those with even a small (or non-existent!) pantry.


Article source here: 15 Incredible Gourmet Foods You can buy at Costco

How to Build a Garden Shed Addition

Click the links below to download the construction drawings and material list for the 2000 shed.

2000 Shed Construction Drawings

2000 Shed Material List

Project overview

How to Build a Garden Shed Addition

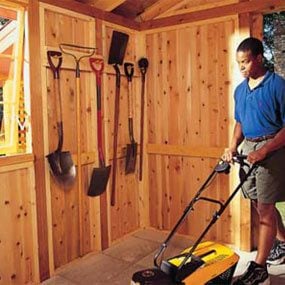
Spacious interior storage

This shed measures 7-1/2-ft. x 13-ft., giving you about 100 sq.ft. of storage space.
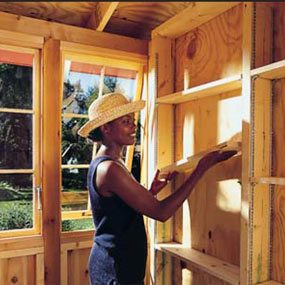
How to Build a Garden Shed Addition

Built-in shelving

Build in shelving for all those little items. The windows bring in a flood of light.
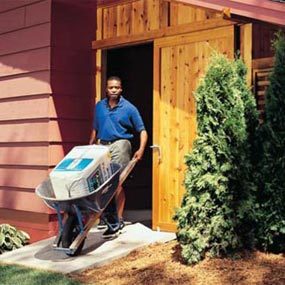
How to Build a Garden Shed Addition

Sliding door access

The sliding door opens wide enough for wheelbarrows to roll through.

Even though we’ve engineered this shed to keep complicated figuring and cutting to a minimum, it’s still a big construction project that will take you at least five or six weekends to complete. If you’ve built a deck or similar structure, you’ll have no trouble putting in the foundation and building the walls. To help you through the trickier roof-framing stage, we’ll show you how to make a rafter pattern without using any complex math. You may have to modify our plans slightly to fit your house, but all the basic building techniques we show will be the same.

You won’t need any special tools for this project. You probably already own most of the basic carpentry tools you’ll need to build this shed. Besides hand tools like a hammer, tape measure, square, utility knife, chalk line, sharp chisel, handsaw and a few screwdrivers, you’ll need a 4-ft. level, a line level (Photo 2) and a power drill, plus the bits listed in the story. A circular saw will work for most of the cutting, but the windowsill and drip cap (Fig. C) require bevel cuts that would be easier to make with a table saw. If you don’t own a table saw, ask a woodworker or a full-service lumberyard to cut these pieces for you. A power miter box is another optional tool that would add speed and accuracy to your cutting, especially for finish work. You can rent a power miter box, but for a project this big, I’d recommend buying one.

Step 1: Pick a site and order materials

How to Build a Garden Shed Addition

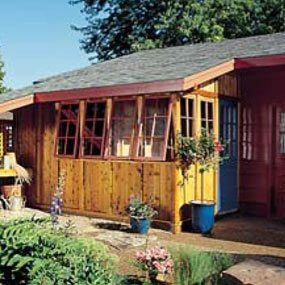
Shed added to garage

We extended our garage roof to cover the shed as well. But you can also butt the shed roof into a garage wall.

Scope out the perfect location.

With its simple roof style, this shed can go just about anywhere. Look for a spot on the back of your house where windows and doors aren’t in the way. Behind or to the side of the garage is a good location. We tied our shed roof into the garage roof, but you can also butt the shed roof against a wall, as long as you install metal flashing under the siding and over the shingles where the roof and wall intersect.

In addition, consider: Ground level. The ideal site is flat and sloping slightly away from the house. If the ground slopes steeply, either toward or away from the house, your job will be a lot harder. You’ll have to excavate and build retaining walls or bring in fill. In any case, regrade around the shed to ensure good every drainage and provide a ramp for your lawn mower and wheelbarrow. Roof pitch and headroom. This is the trickiest stage of planning. Our garage has 9-ft. tall walls and a shallow pitched roof. This combination allowed us to continue the roof in a straight line and still have enough headroom at the outside shed wall for standard-height windows and doors. But your house/garage might be different. To ensure adequate outer wall height, stretch a string along the roof and brace a 2×4 temporarily at the location of the outside wall to figure out how much headroom you’ll have (basically the same procedure shown in Photo 9 for making the rafter template). Measure from the string representing the roof down to what will be the top of the 6×6 foundation beam. If this distance isn’t 90-3/4 in., you’ll have to modify the wall height or change the roof slope of our shed plan.

Then call your local building inspections department to find out if your shed location is OK and what’s required to get a building permit. Most cities will accept a plan drawn to scale on 1/4-in. graph paper if it includes all the structural details.

Every region has a few unique building requirements. In cold Northern climates like ours, deep footings are required to prevent frost heaving. In areas with high winds or earthquakes, you’ll need special metal framing anchors to tie everything together. Ask your building inspector what’s required in your area.

Most of the materials for this shed are available at home centers and lumberyards. For a complete shopping list is in the Additional Information below. Here are a few pointers for your shopping trip:

  • Pick straight, dry cedar 4x4s. Bowed or twisted lumber will cause trouble when it comes time to install the windows and door. Check at both lumberyards and home centers.
  • Make sure the 6x6s are .60 treated, not the less durable .40 that’s sometimes used for landscaping timbers. You’ll probably have to order them.
  • Barn sashes are sold at some home centers and farm-supply retailers. If you’re willing to modify the plan dimensions, consider using old storm windows in place of the barn sashes. Contractors specializing in window replacements often throw these away.
  • Search for an interesting old entry door at salvage yards or architectural antiques dealers, or buy a new one like ours.

Figure A: Framing Details

Note: You can download Figure A and enlarge it from the Additional Information below.

Figure B: Foundation Plan

Note: You can download Figure B and enlarge it from the Additional Information below.

Step 2: Set the foundation

How to Build a Garden Shed Addition

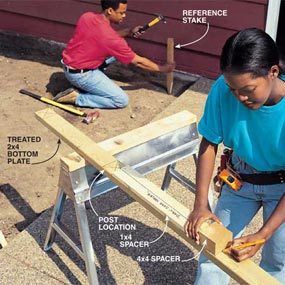
Photo 1: Stake out the corners of the shed

Establish the size of the shed by laying out and cutting the treated 2×4 bottom plates. To accurately space and mark the posts, use as patterns a 2×4 cut to the width of the window sash plus 1/8 in., and a small section of 4×4. Drive reference stakes along the house or garage to mark the corners and establish the floor height. Then lay the plates on the ground to establish the approximate perimeter

How to Build a Garden Shed Addition

Photo 2: Mark the floor height

First pound wooden stakes into the ground about 18 in. outside the perimeter of the shed to support the 1×4 batter boards. Then establish the floor height by leveling across from the reference stake with a string and line level. Mark each stake.

How to Build a Garden Shed Addition

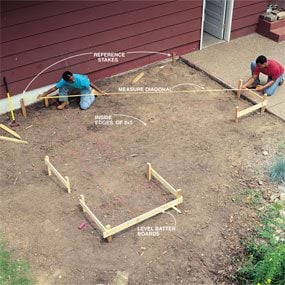
Photo 3: Level and set batter boards

Align the top edge of the 1×4 batter boards with the marks and screw the boards to the stakes. Then stretch strings between the batter boards and reference stakes to indicate the locations of the 6×6 beams and two 4×4 support posts. Subtract 1 in. from the length of the outside wall plate and 1/2 in. from the end plates (the plates overlap the beams 1/2 in.) to determine the beam lengths and positions. Check that the strings form right angles by measuring diagonally from one corner to the other. Adjust the strings until the diagonal measurements are equal and all the sides are the correct length. Tie the strings to nails to hold them taut.

How to Build a Garden Shed Addition

Photo 4: Dig and pour the footings

Position the footings according to your plan. Then dig footing holes with a post hole digger and set 8-in. dia. cardboard forming tubes into them. To establish the correct footing height, measure down from the string the thickness of your 6×6 beam plus the floor thickness, mark the tubes and cut them to this length with a sharp utility knife. Then place them back in the holes, wedge them solidly so the beams will center on them, and fill them with concrete. Set 1/2-in. x 12-in. anchor bolts into the center of each and smooth the tops.

How to Build a Garden Shed Addition

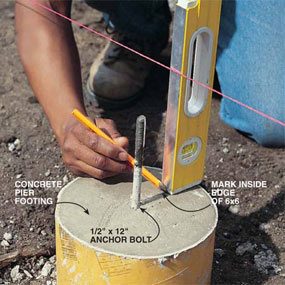
Photo 5: Position and cut the beams

Transfer the layout lines to the footings by plumbing down from the string and marking the concrete piers. Connect the marks with a chalk line. Cut the 6×6 beams to length, allowing an extra 3 in. on the side wall beams so they’ll fit into the existing foundation (Photo 7)

How to Build a Garden Shed Addition

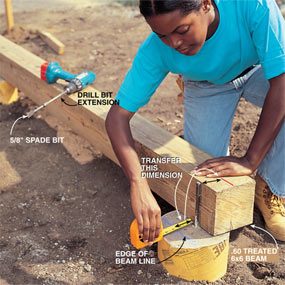
Photo 6: Mark and drill for anchor bolts

Lay the outer beam on the footings and measure from the chalk line to the center of the anchor bolts. Transfer these measurements to the 6×6 beams. Drill 5/8-in. holes through the beams at these marks. Drill 1-in. holes 1/2 in. deep to recess the washer and nut.

How to Build a Garden Shed Addition

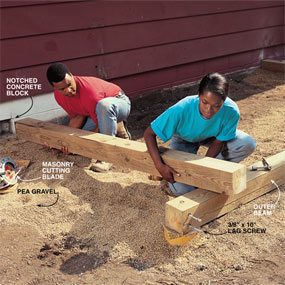
Photo 7: Anchor the beams

Bolt the outer beam to the footings. Use a masonry blade on a circular saw to cut a pocket in the block foundation to support the end of the 6×6 (or pour another footing if the foundation is concrete). Spread pea gravel under the beams. Connect the side beams to the outer beam with 3/8-in. x 10-in. lag screws.

Begin with a square and level foundation.

To quickly double-check the dimensions on your plan, mark the post locations on the 2×4 bottom plates and cut the plates to length (Photo 1). Use the dimensions from these plates to set up the batter boards and strings (Photos 2 and 3). It’s best to align the strings with what will be the outside edge of the 6×6 foundation beam. (Remember to deduct 1 in. from the total length of the front wall and 1/2 in. from each side wall so the walls will overhang the beams by 1/2 in. as shown in Fig. C.) We aligned our strings with the inside edge of the 6×6 because the concrete patio was in the way of setting up batter boards. Take your time getting these strings perfectly level and square.

Our shed is held up by 6×6 treated beams bolted to 42-in. deep concrete piers, which are appropriate for the frost depth in our area. Your building inspector will tell you how deep to go in your region. We rested the end of the 6x6s on notches cut into the garage foundation. If you can’t do this, add piers at these locations. About a week before you plan to dig, call the utility companies to locate buried wires or pipes. Use 8-in. dia. cardboard forming tubes for the piers. They allow you to easily establish accurate pier height (Photo 4). Figure one 60-lb. bag of concrete mix for every 1-ft. length of 8-in. dia. tube. After pouring the concrete, position the anchor bolts 2-3/4 in. from the string so they’ll end up in the center of the 6×6 beam.

Tip: Before the concrete hardens, double-check that all the footings are level with each other using a long, straight board with a 4-ft. level on top.

Then let the concrete harden overnight. Before you start on the 6×6 beams, dig out enough soil to allow space for 3 in. of gravel under the beams and 5 in. under the concrete patio block floor for good drainage.

Next, you’ll cut the 6×6 beams to length and bolt them down (Photos 6 and 7). Mark the beam locations on the footings (Photo 5) and cut the 6x6s to align with these marks. Remember to add the amount that will rest on the garage foundation onto the shorter end beams (Photo 7). Paint wood preservative onto the cut ends of the beams before you bolt them down, and countersink the nuts and washers so the walls will slide on easily.

Step 3: Frame the walls and roof

How to Build a Garden Shed Addition

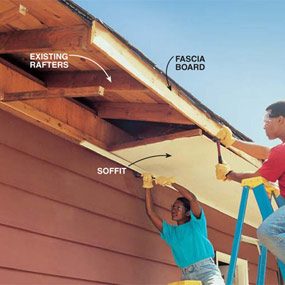
Photo 8: Open up the garage rafters

Pry off the soffit and fascia material in the area of the shed. Remove full pieces if possible. Then cut and replace them after the shed is built.

How to Build a Garden Shed Addition

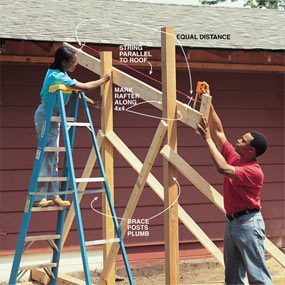
Photo 9: Make a rafter pattern

Mock up the walls and rafter to make patterns. Position the 4×4 posts at the wall locations (overhanging the 6×6 beams by 1/2 in.), plumb them in both directions with a level, and brace them with 2x4s. Make a rafter pattern by cutting the wall angle on the end of a 2×6, sliding it under the overhang, and temporarily securing it to the wall. Use a taut string to align the 2×6 with the existing roof and temporarily screw or nail it to the posts. Mark the 2×6 along each side of the 4×4 posts.

How to Build a Garden Shed Addition

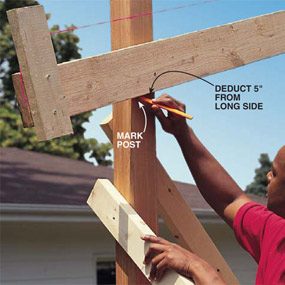
Photo 10: Mark the post heights

Mark the posts along the underside of the 2×6. Use these marks to establish the wall height and length of the 4×4 posts. Take the 2×6 and posts down.

How to Build a Garden Shed Addition

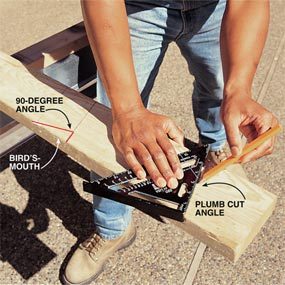
Photo 11: Make a rafter cutting pattern

Mark the 2×6 to make a pattern rafter. Draw the seat cut (where the rafter rests on the top plate) at a right angle to the post marks. Then use a Speed square to transfer the “plumb cut” angle to the end of the rafter, 11 in. beyond the seat cut for the overhang.

How to Build a Garden Shed Addition

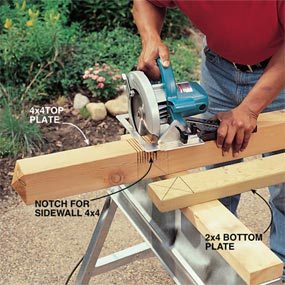
Photo 12: Cut and notch 4×4 top plates

Cut the outside 4×4 top plate 2 ft. longer than the outside 2×4 bottom plate to support the overhanging rafters. Cut the end 4×4 top plates 1-3/4 in. longer than the end 2×4 bottom plates to fit into the notch in the outside 4×4. Align the 2×4 bottom plates with the 4x4s and transfer the layout marks. Cut a 1-3/4 in. x 3-1/2 in. notch in each end of the front 4×4 to accept the side 4x4s.

How to Build a Garden Shed Addition

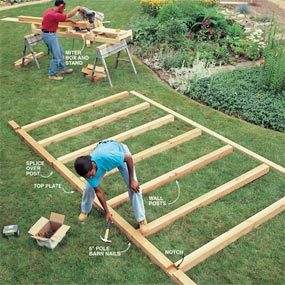
Photo 13: Assemble the walls

Cut the 4×4 posts to length and assemble the walls. Pound two 6-in. pole barn nails through the predrilled 4×4 top plate and into each 4×4 post. Drill two 1/8-in. pilot holes through the 4×4 top plate at each post location and pound 6-in. pole barn nails through the 4×4 into the posts. Secure the treated bottom plate to the 4×4 posts by nailing two 16d galvanized box nails into each post.

How to Build a Garden Shed Addition

Photo 14: Erect the walls

Lift the front wall onto the 6×6 beam. Position it to hang over the 6×6 beam 1/2 in. on the front and ends. Nail the bottom 2×4 plate to the 6×6 beam with two 16d galvanized nails near each post. Hold a 4-ft. level against the 4×4 corner post and push or pull it until it’s perfectly vertical while your helper nails a 2×4 diagonally across the wall to temporarily brace it. Slide the side walls into the slots in the siding and fit the 4×4 top plates into the notches. Nail the bottom plates to the 6×6 and connect the top 4x4s with two 6-in. pole barn nails.

How to Build a Garden Shed Addition

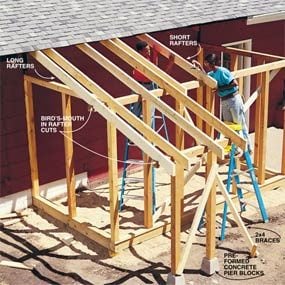
Photo 15: Nail up the rafters

Mark and cut the rafters using the pattern rafter (Photo 11) as a template. Position the overhang rafters 3/4 in. back from the end of the overhanging 4×4 top plates to allow room for trim. If they don’t land alongside an existing rafter, secure the tops as shown in Photo 16. Position the remaining new rafters alongside the existing rafter tails and connect them with three 16d nails every 12 in. Toenail the rafters to the 4×4 top plate with three 8d box nails.

How to Build a Garden Shed Addition

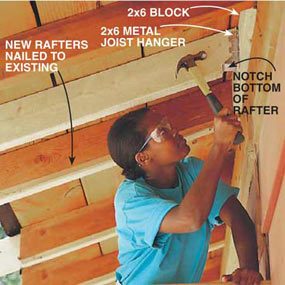
Photo 16: Add joist hangers

Support the tops of the rafters that don’t align with existing rafters with metal joist hangers. First nail a 2×6 block between two rafters and into the top plate if possible. Notch the rafter to fit into the metal 2×6 joist hanger. Pound special 1-1/2 in. joist hanger nails into every hole in the metal joist hanger

Next, mock up a wall and rafter to make exact patterns rather than using math (Photos 9 and 10). After you’ve marked where the rafter crosses the 4×4 top plate (Photo 10), subtract 5 in. (1-1/2 in. for the 2×4 bottom plate and 3-1/2 in. for the 4×4 top plate) from the high side to arrive at the length of the 4×4 wall posts (Photo 10). Cut all the posts off square at this length. Then assemble the walls and brace them plumb and square (Photos 13 and 14). To tie the side walls to the house, we cut out a slot in the siding and slid the 4×4 wall post against the sheathing. Then, since there were no studs in the existing wall at these locations, we added some from inside the garage to provide solid wood for attaching the walls. After nailing the walls in place, use a handsaw to cut out the bottom plates that run across the door openings.

Cut out a rafter pattern (Photo 11) and set it up on the walls to check the fit. This long rafter will need two “bird’s-mouth” cuts, one to fit over the 4×4 top plate of the long front wall and one for the short 4×4 beam that holds up the lattice-covered overhanging section. Adjust the fit as needed and use the pattern to mark the remaining long rafters. Make a second pattern for the shorter rafters.

Sight along the top of the front wall to make sure it’s straight before you secure the rafters.

Figure C: Finish Details

Note: You can download Figure C and enlarge it from the Additional Information below.

Step 4: Finish the roof

How to Build a Garden Shed Addition

Photo 17: Install roof sheathing

Cut the 3/4-in. CDX plywood and nail it to the rafters with 8d box nails. Temporarily support the sheets with 2×6 blocks nailed to the subfascia. Align the sheets so the 8-ft. side is perpendicular to the rafters and stagger the joints on the 4-ft. ends. Space the sheets 1/8 in. apart.

How to Build a Garden Shed Addition

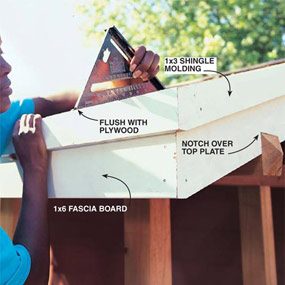
Photo 18: Nail on roof trim

Notch the 1×6 trim to fit over the 4x4s and miter the ends. Nail the 1×6 trim to the rafters and subfascia with 8d galvanized finish nails. Use your square as a straightedge to align the 1×3 drip edge with the surface of the plywood before you nail it in.

How to Build a Garden Shed Addition

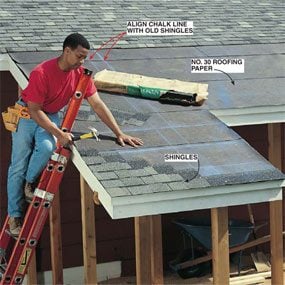
Photo 19: Shingle the roof

Staple no. 30 roofing paper to the plywood. Start at the bottom and overlap each sheet 4 in. onto the one below. Install the shingles according to the instructions on the shingle wrapper. Snap chalk lines to ensure the slots in your new shingles align with those in the existing shingles.

With the rafters in place, nail down the roof plywood (Photo 17) and install the soffit plywood and fascia boards (Photo 18). Match the soffit and fascia details to those on your house.

When you cover the roof with roofing paper (Photo 19), tuck the new paper under the existing shingles and paper. Plan the shingle installation and chalk the lines so the old and new shingles line up (Photo 19). Fasten the shingles with 1-in. galvanized roofing nails according to the instructions on the wrapper. When you get to the top, carefully lift the old shingles and remove the first row of roofing nails with a flat pry bar to allow the new shingles to slide underneath.

Step 5: Finish the exterior and floor

How to Build a Garden Shed Addition

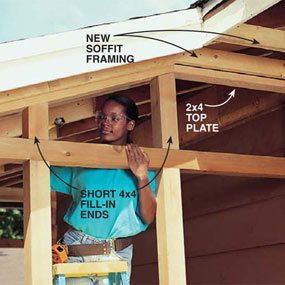
Photo 20: Frame the end walls

Fill in the end walls with a 2×4 top plate and short 4x4s angled to fit the roof pitch. Add 2×4 nailers to support the soffit.

How to Build a Garden Shed Addition

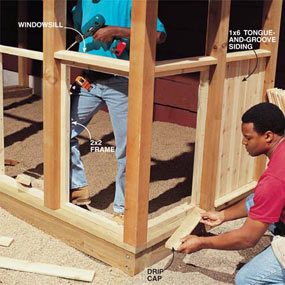
Photo 21: Frame and install siding

Frame between the posts with 2x2s nailed flush with the inside surface of the 4×4 posts. Cut angled windowsills and drip caps on a table saw to fit between the posts at the top and bottom of each section. Nail the drip cap to the 2×4 bottom plate and screw the windowsill to the 2×2 frame. Fill each section with siding nailed to the 2×2 frame. Drill pilot holes for the nails to keep them from splitting the siding.

How to Build a Garden Shed Addition

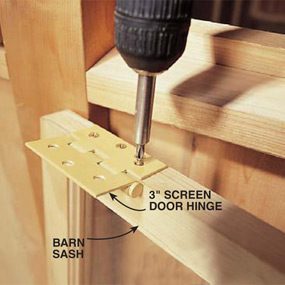
Photo 22: Trim and hinge the windows

Trim the barn sash to fit in each opening, allowing about 1/8 in. on the sides and bottom and 1/4 in. on the top. Screw a 3-in. screen door hinge to the top of the sash.

How to Build a Garden Shed Addition

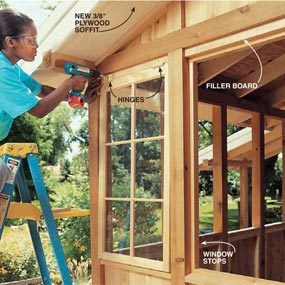
Photo 23: Hang the windows

Screw a 2-5/8 in. x 1-1/2 in. cedar board to the top of each window opening. Screw the hinges to this board. Nail 3/4 in. x 1-1/4 in. cedar stops to the top and bottom of the opening and 1/2 in. x 1-1/4 in. stops to the sides. Position the stops flush with the inside edge of the 4×4.

How to Build a Garden Shed Addition

Photo 24: Trim and mortise the swinging door

Sand the door until it fits into the opening. Allow a 1/8-in. space on the sides and top. Cut enough from the bottom to allow at least 3/8-in. clearance above whatever flooring material you decide to use. Outline the 4×4 butt hinges with a utility knife and chisel mortises so the hinges will sit flush with the door. Screw the hinges to the door.

How to Build a Garden Shed Addition

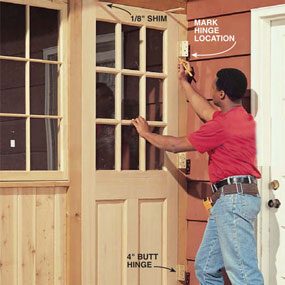
Photo 25: Hang the swinging door

Shim the door opening and mark the hinge positions on the 4×4 post. Remove the door and chisel the hinge mortises in the post. Screw the hinges to the post and nail 1×2 stops to the 4×4 door frame. Complete the installation by installing the lock according to the instructions included.

How to Build a Garden Shed Addition

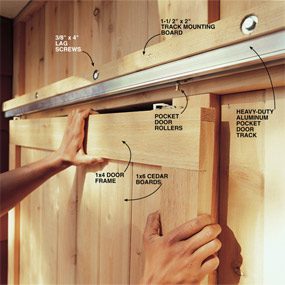
Photo 26: Build and hang the sliding door

Construct a sliding door by screwing 1×6 tongue-and-groove siding to a 1×4 frame. Attach a 1-1/2 in. x 2-in. strip of cedar to the horizontal 4×4 with 3/8-in. x 4-in. lag screws and mount the aluminum pocket door track to it. Hang the doors from pocket door wheels that ride in the track and snap into brackets mounted to the top of the door. Cover the track with a 1×4 cedar board.

Next, fill in the triangular sections above the wall on each end. Then close in the shed by filling the spaces between the posts (Photo 21). With our shed design, you don’t have to install door and window jambs, but you do have to cut angles on the 3/4-in. x 2-3/4 in. drip cap that fits below the siding, and on the 2×4 windowsill. Use a table saw for these cuts and to rip a 2×4 down to 2-5/8 in. for the pieces above the windows (Fig. C). Photos 21 – 23 show how to install the siding and windows. For our floor we laid 18-in. square concrete patio pavers over a level bed of pea gravel. Cut the pavers along the walls and at the doors with a dry-cut diamond blade mounted in a circular saw. We also used the pavers to build a ramp into the yard from the sliding door.

Install the doors after the floor. Photos 24 and 25 show how to hang the entry door. Construct the sliding door by driving 1-1/4 in. galvanized or stainless steel screws through the backside of the 1×6 tongue-and-groove boards into a 1×4 cedar frame. Fig. D and Photo 26 show this detail and how to install the heavy-duty pocket door hardware and three-wheel rollers that suspend the door. Mount a 2×4 open bar holder bracket to the 6×6 to keep the bottom of the door from swinging out. We installed a barn door latch on the outside to secure the door.

Finally, you can customize the shed for your hobbies. To provide a separate planting area inside the shed, we built a wall of 2x6s spaced 30 in. apart and covered on the back with 1/2-in. plywood. Metal shelf standards and clips support 2×6 shelves for pots and planting supplies. We created a narrow, hollow space next to the windows to allow access to the window latch. Use the lattice-walled overhang to store a gas grill or to hold a potting bench like ours. Or use it as a vine-covered sitting area. Cut the cedar lattice panels to fit between the 4x4s and secure them with 1x2s nailed on each side. Make the bench top by screwing a 2×4 ledge to the 4×4 posts and cutting 2×6 cedar boards to rest on top.

To retain the natural look of your cedar shed, apply two or three coats of a top-quality clear exterior finish. Paint the door and exterior trim with alkyd primer and two coats of top-quality exterior latex paint.

Figure D: Sliding Door Details

Note: You can download Figure D and enlarge it from the Additional Information below.

Additional Information

Required Tools for this Project

Have the necessary tools for this DIY project lined up before you start—you’ll save time and frustration.

  • Circular saw
  • Corded drill
  • Drill bit set
  • Drill/driver - cordless
  • Extension ladder
  • Hammer
  • Level
  • Line level
  • Miter saw
  • Posthole digger
  • Sledgehammer
  • Socket/ratchet set
  • Speed square
  • Stapler
  • Stepladder
  • Table saw
  • Tape measure
  • Wheelbarrow
  • Wood chisel
Dry-cut diamond blade,
Shovel,
String line

Article source here: How to Build a Garden Shed Addition

How to Make a DIY Indoor Herb Garden

Cut all pieces of wood Cut the wood for the base (A), sides (B), top cap (C), front and back top faces (D) and pot supports (E). All the co...