Rejuvenate a faulty water softener
There are some simple reasons why a water softener malfunctions, but before getting into the fixes, first let’s briefly review how it works.
How a Water Softener Works
Untreated water enters the brine tank and becomes saturated with sodium (salt). The sodium-saturated water then enters the resin tank, where millions of tiny polystyrene beads attract the sodium molecules and the extra salt water is purged. The brine tank is refilled and unsoftened water enters the resin tank, where the minerals that make water hard—calcium and magnesium—trade places with the sodium and attach themselves to the beads until there are no more sodium molecules to make the trade. At this point, the cycle starts over when the water softener regenerates by scrubbing the hard minerals off the beads and draining the wastewater. To get your soft water flowing again, here are three fixes you can easily perform.
Fix 1. Clean the brine (salt) tank:
Make sure the salt hasn’t formed a hard dome or crust inside the brine tank. The salt dome can result from adding too much salt or adding it too frequently. It will look as if you have salt even though there’s a big air pocket underneath. Break up the salt with a broomstick, then dispose of it. Remove any sediment with a shop vacuum. Use soap and water to thoroughly clean the tank (and the brine well inside the tank if you have one) and rinse it.
Fix 2. Clean an iron-fouled resin bed:
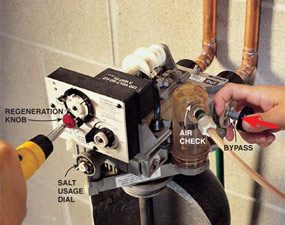
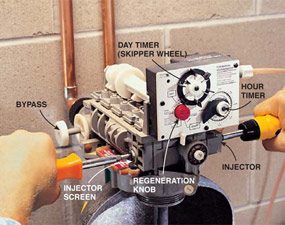
If your water contains iron, it will eventually “foul” the resin bed that removes the hard water particles and replaces them with sodium. To refresh the bed, run Iron-Out through the system. Follow the directions for the amount to add to the brine tank, then run your softener through a manual regeneration to purge the wastewater. To do this, remove the cover from the control valve and find the regeneration knob. Use a flat-blade screwdriver to depress the knob and turn it counterclockwise to “Service.”
Fix 3. Clean the resin tank injector:
The injector sometimes gets plugged with sediment caused by dirty salt. To clean it, first engage the softener’s bypass valve to shut off the water. Next, relieve the water pressure by running the softener through a manual regeneration. Finally, remove the caps on both sides of the softener head. Thoroughly clean the injector (right side of the head) and the injector screen (left side).
Five Steps for Keeping Your Softener Healthy
- Use pure salt with iron remover. Standard rock salt is less expensive, but the contaminants it contains will cost you more in the long run. Rock salt can cause inches of sediment to build up in the brine tank and the sediment can clog the injector and the softener’s control valve.
- Don’t add salt until almost all the salt in the tank is used up. Then refill the tank no more than two-thirds full.
- Use Iron-Out once a year to clean the resin bed and the parts in the control valve.
- Clean the brine tank once a year. Even pure salt contains contaminants.
- Make sure the softener’s drain line isn’t pushed down into a floor drain. The end of the softener’s drain line should be above the grate of the drain to prevent accidental siphoning of sewage into the softener.
Save Money with Water Softener Repairs
Before you replace your softener for $600 to $1,000, have it checked out by a water softener specialist. The most expensive repair probably won’t exceed $200. The softener head can be overhauled for $60 to $100 or the resin bed can be replaced. Search online or look in the yellow pages under “Appliance, Repair” and ask companies if they work on softeners.
Required Tools for this Project
Have the necessary tools for this DIY project lined up before you start—you’ll save time and frustration.
- 4-in-1 screwdriver
- Bucket
- Shop vacuum
Required Materials for this Project
Avoid last-minute shopping trips by having all your materials ready ahead of time. Here’s a list.
- Iron-Out
Article source here: How to Repair a Water Softener


No comments:
Post a Comment