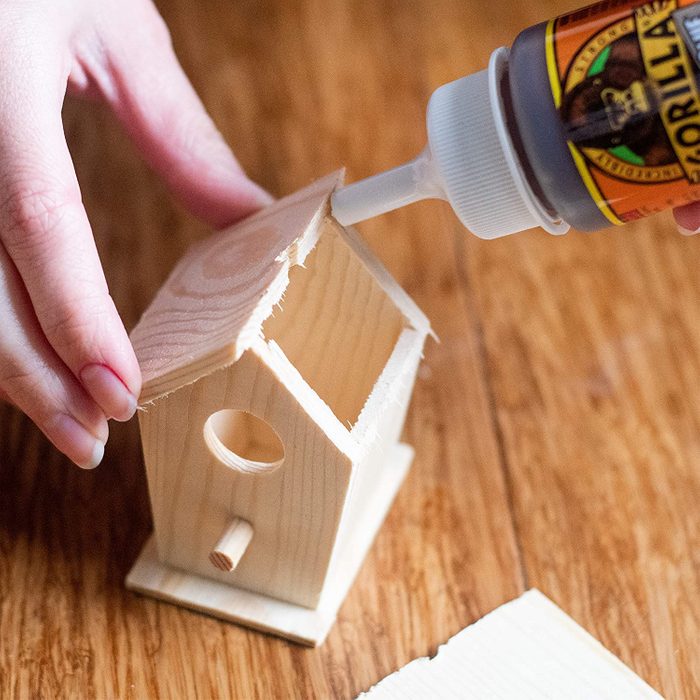
Wood glue is vital in the wood shop. It lets you join pieces together without mechanical fasteners like screws or nails. But wander down the aisle of your local supply store and you’ll find upwards of a dozen types of wood glues: PVA (polyvinyl acetate), epoxy, urethane and hide glues, just to name a few — and that’s not even counting different brands!
So which is the best type for your project? Here are some properties to consider:
Open time: This means how long the glue takes to form a serviceable bond. Open times vary from 30 seconds to several hours. The more complicated your glue-up, the longer an open time you want so you don’t have to rush.
Water resistance: Glues range from water-soluble to waterproof. Choose an appropriate level of water resistance, depending on what environment your project will live in.
Hardness: Some non-wood glues, like your standard craft glue, dry soft and cannot be sanded after they cure. A good wood glue dries hard and creates a rigid glue line.
Cure time: Glues have varying cure times, or the time it takes for the glue to reach its maximum strength. While most glues cure in 24 hours, some slow-set glues can take up to five days to cure.
Set time: Not to be confused with cure time, this refers to how long the glue needs to rest, preferably in clamps, before it can be worked. Think of this as the time necessary for the glue to reach its minimum working strength, though it’s not yet fully cured.
Ease of use: Some glues are simple: Open the bottle, spread the glue and clamp. Other glues require careful mixing, like epoxy, or warming, like hide glue. While all glues have their upsides, choosing the easiest glue to use that matches your project’s needs is key to a successful glue-up.
Read on for a list of my go-to glues for working with wood, drawing on more than a decade of professional woodworking experience.
The price of lumber in the U.S. has been on a roller coaster since the start of the pandemic. A host of factors drove the price up and down the last two years, creating uncertainty for homebuilders and anyone looking to purchase lumber for a project.
Lumber prices peaked in May 2021, with the cost of softwood lumber hitting well over $1,600 per thousand board feet. Just a few months later, lumber crashed back down to less than $600 per thousand board feet. It appeared the cost of wood might hover close to those pre-pandemic levels for some time.
Unfortunately, that was not the case. Lumber prices doubled from November 2021 to January 2022, climbing back over the $1,000 per thousand board feet threshold. Currently, the price remains volatile. It continued its gradual rise in the first half of January before declining sharply in the back half of the month.
So Why Are Lumber Prices Rising Again?
Canadian environmental issues
Several major storms struck parts of Canada in late 2021 and early 2022. Heavy rains and flooding in the West, including British Columbia, caused massive supply chain disruptions.
West Fraser Timber Co. Ltd, the Canadian-based forestry company, reported in November its weekly shipments in Western Canada had fallen by as much as 30 percent. These disruptions had massive repercussions in the U.S., since Canadian forests and lumber mills supply more than a quarter of the lumber to the American market.
Then there’s another environmental issue: The beetle infestation Canada has been dealing with since the ’90s. Female mountain pine beetles lay eggs underneath the bark of softwood trees. Over time, their larvae eat away at the tree until it dies. According to the Canadian Forest Service, mountain pine beetle infestations caused the loss of more 750 million cubic tons of pine wood.
Increased tariffs
One of the most significant economic factors driving up lumber prices is an increase in tariffs on Canadian lumber imports into the U.S.. Last Nov. 24th, the U.S. Commerce Department raised tariffs on imports from Canadian softwood producers to 17.99 percent, more than double the previous rate. That brought criticism from the U.S. construction industry.
“This decision undermines the historic funding commitment made to housing in the Build Back Better legislation and erodes efforts by Commerce Secretary Raimondo and other Biden administration officials to tackle the lumber and building materials supply issues plaguing the industry,” said Chuck Fowke, chairman of the National Association of Home Builders.
“Doubling the tariffs will only exacerbate market volatility, put upward pressure on lumber prices and make housing more expensive.”
Ken Simonson, chief economist for the Associated General Contractors of America, echoed Fowke’s sentiment. “A doubling of this tariff will only prolong the extreme price increases that have hit lumber repeatedly over the past 18 months,” Simonson said.
American lumber producers, however, were much more accepting of the tariffs, anticipating increased domestic production to fill the gap.
“The U.S. Lumber Coalition strongly urges the Administration to continue full trade law enforcement,” said Jason Brochu, chairman of the U.S. Lumber Coalition.
“More U.S. lumber being produced in America to meet domestic demand is a direct result of the enforcement. A level playing field is critical for the continued investment and growth of the domestic lumber industry and its hundreds of thousands of workers and thousands of communities across the United States.”
While the silver in your home may not require as much care as items like linens or glass, it still needs some TLC. It’s important to learn how to clean silver, as well as how to care for and store it.
“Without proper care, over time, silver picks up sulfur contaminants either in the air, on the skin, or from contact with other objects,” says Gabrielle Martin, a supervisor for Bio Recovery, a professional cleaning service. “Sulfur reacts with the surface of silver. Although you may not see it at first, over time the sulfur changes the color of the silver.”
Clean your silver on a regular schedule, from twice a year to every other month, to help break down most of the sulfur compounds that cause tarnishing, Martin says. There still may be some tarnish because of age, especially with older silver. But cleaning can significantly slow the process.
Try one of these easy methods to clean sliver in your home and keep it looking its best.
Clean Silver with Soap and Water
A little household soap and water can go a long way in keeping silver clean, Martin says. Rinse silver under warm water and gently wash with a mild, unscented dish soap.
The trick is to use a non-abrasive sponge or microfiber cloth to avoid scratching your silver. Dish soap and water can help remove excess tarnish, dirt or dust buildup.
Clean Silver with Vinegar and Baking Soda
Make a homemade silver cleaning solution with these two items, which you likely already have in your pantry. “Dilute a 1/2 cup of cleaning vinegar with [two tablespoons] of baking soda in lukewarm water,” Martin says. “Put the solution in a spray bottle and spray it on the silver and wipe it down with a microfiber cloth, or let it soak in the solution.”
If you choose the soaking method, be careful with your timing, Martin says. The chemical reaction between baking soda and vinegar helps dissolve tarnish, but if you leave silver in that solution too long, it can remove or change the color. Aim for a max soak of two to three hours.
Clean Silver with Toothpaste
Yes, good old toothpaste can actually clean silver as long as it’s non-abrasive, Martin says. That means it doesn’t have high amounts of gritty compounds.
When choosing, steer clear of ingredients like aluminum oxide, calcium pyrophosphate and silica. Or consult the Relative Dentin Abrasivity Scale for a low-ranking option like Arm & Hammer Advance White. The toothpaste acts as a buffer, smoothing away any tarnish buildup, dust or dirt.
To clean silver with toothpaste, squeeze an inch or two on a microfiber cloth, then gently rub it into the silver until the tarnish begins to disappear. Rinse with warm water and pat dry with a clean cloth.
Clean Silver with Silver Cleaner or Polish
While DIY silver cleaning methods can keep silver clean, sometimes it’s faster and more convenient to turn to professional silver cleaning products. Silver cleaners or polishes are usually easy to find online, or in home improvement or general merchandise big box stores. Here are a few top-rated products to consider:
Weiman Silver Polish and Cleaner. This trusted brand has been in business for more than 80 years. It’s fairly priced and available at most big box stores or online retailers.
Wright’s Silver Polish Cream: For less than $5, get you a trusted product that ranks as one of the top silver polish creams on the market.
Smoke alarms and carbon monoxide detectors are essential in every home, but don’t let the fact that you dutifully installed one in every room on every floor give you a false sense of security.
Even with smoke alarms and CO detectors on site, fire still takes lives and destroys property. Between 2015 and 2019, home fires averaged 2,620 fatalities and $7.3 billion in property damage annually in the U.S. alone, the National Fire Protection Association reports. That’s a lot of lives and money, especially when you consider 96 percent of homes contain at least one smoke alarm.
However, the odds of becoming one of these fire-related statistics drop significantly when smoke alarms and CO monitors are paired with residential fire sprinkler systems, according to Bruce D. Bouch, fire program specialist for the United States Fire Administration.
While only a handful of states and municipalities require new residential construction to include fire sprinkler systems, Bouch says he recommends them for everyone regardless of code requirements. This, he says, applies to all homeowners, not just those building a new dwelling from the ground up.
“Unlike carpet upgrades, (fire sprinklers) last for the life of the home, and they are there to protect you, your family, your friends and your pets,” Bouch says.
What Is a Home Fire Sprinkler System and How Does It Work?
If you’re picturing a rush of water pouring from the ceiling in every room of your house whenever there’s little smoke in the kitchen, you might be hesitant to invest in a residential fire sprinkler system for fear of excessive and repeated water damage. But don’t worry — Bouch says that’s just the Hollywood version of sprinkler systems. Actual residential fire sprinklers are far more precise.
“Unlike in the movies, in most cases only one (sprinkler in the home) reacts,” Bouch says.
Depending on square footage, the typical system includes at least one sprinkler head in every room. These connect directly to your plumbing or have their own dedicated pipes.
Most of the time (and preferably, all of the time), the sprinkler heads just hang there. They only activate when they detect potentially dangerous levels of heat, Bouch says. Standard activation range is between 130 F and 155 F.
Here’s how the system works:
A bulb filled with glycerin controls activation. When the glycerin gets hot, it expands and breaks the bulb. Once it’s broken, the pipes release water. The water flows at about 13 gallons a minute, enough to put out the fire without excessive water damage.
Common Types of Home Fire Sprinkler Systems
According to the Home Fire Sprinkler Coalition (HFSC), a charitable organization that works with the Federal Emergency Management Agency (FEMA) and the USFA to educate the public about residential sprinkler systems, home sprinklers are available in three common “styles.”
Pendant sprinklers: These hang from the ceiling and definitely look like sprinkler heads. Even if you get them in white to match the ceiling, they’re noticeable.
Sidewall sprinklers: These resemble pendant sprinklers but are placed on walls rather than ceilings.
Concealed sprinklers: Not interested in seeing a sprinkler head sticking out of your ceiling or wall, disrupting your home aesthetic? Concealed sprinkler heads are recessed and covered with a plate so you don’t see them. Place them on walls or ceilings, or paint the covers to match the wall or ceiling. Do not paint the sprinkler heads themselves, though — only the covers.
Home Sprinkler System Pros
The main advantage is the superior level of fire protection they provide, Bouch says. A sprinkler system reacts so fast that the fire is often contained before the fire department arrives.
Home fire sprinkler systems also:
Keep people and pets safe. “You can be sound asleep on the couch in the very same room … and the sprinkler will react and save your life,” says Bouch. But fires can turn deadly in two minutes, the HFSC says, meaning the person on that couch might not even have a chance to react before those two minutes are up. As for your pets, since they aren’t capable of calling 911 or opening a door or window to escape a fire, a sprinkler system is really the only way to make sure they’re safe if they’re home alone. In the same vein, sprinkler systems also keep you safe from physical and emotional devastation of losing your home and possessions in a fire.
Curtail the environmental impact of a house fire.Home fires emit toxins that pollute our air and wastewater, Bouch says. Today’s homes contain a lot of quick-burning plastic combustibles, he says, exacerbating the problem. According to the HFSC, a sprinkler system can reduce greenhouse gas emissions from a house fire by 98 percent. They also significantly reduce the water needed to fight the fire, and help keep pollutants out of wastewater.
Save firefighter lives. Sprinkler systems can save your life, of course, but they also save the lives of firefighters. This, Bouch says, is because sprinklers keep small fires from erupting into large fires that are more dangerous to fight. If a small fire is contained by the time the truck arrives, the firefighters avoid exposure to smoke and toxins, and they don’t need perform risky rescue maneuvers on a roof that’s about to collapse.
Help reduce the cost of homeowners insurance. On average, people across the nation shell out $1,585 per year on homeowners insurance policies, according to a Nerd Wallet insurance survey. You can save money on your premiums, though, with a residential fire sprinkler system. “Depending on your insurance holder, there are discounts when you have a sprinkler system installed,” Bouch says. The specific discount depends on location, size of the home and other factors. However, the HFSC states on their website that some insurance companies will discount your policy up to 35 percent if you install a sprinkler system. That means the system could pay for itself in a few years.
Attract potential buyers. If you decide to sell your home, a fire sprinkler system could make your home more marketable, the National Fire Sprinkler Association reports. One 2020 poll reported 74 percent of respondents are “more likely to buy a home with fire sprinklers.”
Home Sprinkler System Cons
The only potential downsides to a home sprinkler system are cost and logistics, especially if you’re installing the system in an existing home.
While the average cost is around $1.35 per square foot, Bouch says, installation is much easier when building a new home. It’s definitely possible (and still recommended) in existing homes, but you’ll need to cut into the walls or ceilings to install sprinkler heads, and figure out how to connect them to water pipes.
Home Sprinkler Maintenance
Once you install a sprinkler system, you can rest easy because maintenance is minimal, Bouch says. He recommends testing the system once a year to ensure the water flows properly and nothing leaks. (The sprinkler heads have valves, just like your other plumbing fixtures.)
Otherwise, you don’t have to do a thing to keep the system operational. With any luck, you’ll never actually need to find out how well it works.
Most DIYers choose a cordless driver/drill as their go-to tool. But that doesn’t mean there’s no place in your tool box for a corded model. They do the job quickly and effectively, and you’re never worried if there’s enough charge left in the battery. As long as you have access to an outlet, you’re good to go.
Here are some factors to keep in mind when buying a corded drill:
Function. These are more likely to be specialty devices, like a hammer drill or mixer.
Price. Many DIYers are surprised to find corded drills aren’t sold at a discount like cordless drill models. The sheer volume of cordless tools means their price has dropped. While you’ll find plenty of variety in price, most general-purpose corded drills fall in the $60 to $200 range.
Chuck size and style. The drill chuck is what clamps drill bits in place. The chuck size indicates the largest diameter drill bit you can use. Traditional or keyed chucks are tightened with a specialized tool called a chuck key, while keyless chucks can be tightened by hand.
Variable speed. Some drills kick on at full speed, but those with variable speed let you control the revolutions per minute (RPM) through trigger pressure. Variable speed isn’t needed for every task. But it’s a nice feature, and always better to have than not.
Motor style. Drills with electric motors are brushed or brushless. The differences take up a full conversation on their own, but in general, brushed motors have a physical contact that brushless motors don’t. This means brushed motors generate more heat and require maintenance when the brush wears down. Motor style also encompasses build-quality issues, such as whether the gear housing is metal or plastic.
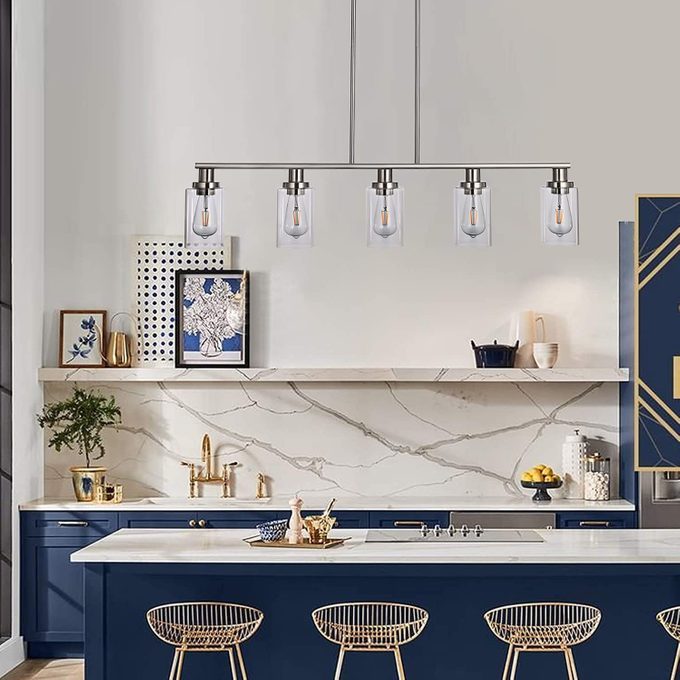
Dining rooms are the focal point of any home. Besides being where your family gathers for meals, it can be a great space for entertaining friends, playing games, working or any number of activities. Vivid lighting is vital for getting the most out of it.
Lots of light fixture designs, from farmhouse to industrial to antique and more, should match the style and vibe of your home. Some fixtures let out maximum light, while others feature more intricate designs that emit much less light. Take your existing lighting into account when deciding how much illumination you’ll need.
Best Dining Room Light Fixtures
Dining table lighting
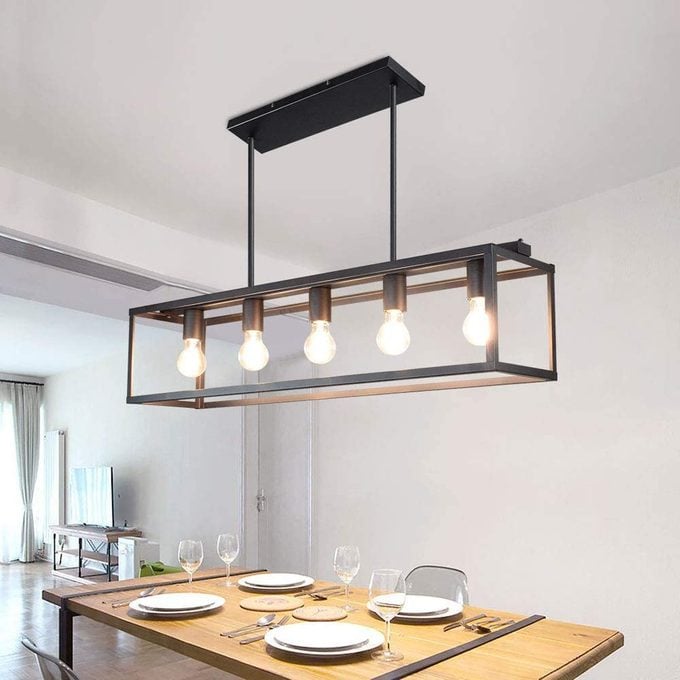
Depuley’s five-light fixture provides ample illumination with its open bulb design. The adjustable hanging length — 16 inches or 32 inches — makes it a good choice regardless of ceiling height. The metal frame, in a trendy farmhouse style, is easy to dust and clean.
“You can extend it lower, I prefer higher hang,” one Amazon reviewer writes. “It looks great in my dinning area, I have open space kitchen so I was impressed on the lighting.
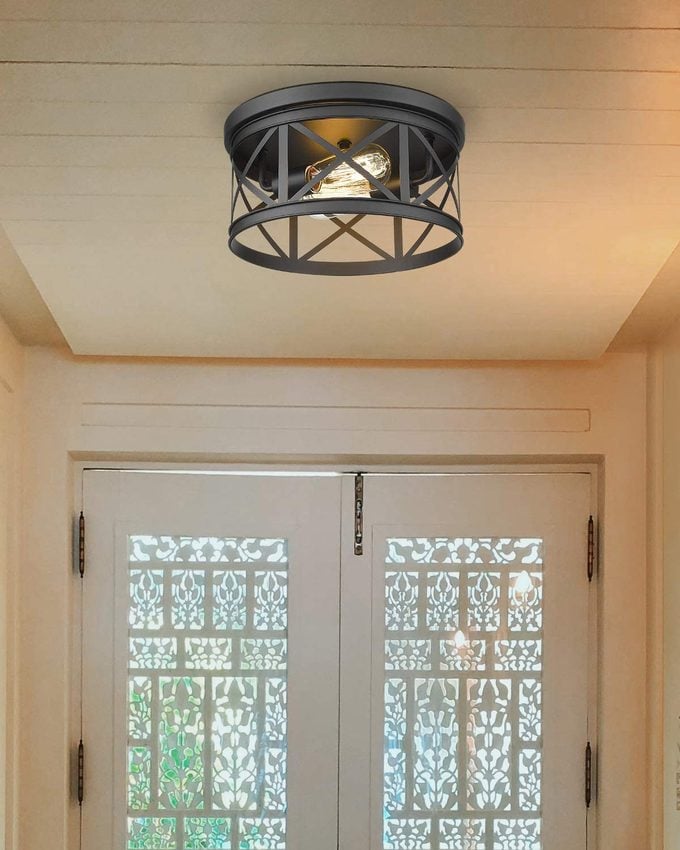
Flush to the ceiling, this Femila cage ceiling light features a stylish black metal frame in an intricate woven pattern for an industrial/farmhouse look. This fixture supports dimmable or non-dimmable lighting, including any LED/CFL/Edison bulbs 60 watts or less.
The two-light design and more covered style provide less light than other options on this list, making this better suited for rooms with ample natural light and/or bright light fixtures nearby.
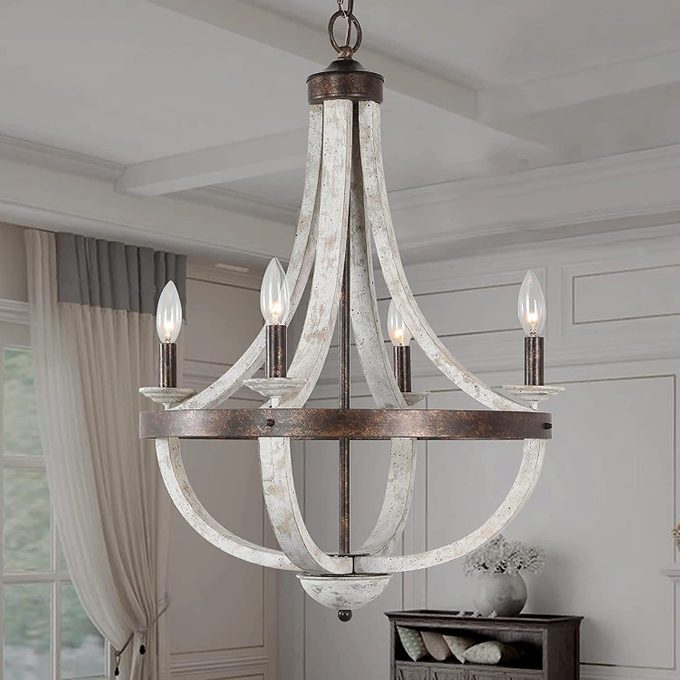
Farmhouse style isn’t for every homeowner, but this 42.9-inch linear chandelier works for those who embrace it. Clear glass shades provide plenty of lighting. Exposed iron details and wood beam support give a rustic look while maintaining a trendy style.
Multiple Amazon reviewers call it a perfect fit for farmhouse décor.
The modern metal design of this Jonathan Y light fixture will look great hanging over your dining room. Color options include antique gold, chrome and oil-rubbed bronze. Eco-friendly LED bulbs come with this fixture. It earned 4.8 stars on Amazon with nearly 800 reviews.
“This light fixture completely modernized my dining room, which was stuck in a different era and really bothering me,” one Amazon reviewer writes. “By just replacing the light the room immediately looked hugely updated, and it gave our whole house a more modern feel.”
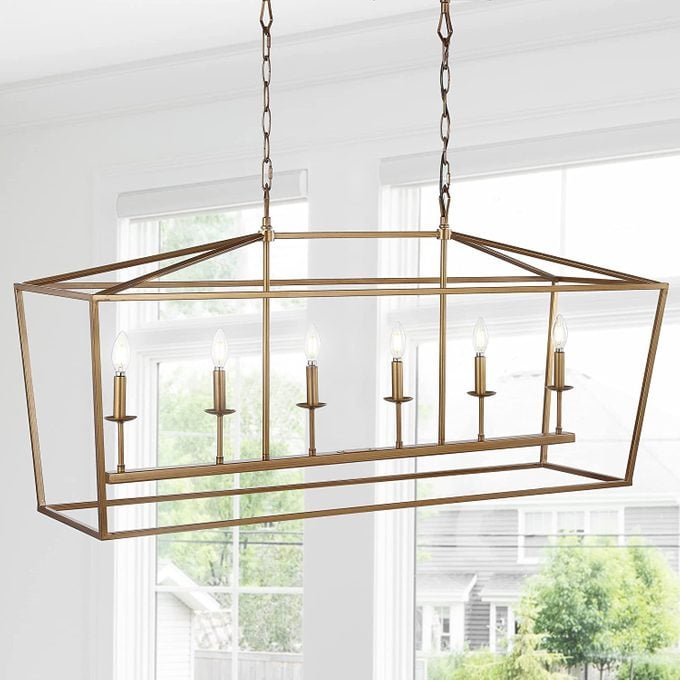
The simple design of this modern pendant light by Kpiok should fit any style home. Customize this fixture with four or five lights. Color options include black and crystal, black and gold, chrome and satin brushed nickel. Choose the style, like one with a clear shade, to fit your lighting needs.
Made from high-quality solid wood, this 28-inch chandelier by Philomena beautifully combines wood and metal designs. It comes with an adjustable 59-inch chain to fit any dining room ceiling height. Color options include antique wood and distressed white.
Storage & Organization Essentials for the Whole Home
Decluttering your home is an ongoing process. But with the right tools and a little time every day, it’s possible to beat the constant influx of junk mail and freebies.
The pros from Family Handyman’s Declutter Challenge, Michelle Vig of @NeatLittleNest and Jamie Novak, author of Keep This, Toss That, recommend some of their favorite products for keeping clutter under control. Here are pro-recommended storage and organization essentials for the kitchen, bathroom, bedroom, laundry room and entryway.
Most miter saws ship from the factory with a blade that’s good but not great. Whether you’re looking to upgrade to a better option or replace a blade that’s gone dull, we’ve rounded up a selection of great miter saw blades.
But first, let’s look at some of the top features and traits to look for in a miter saw blade.
Blade size. This is simply the blade’s diameter; 10-in. and 12-in. are the most common sizes. Smaller trim saws often use 7-1/4-in. or 8-1/2-in. blades.
Teeth. Tooth geometry can be complex, but we’ll focus on the number of teeth on the blade. In general, blades with more teeth give a finer finish but cut slower than those with fewer teeth. Some blade teeth have tungsten-carbide tips. These last longer and can be resharpened more often.
Arbor/bore size. The hole in the middle of the blade is called a bore, and it slips over the saw’s arbor. (Some manufactures use different terms such as “mandrel” or “blade mount,” but we’ll stick with arbor and bore.) Most 10-in. saws have a 5/8-in. arbor, while 12-in. saws have a 1-in. arbor. Double-check your saw’s arbor size before buying blades.
Kerf width. A blade’s kerf is the width of the cut. Narrow-kerf blades are good choices for material like plywood or laminates because they reduce chipping.
Stabilizer vents. These are the wavy lines and holes cut in the body plate of some blades. Stabilizer vents allow hot blades to expand without warping, while also reducing overall heat and noise.
Note: Retailers list some blades as “circular saw blades” or “table saw blades.” That’s because identically-sized blades can be swapped out between tools. All the blades on this list are particularly good choices for miter saws.
Many homes have at least one room that is rarely used. And then there’s the bathroom, which everyone uses every day. With all of those hard surfaces, sharp objects and then water to make everything slippery, the bathroom needs plenty of light for safety.
Preventing accidents is just one function of bathroom lighting. Joel Worthington, president of Mr. Electric, a Neighborly company that supplies bathroom lighting, says it also provides atmosphere, illumination for grooming and even auxiliary heat.
What kind of lighting are you looking for? The answer to that question will help you navigate your many options.
Perhaps you want ambient illumination for the entire room. While low-hanging fixtures are best avoided in small spaces like bathrooms, Worthington suggests semi-flush ceiling mounts are a great way to go. Choose clear or white shades for maximum brightness in dark, windowless bathrooms.
What if you want atmospheric lighting to help you relax in the tub after a tough day? Check out wall sconces that provide accent and indirect lighting. You might also consider under-cabinet lighting to help keep track of your toiletries. Or go for vanity lights if you need a dose of high-powered electricity to jump-start your day.
Whatever your preferences, consider these key factors:
Durability: Not all light fixtures do well in the moist environment of a bathroom. The best ones are plastic, wood or a non-corroding metal like chrome or stainless steel.
Wattage: If you’re looking for one bathroom light fixture to illuminate the whole room, make sure it accepts a bulb with enough power for the task — 800 to 1,600 lumens, which corresponds to 60 to 100 watts. Low-voltage fixtures are better for mood and accent lighting.
Size: The fixture you choose must fit the available space. If you go for semi flush-mount fixtures, be sure to leave enough room for people to walk underneath. That’s at least seven feet — more for extra-tall people.
Placement: When deciding where to install a fixture, pay attention to walls and obstructions that prevent the light from reaching parts of the bathroom. Sometimes two or more strategically placed fixtures are better than a single bright one.
Cost: Prices range from around $30 for a flush-mount ceiling fixture to more than $700 for some of the more stylish vanity sets. Installation can cost from $50 to $500, depending if you need new circuitry.
Types of Bathroom Lighting Fixtures
The choice of lighting fixtures for the bathroom is just as varied as it is for other parts of the house and maybe moreso, depending on illumination needs.
Ceiling-mount fixtures: Worthington says overhead fixtures make the room appear larger by drawing your eyes to the ceiling. A well-placed light in the center of the bathroom can illuminate the entire room. That’s why, if a bathroom has just one fixture, it’s usually a ceiling mount. A ceiling light fixture with an infrared bulb can double as a heat lamp, and it may come as part of a bathroom exhaust fan.
Vanity lights: These illuminate the space around the vanity, including the mirror. You can have a row of them spaced equally along the top of the mirror or two on either side. For the best visibility, Worthington recommends bright white bulbs like the round ones you see in theater dressing rooms.
Recessed lighting: Also known as can lights, Worthington doesn’t consider these ideal for bathrooms because they allow moisture to escape into the attic. However, they’re definitely space savers if you’re looking for overhead lighting. Just be sure to seal them with caulk.
Sconces: Wall sconces can provide atmosphere and accent lighting as well as illuminate dark toilet alcoves that don’t get the full benefit of overhead lighting. Sconces can also make effective vanity lights when you don’t want the brightness of conventional ones.
Cabinet lights: Placing low-voltage lights under your medicine cabinet can help you find the things you need on the countertop. You can also place them under the vanity to illuminate the floor.
Shower and bathtub lights: A light in the shower can be really helpful, especially in a bathroom with primarily mood lighting. Fixtures that go in wet places like showers must be completely waterproof, with their switches located outside the wet areas they illuminate.
Bulbs and Dimmers
Stay away from CFL bulbs in the bathroom, Worthington says. People turn the lights on and off more frequently there than in any other room, and that wears out CFL bulbs more quickly. Moderate to bright LEDs with a color rendering index (CRI) of 90 or above are the most practical option.
If you like to step out of the shower without shivering, consider a ceiling fixture that accepts one or more halogen incandescent bulbs.
A dimmer switch in the bathroom can give you just enough light at night to find your way. Dimmer switches require dimmable bulbs in the fixtures.
In lieu of manual dimmer switches, you can also install smart bulbs, fixtures or switches. These turn off and on, adjust brightness and even change color according to your voice prompts. Some WiFi-enabled bathroom fixtures will even serenade you with music while you’re in the tub.
Bathroom Lighting Installation
Installing a light fixture in a bathroom is no different than installing one in any other room. With waterproof fixtures, follow all manufacturer’s instructions to ensure they’re watertight. If you opt for can lights, don’t forget to seal them.
A single fixture can share the required 20-amp circuit for the receptacles. But if you install more than one, it’s a good idea to run a new circuit. Share the lights between circuits so that if a breaker blows, you won’t be left totally in the dark.
Note: The National Electrical Code has specific restrictions regarding the installation of a chandelier over a bathtub.
A table saw is essential equipment in the wood shop and on building sites. It isn’t the only tool that can rip wood to precise dimensions, slice and dice wood paneling, cut bevels and grooves and crosscut compound angles, but it’s the best choice for all those jobs.
A hand tool like a circular saw can also handle these tasks, but not with the accuracy of a table saw. And accuracy is key for a quality finished product.
The stationary table saw (AKA a shop saw) you find in a wood shop is an extremely powerful and precise tool. But you don’t need all that power and precision for most home improvement projects, and you can’t move a stationary saw to a jobsite. Most table saws you see for home or jobsite use are portable.
Portable saws come in two types. Benchtop saws are the smallest and easiest to carry around, and true to their name can be set up on a work bench. They often come with removable stands. Contractor saws have bigger tables and more power, and are usually outfitted with wheels.
Whether you’re looking for a stationary or portable saw, here are some important points to consider:
Power draw: Powerful motors draw between two and four amps of current, which can be enough to blow a breaker in your fuse box. Less powerful saws may not cut as cleanly or precisely but are fine for utility use.
Size: Table width can vary from 25 to 50 or more inches. Small tables save space and are easier to transport, but they limit the width of the material you can cut.
Weight: A convenient saw is lightweight and easy to transport, while an accurate saw is heavy enough to remain in place while you’re working. Look for a compromise that suits your needs.
Stability: Contractor saws come with stands, and so do some benchtop models, The stand should be stable when placed on a flat surface and easy to set up. Avoid ones that wiggle.
Fence: This must be sturdy and dead flat for accuracy. It should also be easy to adjust with an easy-to-read distance gauge, and lock securely.
Miter gauge: The miter gauge slides back and forth along the table top and lets you make angled crosscuts. It should have a secure locking clamp and well-graduated angle scale that’s easy to read. It should also be sturdy.
Blade adjustments: Table saws have a crank to set blade height, and the entire crank pivots to set blade angle. Both adjustments should be smooth (not sticky) and lock securely, and the angle scale should be easy to read.
Discovering your car won’t start on a freezing morning can quickly ruin your day. Of course, a dead battery is the most likely culprit when an engine can’t turn over, but there are other reasons why your car won’t start in the cold.
Here are the most common reasons, what to do if it happens and how to prevent cold-weather starting problems.
Dead Battery
Even a battery in good condition loses half its potential power at 0 F. At the same time, motor oil and other fluids thicken, requiring more battery power to start your vehicle than on a warm day. That’s why a dead battery is one of the most common reasons a car won’t start in the cold.
Safety first! Never attempt to jump start a frozen battery — it can explode. Car batteries contain sulfuric acid that can cause serious burns. Always wear gloves and eye protection when working around a battery or jump starting a car. If you come into contact with battery acid, flush with water and get medical attention immediately.
Clean the battery. Use a plastic brush and weak solution of one-quarter cup baking soda and one-quart clean warm water to scrub the top of the battery. Dry, then check and top off the battery fluid with distilled water if needed.
Turn off unnecessary electrical devices to help the battery send all its starting power to the engine.
How to prevent:
Install a battery blanket. A heated blanket keeps the battery from losing voltage and power in cold weather.
Replace the battery. If your battery is more than three years old, replace it with the highest cold cranking amps (CCA) rating that will physically fit into your vehicle.
Thick Motor Oil
As temperatures drop, motor oil becomes thicker and harder to push through the engine. Contaminants and sludge buildup also thicken oil. Consider switching to full synthetic motor oil that has better cold-weather properties.
Always choose an oil with the vehicle manufacturer’s recommended viscosity rating. The two most common viscosities are SAE 5W-30 and SAE 10W-30. The lower the number, the thinner the oil, so it flows better at low temperatures. The “W” means the oil is suitable for winter driving.
What to do:
Warm the engine. Install a self-stick warmer onto the oil pan. In extreme climates, have your repair shop install an in-the-block heater.
Lower temperatures make it harder for gasoline to vaporize. And as temperatures fluctuate, condensation (water) can build up in the gas tank. Because water is heavier than gasoline, it collects on the bottom of the tank and eventually makes its way into the fuel lines. When temperatures drop below 32 F, the water can freeze, blocking the fuel lines or jamming the fuel pump.
Older carbureted vehicles face two problems. One is carburetor icing due to water vapor freezing onto the throttle valve, which hinders gasoline from vaporizing. The other is a frozen shut butterfly valve, preventing air from entering the combustion chamber.
What to do:
Warm the fuel lines. Wrap warm towels around them and place a shallow bucket with hot water under the fuel tank.
For carbureted engines only, use a spray carburetor cleaner or starter fluid to dissolve frost buildup in and on the carburetor. Always reinstall the air cleaner and let the spray dry before starting the engine.
How to prevent:
Keep your fuel tank full. That reduces the amount of surface area where water can condense.
Cold temperatures call for richer fuel mixture when starting your engine. A defective coolant temperature or malfunctioning air intake temperature sensor can cause a lean air/fuel mixture, making the engine difficult to start in cold weather.
A weak or worn alternator or a slipping drive belt will drain the battery, especially if you’re using your headlights or other high-current-draw accessories. On a freezing day, worn starter motor brushes cannot conduct sufficient power from an already weakened battery to spin the engine, so the car won’t start.
What to do:
A faulty starter usually means a tow to your local repair shop. If all else fails, give the starter a whack with a rubber mallet.
Check the alternator drive belt. The belt should not deflect more than a one-half inch when pressed with your thumb along its longest run between pulleys. Replace if there are any signs of wear.
Reduce stress on the charging system. When possible, turn off unnecessary electrical accessories and devices until the engine reaches operating temperature.
The Final Word
If you have access to a heated garage, use it. Consider a garage heater to take the chill. Winterizing your car is the best protection against being stranded.
Whether you’re boiling water for a cup of tea or taking the chill off a room with a space heater, many of the ways we try to stay warm and cozy during the winter months also rank among the top causes for home structure fires.
U.S. fire departments responded to an estimated 1.4 million fires in 2020, reported on average every 89 seconds, according to the National Fire Protection Association (NFPA). Those fires caused 3,500 civilian deaths, 15,200 injuries and an estimated $21.9 billion in property damage.
“Cooking is by far the leading cause,” says Susan McKelvey, communications manager for the NFPA. “We live in a world where we’re all trying to do so many things at once. It’s easy to get distracted when something is on the stove.”
That also explains why Thanksgiving — with larger meals and more people in the house — ranks as the busiest day of the year for cooking fires, followed by Christmas Day and Eve.
Modern smoke alarms, especially the recommended hard-wired units, help alert everyone more quickly when mere seconds can save a life. “Today’s home fires burn faster than ever,” McKelvey said.
Why? More furnishings and household items are made from synthetic materials that burn faster and hotter. That uses up available oxygen more quickly, giving off toxic gases and particles that can damage lungs. More open floor plans also allow fires to spread more quickly. The window of time to get out of the house safely after an alarm goes off is only two to three minutes.
Nearly half of home fires happen in the kitchen, and often can be traced to inattentive cooking.
Here’s how to keep safe:
Keep anything flammable (clothing, oven mitts, paper and cloth towels, food packaging and curtains) at least three feet from the stove.
If you leave the kitchen, turn off the stove until you return. If you have something in the oven, make sure you activate a loud kitchen timer or the one on your phone to remind you when food is done. You could also take an oven mitt or wooden spoon into another room with you as a reminder to check food in the oven.
Plan meals and menus carefully so you aren’t hurrying or doing too much at once.
Turn pan handles inward so they can’t be bumped by anyone walking by.
If you have small children, put tape on the floor to mark a three-foot danger zone. Keep them out of that area when the stove is on.
Heating
U.S. fire departments responded to an estimated 48,530 fires involving heating equipment per year between 2014 and 2018. Heating equipment is the second-leading cause of home fires (14 percent) and the third-leading cause of home fire deaths and injuries (19 percent) in the U.S. In most cases, space heaters are the culprits.
Here are some tips for using space heaters wisely:
Don’t plug additional heat-producing appliances or devices into an outlet used for space heaters.
Keep anything potentially flammable, such as clothing, books or paper, at least three feet from a heater.
Keep flames at least a foot from materials that could catch fire. Three of five candle fires engulf nearby objects such as paper, curtains, a blanket or clothing.
Don’t leave lighters or matches where children can reach them.
Never leave burning candles unattended.
Smoking
Fewer people smoke now, reducing the number of smoking-induced fires. And yet, the danger from discarded cigars, cigarettes and pipes that aren’t fully extinguished still exists.
If you smoke:
Limit smoking to the outdoors.
Dispose of butts and burned tobacco in an ashtray or other non-flammable container. Don’t flick them onto dry vegetation. Douse them in sand or water for extra precaution.
Don’t smoke near medical oxygen, which is flammable.
For those of us living in the suburbs or small towns, the sentiment of “knowing your neighbor” means a lot. Living in a tight-knit neighborhood often creates close family friends, the ones you join for outdoor games and invite to backyard barbecues.
In the neighborhood where I grew up, doors were rarely shut or locked during the day. Even if they were, neighbor kids were welcome to ring the doorbell and see who was home.
Times have changed, though. In a lot of neighborhoods, front doors stay locked. But in the South, you’ll likely still see some open front doors, especially if they lead to the porch.
What Are Hospitality Doors?
You’ve probably come across the phrase “Southern hospitality,” which describes the welcoming nature of people in Southern states. But unless you’re from the South or experienced Southern hospitality yourself, you might not understand the influence it has on Southern communities.
In Charleston, South Carolina, historic homes were built with an airy front porch that included a door separate from the one to the house. That porch door is called a hospitality door, according to Glimpses of Charleston and It’s A Southern Thing.
Many Charleston homes in the 18th century were built with the narrow end facing the street, according to the South Carolina Encyclopedia. The design of these homes, called “Charleston singles,” allowed the prevailing wind to blow through and cool the interior and the porch. (This was, of course, long before air conditioning.) The main entrances faced the side of the lot, while the porch door permitted access to the street.
What Are Hospitality Doors For?
Hospitality doors offered helpful social cues for neighbors and friends. If that door was propped open, it meant that the family inside was ready for visitors. If the door was shut, you guessed it — Do not disturb.
Though this old home feature has gone out of style, hospitality doors are still preserved in many houses in the South. Maybe one day they’ll even make a comeback.