Meal Prep Delivery

Friday, December 30, 2022

What To Know About Soundproofing a Basement Ceiling

Because they’re underground, basement walls are technically already soundproof. If you want a truly quiet basement, you’ll need to know how to soundproof your basement ceiling. This helps dampen the sounds of footsteps and voices coming from above while preventing basement noise from disturbing those upstairs.

If the basement you want to soundproof is still under construction or undergoing a major remodel, you’re in luck. That’s by far the best time to soundproof. Getting in during construction means you can add soundproofing material to the top and underside of the subfloor, making it doubly effective.

But even if the basement is already built and finished, you still have soundproofing options. Most are DIY-able.

A wooden subfloor does a poor job of soundproofing for two reasons. First, the subfloor is full of gaps where sound can travel unhindered. Second, the subfloor vibrates in resonance with sound waves, essentially letting them pass right through. A good soundproofing strategy eliminates gaps by adding extra mass in layers decoupled from each other and from the joists.

Fill Gaps

Caulking gaps in the ceiling is a good way to start soundproofing. Don’t use just any old caulk, though. You need acoustic caulk, an elastomeric material that doesn’t harden and crack over time. Its resilience dampens incoming sound waves.

For an unfinished ceiling with exposed joists, apply the caulk around the perimeter of the subfloor and in any visible gaps and seams between the sheets of plywood. While you’re at it, seal gaps around pipes and wires that pass through the floor.

Add Insulation

Batt insulation does a pretty good job of damping sound vibrations, too. When sound waves strike the loosely woven fibers, they bounce back and forth, with some absorbed into the air between the fibers.

Mineral wool, known by the trademark Rockwool, works better for soundproofing than fiberglass because it’s denser and adds mass to the ceiling. The latter also contributes to sound dampening.

Mineral wool batts come in the same widths as fiberglass and fit snugly between exposed joists. They might stay where they are by themselves. If not, hold them in place with string or duct tape until you install drywall. If the ceiling already has drywall, it might be worth the effort to remove it and add insulation. This also gives lets you bulk up the ceiling covering.

Choose the Right Mass

Thick or dense materials block sound better than light materials. To increase mass, you could install extra drywall and/or a layer of mass loaded vinyl (MLV).

MLV comes in four-foot rolls, and you fasten it directly to the ceiling joists under the drywall. If the ceiling is already covered, you can’t install MLV. In that case, you can increase mass by adding an extra layer of 1/2-in. soundproofing drywall.

It costs a lot more than regular drywall, so if you’re on a budget you may prefer a double layer of regular drywall. If so, you’ll get better sound attenuation by using 5/8-in. drywall instead of the standard 1/2-in. material.

Decouple Sound-Insulating Layers

Decoupling prevents sound waves from reaching the joists. The most common ways to decouple are installing resilient channel or isolation clips, or using a noise-proofing compound like Green Glue.

Resilient channel is a type of metal beading attached to the ceiling joists before you install drywall. The channel’s C-shaped cross-section physically separates the drywall from the joists, and prevents the wood from vibrating in resonance with sound waves that hit the drywall. You screw the channel to the joists, then screw the drywall to the channel.

A similar decoupling method uses isolation clips in conjunction with furring channel (also known as hat channel). After you screw the clips to the studs, snap in the metal channel and screw the drywall to that.

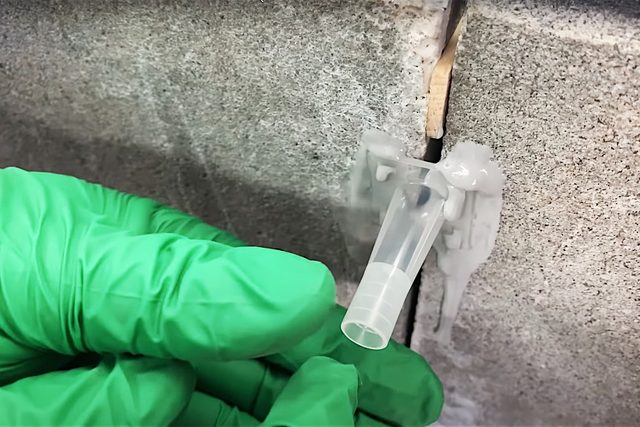
A product like Green Glue comes in a caulk gun. If the joists are exposed, apply beads of the compound to the joists before screwing drywall to them.

If there’s already a layer of drywall and you want to add a second layer, apply the compound to the inside surface of the second sheet before setting it over the existing layer and screwing it to the joists. The compound stays flexible and maintains a vibration-deadening distance between the drywall and the surface it’s attached to.


Article source here: What To Know About Soundproofing a Basement Ceiling

What’s a Catio and Why Would I Want One?

I first heard the word catio from my friend who’s a park ranger. She witnesses firsthand the damage outdoor domestic cats do to ecosystems and endangered species, and sees catios — outside enclosures for cats — as the solution.

Cats are the No. 1 threat to birds in the U.S., killing an estimated 2.4 billion every year. That’s 20 percent of the total bird population. Domestic cats allowed to roam outside also kill millions of small mammals, reptiles and amphibians.

Cats are cute to us, but from the perspective of local wildlife, they’re huge apex predators,” says Liz Baessler, senior editor at Gardening Know How.

“That’s why more and more people are opting to install a catio that lets your cat experience the sights, sounds and sensations of being outdoors, all while keeping their would-be prey at a safe distance. It also protects your cat from the dangers of the wide world, from cars to rival cats to the occasional even bigger predator.”

Here’s more about why you might want a catio, and how to make or buying one.

What Is a Catio?

A catio, aka cat patio, is an enclosed structure that lets cats hang out in a safe outdoor environment. Walls are usually mesh or wire, and they often include a cat door. They range from small window boxes to large, complex patios.

Types of Catios

large catio attached to a house

Catios come in many shapes and sizes, from simple wire-mesh boxes to elaborate multi-level playgrounds. They can be DIY, built from a kit or custom constructed by professional catio makers.

“The options for catios are endless,” says Cynthia Chomos, catio designer and founder of Catio Spaces. “If you only have a small area to work with, keep in mind cats love high spaces, and you can add lots of shelves for vertical and horizontal movement in a catio.”

You can also add tunnels around the yard at various elevations for further cat exploration.

Stand-alone catios

Freestanding catios are not attached to the home, so they can be placed anywhere in your yard or garden. One drawback: “Kitty guardians must take their felines and put them in and take them out,” says Yvette Bacha of Hellas Custom Catios. “This is not often requested, as cats usually like to do things on their own terms.”

To solve this dilemma, some people install above-ground tunnels between their home and the catio.

Attached catios

Attached catios often include a pet door from the house, which lets cats go back and forth at their leisure. “This is the best for cats,” says Bacha. “If something scares them outside in the catio, they can run back into the home to their preferred safe spot.”

Attached catios can be as small as removable window or balcony boxes or as big as a porch, which some people convert into a catio, says Robert Johnston, owner of Catio Bob. He recommends the porch conversion. “Larger attached-to-home and freestanding catios with insect screen overlays are great for kitties and human minions as well,” he says.

Catio Benefits

cat in a catio pathway

Catios are a win-win-win for humans, cats and wildlife because:

  • Cat safety: Cats can safely enjoy the outdoors without getting lost, hit by a car or attacked by dogs, other cats and wildlife.
  • Entertainment: Physical and mental stimulation means cats are less likely to be bored and develop bad behaviors.
  • Wildlife: Protecting birds is becoming more urgent as increasing stresses from climate change and habitat over-development threatens many species.
  • Friendliness: Catios help reduce multi-cat issues by adding more territory.
  • Bonding: Outdoor space helps with human-feline interaction and bonding.
  • Disease: When cats eat wildlife, they can contract and spread toxoplasmosis, a brain parasite. That’s harmful to humans (especially pregnant women) and deadly to many wild animals.
  • Smell: You can move the litter box and its odors outside. (Keep an indoor box for when they don’t feel up to going outside.)
  • Money: Keeping your cat safe means avoiding vet bills from injuries or illnesses.
  • Neighborliness: Your neighbors will probably appreciate not having cats in their garden beds or around their bird feeders.
  • Less stress: You’ll have peace of mind knowing your cat is safe and enriched with fresh air, exercise, sunbathing and bird watching.

“We have not heard or experienced any cons of a catio,” says Bacha. “Even clients who had cats who previously roamed the neighborhood unsupervised said their cats acclimated well to the new enclosure.”

Catio Faux Pas

The only way to go wrong with a catio is failing to consider your cat’s habits and comfort.

“Catios can be tailored to a cat’s specific needs, so it’s not a one-size-fits-all approach,” says Chomos. “For example, mobility or sight-challenged cats will benefit from design elements such as ramps and railings, and soft landings such as grass or outdoor rugs.”

Also, renters should avoid securing a catio to their building without prior landlord approval.

How To Build a Catio

cat inside a catio looking out into a backyard

Before you start, plan out the design, size and features — things like scratching posts, climbing structures and built-in toys.

“Make sure the catio is located in a safe and secure area, and consider how your cat will be able to access it,” says Lance Harding, owner of Cat-Topia. “Also, ensure that the catio is secure and cannot be easily escaped from or accessed by other animals.”

Building a catio is similar to building a house. A level foundation is key, and use pressure-treated 4x4s for the frame if you’re building on grass.

Some other aspects to keep in mind:

  • Local building codes and Homeowner’s Association rules;
  • Appropriate mesh for cat safety and area predators (usually galvanized welded wire);
  • Durability and look of the wooden frame (natural, stained or painted);
  • Whether the cat can dig underneath it to escape;
  • Whether you want a mesh roof or a solid one to keep out the elements and offer shade;
  • Type of floor — grass, decking or pavers;
  • Personalizing it to your cat’s curiosities, activities and physical capabilities with elements like cedar shelves, perches for lounging and cat-safe plants;
  • Steering clear of hazards like vinyl-coated wire (choking hazard) and artificial grass (too hot);
  • Environmental conditions. “Location is key,” says Chomos. “Keep in mind cats love basking in the sun, so an area with partial sun exposure is ideal. Polycarbonate roofing provides year-round enjoyment, and shade can be created with awnings, sailcloth, cat cubbies or a bench to lay under.”

Catios for Sale

If you’re not feeling motivated to DIY, there are a lot of options for buying a catio. “Make sure the catio is large enough for your cat to move around comfortably and has enough space for them to climb, play and rest,” says Harding.

Also consider:

  • The durability of the materials and ease of maintenance;
  • Your budget;
  • Features that appeal to your cat, like scratching posts and climbing structures.

Here are some of our picks:

  • Best budget moveable catio: Aivituvin Cat House, with wheels and a waterproof asphalt roof, for less than $300.
  • Best window catio splurge: Cat-Topia Kittens Playpen Catio, with room for two cats, plus a ladder, solar lanterns and pleasant wooden aesthetic.
  • Best DIY catio manual: Hellas Custom Catios, with chapters on building codes, materials, location, construction, kitty bling and other vital catifications.
  • Best DIY catio plans: Catio Spaces comprehensive designs plans, including window boxes, tunnels, large enclosures and litter box spaces.

For all types of catios, Bacha, Johnston and Harding‘s companies make custom DIY kits to fit your home, budget and cat’s unique personality. And if you’re in Seattle, Catio Spaces can custom-make you one.

“You won’t regret it,” says Johnston. “Like all my customers say, and I mean all, it’s the best thing they ever did for their kitties and themselves.”


Article source here: What’s a Catio and Why Would I Want One?

Thursday, December 29, 2022

How To Fix Concrete Foundation Wall Cracks

Identify cracks and install injection ports

  • Try to identify cracks in your basement early on. Repair works best when cracks are 1/4-inch wide or less, although this approach will work for cracks up to one inch wide.
  • Put on rubber gloves and eye protection.
  • Use a wire brush to remove any dust, grit and debris on the concrete bordering the crack. If your wall is spalling (flaking off in large pieces), take a grinder with a cup wheel to remove all loose material.
  • Fit a tube of crack prep surface paste into your caulking dispenser. The product linked is the most effective I’ve tried for concrete crack repair.
  • Thread a fresh nozzle onto the tube. Start at the top of the crack if it runs vertically.
  • Dab a thin bead of paste about an inch long onto the concrete where the crack begins, on both sides.
  • Press a plastic injection port (included with the crack prep surface paste we used here) into the paste, centering it over the crack so the port leads directly into it.
  • Repeat the process, installing a port every 18 inches along the length of the crack.

Identifying the crack and Prepping the Surface


Article source here: How To Fix Concrete Foundation Wall Cracks

How To Install a Sump Pump

A sump pump keeps basements dry. It’s absolutely essential if your basement floor pad was poured close to the natural water table.

Installing one is pretty simple, but requires some forethought. First, know the different types of sump pumps: submersible, pedestal, battery-operated and water-powered.

Submersible sump pumps are generally the most expensive, but also the most robust and reliable in my experience. I’ve seen them work for decades without failing. Here, we’ll focus on installation techniques for submersible sump pumps.

Tools and Materials To Install a Sump Pump

  • Rotary hammer with long 3-in.-dia. and 1-in. bits;
  • Sledgehammer;
  • Shovel;
  • Hand saw;
  • Safety glasses;
  • Hearing protection;
  • Trowel;
  • Permanent felt-tip pen;
  • Several five-gallon buckets;
  • One 120-volt submersible sump pump with float switch (1/2-horsepower for moderately wet areas, 3/4-hp for spots with heavy flooding);
  • Battery-powered backup sump pump with float switch (1/2-hp for moderately wet areas, 3/4-hp for spots with heavy flooding);
  • Plastic sump tank (18-in.-dia. by 24-in. deep is standard);
  • Multiple lengths of 2-in. PVC pipe with 90-degree elbows and straight couplers;
  • Can of spray foam;
  • Quick-set concrete (mortar);
  • PVC cement;
  • 3/4-in. gravel.

Fhm How To Install A Sump Pump

Choose Your Location and Pumps

  • Scope out the land around your house. Find an area where the land slopes naturally downward and away from your home, but not directly into a neighboring yard. Note which wall of your house borders the low area.
  • In your basement, locate the wall closest to the low spot outside.
  • Place your plastic sump tank on the basement floor in a spot close to a GFCI electrical outlet, roughly six inches from the wall where it’s convenient to drill a hole.
  • With a permanent felt-tip pen, trace a circle on the basement floor around your sump tank.
  • Move the sump tank to one side and make a second mark on the floor six inches larger in diameter than the circle you just traced. Elongate this second mark on the wall side so it butts up against the wall, forming a long oval shape with one end cut off.

Dig Out the Sump Hole

  • With your rotary hammer, drill a series of 1-in.-dia. holes through your basement floor foundation slab, following the larger of your two lines. Be sure to use eye and hearing protection.
  • Continue drilling through the floor slab until you’ve replaced your entire line with side-by-side holes.
  • Take a sledgehammer and break the concrete within your border of holes into pieces. Remove these pieces carefully and dispose of them at a landfill or recycling station.
  • Once all the concrete is out of the hole, you should see soil. Dig this out there’s a hole large and deep enough to fit your sump tank, with six inches extra on the bottom and sides.

Install the Sump Tank

  • Line the bottom of your hole with about six inches of 3/4-in. gravel.
  • Place your sump tank into the hole. The top of the tank should be flush with or just above the surface of the surrounding floor.
  • Fill in the space around the tank with more gravel until the hole is nearly full. Leave an inch or two of empty space at the top for mortar.
  • Mix a small batch of quick-set concrete, then carefully trowel it over the graveled area around the sump tank. Try to make it a smooth continuation of the surrounding floor slab.
  • Allow the concrete to fully harden.

Install the Discharge Pipes

  • Outside, take your rotary hammer and drill a 3-in.-dia. hole through your basement wall as close as possible to the sump pump tank, one to two inches above ground level. This hole will be for the discharge line of your main sump pump. Be sure to use eye and hearing protection.
  • Drill a second identical hole about one foot to the left or right of the first one, whichever direction places it closest to your sump inside. This will be for the discharge line of your backup sump pump.
  • Thread a length of 2-in. PVC pipe through each hole in the wall. Use coupler and elbow fittings as needed to extend the pipes to the low spot you identified earlier.
  • Make sure both pipes protrude several inches from your basement wall.

Install the Main Pump and Backup Pump

  • Place your main sump pump and battery-operated backup pump into the bottom of the sump tank. Because your battery-powered pump is smaller, it should fit in the sump tank alongside the main one.
  • Position your battery-powered pump so the float switch that activates it is several inches higher than the float switch of the main pump. You only want the battery-powered pump to kick on if the main pump fails.
  • Use PVC cement to join 2-in. PVC elbow fittings to short lengths of PVC pipe. Cut these with a handsaw as needed to connect to your pumps and branch out of the sump tank through the factory-made holes in the lid.
  • Add more lengths of pipe and fittings as needed, bonded together with PVC cement, to extend these pipes over to the wall where you drilled holes.
  • Use 90-degree elbows and PVC cement to join the two pipes going up the wall to the pipes coming through the holes you drilled. Cut them to length first, as needed.
  • Pour water into your sump if water hasn’t collected there naturally already. Plug in your pumps one at a time to test them. With the battery-operated backup pump, you’re plugging in the charger.
  • Allow the pumps to clear the water from your sump. Then plug them both in, with the battery and charger working to continuously charge your backup pump.

Seal the Holes

  • Finish up by injecting spray foam into the holes in your basement wall around the discharge pipes.
  • Allow the foam to fully harden.


Article source here: How To Install a Sump Pump

Wednesday, December 28, 2022

How To Sharpen and Tune Up a Hand Plane

Hand Plane Parts labeled

Remove the blade from the hand plane

  • Loosen the threaded wheel holding the cap iron, i.e. the piece of metal on top of the blade and chip breaker assembly. Then remove it.
  • Remove the blade and chip breaker assembly.
  • With a slot screwdriver, loosen the large-headed machine screw holding the blade and chip breaker together.
  • Separate the blade from the chip breaker.

Removing the Blade


Article source here: How To Sharpen and Tune Up a Hand Plane

Tips for Removing Nails Stuck in Wood

Maximize Your Hammer Power

Ram the claw of your hammer into the nail shank and rock it sideways using the claw edge as a pivot point. Repeat the process until you pry out the nail. This nail-pulling technique produces maximum pulling power with little stress on the handle. Because the hammer claw grabs the nail’s shank, this method usually works even when the nail head has broken off.


Article source here: Tips for Removing Nails Stuck in Wood

The 7 Best Belt Bags Perfect for the Outdoors

Excursion Waistbag Ecomm Athleta.gap.com

Athleta Excursion Waistbag

This belt bag from Athleta is perfect for commuting, going to work or the gym and traveling. The main compartment has interior pockets, a zippered compartment and a keyring to help you stay organized while on the go. There’s also a zipper stash pocket at the top for quick access to items you use frequently.

The water-repellent recycled nylon material resists snags and tears. Two compression straps on the side help safely secure essentials inside the bag, and a mesh back adds a little extra comfort for your hips. Wear it around your waist, across your body or use the top handle to carry it in your hand. While you’re shopping, check out the essential products to stay warm this winter.

Tuesday, December 27, 2022

7 Downsizing Tips For Your Living Space

I’ve downsized twice in my life. Once, after my son went off to college, I moved from a two-bedroom home into a beautiful yet boat-sized studio apartment. The second time was in 2012 when I packed my life into two admittedly large suitcases and one laptop bag and moved abroad.

Downsizing often comes with natural life transitions. And with today’s cost-of-living crisis, soaring real estate prices and the rise in interest rates, more and more people are opting for a “less is more” lifestyle that may require some measure of downsizing.

Whatever your reason, if you’re planning to downsize but don’t know where to start, here are some tips that could make the job easier, less stressful and maybe even fun.

Start Early

Allowing yourself plenty of time to sift and sort through your possessions has its advantages:

  • Gives you a feeling of control and accomplishment;
  • Provides the opportunity to reflect on decisions about belongings;
  • Helps avoid the stress of a last-minute rush job.

Work by Category

Decluttering is the first step to a successful downsizing effort. To make the process more manageable, Michele Vig, founder and chief organizer of Neat Little Nest, suggests going through items by categories, rather than room by room.

“It’s easier to make a decision on how many screwdrivers [you need] if you gather them up from around the house to see just how many you really have,” she says. “Same goes for shoes, sweaters, books, and the list goes on.”

Then, get rid of any duplicates, as well as items that are outdated, damaged, worn out or expired.

“Save sentimental items for last,” Vig says. Decluttering emotionally-charged items too early in the process could slow you down or bring it to a halt as you spend hours reminiscing over a shoebox full of old photographs.

Make a Checklist

Just thinking about the fate of every last thing in your home can be daunting, to say the least. Creating a checklist helps you break down the project into manageable pieces, Vig says, leaving you better able to prioritize and track your progress.

Generate a “hit list” yourself, or download Vig’s.

Let Go of What You Don’t Love or Need

Going through items can be an emotional experience, whether you’re running across long-held family heirlooms or that plaster hand-print you made in first grade. Take a page out of the Marie Kondo playbook and approach each by asking yourself not only if an item brings you joy, but if it fits into the new lifestyle you’re envisioning for yourself. If not, let it go.

Tactics to help ease the loss:

  • Take a photo of it;
  • Give it to a family member or close friend;
  • Share stories about the item with people;
  • Know it’s always there in your memory.

Purge the Paperwork

The cardinal rule of downsizing: Don’t keep what you don’t have to. Paperwork is an easy target on this front. Think bank statements, tax returns more than seven years old, restaurant receipts, expired appliance warranties, junk mail, etc.

Check with your city or county to see if there’s a community shredding event on the horizon. Or invest in a good home shredder to destroy anything containing personal information, like account or social security numbers. Have nightly shred time while watching TV or listening to your favorite podcast, then recycle.

Give Away, Donate or Sell

Getting items into the hands of a more appreciative owner can be a great motivator, along with netting some money in the process.

Are there family members who might want or need the item? Local charities? Thrift or consignment shops? Don’t rule out a yard sale, either. While the garbage is a fine final option, you may be surprised at how many of your unwanted items can be recycled, donated or sold.

Top apps and websites to get rid of your stuff:

  • Nextdoor: Connects with your neighbors.
  • Facebook Marketplace: Offers local or national reach.
  • Decluttr: Electronics focused.
  • Poshmark: Clothing re-sale.
  • Esty or eBay: Vintage items and collectables.

Ask for Help

Downsizing can be stressful. For some, the one-two punch of decision-making and dealing with the fallout of those decisions can produce enough anxiety to warrant support, Vig says. She recommends recruiting friends and family to help.

That might mean setting up accountability check-ins, coming over to help make decisions or picking up your unwanted items ASAP, so you can’t change your mind.

And, of course, there’s always the option of calling in a pro, who can guide you as well as speed up the process. Hourly rates vary, but expect an average fee of around $100 an hour for a team of two organizers or $250 for a three-person team.


Article source here: 7 Downsizing Tips For Your Living Space

Monday, December 26, 2022

What Is Clutter and What Can I Do About It?

Everyone deals with clutter. Even extremely organized people declutter periodically. That’s probably why they’re so organized. And maybe they know clutter doesn’t just make a home look messy; it negatively effects on our mental health.

“A cluttered and chaotic home often reflects a cluttered and chaotic mind,” says Brenda Scott, owner and operator of Tidy My Space. The inability to find things, constantly moving one thing to find another, being late for jobs or appointments — it all can lead to stress and frustration, Scott says.

“Clutter can have a negative effect on your emotional wellbeing,” says Lauren Saltman, a professional organizer and owner of Living. Simplified. “Looking around your home should give you a sense of peace, knowing that everything you own in your home is useful to you and your family.”

What Is Clutter?

“Clutter is anything you are keeping in your home that doesn’t serve a purpose, that you don’t use and that doesn’t bring joy to your life,” Saltman says. That could be items handed down by family members, gifts you received but don’t need, clothing you no longer wear and books you won’t read, Saltman says.

Scott adds: “Clutter is anything that doesn’t have a home. It’s the stuff that no one knows where it belongs, so it gets dropped anywhere and everywhere.” You’ll know it by the constant act of moving it around to find what you’re actually searching for, Scott says.

Clutter vs. Hoarding

When should you be concerned that your messy home might signal a deeper problem?

Scott says one distinction between clutter and hoarding is whether you can still use the space for its intended purpose. If piles of items haven’t been moved in a while, hindering your use of the room, you may be approaching the line between clutter and hoarding.

Scott recommends comparing your rooms to the images in Randy Frost’s clutter rating scale. Frost is a hoarding expert and psychology professor at Smith College, and the author of many definitive books on hoarding.

It’s important to reduce clutter before it becomes a massive problem. Hoarding can lead to pest infestation, health issues and even eviction, Scott says.

What Your Clutter Is Trying To Tell You

“Clutter buildup is usually in the areas with the most traffic,” Scott says. That means near your home’s entrances, where we tend to drop things like mail and packages. Also kitchen and bathroom counters, nightstands and the floor. This can point to an absence of good storage solutions to keep it under control, Scott says.

Clutter can also indicate a connection that goes beyond the physical. “People tend to hold onto things because of past memories or guilt,” Scott says.

Keeping things that are useful and needed is OK. When when we keep something out of obligation — maybe because it’s from a deceased loved one, or it cost a lot of money — it’s time to sell, re-gift or donate it. There are tactics to help, too, like taking a photo of the item, or passing it on to an appreciative new home.

Either way, it’s important to think about what you bring into your home. If you’re trying to reduce clutter, pause before you buy new or even used things. At gift-giving season, remind friends and family you prefer experiences to things, Saltman says. And it’s OK to decline hand-me-downs from relatives if you can’t use them.

How To Declutter

Getting started on your decluttering journey can feel overwhelming,” Saltman says. But don’t worry. Your entire home doesn’t need to be decluttered in a day, or even a week.

Scott says people struggle to start because we tend to focus on the enormity of the problem and how long it’s going to take. To make it more manageable, break up your decluttering project into small chunks or areas at a time.

Here are some other tips to help:

Put it on your calendar

Saltman says to schedule several 15-minute sessions per week. Pick days you know you’ll be home, and don’t forget to set reminders. Start with one flat space (like a section of countertop), one shelf or one drawer. Remember: You don’t have to tackle this all at once.

Sort and donate

Once you decide what space you’re going to declutter, Saltman says to bring three boxes and a trash bag with you. Label the boxes “donate,” “recycle” and “relocate.” Go through the area and sort the clutter into the three boxes and the bag. Then organize what’s left. Over time, use this method to go through your entire house, room by room.

Use the 20/20 rule

Can’t decide whether to keep something? “If you can replace the item within 20 minutes for less than $20, then it’s time to let it go,” Scott says. This works great for multiples of small things, like stacks of notepads, hair accessories, rolls of tape and a drawer full of pens.

Stay on track

Saltman says to follow the “one in, one out” rule. If you buy something new, get rid of whatever you’re replacing. New pair of shoes? Donate or trash the old pair. This goes for everything in your home, from kitchen utensils and books to clothes and toys.


Article source here: What Is Clutter and What Can I Do About It?

12 Home Office Lighting Ideas

Interior view of a bright and modern creative workspace.

Task Lamp

This is one of the top lighting decisions you have to make for a home office: Choosing the light to view your important (and not-so-important) documents, drafts and to-do lists.

While overhead lights can create glare or shadows, task lamps reduce both, which is soothing to the eye and the spirit. Task lamps, like this one, often have metal shades that direct the light to a specific spot on your desk.

Many have adjustable arms, joints or shades, too. That way you can shine the light exactly where you need it, no matter what type of work you’re doing.


Article source here: 12 Home Office Lighting Ideas

Thursday, December 22, 2022

Common Dryer Repairs You Can Do Yourself

Here’s the first thing to know about dryer repair: You can solve some common dryer troubles yourself. There’s no need to find a technician, schedule a service call or pay hundreds dollars for dryer repair.

The dryer repair fixes we show in this article correct about 90 percent of dryer breakdowns. Most repairs take about an hour, but set aside extra time to locate replacement parts.  Aside from basic tools like a socket set and screwdrivers, you may need a continuity tester or multimeter to diagnose the problem.

Unplug Your Dryer Before Repairing It

The first step in any appliance repair is to make sure it’s getting electricity. Unplugged cords and tripped breakers are a leading cause of appliance “breakdowns.”

How to Disassemble a Dryer

Dryer Repair
Most dryer repairs require some disassembly of the outer cabinet so you can get at the parts inside and you might not even need a dryer repairman. Dryer disassembly is slightly different depending on where the lint filter is located. For gas dryers, most repairs require that you remove the top and front (not the back or sides) to access the parts.

If your dryer’s lint filter is inside the front door, disassemble it this way: First, remove the screws at each corner of the control panel. Flip the panel up and back to expose the screws in the top panel. Remove the screws, then pull the top toward you and lift it off. To open the bottom panel, release the spring catches by shoving a putty knife into the slot just above them. With the bottom panel open, you can remove the front panel by removing two screws at the top and two at the bottom.

If your filter slides into the top of the dryer, remove the screws alongside the filter slot. Using a putty knife, release the two spring catches located under the top panel at the front. Tilt the top panel up like a car hood and remove the screws that hold the front panel in place.

How to Fix a Dryer That Won’t Start

If your dryer seems absolutely dead when you turn it on, chances are the door switch is bad or the plunger is broken or bent. Door switches wear out from normal use, but repeatedly slamming the door can speed up their demise.

Start by checking the plunger located on the door for dryer troubleshooting. If it’s missing or bent, replace it. If the plunger checks out, the next step of dryer troubleshooting is to remove the top cabinet panel to gain access to the door switch. See the disassembly instructions.

Test the switch for continuity. If the switch is good, test the thermal fuse mounted on the blower housing. If you have a gas dryer with the lint filter in the door, access the thermal fuse by opening the bottom panel. If the filter slides into the top of the machine, remove the entire front panel. On an electric dryer, remove the rear service panel.

If you don’t get a continuity reading from the thermal fuse, do NOT simply replace it. A blown thermal fuse is a warning that you have other serious problems—either a malfunctioning thermostat or a clogged vent. Fix those before replacing the fuse.

What to Do if Your Dryer Is Making Noises

If your dryer is making thumping or rumbling sounds, the most likely culprit is worn out drum support rollers. Replace all of them. If the noise continues, replace the tensioner roller (see below). Since it takes longer to disassemble the machine than to actually replace the rollers and belts, we recommend replacing both of them at the same time.

Dryer making noises

Dryer Isn’t Heating

If you’re dryer isn’t drying clothes, the first thing to do is check the airflow from the dryer vent tube. It gets clogged with lint, preventing airflow and causing it to take a long time to dry clothes, if it’ll dry them at all. If that’s not it, there are a few other common fixes for a dryer that isn’t drying, everything from checking the breaker box to cleaning the lint filter.

However, there are other problems that could cause a dryer to tumble but not heat. If that’s the case, check the thermal fuse for continuity. If the thermal fuse checks out, move on to the radiant sensor, if you have a gas dryer. It monitors the igniter and powers up the gas valve coils when the igniter reaches peak temperature. A bum sensor will stop the whole show. Test it for continuity and replace it if it fails. If the sensor is good, disconnect the electrical connector to the igniter and check it for continuity. Again, replace it if it fails the continuity test.

If both the radiant sensor and the igniter pass the test, replace the gas valve coils. To replace them, remove the retaining plate, unplug the sensors and pull them off the gas valve.

If the thermal fuse on your electric dryer checks out, test the heater element for continuity. Replace the element if you don’t get continuity.

Dryer Doesn’t Rotate

It might be a broken belt. To replace the belt, remove the front cabinet panel and lift the entire drum out of the cabinet. Then, fire up your shop vacuum and suck out all the lint. Then spin the tensioner roller by hand to see if it runs smoothly and examine it for cracks. Replace the tensioner if it fails either test.

Reinstall the drum and wrap the new belt around it (ribs facing the drum). Some tensioners are mounted behind the motor, so they’re difficult to see from the front access panel. You’ll have to do this by feel. Reach your hands around the blower housing and lift the tensioner up while you route the belt around the motor pulley.

Dryer Door Won’t Stay Shut

If your dryer door won’t stay closed, chances are the latch is either bent or missing, or the strike is worn. The fix is cheap and easy. Buy the parts from any appliance parts store. Then grab pliers, a couple of small, straight-slot screwdrivers and a roll of masking tape.

Grab the bent or broken latch and yank it out. Then install the new one, pushing in firmly until the locking tabs seat. Next, protect the door’s finish with tape and remove the old strike. Jam a small screwdriver into the strike and bend the metal locking tab inward. Pry upward with a second screwdriver to pop it out (Photo 2). Snap in the new strike and you’re back in the laundry business.


Article source here: Common Dryer Repairs You Can Do Yourself

How Basement Subfloor Panels Can Keep Out Mold and Mildew

Finished basements can be wonderful spaces, but musty smells will ruin them fast. One of the most common reasons for musty basement smells is moisture beneath the finished floor, causing mold and mildew to grow. Basement subfloor panels were invented to solve this problem.

If you’ve got a basement you’re planning to finish or renovate, don’t make the mistake of installing a finished floor directly on top of your foundation slab. Keep reading and learn how basement subfloor panels work, the different types available and how to install them.

What Are Basement Subfloor Panels?

Basement subfloor panels are sheets of material installed on foundation slabs before the finished floor goes down. Whether you’re putting in tiles, carpeting, wood flooring, laminate or luxury vinyl, laying proper subfloor panels beforehand is a must.

In a typical finished basement without subfloor panels, warm, moist air from the room penetrates the finished floor. When it encounters the foundation slab, the coolness of the concrete causes the warm air to condense. This condensation provides more than enough moisture for mold and mildew to grow beneath the floor.

If this happens in your basement, chances are you won’t realize it until there’s that telltale musty odor in the air. Gross! Basement subfloor panels prevent condensation from forming beneath the finished floor. No condensation means no mold, mildew or mustiness.

Types of Basement Subfloor Panels

Plastic-bottom panels

This style features pieces of rigid plastic factory-bonded to tongue-and-groove oriented strand board (OSB). When warm, moist air from the room drops through the finished floor and the OSB layer, the layer of hard plastic on the underside stops it.

The best basement subfloor panels of this style are often dimpled on the underside with raised sections of plastic, creating a small air space and drainage layer. These providing further protection from any moisture forming on top of your foundation slab. Here are my personal favorite plastic-bottomed panels.

Foam-bottom panels

These work like plastic-bottomed subfloor panels, but with extruded polystyrene foam bonded to OSB rather than plastic. Insulation is foam’s primary benefit.

Though the foam layer on most basement subfloor panels isn’t that thick, I can tell you from experience it leads to noticeably warmer floors. I’ve worked with Dricore’s foam-bottomed subfloor panels, and found them high quality and effective.

Foam-only panels

This style works like foam-bottomed panels, without the OSB. Provided there’s a good seal between panel edges, the foam will be more than enough to do the job. Well-designed foam-only panels ensure a good seal through their tongue-and-groove profiles.

Again, Dricore makes the best foam-only panels I’ve tried. I particularly like the raised foam circles on the bottom of each panel, which creates a small airspace for water to drain through.

Uncoupling membrane

Uncoupling membranes aren’t “panels” in the traditional sense, since they aren’t rigid and usually come on a roll rather than in a stack. Uncoupling membranes support tiles. They’re usually wide strips of dimpled plastic “glued” to the concrete foundation slab with thinset mortar. More thinset mortar is then applied on top of the uncoupling membrane to secure the tiles.

I’m including uncoupling membranes in this list because they provide the same benefit as dedicated basement subfloor panels – preventing moisture beneath the finished floor. Ditra is the best uncoupling membrane I’ve used. It’s easy to install. Some versions even allow electric heating cables to be installed beneath the finished floor for extra toasty toes.

Choosing Basement Subfloor Panels

The style of basement subfloor panel you choose depends on cost, convenience and the type of finished flooring you plan to install.

  • If you want the cheapest, fastest option, go with foam-only panels. They’re light, easy to install and often larger than other types of panels, so the work goes quicker. Just keep in mind that only floating floors (flooring material that doesn’t need to be fastened down with nails or staples) work with this material.
  • Plastic-bottomed and foam-bottomed OSB panels are similar in price, with both slightly more expensive than foam-only panels. They’re also slower to install since they’re smaller, but they allow finished flooring materials that require fasteners.
  • Choose an uncoupling membrane if you plan to install any sort of tile. It’s not cheap or fast, but it’s essential if you want a tile installation that won’t crack. The uncoupling membrane kits meant to house thermostatically-controlled heating cable also provide the best way I know to achieve a warm basement floor.

Installing Basement Subfloor Panels

Installing most types of basement subfloor panel is generally quick and easy.

For the OSB-clad varieties, you’ll need a rubber mallet to tap the panels together, along with a tape measure, straightedge, circular saw and jig saw to custom cut around walls and other obstacles.

Foam-only panels are even easier since they can be interlocked by pushing them together by hand. They can also be custom cut with a utility knife.

Uncoupling membranes are the most time-consuming option. You’ll need to spread thinset mortar over your entire basement foundation slab, one uncoupling membrane width at a time, before laying the product down. Then you apply another layer of thinset on top before adding tiles.

Regardless of which basement subfloor option you choose, installation will involve lots of time on your hands and knees, so kneepads are an excellent idea.


Article source here: How Basement Subfloor Panels Can Keep Out Mold and Mildew

Combination Square Hack: This Is the Secret to Perfectly Straight Lines for Your Next DIY

Every handyman knows that a combination square is a vital tool for drawing precise lines in DIY projects. But even the steadiest hand slips sometimes and the combo square falls off track, leaving you with a wonky line and inaccurate measurements. That’s where a good tool hack comes in handy and, luckily, Tiktok creator @sedgetool has the perfect fix.

@sedgetool Combination Square Hack! #combinationsquare #tipsandtricks #carpentry #woodworking #woodworkingtools #toolhack #howto #pencillines ♬ original sound – Sedge

What’s the Hack for Drawing Straight Lines?

When you’re pressing a combo square along a piece of wood and pressing a pencil into the combo square, it’s easy for those competing pressures to yield shaky lines. To help steady the pencil, this hack helps by creating a small notch at the end of the ruler in the combo square. Then, the pencil and square glide smoothly together down the wood as you draw a perfectly straight line.

To create the notch, take apart your combo square so you are holding the ruler. Stabilize it between two pieces of wood and/or a clamp, so that the short end closest to the 1″ mark is exposed.

Use the long edge of a steel bar stock to saw a notch into the middle of the ruler’s edge. It does not need to be very deep, just enough to comfortably support the tip of your pencil.

Unclamp the ruler, then lap the notched side of the ruler against an abrasive surface to knock off any burrs. Reassemble the combo square with the notched side of the ruler facing upwards, nestle your pencil tip into the notch and draw a straight line on the first try.

What Other Hacks Should I Know?

Now that you’re on a combo square kick, feel free to soup it up with pre-set holes for cabinet knobs and pulls. Or, if you have a speed square, check out these 10 hacks for everything from marking angles to leveling to measuring saw blades. Better yet, why not hack everything in your house? We all could use a helpful home tip or two.


Article source here: Combination Square Hack: This Is the Secret to Perfectly Straight Lines for Your Next DIY

How Much Extra Do Your Christmas Lights Cost You On Your Electric Bill?

In America, Christmas light displays are a staple of the season. According to a 2020 poll from Yahoo, 42% of Americans decorate their home exteriors each year. By far, the most common outdoor Christmas decorations are light displays, whether that’s a simple strand or an elaborate kaleidoscope of rainbow bulbs.

But the festive decorations come at a cost, and many holiday enthusiasts may be dreading their January electric bill. Read on to learn, on average, how much you can expect to pay for running your Christmas lights.

How Much Electricity Is Used for Christmas?

In a stunning 2008 study from the United States Energy Information Administration (EIA), seasonal light displays were discovered to account for 6.6 billion kilowatt hours (kWh) of electricity consumption each year. To put that in perspective, that is over 1 billion kWh more than the entire country of El Salvador uses in a year, or enough to power approximately 14 million refrigerators.

What’s the Average Cost of Lighting Christmas Lights?

Predictably, the cost of Christmas lights per household will vary according to several factors, including where the family resides, what type of lights they’re using, and how long they are keeping the lights on, according to HouseMethod.

HouseMethod first gathered data on each state’s average square footage and electricity rate. Then, they found the most popular Christmas decorations purchased from The Home Depot to use as a median sample. That sample included four sets of 13.25-foot-long icicle lights, two sets of 28.8-foot string lights and two 6-foot-tall inflatable yard decorations. HM calculated the total cost to power these lights for six hours a day, from Thanksgiving to New Year’s Day, in each of the 50 states.

Costs ranged from $10.51 in Washington state to $38.46 in Hawaii, with an expected average of $16.48. To find your specific state, check the interactive map here.

How to Save Money Powering Your Christmas Lights

Now that you know what costs to expect this Christmas, it’s worth learning a few key ways to save money for future Christmases. Pay attention to these four tricks:

Use LED Lights

It’s no secret: LED lights are the most cost-effective. In 2017, the Washington Post determined that running one strand of LED lights costs just 1.4% of the price to run a similar string of incandescent bulbs. Yes, they are more expensive at the initial purchase, but the electric savings handily make up for the downpayment.

Store Lights Properly

Safe, clean storage leads to fewer broken bulbs. In turn, fewer broken bulbs mean that you can keep your lights for longer and bypass the need to buy more strands each year.

Set Timers with Smart Lights

Smart lights conveniently allow you to set them on a timer. This handy feature helps you eliminate extra charges, as you’ll never forget to turn off your lights.

Fix Fuses to Get More Use Out of Your Lights

Those tangled lights at the bottom of the box may still have more life in them yet. Before you throw them away, try repairing the fuses yourself to avoid the cost of replacing the strand.

Other Thrifty Tips

No matter where you’re celebrating Christmas this year, we hope these tips help eliminate some of the financial stress of the season. To save more money on decorations, try finding fun pieces at your local dollar store or making them yourself. After all, no handyman holiday is complete without a festive DIY!


Article source here: How Much Extra Do Your Christmas Lights Cost You On Your Electric Bill?

What Should You Do if Fly Eggs Hatch in Your House?

My favorite aunt lives in the Northeastern U.S. After being away from home for a few days, she returned to find her kitchen overtaken by a swarm of flies. Not knowing what to do, she snapped a couple of photos and, in a cyber cry for help, texted them to her pest control guy.

If the same thing happens to you, you’ll need to act fast. Besides being a nuisance, some flies can transmit disease-causing organisms like salmonella, e-coli and even typhoid fever. Yikes!

We asked Rachel Maccini, an urban entomologist and pesticide safety education program coordinator at the University of New Hampshire Extension, to offer her insight into the characteristics and behaviors of flies. “There’s a lot homeowners can do themselves to remedy a fly infestation, though it may require some detective work,” says Maccini.

Start here:

Step One: Catch and Kill

Use a bag-type vacuum cleaner to suck up as many flies as possible. Dispose of the bag outside in a sealed trash container. Since flies can carry germs, don’t forget to wear protective gloves.

Another option: Your trusty fly swatter. This old-school method works if you’re only dealing with a handful of pests. For a larger cloud of flies, go with the vacuum method.

Step Two: Locate The Fly Breeding Site

flies on a kitchen wall

Most flies enter the home from outside in search of shelter or food. Some species, however, breed and complete their life cycles indoors, especially if they find a wet and warm spot to start their families.

You know you’ve found the breeding site if you see small, dark clusters of spots the size of a pinhead (eggs) or pale-colored larva (maggots) resembling little worms. Once these maggots develop hard cases, flies are about to hatch!

Three common varieties of flies lay eggs indoors, each with a different preferred breeding site:

  • House or cluster (aka blow) flies: These lay their eggs in moist garbage or pet waste. Adult house flies measure about 5/32- to 17/64-in. long with sponging mouthparts, a thorax with four narrow stripes and one pair of wings. Cluster flies are large and sluggish, often invading homes in fall and turning into wintertime pests.
  • Fruit or vinegar flies: Usually found on overripe fruit and vegetables (i.e., bananas on the counter or tomatoes in a bowl). They’re about 1/16- to 1/5-in. long and dull brownish-yellow to brownish-black. Their head and thorax are tan-colored, while the abdomen is black and gray underneath. Some species have red eyes.
  • Drain (aka moth or humpback) flies: These live and reproduce in drains where organic material tends to collect. Slightly larger than fruit flies, they range from light tan or gray to black. They’ve got furry bodies with large, oval-shaped wings.

Step Three: Eliminate the Fly Breeding Site

Your remedy depends on the type of fly.

For house or cluster fly eggs

Cover or remove garbage containers. Seal compost bins and drain and dry areas with standing water.

For fruit fly eggs

Ditch the fruit they’re attracted to. After that, Maccini recommends covering or storing susceptible food in a refrigerator for at least a week so the adult flies die off. (Their entire life cycle only spans one to two weeks.)

For drain fly eggs

Clean pipes with a brush to remove the bacterial scum that often lines plumbing, which these flies are attracted to. Use an enzyme-action product found in custodial supply stores or online to break up the sticky bond of bacteria and algae in the pipes.

Avoid bleach; it’s not effective against fly larvae. And do NOT pour insecticide down the drain. Maccini says it’s unlikely to work and can severely damage sewer and sanitation systems.

How To Prevent Fly Eggs From Hatching in Your House

To prevent the eggs, you need to keep out the flies that lay them. Try these methods:

  • Keep home clean and sanitary;
  • Cover food and beverages or store them in a refrigerator;
  • Install or repair screens on windows and doors;
  • Seal cracks and fill in crevices to the exterior with expandable caulking or other material;
  • Clean litter boxes and yard of pet waste;
  • Close trash cans and seal garbage bags completely;
  • Remove household garbage every four to five days in hot summer months;
  • Set out sticky traps, flypaper or make this simple DIY fly trap;
  • Install ultraviolet light boxes that attract flies, then kill them with an electric zapper;
  • Employ fly bait that contains insecticides that, when ingested, kills in minutes.
  • Apply indoor fly spray (found at grocery or hardware stores) directly to the insects or their larva. Coat surfaces around windows, doors, screened-in porches and cracks with a residual fly pesticide. These types of sprays can remain active for weeks, so they’re effective at suppressing fly populations.

When To Call a Pest Professional

If you’re unable to determine which kind of fly has infested your home, Maccini advises contacting a pest control specialist ASAP. Failure to clean a breeding site thoroughly means your fly problem will most likely continue.


Article source here: What Should You Do if Fly Eggs Hatch in Your House?

How to Make a DIY Indoor Herb Garden

Cut all pieces of wood Cut the wood for the base (A), sides (B), top cap (C), front and back top faces (D) and pot supports (E). All the co...