While LED Christmas lights are more expensive upfront, you’ll save money in the long run. You can pay $13.65 per month to decorate your rooftop with those old incandescent lights, or you can pay 22 cents with LED lights (prices estimated by Xcel Energy Colorado).
In comparison, LEDs are long lasting with some LEDs rated to last up to 100,000 hours. Additionally, LEDs come in both warm-and cool-glow varieties.
Doing your own faucet repair may seem daunting, but once you learn the basics, modern faucets are fairly easy to repair. In fact, the hardest step to fix a leaky faucet is usually finding the right replacement parts. In this article, we’ll tell you how to find replacement parts and show you how to stop spout drips on the three main types of single-lever faucets: rotary ball, cartridge and ceramic disc. We’re showing kitchen faucets and kitchen faucet repair for a dripping faucet, but you can fix most single-lever bathroom faucets using the same procedures. We’ll also show you how to stop leaks around the base of the spout and fix leaking faucets.
The tools you’ll need for this how to fix a leaky faucet project vary a little depending on the faucet you’re repairing. You’ll probably need an Allen wrench to remove the handle. Buy a set of small Allen wrenches and you’ll be prepared for all kinds of leaking faucets. Most repairs also require screwdrivers and a pair of large slip-joint pliers.
Rotary Ball Faucet Anatomy
The diagram below shows the parts and assembly of a rotary ball faucet.
Note: We recommend that you buy a repair kit that includes the ball, springs, seats and O-rings for the spout, as well as a small repair tool. With this kit, you’ll be prepared for almost any repair.
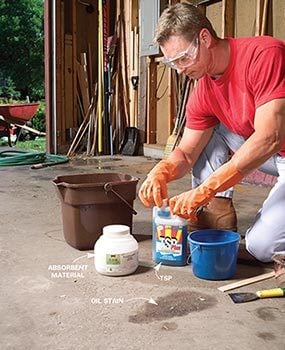
You can’t scrub oil and grease stains away. The trick is to draw them up out of the concrete with trisodium phosphate (or a TSP substitute), water and an absorbent material.
Patience is the key. Old, long-neglected stains may require two or three applications for complete removal. And even then, some stains might still show, or the freshly cleaned area might look slightly different from the surrounding concrete.
Removing Stains from Concrete
Mix Up an Absorbent Solution
Pour 1 ounce of trisodium phosphate (or TSP substitute) and a cup of water into a small bucket and mix.
Add about a cup of absorbent material and mix to make a creamy paste.
The knives in this 16-piece set are made of superior high-carbon stainless steel blades and feature high-grade wenge wood handles. The handles are designed to be non-slip and the blades are balanced for culinary stability and control. Knives should be hand-washed to maintain their classic look and functionality.
The knives in this 16-piece set are made of superior high-carbon stainless steel blades and feature high-grade wenge wood handles. The handles are designed to be non-slip and the blades are balanced for culinary stability and control. Knives should be hand-washed to maintain their classic look and functionality.
It’s no wonder we use dish soap to clean more than just our dirty dishes. Relatively inexpensive and conveniently located on the kitchen counter, it’s easy to grab and glug onto a sponge or into a bucket. But while dish soap is a great multitasker, it’s not the best choice for everything in your home. That’s because dish soap isn’t actually a soap but a detergent.
What’s the difference? Soaps encapsulate dirt and oil so they can be washed away under running water. Detergents, on the other hand, actually break up the dirt so it can’t settle back onto what’s being cleaned, as it might in a washing machine when the water drains out. That difference means that detergents —including dish soap — are too strong for some materials.
Spending more time at home means spending more time going through your belongings. Efficient organizing also means knowing how to repurpose ordinary household objects into extraordinary essentials with renewed lives.
Spending more time at home means spending more time going through your belongings. Efficient organizing also means knowing how to repurpose ordinary household objects into extraordinary essentials with renewed lives.
Scurrying and chomping since the Cretaceous period (circa 65 million years ago), rodents are a group of small, non-flying mammals with large, sharp front teeth. For many people, rodents are cute and cuddly creatures, while others think of them only as nuisance animals.
Scurrying and chomping since the Cretaceous period (circa 65 million years ago), rodents are a group of small, non-flying mammals with large, sharp front teeth. For many people, rodents are cute and cuddly creatures, while others think of them only as nuisance animals.
With winter around the corner, you may be thinking about stocking up on ice melt or rock salt for your driveway. If snow and ice are a way of life for you each winter, understanding how these work products can help you make an informed buying decision while keeping your property as slip resistant as possible.
What Is the Difference Between Ice Melt and Rock Salt?
Rock salt and ice melt are both designed to melt through snow and ice on driveways, sidewalks and other surfaces. Both are sold as bagged pellets to be sprinkled across icy surfaces, lowering the freezing point of water so ice melts and new ice takes longer to form. It also makes ice easier to remove with a shovel or pick. The differences between the two products come down to chemical makeup and performance in different temperatures.
Rock salt, also known as halite, features naturally occurring chunks of pure sodium chloride, the chemical name for salt. Rock salt helps keep ice from forming down to about 5 degrees F.
Ice melt also contains sodium chloride, along with other chemicals like calcium chloride and magnesium chloride. The exact proportions of these chemicals varies by product brand. Most ice melt products, with their calcium chloride additives, will melt ice effectively in temperatures as cold as -10 F.
Ice Melt and Rock Salt Pros and Cons
Ice melt usually melts ice faster than rock salt, and is effective against snow and ice down to lower temperatures.
Plain rocks salt is often cheaper, but its harder crystalline pellets can be more damaging to concrete, decks and patios.
Both ice melt and rock salt are salts, and as such can cause corrosion to concrete and metal.
Neither product has been proven to cause more corrosion damage than the other. So whether you use ice melt or rock salt, apply it sparingly, and consider mixing it with sand for extra traction. This will let you use less, minimizing their damage.
Note: Wash or wipe your pet’s paws when they come inside, being careful to remove all salty residue. Some ice melt products claim to be pet friendly due to a coating of calcium magnesium acetate on the individual crystals. Trouble is, this coating melts away after the product is applied, leaving pets’ paws as vulnerable as ever.
When To Use Ice Melt or Rock Salt
If your temperatures routinely drop below 5 F, go with ice melt
For areas where temps below 5 F are rare, simple rock salt is fine.
Choose a product with a high proportion of calcium chloride, which lowers water’s melting point more than any of the other ingredients.
Keep an eye on the air temperature and don’t forget to take the wind chill into account. According to the National Weather Service, it feels much colder on windy days because the wind pulls heat from the body, which ultimately results in deceased internal body temperatures.
Experts disagree on how cold is too cold for young children. American pediatricians recommend limiting time outside when temperatures reach below 0 degrees F. Canadian pediatricians set the limit at -14 F, while in Nordic countries napping outside in freezing temperatures is common. Play it safe. Once temperatures drop below 0 F, monitor children frequently for signs of frostbite, including complaints of tingling skin or red skin that begins to turn white.
In general, babies and young children are most vulnerable to the cold and their time outside should be limited, particularly on the coldest days.
As the saying goes, “There’s no such thing as bad weather, only bad clothing.” Follow these tips to properly outfit children when they’re outside during cold temps.
Layer Up
Dress babies and young children in layers. Staying warm and dry is key. The layer closest to the skin should be a thin, wicking layer, such as long underwear made of merino wool. The outermost layer should be wind- and waterproof. For active play in snow, a snowsuit, snowpants or waterproof bibs and a windproof coat are ideal.
Rule of thumb: Give them one more layer than adults would wear in the same conditions.
Accessorize Warmly
Always outfit children in a hat, boots and gloves or mittens at a minimum.
Mittens make a warmer choice than gloves, as they allow fingers to bunch together for warmth. If your child needs dexterity, consider liner gloves underneath the mittens or a really good pair of insulated ski gloves.
Wool socks are especially helpful to keep feet warm. For a long day on outside, consider hand or toe warmers. If you use disposable warmers, monitor their use and ensure they are thrown away properly at the end of the day.
Cover Up
Limit exposed skin as much as possible and watch for signs of frostbite. A warm wool scarf will keep the neck and face covered, as will a neck gaiter or buff, which can cover the lower face, too. Balaclavas and ski masks can provide near-total face coverage — all but the eyes.
Car Seat Considerations
When using a car seat in winter, outfit children in thin, tightly-fitting layers rather than thick, bulky winter coats or snowsuits. Add any necessary insulating layers over the top of the car seat harness, not under it, so the harness remains tight in the event of a crash.
Stay Safe Around Outdoor Fires
Bonfires are a fun way to stay warm outside on a cold day. However, as fire pits and outdoor heaters increased in popularity, so too have the number of burn-related visits to the emergency room. In 2017, more than 1,300 children under the age of five were treated for outdoor fire-related injuries, according to a report by the U.S. Consumer Product Safety Commission (CPSC). So take these precautions:
Start and Stop Smart
Safely establish your outdoor fire pit. Keep a fire extinguisher nearby, and make sure kids are never left unattended. Be sure to completely put the fire out. Many burns can occur the day after, when children touch still-hot coals.
Indulge in Kids’ Curiosity
Talk them through what you’re doing as you build the fire. Call out the many ways you’re being careful and why, to help demystify the process. And here’s an idea: Let them build their own “fire” out of snack foods at the same time.
Distance Matters
Teach children they should maintain a safe distance from the fire. Don’t allow them to poke at it or throw things into it. Watch out for loose items of clothing and remind children how to stop, drop and roll.
Play Safely In Winter
Enjoy all the fun cold-weather classics — sledding, skating, skiing and more — with these safety tips in mind:
Wear Helmets
There’s a risk of head injury when sledding, skating, skiing and snowboarding. Proper helmet usage could prevent or minimize more than 40 percent of snow skiing and snowboarding-related head injuries that occur each year, according to a report by the CPSC. Add knee and elbow pads when skating, too.
(Snowball) Fight Fair
Have fun, but skip the ice balls, which can be dangerous. Instruct children to avoid throwing snowballs at anyone’s head, or at vehicles.
Hydrate
Winter is already dry, and activity only increases the need for hydration. Bring plenty of water and snacks if you plan to be out for several hours.
Don’t Forget Sunscreen and Sunglasses
The sun’s glare off the snow can burn the surface of the eye, causing snowblindness, a temporary but painful condition.
And though sunburns are most commonly associated with summer, sunscreen also remains important during the winter months. Due to reflection of UV light by snow, it’s especially important to slather sunscreen on the back of the ears, chin and nose.
Take Breaks
Take frequent timeouts to warm up inside. Children may not realize how cold they are when they are having fun playing outside in the snow. Be especially mindful of the time children spent outdoors when it is cold and really windy. In those conditions, frostbite sets in much faster than normal.
Supervise Winter Activities
Pediatricians recommend that children, especially those under the age of eight, should always be supervised when outside. Take kids’ skill level and maturity into consideration when thinking about allowing them to play unsupervised. When skiing, skating or sledding, instruct kids under the age of 16 to always use the buddy system.
Winter Sport-Specific Tips
Sledding Safety
According to the Mayo Clinic, nearly 25,000 children age 15 are seen in the emergency department each year for sledding injuries, many of which are severe. Choose a hill away from roadways or obstructions such as trees. Ideally, it should have less than a 30-degree incline and end with a flat bottom. Children should ride sitting up or feet-first, rather than head-first. Know that sleds or toboggans are safer and easier to control than saucers or tubes.
Skiing and Snowboarding Safety
Consider a lesson with a professional before venturing out on your own as a family. Check that equipment fits properly, especially at the beginning of each season.
Snowmobile Safely
Children under the age of six should never ride on snowmobiles, and those under the age of 16 shouldn’t operate them. Always wear protective equipment including goggles, waterproof snowsuits and helmets — head trauma is the leading cause of snowmobile accident deaths. Never use snowmobiles to pull sleds or tubes.
Professional electricians have the word “professional” in their titles for a reason — they have the training and experience required to perform electrical work safely and efficiently.
“Electricians spend years crafting their skills and respecting electricity,” says Terry Duncan, CEO of Mr. Electric in Inglewood, Cal. “If you don’t know what you are doing, you could get yourself hurt or killed.”
Nobody wants to become a grim statistic. The best way to avoid it? Recognize that if you are going to tackle a DIY electrical project in your home, always take advice from the people who do these things for a living — and that includes taking advice on what not to do. This starts with understanding your limitations, says Jake McKusker, owner of McKusker Electric in Mead, Colo. McKuster also works with ProTip, an app that offers real-time advice to DIYers.
“If you are not comfortable with it, don’t do it,” McKusker says.
Beyond that, however, the pros urge DIYers to keep specific “don’ts” in mind. Here are seven things professional electricians would never do in their homes.
Furnishing a small space requires creativity, and that’s certainly the case when it comes to finding the right bookcase. A bulky traditional bookcase makes a small room feel cramped.
But don’t give up on your book storage dreams just yet! There are a few tricks to squeezing a bookcase or set of bookshelves into a small room.
Obviously, first choose a piece that isn’t too large. A small or narrow bookcase is easier to fit in awkward nooks and corners. Your bookcase or bookshelves should also have a simple design; anything too ornate will add visual clutter to a small space. A multi-functional piece, like a table or seat with built-in shelves, also helps save space by working as two furniture pieces in one.
We’ve gathered up our favorite bookshelves for small spaces. Each one solves a problem unique to small living.
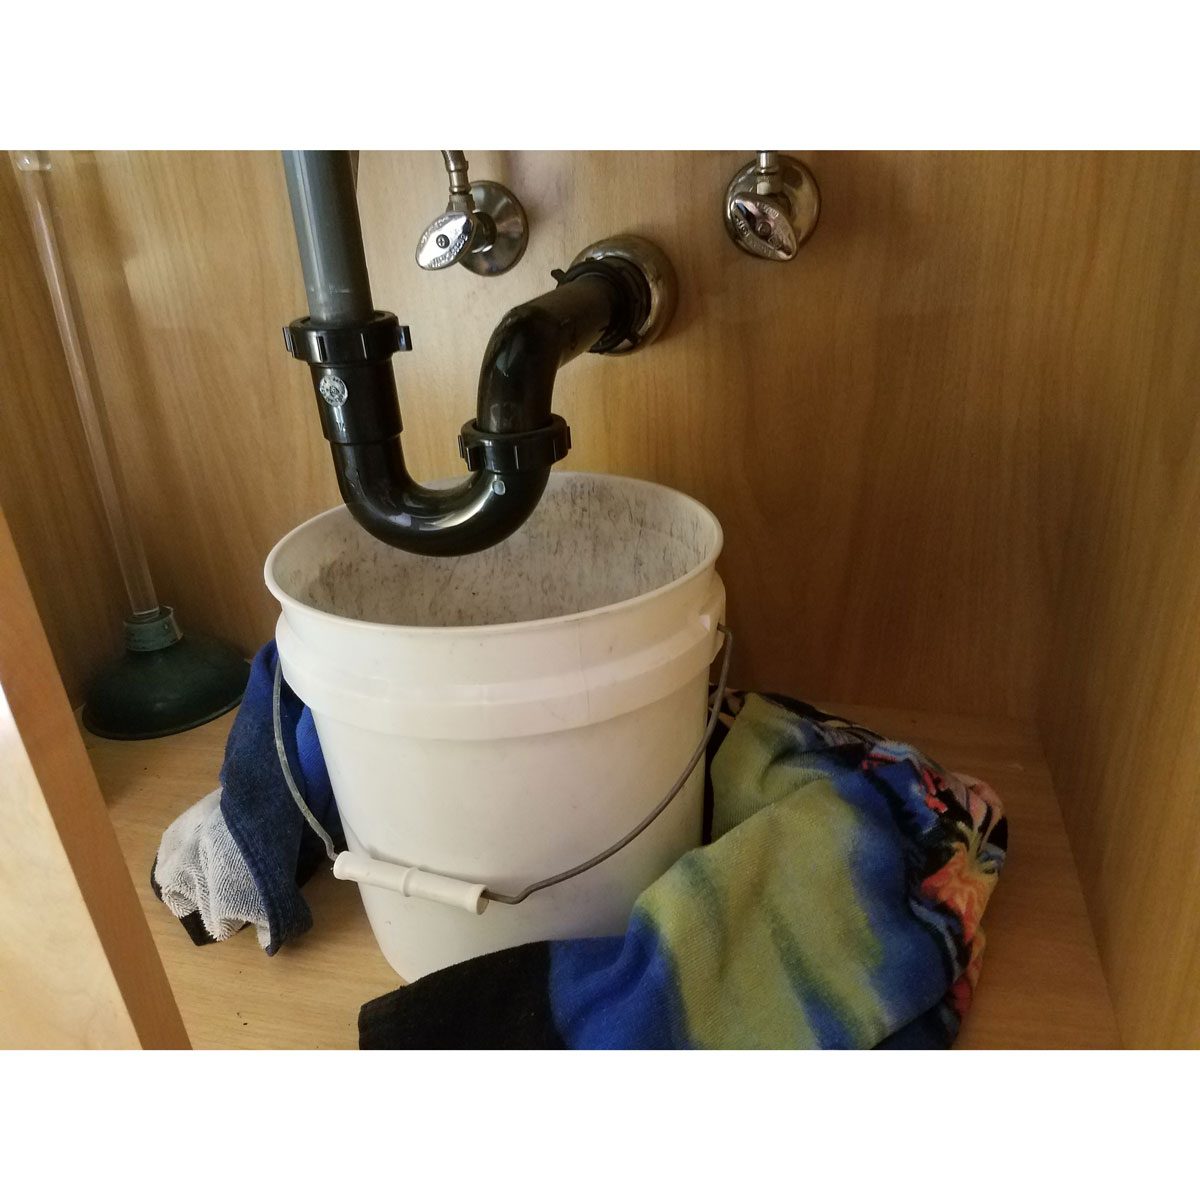
Master baths are often distant from the rest of the plumbing in the house, so they often have their own plumbing vents independent of the home’s other plumbing. If the flushing performance is anemic and there are no clogs or obvious malfunctions, there may be an amazingly simple remedy.
Inspect the Vent
Note: Occasionally, plumbers forget to remove the temporary plug that’s used to pressure-test the lines after plumbing rough-in. They’re located at the top of the vent pipe up on the roof.
From ground level, check if you can see a rubber cap clamped on the vent over the bathroom.
If you can’t see it, grab a screwdriver, and climb up on the roof and inspect the end of the vent over your bathroom.
If the overlooked plug is intact, break through the plastic with a screwdriver and pry out the pieces — the toilet should work just fine.
If the plug isn’t the problem, you probably have a defective toilet or an obstruction in the drain line. Get ahold of the plumber who worked on the house. He or she should be able to solve the problem.
Some types of wood, like pine, cherry, birch and maple, are notoriously difficult to stain. A board that has a nice, attractive grain pattern can end up with dark, splotchy areas after you apply the stain. But there’s a simple way you can prevent most stain blotches. In this article, we’ll show you how.
Video: How to Stain Wood Evenly
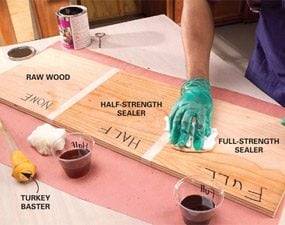
Start with Wood Stain Sealer and a Test Board
Divide a test board into three sections.
Leave one section raw; wipe full-strength sealer on one section, and wipe half-strength sealer on the third section.
Pro tip: An inexpensive turkey baster is a great tool for measuring small amounts of finish and mineral spirits. Mark the baster with a permanent marker. Draw out equal amounts of sealer and solvent to make a 50 percent solution.
Let it dry for a few hours.
Sand lightly with 220-grit paper.
Note: We’re using a wipe-on oil finish as the sealer. The key is to apply a thin base coat to partially seal the wood before wood staining. Sanding sealers, dewaxed shellac and wipe-on finishes will all do the trick.
Some types of wood, like pine, cherry, birch and maple, are notoriously difficult to stain. A board that has a nice, attractive grain pattern can end up with dark, splotchy areas after you apply the stain. But there’s a simple way you can prevent most stain blotches. In this article, we’ll show you how.
Video: How to Stain Wood Evenly
Start with Wood Stain Sealer and a Test Board
Divide a test board into three sections.
Leave one section raw; wipe full-strength sealer on one section, and wipe half-strength sealer on the third section.
Pro tip: An inexpensive turkey baster is a great tool for measuring small amounts of finish and mineral spirits. Mark the baster with a permanent marker. Draw out equal amounts of sealer and solvent to make a 50 percent solution.
Let it dry for a few hours.
Sand lightly with 220-grit paper.
Note: We’re using a wipe-on oil finish as the sealer. The key is to apply a thin base coat to partially seal the wood before wood staining. Sanding sealers, dewaxed shellac and wipe-on finishes will all do the trick.
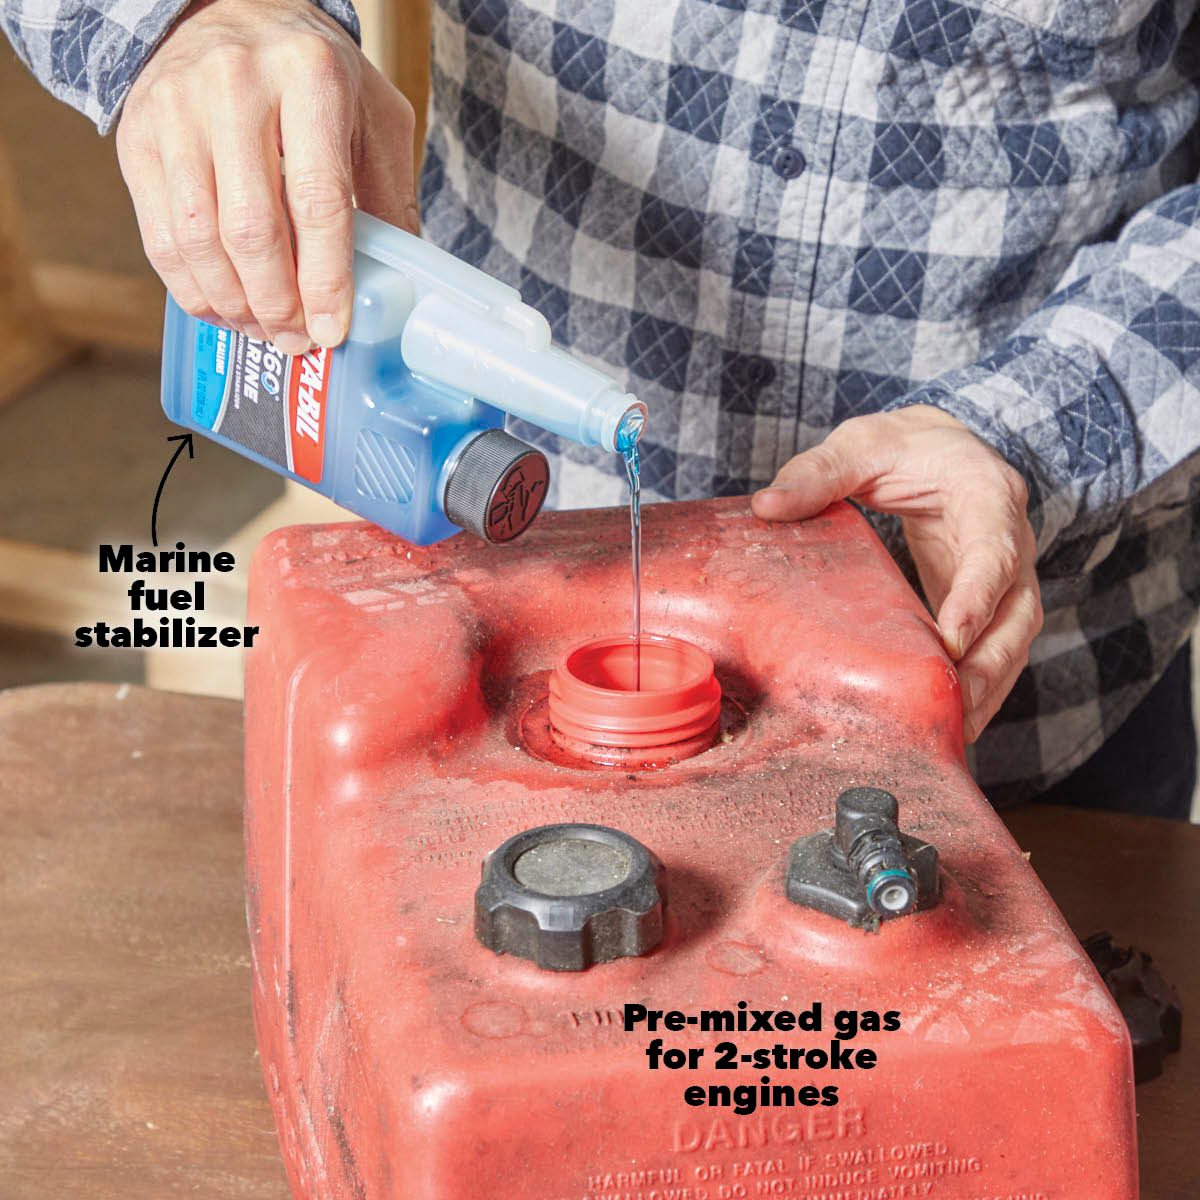
If you can’t get a small engine started, it takes too many pulls to get it going, or it runs poorly, ask yourself this: Did it sit for a long time with gas in it? Like over the winter? If so, your problem is most likely a corroded or gummed-up carburetor. Small engine repair shops earn about 50 percent of their revenue by cleaning or replacing carburetors sidelined by old gas. Look at your lawnmower carburetor next time you sharpen the blades or complete a lawn mower tune-up.
Before you start taking things apart, take a minute to confirm the carburetor is the problem. We’ll show you how to do that, as well as how to clean, rebuild or replace a lawnmower carburetor. Either way, you’ll save about an hour of shop labor (about $70). You can complete the carburetor rebuild project in a single morning, including the time scouting for parts.
Start Your Engine (At Least Try)
Confirm that the fuel valve is on, there’s gas in the tank and the spark plug is in good shape.
Shoot a one-second burst of aerosol lubricant or carburetor cleaner down the throat of the carburetor.
Yank the cord.
Note: If the engine runs (even just sputters) and dies, you have a fuel problem. If there’s no life after a few tries, it’s something more serious and you need to haul the engine to your garage for some detective work.
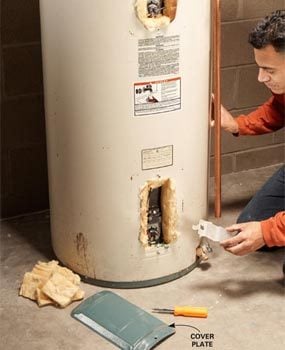
If your electric hot water heater is slow to heat, runs out of hot water faster than it used to, or doesn’t deliver any hot water at all, there’s a 90 percent chance that simply replacing one or both of the heating elements will solve the problem. Water heater repairs are straightforward, and replacement elements are inexpensive ($8 to $20) and readily available at home centers, hardware stores and appliance parts dealers.
We’ll show you how to test the heating elements, remove one if it’s bad, and install a new one. Just keep in mind that water heaters have a typical life span of 10 to 15 years. If your heater is approaching old age, replacement may be smarter than repair.
Of course, there are other potential causes of a lack of hot water. Before you test the elements, check to make sure the circuit breaker is on and not tripped. Also press the reset button on the high-temperature cutoff located just above the upper thermostat. Resetting either the circuit breaker or the high-temperature cutoff may resolve the problem, but the fact that they were tripped in the first place may indicate an electrical problem. If they trip again, test the heating elements.
If the heating elements are good, the problem could be with the thermostats or cutoff switch. Testing is complicated, but since they’re inexpensive—about $20 for both thermostats and the cutoff switch—you could simply try replacing them.
Video: How to Test Your Water Heater Element
Remove the Cover Plates
Turn off the power at the circuit breaker.
Remove the metal covers to expose the thermostats and elements.
Pro tip: Make sure the power is off by touching the electrical connections with a noncontact voltage detector.
The National Association of Home Builders/Wells Fargo Housing Market Index surged to an all-time high in November, climbing five points month-to-month to a score of 90. It marked the third consecutive month the HMI, which gauges builder perceptions of the current single-family housing market, reached a record high, thanks to highly favorable conditions in market.
“Historically low mortgage rates, favorable demographics and an ongoing suburban shift for home buyer preferences have spurred demand and increased new home sales by nearly 17 percent in 2020 on a year-to-date basis,” said Chuck Fowke, NAHB chairman.
This has been a tumultuous year for the home building industry, and the HMI has largely reflected that. April and May saw massive drop-offs in builder optimism that resulted in HMI scores in the 30’s, following the unprecedented economic and societal impact of the coronavirus pandemic. As the economy began to recover over the summer, the HMI did as well, gradually rising back into the 50’s and 60’s before spiking this fall.
“Though builders continue to sign sales contracts at a solid pace, lot and material availability is holding back some building activity,” Fowke said. “Looking ahead to next year, regulatory policy risk will be a key concern given these supply-side constraints.”
Regionally, builder confidence was highest in the West where the HMI climbed all the way up to 98. The other three regions were slightly more tempered in the their optimism, with the South, Midwest, and Northeast posting scores of 90, 85, and 82, respectively.
“Another record high for the HMI reflects that housing is a bright spot for the economy,” said NAHB Chief Economist Robert Dietz. “However, affordability remains an ongoing concern, as construction costs continue to rise and interest rates are expected to move higher as more positive news emerges on the coronavirus vaccine front.
“In the short run, the shift of housing demand to lower density markets such as suburbs and exurbs with ongoing low resale inventory levels is supporting demand for home building.”