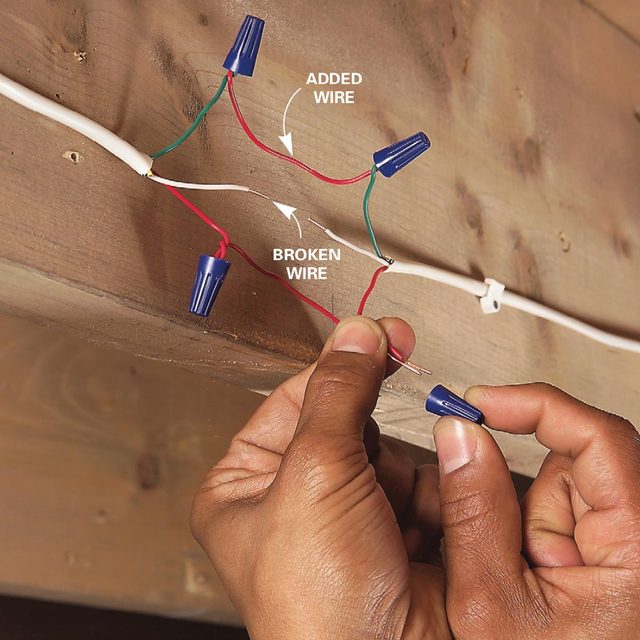
Inspect the wires for damage. Repair breaks with twist-on connectors. Splice in new wire to add length and allow for connections.
A complete inspection of doorbell wiring is usually impossible, since most of the wire is hidden inside walls. But some wire is visible in every home, and that’s usually the stuff that gets jolted loose or broken. An inspection takes only a minute. You may find a few inches of wire exposed near the transformer or several yards running through an unfinished basement. Doorbell cable consists of three or more thin wires inside a plastic sheath (Photo 1). Look for areas where the sheath is damaged, and also for pinched or badly kinked sections. Sometimes the only way to tell for certain whether wires inside the sheath are damaged is to carefully slice open the sheath with a utility knife. If you find broken wire, strip the broken ends and rejoin them with wire connectors. Often there’s not enough slack in the wire to allow for new connections. In that case, add a short section of wire between the broken ends. A spool of 18-gauge wire is available at hardware stores and home centers. The color of the wire doesn’t matter.
Clue!
If you have hardwired doorbell buttons at the front and back of your house and one of them works, you can be sure that the non-working button or the wiring connected to it is bad.
Buying a home is a huge step. Learning to maintain and improve it is a long series of baby steps, sometimes painful and sometimes rewarding. To help get new homeowners off on the right foot, we asked our Field Editors, some of the sharpest DIY veterans around, to pass along their best tips for choosing, maintaining, and improving a home.
Scout the Neighborhood
Ask questions
We went on three separate occasions (Saturday, Sunday, and Monday) at different times of the day. We asked neighbors about the neighborhood, schools, etc. It gave us a real indication of what the neighbors and neighborhood were like. We bought the house and love the neighborhood — no regrets.
Jon Rump
Tackle One Project at a Time
Do one project at a time
When we first bought our old house, I tore right into a porch and kitchen remodel and started on a fence. Before I knew it, I had the whole house AND yard torn up. Ultimately it all came together, but there was a lot of added stress with everything going on at once.
Kirk Pennings
Make a Homeowner’s Journal
Buy a ring binder and keep insurance papers, repair receipts, and all other paperwork pertaining to the house in it. Storing all your house information in one handy place makes life easier for the homeowner and can be a sales “plus” when selling the house later.
Debora Emmert
Get to Know Your House Before Renovating
Live in your home for 12 to 18 months before undertaking any major renovations such as additions or knocking down walls. What you initially think you want may change after you’ve lived there for a while.
Fran Carpentier
Check the Furnace Filter
Look for clues
This can give you some insight into whether the previous owner took care of regular maintenance.
Michael Guarraia
Don’t Be Afraid to DIY
Ninety percent of a DIY project is having the guts to try. Worst case — you mess up and then bring in the professional. Best case — you save money, learn something new, and feel a great sense of accomplishment.
Fran Skwira
Finish Projects . . . Now
Don’t learn to live with incomplete projects. If you do, the last couple of pieces of trim can linger for years!
Jack Bauer
Budget for Trouble
The worst will happen sooner or later
We bought a house with an old furnace, and we knew it was going to go. Sure enough, the first winter did it in. But since we were prepared, it was just an expense, not a financial shock.
Pat Minick
Verify Everything
Get the house history
Insist on full written disclosure from the seller about remodeling, repairs, old damage, leaks, mold, etc. Check with the city or county, and get—in writing—the property’s permit history, zoning, prior uses, homeowners’ association restrictions, and anything else you can find out. Forget “location, location, location.” I say, “Verify, verify, verify!”
Paul Bianchina
The TOP Piece of Advice
We heard this tip over and over, along with many horror stories from new homeowners who didn’t follow it:
Get a licensed home inspection!
Don’t let your real estate agent choose the inspector. Hire someone who works for you without any conflict of interest.</li.
Inspect the inspector before you hire. Ask to see a sample home inspection report. Comprehensive reports run 20 to 50 pages and include color photos showing defects or concerns. Also ask about the length of the inspection. A thorough inspection takes a minimum of three to four hours.
Walk through with the inspector. You’ll learn a lot about your house.
You may have to pay more for a certified inspector, but in the long run it’s worth it. Certified inspectors use sophisticated measuring and detection equipment that can find potential defects that can’t be easily seen. Spend $1,000 now rather than $10,000 in surprise repairs later. (For a list of inspectors certified by the American Society of Home Inspectors, visit ashi.org.)
Get a Home Warranty
Piece of mind
We had the seller throw in a home warranty. This saved us from a faulty dishwasher and got us a brand new furnace.
Larry Gusman
Check Crime Stats
Crime
Before buying, get a report of police calls in the neighborhood. A bargain price may be due to the crime rate in the area.
Mike Collins
Ask Neighbors About Pros They Trust
If you’re looking for plumbers, electricians or other pros, ask your neighbors. You tend to get decent advice if you get it from people who live near you.
Bob Bessette
Offer to Buy the Tools Too
You can always use more tools
If you buy from a couple that’s downsizing, you might get a great deal if you purchase their garden tools, tractors, snowblowers, and tools in general.
What You Need to Know About Attic Insulation Types
Looking for the best attic insulation? That answer depends on your definition of “best.” The best performing way to insulate an attic doesn’t always align with the most cost-effective way.
First, let’s discuss the most common types of insulation available for attics: fiberglass batts, cellulose, loose-fill fiberglass and spray foam. More options exist, but these four materials make up the vast majority of installations. The term “R-value,” when used below, refers to the material’s ability to resist the transfer of heat and measurement looks at “per-inch” units. The higher the number, the better.
Fiberglass batts offer the easiest way to add attic insulation or just about any area of your home. However, typically batts offer the worst insulation performance for any job. But grabbing a bundle at the store and rolling it out takes little effort, so people use them frequently.
The image below shows an atrocious installation found at a two-year-old home. The residence stood in an upscale neighborhood and yep, this passed the city inspection.
I won’t even discuss R-value, because fiberglass batts don’t belong in an attic.
Pros and Cons of Cellulose Attic Insulation
Cellulose — recycled, ground-up paper with boric acid added for insect control and fire resistance — offers a better attic insulation option than batts. If you choose to install cellulose yourself, you can buy the insulation in bags from your local home-improvement store. If you buy enough, they’ll probably let you use an insulation blower for free. Don’t try to buy a single bag and spread it out by hand for spot-insulation: It’s way too densely packed.
The cellulose insulation method creates lots of dust, but it gets the job done. If you hire a pro, they use wet-spray cellulose, which adds a small amount of water to help control the dust and to slightly increase the insulation value per inch.
Cellulose provides an R-value of approximately 3.5 per inch. While it doesn’t actually create an air barrier, the dense material stops most air movement. That helps control frost in attics. Not completely, of course, but it does a pretty good job. The same cannot be said for fiberglass.
Pros and Cons of Loose-Fill Fiberglass Attic Insulation
Loose-fill fiberglass seems to dominate attic insulation in new-construction homes and has an R-value of approximately 2.5 per inch. Like cellulose, you need a big machine to blow it in. You can’t simply buy it in bags and spread it around yourself.
Older fiberglass is itchy and bothers your skin and lungs way more than the newer stuff.
Pro tip:Don’t even think of doing any type of insulation work without wearing a respirator.
A widely publicized study conducted by Oak Ridge Laboratories in 1991 said that loose-fill fiberglass attic insulation lost a lot of its insulation value once temperatures dropped below 20 degrees, making loose-fill fiberglass an inferior product when compared to cellulose. I contacted Andre Omer Desjarlais at Oak Ridge Laboratories about this issue, and he said: “This was true 20 years ago but all fiberglass manufacturers have changed their products appreciably since then and this is simply no longer an issue.”
I also contacted several insulation manufacturers about this. They said the same thing and sent me some great information to back it up. Loose-fill fiberglass attic insulation still experiences convection, but not nearly as much as old fiberglass used to.
Spray foam offers the best attic insulation performance available. Choose from two types: closed-cell and open-cell, aka 2-pound and ½-pound, respectively. They sport insulation values of approximately R-6.5 and R-3.6 per inch, respectively. When installed properly, both types of insulation fill all of the nooks and crannies in a space and make for a perfect air barrier. When air can’t move through it, you have zero heat transfer through convection.
With closed-cell foam, 2 inches of thickness also serves as a moisture barrier. Because of this and the higher R-value per inch, most foam insulation used in Minnesota is closed-cell. To tell the difference between the two, try poking it with your finger. You can easily poke a hole in open-cell foam, but not closed-cell foam. That stuff is way too hard. Here’s why spray foam can regulate your house temperature.
The big downside to either type of spray-foam insulation lies in cost. It’s expensive stuff, and it shouldn’t be installed by a DIYer. Of course, that’s not to say it can’t be done, it just shouldn’t be done. It requires expert use of a spray foam gun. Professionals already have a hard enough time getting it right.
The image below shows a botched spray-foam installation at the rim joist of a new-construction home that I inspected.
One drawback: Spray foam insulation requires the off-gassing of toxic poisons. I’m no expert on that matter, so I won’t discuss. Some people express concerns about it, so do your own research. After conducting my own research, I concluded that I was comfortable putting it in my own home.
Buying a home is a huge step. Learning to maintain and improve it is a long series of baby steps, sometimes painful and sometimes rewarding. To help get new homeowners off on the right foot, we asked our Field Editors, some of the sharpest DIY veterans around, to pass along their best tips for choosing, maintaining, and improving a home.
Scout the Neighborhood
Ask questions
We went on three separate occasions (Saturday, Sunday, and Monday) at different times of the day. We asked neighbors about the neighborhood, schools, etc. It gave us a real indication of what the neighbors and neighborhood were like. We bought the house and love the neighborhood — no regrets.
Jon Rump
Tackle One Project at a Time
Do one project at a time
When we first bought our old house, I tore right into a porch and kitchen remodel and started on a fence. Before I knew it, I had the whole house AND yard torn up. Ultimately it all came together, but there was a lot of added stress with everything going on at once.
Kirk Pennings
Make a Homeowner’s Journal
Buy a ring binder and keep insurance papers, repair receipts, and all other paperwork pertaining to the house in it. Storing all your house information in one handy place makes life easier for the homeowner and can be a sales “plus” when selling the house later.
Debora Emmert
Get to Know Your House Before Renovating
Live in your home for 12 to 18 months before undertaking any major renovations such as additions or knocking down walls. What you initially think you want may change after you’ve lived there for a while.
Fran Carpentier
Check the Furnace Filter
Look for clues
This can give you some insight into whether the previous owner took care of regular maintenance.
Michael Guarraia
Don’t Be Afraid to DIY
Ninety percent of a DIY project is having the guts to try. Worst case — you mess up and then bring in the professional. Best case — you save money, learn something new, and feel a great sense of accomplishment.
Fran Skwira
Finish Projects … Now
Don’t learn to live with incomplete projects. If you do, the last couple of pieces of trim can linger for years!
Jack Bauer
Budget for Trouble
The worst will happen sooner or later
We bought a house with an old furnace, and we knew it was going to go. Sure enough, the first winter did it in. But since we were prepared, it was just an expense, not a financial shock.
Pat Minick
Verify Everything
Get the house history
Insist on full written disclosure from the seller about remodeling, repairs, old damage, leaks, mold, etc. Check with the city or county, and get—in writing—the property’s permit history, zoning, prior uses, homeowners’ association restrictions, and anything else you can find out. Forget “location, location, location.” I say, “Verify, verify, verify!”
Paul Bianchina
The TOP Piece of Advice
We heard this tip over and over, along with many horror stories from new homeowners who didn’t follow it:
Get a licensed home inspection!
Don’t let your real estate agent choose the inspector. Hire someone who works for you without any conflict of interest.</li.
Inspect the inspector before you hire. Ask to see a sample home inspection report. Comprehensive reports run 20 to 50 pages and include color photos showing defects or concerns. Also ask about the length of the inspection. A thorough inspection takes a minimum of three to four hours.
Walk through with the inspector. You’ll learn a lot about your house.
You may have to pay more for a certified inspector, but in the long run it’s worth it. Certified inspectors use sophisticated measuring and detection equipment that can find potential defects that can’t be easily seen. Spend $1,000 now rather than $10,000 in surprise repairs later. (For a list of inspectors certified by the American Society of Home Inspectors, visit ashi.org.)
Get a Home Warranty
Piece of mind
We had the seller throw in a home warranty. This saved us from a faulty dishwasher and got us a brand new furnace.
Larry Gusman
Check Crime Stats
Crime
Before buying, get a report of police calls in the neighborhood. A bargain price may be due to the crime rate in the area.
Mike Collins
Ask Neighbors About Pros They Trust
If you’re looking for plumbers, electricians or other pros, ask your neighbors. You tend to get decent advice if you get it from people who live near you.
Bob Bessette
Offer to Buy the Tools Too
You can always use more tools
If you buy from a couple that’s downsizing, you might get a great deal if you purchase their garden tools, tractors, snowblowers, and tools in general.
What You Need to Know About Attic Insulation Types
Looking for the best attic insulation? That answer depends on your definition of “best.” The best performing way to insulate an attic doesn’t always align with the most cost-effective way.
First, let’s discuss the most common types of insulation available for attics: fiberglass batts, cellulose, loose-fill fiberglass and spray foam. More options exist, but these four materials make up the vast majority of installations. The term “R-value,” when used below, refers to the material’s ability to resist the transfer of heat and measurement looks at “per-inch” units. The higher the number, the better.
Fiberglass batts offer the easiest way to add attic insulation or just about any area of your home. However, typically batts offer the worst insulation performance for any job. But grabbing a bundle at the store and rolling it out takes little effort, so people use them frequently.
The image below shows an atrocious installation found at a two-year-old home. The residence stood in an upscale neighborhood and yep, this passed the city inspection.
I won’t even discuss R-value, because fiberglass batts don’t belong in an attic.
Pros and Cons of Cellulose Attic Insulation
Cellulose — recycled, ground-up paper with boric acid added for insect control and fire resistance — offers a better attic insulation option than batts. If you choose to install cellulose yourself, you can buy the insulation in bags from your local home-improvement store. If you buy enough, they’ll probably let you use an insulation blower for free. Don’t try to buy a single bag and spread it out by hand for spot-insulation: It’s way too densely packed.
The cellulose insulation method creates lots of dust, but it gets the job done. If you hire a pro, they use wet-spray cellulose, which adds a small amount of water to help control the dust and to slightly increase the insulation value per inch.
Cellulose provides an R-value of approximately 3.5 per inch. While it doesn’t actually create an air barrier, the dense material stops most air movement. That helps control frost in attics. Not completely, of course, but it does a pretty good job. The same cannot be said for fiberglass.
Pros and Cons of Loose-Fill Fiberglass Attic Insulation
Loose-fill fiberglass seems to dominate attic insulation in new-construction homes and has an R-value of approximately 2.5 per inch. Like cellulose, you need a big machine to blow it in. You can’t simply buy it in bags and spread it around yourself.
Older fiberglass is itchy and bothers your skin and lungs way more than the newer stuff.
Pro tip:Don’t even think of doing any type of insulation work without wearing a respirator.
A widely publicized study conducted by Oak Ridge Laboratories in 1991 said that loose-fill fiberglass attic insulation lost a lot of its insulation value once temperatures dropped below 20 degrees, making loose-fill fiberglass an inferior product when compared to cellulose. I contacted Andre Omer Desjarlais at Oak Ridge Laboratories about this issue, and he said: “This was true 20 years ago but all fiberglass manufacturers have changed their products appreciably since then and this is simply no longer an issue.”
I also contacted several insulation manufacturers about this. They said the same thing and sent me some great information to back it up. Loose-fill fiberglass attic insulation still experiences convection, but not nearly as much as old fiberglass used to.
Spray foam offers the best attic insulation performance available. Choose from two types: closed-cell and open-cell, aka 2-pound and ½-pound, respectively. They sport insulation values of approximately R-6.5 and R-3.6 per inch, respectively. When installed properly, both types of insulation fill all of the nooks and crannies in a space and make for a perfect air barrier. When air can’t move through it, you have zero heat transfer through convection.
With closed-cell foam, 2 inches of thickness also serves as a moisture barrier. Because of this and the higher R-value per inch, most foam insulation used in Minnesota is closed-cell. To tell the difference between the two, try poking it with your finger. You can easily poke a hole in open-cell foam, but not closed-cell foam. That stuff is way too hard. Here’s why spray foam can regulate your house temperature.
The big downside to either type of spray-foam insulation lies in cost. It’s expensive stuff, and it shouldn’t be installed by a DIYer. Of course, that’s not to say it can’t be done, it just shouldn’t be done. It requires expert use of a spray foam gun. Professionals already have a hard enough time getting it right.
The image below shows a botched spray-foam installation at the rim joist of a new-construction home that I inspected.
One drawback: Spray foam insulation requires the off-gassing of toxic poisons. I’m no expert on that matter, so I won’t discuss. Some people express concerns about it, so do your own research. After conducting my own research, I concluded that I was comfortable putting it in my own home.
Surround the pipes on all four sides with 2-inch rigid insulation, then create an inlet and an outlet for warm air at each end of the chase. Keep air flowing with a small duct fan.
How to keep pipes from freezing in crawl space: Duct booster fan
A small duct booster fan will keep warm air flowing through the pipe chase.
For starters, forget about using fiberglass or the foam pipe insulation sold at home centers. At best, it provides an insulation value of R-3.8. That’s not enough to prevent frozen pipes during extended cold periods. Plus, it’s difficult to install on existing pipes, especially when the pipes run along the length of a floor joist. So we put our heads together and came up with a solution that can be adapted to most crawlspaces. One of the editors also used this fix to successfully insulate freeze-prone pipes on an outside wall.
Here’s how it works: Build a duct system around the pipes with 2-inch thick rigid extruded polystyrene foam (R-10). It works by drawing heated household air through the foam duct and back into the house. Start by locating a spot near the pipes on one end of the crawl space near a wall and cut a 5 x 10-inch hole in the floor above. This exhaust hole should be near an electrical outlet. Cut another hole at the far end of the pipes to fit a conventional floor vent — the size is up to you.
Next, construct the duct by running the foam down a few inches below the pipes to create enough room for airflow. Glue the lengths together with foam construction adhesive and pin them with screws or nails until the adhesive sets up. Crosscut individual foam pieces to “cap off” any open joist areas. Cutting is easy with a circular or table saw.
Use the same method to encase vertical riser pipes and pipes that run along the length of a joist. Once all pipes are enclosed, glue on end caps.
Buy a duct booster fan (available in the HVAC department at home centers) and place it over the exhaust vent. Run the fan full time at low speed during freezing weather (that’ll only cost a few dollars per month).
CAUTION!
Foam insulation is flammable and produces toxic smoke when burning. You must follow these safety precautions:
Keep crawl space lights at least 6 feet away from the foam duct.
Never use electrical heating tape inside the foam duct.
Do not install a fan inside the duct.
Do not tap into an existing HVAC duct to supply heat to the foam duct
Required Tools for this Project
Have the necessary tools for this DIY project lined up before you start—you’ll save time and frustration. [project-tools]
Required Materials for this Project
Avoid last-minute shopping trips by having all your materials ready ahead of time. Here’s a list. [project-materials]
Wind and hail damage caused the most insurance claims between the years 2014 and 2018, according to the Insurance Information Institute. In addition to damage caused by hurricanes and tornadoes, thunderstorms created widespread wind-related claims. The average claim came in at $11,200. Learn how to find a good repair contractor and work with your homeowners’ insurance agent after storm damage.
Water damage can result from rain or snowmelt, along with interior issues such as a burst pipe or leaking plumbing. Travelers Insurance analyzed eight years of insurance claim coverage data and found water accounted for 31 percent of its claims. Here are five flood insurance tips you should know.
Wonder where dog bites and trampoline accidents fall? Well, the Insurance Information Institute says liability insurance claims made up just two percent of total claims. Liability refers to your duty toward other people, such as when a guest suffers injury or property damage while visiting your home. Although infrequent, these claims can be expensive — averaging a hefty $26,872. Did you know homeowners insurance covers these 10 unbelievable events?
Are you a genius homeowner? Find out in this video:
Plus: 13 Things to Do If Your Home Gets Broken Into
1 / 13
Call the Police
You’ll want to report the incident to the police to establish a record and also give you information for filing an insurance claim. Make sure you can see the 13 sneaky signs someone is watching your house.
Take Pictures
Photos will provide additional evidence of what your home looked like following the burglary or robbery. Police photos might be incomplete or the insurance company might need additional photos. Find out what burglars don’t want you to know.
Keep a complete list of what was taken and its approximate value. You might want to even draw pictures or let police know of specific identification marks. Keep an extra copy of the list for insurance purposes. These are 10 common homeowners’ insurance mistakes that can cost you.
It’s good to call your bank even if you don’t know if any financial records were taken. You may not see the effect of stolen bank documents right away but you can avoid any potential losses by changing accounts, pins and other financial information. Protect yourself against phone scams that can take your money, too!
Let the Neighbors Know
Burglars like to strike in the same area multiple times because they’ve usually cased a neighborhood for some time before striking. So, be a good neighbor and let your neighbors know about a burglary. Here are 15 other ways you can be a good neighbor.
Follow Up With Police
You’ll want to find the burglar immediately but crimes don’t usually get solved over night. Be sure to follow up with police periodically to keep abreast with the investigation. Here are more tips on how to deal with a burglary.
Talk to Someone
A burglary will summon feelings of being unsafe and that can have a lasting effect. If you have residual effects from the burglary be sure to speak with a professional who can help with anxiety issues.
If high energy bills are causing you shock and frustration, take heart. There’s something you can do — call your local utility company and ask for an energy audit.
An energy auditor will come to your home and conduct a series of tests to provide detailed information about your home’s energy usage and energy loss. A report, generated at the conclusion of the two- to three-hour audit, will detail:
The condition and efficiency of your heating and cooling system
The overall efficiency of your home, including the primary areas of air leakage in your walls and ceilings
Low-cost ways you can improve energy efficiency and save energy
Larger upgrades that will pay back their cost with energy savings within a relatively short period.
In this article, we’ll walk you through a professional energy audit and show you how it works. An audit typically costs several hundred dollars, but most utility companies offer a rebate to reduce the cost to you. We worked with Erik Lindberg, a Minnesota state-certified energy auditor, whose company, Enervision, has performed more than 12,000 audits. The house we audited was built in 1979.
An Energy Audit Addresses Five Priorities
“First is home safety. If your house isn’t safe, energy efficiency doesn’t matter. Second is durability. Finding and fixing moisture problems and rot helps the house last longer. Third is comfort. The audit identifies drafts and cold spots. Fourth is to set up the best action plan to make your home more efficient, especially things you can do yourself. Fifth is cost-benefit, which tells you what it’ll cost to make improvements, and how long it’ll take for the savings to pay off those costs.”
Checking Heating and Hot Water Systems
Photo 1: Furnace efficiency test
The auditor tests the furnace exhaust with an electrical gas analyzer, which gives a combustion efficiency reading. It also measures draft pressure to determine if flue gases might leak into the house.
Photo 2: Backdraft test
With all doors and windows closed and all combustion appliances turned on, the auditor tests for backdrafting at a natural draft gas water heater. The flame, held next to the draft diverter, should be drawn up into the flue.
The audit starts with a furnace combustion efficiency test. With the furnace running, Erik inserts a gas analyzer in the furnace’s draft diverter (Photo 1). If there’s no draft diverter, he drills a small hole in the flue for the wand, then later patches it. The analyzer provides an immediate reading. Our furnace had a 76.9 percent combustion efficiency—not bad considering furnaces at least 15 years old are usually 55 to 68 percent efficient and this unit is 27 years old (typical lifespan is 15 to 20 years). This test also measures:
Amount of carbon monoxide in the flue gases
Draft pressure in the flue to determine if gases could leak into the house.
These are safety issues. If waste gases aren’t being drawn up the chimney, moisture, carbon monoxide, and other pollutants could be flowing into your home. Common causes of vent problems (allowing gases to “backdraft” into the home) are birds’ nests in the vent pipes or vents that have come apart. Erik often finds these problems. He notes one common clue: “If you have moisture on your windows, the first thing to check for is back-drafting in the furnace and water heater flues.”
Erik tests for back-drafting in the water heater flue as well by holding a flame or a smoke stick next to the draft diverter (Photo 2).
The check of the heating and hot water systems concludes with a visual inspection. Rust particles (called “scaling”) inside the furnace heat exchanger indicate corrosion, which will eventually lead to holes and combustion gas leakage. Scaling may also be visible on top of the water heater around the draft diverter.
Erik looks to see if the furnace filter is clean and installed correctly. “Clogged filters can cause a moderate increase in heating costs, but more significantly, cause the heat exchanger to overheat and fail, and cause the fan motor to heat up, increase electric consumption and reduce the life of the motor.” He also looks for combustibles stored near the furnace or water heater, because the flame could cause an explosion.
Other common problems Erik has found include disconnected flue pipes, leaky ductwork, clogged condensation pipes, dirty burners, and dirty fan blades. “I’ve found many furnaces missing the cover for the filter slot, and major leaks in the return-air ductwork. This causes depressurization in the furnace room and can draw dangerous exhaust gases out of the flue pipe and distribute these gases throughout the house,” he says.
Heating System Efficiency
“Old boilers, originally designed for coal, then converted to oil and then to natural gas, can be as low as 55 percent efficient—that’s 45 percent waste! The best furnace designs feature variable-speed fan motors and modulating or multi-stage burners, which enable the furnace to match its Btu output to the home’s temperature needs, thereby increasing the system’s efficiency.”—Erik Lindberg, Certified Energy Auditor
Testing for Air Leakage
Photo 3: Blower door test
With all doors and windows closed, the auditor inserts a blower door in the front or back doorway and starts the fan.
Photo 4: Measuring pressure difference
The gauge shows the pressure difference between the inside and the outside and the airflow per minute. From these, the auditor calculates the leakage rate.
Part two of the audit entails a “blower door” test, which measures the home’s “tightness,” or air infiltration rate. Erik first closes all doors and windows, then he sets an adjustable panel with a variable-speed fan in a doorway, completely sealing it. He turns on the fan to blow air out of the house, which reduces the indoor air pressure, and then measures airflow through the fan at predetermined pressure points (Photos 3 and 4). Outside air then enters through cracks and gaps in walls and ceilings.
With the fan running, you can feel air come in with your hand, especially around leaky windows and doors. Gauges connected to the fan measure the airflow rate needed to maintain a constant pressure, allowing the auditor to calculate the leakage rate.
Newer homes are built tighter under the most recent Minnesota building code. (Most other state codes have tighter rules too.) It even requires special ventilation fans to ensure adequate fresh air. Still, their leakage rate is often equivalent to a 6 x 6-in. hole in a wall. Older homes weren’t built nearly as tight. They often have a leakage rate equivalent to a 19 x 19-in. hole, which is like having a window wide open all the time! The house we tested had leaks totaling .77 square feet (about an 11 x 11-inch hole). Erik estimates that sealing air leaks alone will save 10 to 20 percent on this home’s annual heating bills.
Erik pointed out several signs of air leaks: stains around exhaust fans and dirt on insulation. A batt of insulation between joists in the basement was dirty, meaning the insulation was serving as a filter for air leaking in through the foundation. “You can’t fix these leaks with insulation because it won’t stop the airflow,” Erik says. “You have to seal them with caulk, expanding foam, or some other sealant.”
Air Leaks
“In my opinion, there’s no limit to how tight you can make the ceiling. The less air that goes out the ceiling, the less that will come in around doors, windows, and other leaky areas. When you’re carrying water in a bucket, it doesn’t matter if the top leaks because no water is going to get out. What matters is the bottom. Think of your house like an upsidedown bucket holding heat.”—Erik Lindberg, Certified Energy Auditor
Pinpointing sources of energy loss
Photo 5: Thermography
The auditor uses an infrared camera to scan walls and ceilings. The camera detects temperature differences and can pinpoint cold spots and air leaks.
Photo 6: Attic access door scan
Doors and hatchways are likely suspects.
Attic access door results
Dark blue areas around the perimeter of the attic access panel indicate air leakage. The overall blue tinge indicates poor insulation.
Photo 7: Outlets and switches scan
Electrical devices on exterior walls are often sources of leaks.
Outlets and switches test results
Electrical outlets and switches typically leak, but this is excessive. This kitchen wall feels cold and drafty in the winter.
Photo 8: insulation scan
The infrared scan will also pinpoint cold areas in the wall where insulation is missing.
Insulation test results
Inadequate insulation in a wall cavity and gaps in the top plates (wall framing) cause most of the air leaks in this dining room.
While the blower door test measures the overall leakiness of the house, infrared scanning (technically called “thermography”) graphically identifies the precise locations of those leaks. Erik keeps the blower door fan running to draw in outside air. Then, using an infrared camera, he scans the walls and ceilings, photographing surface areas that show up as cooler (Photo 5).
Cold areas show up as blue, and warm areas as yellow (Photos 6 – 8). Today (a chilly day in March), the framing members showed up as blue, since they’re cooler than the insulated portion of the walls. (The opposite would be true on a hot day when the indoors is air-conditioned and the outside air is warmer.)
Air leaks in the ceiling typically cause the greatest energy losses. Openings made for light fixtures, plumbing vents, exhaust fans, attic access, and smoke alarms will leak if the builder doesn’t make an extra effort to seal them. In this house, the area around the attic access panel and the exhaust fan in the upstairs bathroom showed extensive leaking (Photo 6), while a ceiling light fixture, which must have been sealed better, leaked very little.
Electrical outlets and light switches on outside walls also usually leak, unless the builder took extra pains to seal them. The infrared scan showed that four of these in the north kitchen wall leaked profusely (Photo 7). The homeowner confirmed this, noting that she often felt cold drafts when standing by this wall.
While some of these problems are easy to fix—foam weatherstripping on the attic access panel, spray foam or caulk around the exhaust fans, and foam seals under the outlet and switch cover plates—others are difficult to seal and may not be practical to go after. Leaks around exterior wall top plates and inadequate insulation in some wall cavities are common (Photo 8) but hard to access and therefore expensive to remedy.
Expect some air leakage around windows, sliding patio doors, and exterior doors. “All doors will leak, especially since people step on the threshold as they enter and leave the house, wearing a gap between the door and sill,” Erik explains. “The only doors that don’t leak are the ones on submarines.”
Infrared scanning can identify other hidden problems. It’ll show cold spots where insulation is poor or missing. Erik has even found double-pane windows that have failed. Condensation between the layers of glass, which is the usual sign of failure, hadn’t shown up yet. Yet the infrared image showed that the centers of the panes were cooler than the sides, which meant the special argon gas they had been filled with was completely gone.
Since infrared scanning works by identifying heat differences, it can also detect water leaks (not to mention warm-blooded critters in the walls). Erik once found an area in a basement floor that was inordinately warm. Turns out a hot water pipe was leaking under the concrete, which explained the homeowner’s high energy bill.
Testing With Infrared Scanner
“With my infrared scanner, I’ve discovered missing batts of insulation, insulation that stops 2 ft. short of the top of the wall, and entire room additions—20 by 30-ft. rooms—with absolutely no insulation in the ceiling. I’ve also found broken ducts sending heat into uninsulated attics.”
Final Report—What You Can Save
Once the testing is complete, the auditor prepares a comprehensive report detailing the amount of leakage, ways to improve efficiency, the cost of specific improvements, and the time frame for recouping those investments.
The report lists specific low-cost steps for reducing energy consumption that you can usually do yourself. For this house, they include insulating the attic access panel, weatherstripping it with closed-cell foam tape, sealing ceiling penetrations at electrical fixtures, insulating kitchen soffits, adding attic insulation, insulating the rim joists, and caulking around windows, doors and base trim. Erik estimates that these upgrades will cut annual energy bills by 15 to 20 percent. Adding insulation to exterior walls isn’t worth the cost.
The furnace, installed when the house was built in 1979, had an “annual fuel utilization efficiency” of about 68 percent. This furnace is operating well below the current minimum standard specified by the building code and far below the efficiencies currently available. (Energy Star furnaces must be at least 90 percent AFUE.) Erik recommends replacing any old furnace (in Minnesota’s cold climate) that’s not at least 80 percent efficient since newer models use less energy and eventually pay for themselves (in this case, in nine years). Your energy auditor will make these calculations and recommendations based on your local climate. Furnaces that are at least 95 percent efficient may qualify for a federal tax credit.
Installing a programmable thermostat in this home will pay for itself in just two to three years. A new high-efficiency air conditioner isn’t a priority, but it’s likely to be a priority in warmer climates. You want to recoup your investment through predicted energy savings within seven to 10 years.
Recommended Energy-Saving Tips
The final report lists energy-efficient upgrades, their cost (of hiring a contractor or doing it yourself), and estimated annual savings. Upgrades that pay back in seven to 10 years are considered good investments.
Seal leaks in ductwork
Clear space in front of heating units, registers, and radiators
Reduce water usage by using low-flow showerheads
Insulate the water heater tank and water pipes
Wash clothes in cold or warm water. Rinse with cold.
Dry laundry loads consecutively to maximize dryer efficiency
Replace incandescent bulbs with efficient compact fluorescent bulbs
Use timers or motion detectors to turn off lights when not needed