Meal Prep Delivery

Tuesday, May 31, 2022

No Job Is too Tough for Family Handyman Approved Grime Hand Soap

One of the worst things about working on your car or motorcycle after work is showing up to the office the next day with dirt and grime still in every crevice of your hands. I’ve tried many of the degreasing hand soaps out there, but they often leave my hands feeling chemical-ridden and dry.

Recently, a friend and fellow Family Handyman editor told me about an all-natural degreasing hand soap called Grime. So with a couple of dirty jobs on my to-do list, I decided to pick up a bar and give it a try.

What is Grime Hand Soap?

Grime Hand Soap is an all-natural, biodegradable hand soap with a blend of coconut oil, activated charcoal, natural sand, and fir needle essential oil.

It’s made the same way as any standard hand soap (AKA cold process), retaining the glycerin and nutrients so there’s no need to add harsh chemicals or preservatives. Grime hand soap uses only recyclable packaging, and the bars are formulated, produced and packaged in the U.S.

When I opened the package, a two-inch square bar tumbled out, bluish-grey and speckled with light and dark granules.It has the faint, pleasant smell of something like summer air.

How We Tested It

With hand soap, only two things matter: How well it cleans, and what it leaves your hands feeling like afterward.

So I got busy dirtying my hands with the filthiest projects on my to-do list: Changing the oil in my car, lubing my bicycle chain, planting vegetables and painting some shelves with oil-based paints.

I did these over a two-day stretch, keeping a tally of how many times I used Grime Hand Soap and how long it took to remove the gunk each time.

Performance Review

Fh22d Approved Grime Soap 05 24 003 Grime Degreasing Hand Soap

After 30 individual washes and nearly 15 minutes of total hand-washing time, my hands look and feel fantastic. At no point did my hands dry out, crack or need lotion, thanks to the high quality, all-natural ingredients and moisturizing coconut oil.

I love the coarseness of the bar when it’s wet in your hands. It works like a scrubby pad or pumice stone, removing the chain lube grease and caked-on paint from deep within the crevices of my hands.

I appreciate the subtleness of the soap’s smell as well.  The bar has a soft fresh scent without that lingering, perfumery, over-the top smell.

There are a couple of downsides to Grime Hand Soap, too.  High quality, well-made products tend to cost more, and Grime is no different. Though small (less than two ounces), it costs the same as a full-size bar of run-of-the-mill degreasing soap. Natural soaps also dissolve quicker than soaps made with artificial ingredients. Over my 30 washes, the bar shrunk to less than half its original size.

Why You Should Buy This

No matter how much you love getting your hands dirty, Grime Hand Soap can help you get them clean. The all-natural, biodegradable formula is ruthless on dirt and grime while leaving your mitts feeling soft and smooth.

Where to Buy

Grime Degreasing Hand Soap Ecomm Hivebrands.com

Grime Hand Soap is available online at hivebrands.com and Amazon.

Buy Now!


Article source here: No Job Is too Tough for Family Handyman Approved Grime Hand Soap

How To Grow Potatoes

Did you know genetic testing traces the origin of the potato to Peru and parts of Bolivia? Wild potatoes grow in the southern U.S. I grow mine in my small urban yard in the Midwest, in 20-gallon lightweight cloth growing bags called Smart Pots.

Whether you’re raising them in growing bags, in the ground or in a raised bed, read on to find out all you need to know about how to grow potatoes.

Types of Potatoes

Many gardeners grow a variety of early, mid- and late-season potatoes to ensure a long harvest. Besides those familiar brown- and red-skin kinds with white flesh, potatoes come in other colors, including purple, blue and creamy white.

Early season potatoes

  • Harvest 80 to 90 days after planting.
  • Norland has red skin and resists scab, a potato disease.
  • Yukon Gold is a yellow, uniform, oblong potato.

Mid-season potatoes

  • Harvest 90 to 110 days after planting.
  • Popular varieties include French Fingerling and Purple Viking.
  • Kennebec can be mid- or late-season.

Late-season potatoes

  • Harvest 120 to 135 days after planting.
  • Varieties include Purple Peruvian, Fingerling Salad, Russet and German Butterball.

Ways To Plant Potatoes

You’ll notice potato plants aren’t available at your local nursery or garden store. To grow potatoes, you have two options to start from: seed potato and potato seed.

How to plant seed potato

This is the traditional way to plant potatoes. Seed potatoes are cut from another potato. Each piece is about the size of an egg, with a few growth points (AKA eyes). Seed potatoes are readily available and certified disease-free at garden centers and from online seed merchants, which will have the widest selection.

You may be inclined to use a grocery store potato as a seed potato. Don’t. It may have been treated with a growth-detering hormone, or harbor disease.

If planting in the ground:

  • Plant potatoes in early spring, two to three weeks after the last frost date. Select a sunny area with well-drained soil.
  • Potatoes do best when the soil is on the acidic side, which helps control potato scab, a disease you won’t discover until harvest. Test your soil to determine its pH and see if you should take steps, such as sulfur application, to lower it.
  • Add nutrients and improve drainage by digging compost, aged manure, chopped leaves or other organic material into the top 10 inches of soil. I also mix in Organic Espoma Garden-Tone, or a 10-10-10 mix of all-purpose fertilizer, according to label directions.
  • Form the soil into a hill or mound six to eight inches high for each seed potato. Plant cut-side down, about six inches below the soil surface and 12 to 15 inches apart.
  • Water the new plantings.

If planting in a container:

  • Ensure your container has holes in the bottom for drainage. A five-gallon bucket is a good size. Just drill or punch holes in the bottom.
  • Use a 50-50 mix of topsoil or potting soil and compost. Add three or four inches of soil mix in the bottom of the container.
  • Place two or three seed potatoes in each container. Cover with potting mix, keeping the leaves off the seedlings an inch or two above soil level.
  • Water.

How to plant potato seed

Although there are other potato seeds available, the Potato Clancy was named the first All-America Selection (AAS) potato seed in 2019. Judged highly productive and disease-free, it’s available at many online seed retailers. From my experience, Clancy potatoes have different skin hues and are not all the same size.

  • Start potato seeds inside, six weeks before planting outdoors.
  • Sow seeds in two- to four-inch pots filled with a good-quality potting mix. Moisten the soil and sow one or two seeds 1/4-in. deep per pot.
  • Keep seedlings about an inch below a light source, such as fluorescent shop lights or grow lights. Raise the light as the plants grow.
  • Keep the soil moist but not sopping wet.
  • Transplant outdoors when the seedlings are three to four inches tall. Remove the plant from the pot and plant two or three inches deep, with just the top few leaves above the soil surface.

How To Grow Potatoes

Fresh potato lying on the ground, good harvest and organic food.

  • Add a layer of mulch — like shredded bark or chopped leaves — around the plants to help cool the soil, retain moisture and discourage weeds.
  • As the plants emerge, hill up the soil around them if in the ground. Or add soil mix to containers, leaving a few inches of leaves above the soil surface. This prevents the plants from getting sunburned or green skin and developing a bitter taste. You’ll probably need to do this two or three times before harvesting.
  • Water deeply during dry spells. This helps develop potatoes of similar size.
  • Watch for potato insects and diseases. Colorado potato beetle, flea beetle, leafhoppers and wire worms are common potato pests. To avoid disease, be sure to plant certified disease-free seed potatoes and ensure your soil is on the acidic side. Check with your county extension office for more information about controlling potato insects and diseases in your area.

How To Harvest Potatoes

Harvest potatoes when the tops of the plants turn yellow and start to dry. “New” potatoes get their name because they are harvested sometime before maturity.

Use a garden fork or spade to dig up the potatoes, being careful not to cut or slice them. The damaged ones should be eaten first. Cure the harvest at 65 F to 70 F for a couple of weeks before storing.

Store potatoes at about 45 F. They can be stored up to nine months, depending on the variety. Remove any eyes or sprouts before eating. Peel potatoes with greenish skins.


Article source here: How To Grow Potatoes

13 Tips and Tricks for Hiding and Storing Money

hiding money in a phone case

Your Phone Case

These days, you’re much more likely to forget your wallet at home than you are your phone. Keep a little extra cash tucked behind your phone case for emergencies. — J.M. Rotzenberg.


Article source here: 13 Tips and Tricks for Hiding and Storing Money

Saturday, May 28, 2022

How To Choose the Right Sandpaper for Wood Projects

Sandpaper is ubiquitous in the wood shop, and there are so many variations it can be overwhelming to a beginner. Is it best to sand to 180 or 220? What are those spongy sanding blocks for? Why are some sandpapers different colors?

The world of abrasives can be vast and tricky to grasp, but let’s stick to what’s generally useful in the wood shop. I’ll give you all the information you need to be successful in your sanding endeavors on your next project.

Understanding Sandpaper for Wood: Grit Size

The first thing you need to understand is grit size. Sandpaper is nothing more than tiny particles, most often made of metal compounds, that adhered to a backing — often, paper. The size of those particles determines the grit size.

The lower the number, the larger the particle size and the coarser the sandpaper will be. That removes material faster while leaving a rougher surface. The higher the number, the smaller the particles, which leave a smoother surface. There’s no end to how long and how fine you can sand, but for our purposes we’ll focus on four main grit ranges.

  • Coarse grit = 36 to 80: This is best for fast stock removal, such as smoothing the live edge of a slab or sanding down rough-sawn surfaces.

  • Medium grit = 100 to 180: This will remove any mill marks from your machines and give you a generally clean and clear surface. Some finishes will recommend only sanding up to 180 to allow the finish to “bite” onto the surface of the wood, so be sure to read the instructions before applying your finish.

  • Fine grit = 220 to 400: I generally sand up to 220. This gives me the best clarity of grain on the surface of the wood. I may sand with 400 grit sandpaper or an equivalent abrasive cloth after the final coat of finish to give a nice, smooth surface to the piece.

  • Polishing grit = 600 and up: These grits, for polishing finished surfaces, are only occasionally employed in the wood shop.

Bonus fact: Europe has a different grit scale than the U.S. If ever you see the grit size labeled P-180 or P-220, that’s the European scale. And while it’s not an exact equivalent, it’s close enough. I consider it basically the same.

Hand Sanding vs. Machine Sanding

Depending on your sanding setup, you may need different styles of sandpaper. The most common are as follows:

Hand sanding

  • Sheet sandpaper: You can find sanding sheets in various sizes, but the most common are 9-in. x 11-in. and 9-in. x 3-in. These sheets generally have a smooth paper back and are fairly rigid when folded. They can get into crevices and corners that machines can’t, letting you sand every square inch of your project.

  • Sanding blocks: These semi-rigid, spongy blocks are often sold at hardware stores for a significant markup over sanding sheets. While they have their useful applications (drywall sanding comes to mind), they are not all that useful in the wood shop. Don’t waste your money. Buy sandpaper sheets and make your own sanding blocks!

Machine sanding

  • Sanding discs: These discs are generally five or six inches in diameter, so make sure you know the size of your sander. There are also two styles of backing: hook-and-loop (AKA H&L or Velcro) and pressure sensitive adhesive (PSA). While H&L discs are far and away the most common, don’t assume every package is H&L. Make sure you get the right disc for your machine.

Note: Here are Family Handyman’s picks for the best sanders for wood projects.

Types of Sandpaper

Here are the basic industry terms:

  • Aluminum oxide: Sometimes abbreviated AO, it’s the most common type of abrasive. Nearly all the sandpaper you buy for wood, whether as sheets or discs, will be aluminum oxide. These sheets are typically brown or maroon in color.

  • Zirconia alumina: Abbreviated Zirc, it’s a long-lasting abrasive often employed in aggressive stock removal, such as the flap discs you might purchase for an angle grinder or a belt sander for shaping wood. They’re most often blue or green.

  • Silicone carbide: These abrasives are versatile, durable and generally more expensive than AO or Zirc abrasives. You will often find this abrasive if you purchase high grits (roughly 400 grit or up) or sandpaper at a metal working or auto body shop. These are generally black and the backing often water-resistant, making it the best choice for wet sanding applications such as polishing a finished tabletop.

Choosing the Right Sandpaper for Your Woodworking Project

Despite all these grit ranges and abrasives types, choosing the right sandpaper for your woodworking project is simple if you follow these general guidelines.

  • Shaping and stock removal: Stay in the coarse range, between 36 and 100 grit.

  • Paint and finish removal: Refurbishing an old table? That starts with removing old paint or finish. For this, I would start with 80 grit and work my way up to 150 grit.
  • Prepping a surface for finishing: Anywhere between 120 and 220 grit is fine, whether you sand by hand or with a power sander.

  • Polishing a wood surface after applying finish: If you want to polish up a wood surface to really make the finish shine, between 400 and 800 grit sandpaper works best.


Article source here: How To Choose the Right Sandpaper for Wood Projects

Wearing Shoes In the House: Right or Wrong?

One of my favorite photos from a 2006 trip to Japan shows my friend Sue modeling a pair of green Croc-like toilet slippers. Each shoe features daisies and two stick figures, one in a black tuxedo and one in a pink dress, along with “TOILET” in big black letters.

While these were the most colorful pair of toilet slippers we encountered on our two-week trip, they weren’t the only ones. In Japan, most people take off their shoes inside a house or an inn.

Most inns provided us special slippers to wear inside, and even-more-special toilet slippers to wear in the bathroom. Wanting to be respectful of our host country’s traditions, we were careful to do so. But in other countries, it’s not as clear-cut whether it’s acceptable to wear shoes inside the house.

“We fight over this all the time in my house,” says author, speaker and TV personality Leslie Reichert, AKA The Cleaning Coach. “I raised my kids to remove their shoes before walking inside, but my husband grew up wearing his shoes inside and refuses to take them off. It’s an ongoing battle.”

Should You Wear Shoes in the House?

Confession: At my home, I often wear my shoes inside. I wear simple, light flats, don’t run around outside in the mud, and clean my floors regularly. I’m more comfortable with my shoes on — can’t explain it, I just am. And if I need to duck outside for just a moment, to take the recycling out or grab the mail, I don’t want to go find my shoes.

The New York Times spoke to experts who said wearing shoes inside is not a huge health risk. Rutgers microbiologist Donald W. Schaffner told the Times that if you’re worried about getting sick, issues such as proper food preparation are more important.

And Dr. Aaron E. Carroll, an Indiana professor of pediatrics, told The Times that we touch far dirtier things in the course of a day, like money, ATM buttons and gas station pump handles. “Focusing on people’s shoes feels like focusing on the wrong vector,” he said, according to The Times.

Should You Take Shoes Off in the House?

I’m willing to concede I’m in the minority.

“It’s a dirty world out there. Why wouldn’t you just take one extra step and remove your shoes?” Reichert says. “If you keep your shoes off, your floors definitely stay cleaner.”

Whatever you think of shoes inside the home, remember: It’s the host’s prerogative to decide.

“There are several reasons why a host may be particular about shoes in the house,” says Diane Gottsman, an international etiquette expert, author and founder of the Protocol School of Texas. “Among them are mud and dirt, and allergens.

“Some people are highly sensitive to the outdoor environment and keeping the floors clean and the carpets free from debris is a way to keep allergens at bay.”

A 2008 study cited by the New York Times tracked new shoes worn by 10 participants for two weeks. The study found that coliform bacteria such as E. coli were common on the outside of the shoes. “Transfer of bacteria from the shoes to uncontaminated tiles ranged from 90 percent to 99 percent,” the study says.

Tips for a Shoes-Off Home

Require shoes off inside your home may be a challenge for your guests. “If you are hosting a party, and would like your guest to take their shoes off, there should be no surprises,” Gottsman says. “The host should let their guests know in advance what is going to be expected.”

But you needn’t go to extremes. “While offering your guests brand-new, never-been-used slippers is an option, it is certainly not the norm and should not be expected,” she says. I’ve also found that seeing an obvious area inside the door where I can leave my shoes reminds and encourages me to do so.

Tips for a Shoes-On Home

If you allow guests or family members to wear shoes inside, try to keep on top of any mess. Set out a good mat at your exterior doors and encourage guests to use it. “There are some great mats that are made out of microfiber that pull dirt off shoes,” Reichert says.

And after the party, a quick clean-up should suffice. “Once the guest leaves, you can pull out a little Dust Buster to pick up what they dragged in,” Reichert says.

Do Your Own Test

If you’re undecided, Reichert has a suggestion.

“Do a test — take a day where everyone takes their shoes off when they come in,” she says. “Then vacuum. The next day, have people wear their shoes inside. Vacuum again. You’ll see the second day is much dirtier than the first. It’s such a small thing but makes cleaning so much easier!”

Wearing Shoes In the House: You Weigh In

The experts can have their say, but it’s really up to each family to decide whether shoes come off or stay on inside their front door. What do you think?


Article source here: Wearing Shoes In the House: Right or Wrong?

7 Best Solar Fence Lights

Zookki Solar Outdoor Lights Motion Sensor Lights And Waterproof Wireless Security Outdoor Solar Powered Lights For Garden Fence Patio Deck Ecomm Amazon.com

Brightest Solar Fence Lights

You’d be hard-pressed to find a brighter solar fence light than the Zookki Outdoor Solar Motion Sensor Lights. Each of the 28 LEDs produces 400 lumens of light, with a wide illumination range and motion detection. Sensors pick up movement from 26 feet away. Perfect on fence posts, they can also be mounted on walls, over patio doors and on the garage.

Writes one Amazon reviewer, “These are great for a fence perimeter. We use these in our decent sized suburban backyard, and they are great! We live in [Colorado] and we occasionally get coyotes, but these allow us to see what is back there. Nice and bright.”

Shop Now


Article source here: 7 Best Solar Fence Lights

This Smart Garage Opener Keeps Your Home Safer

Have you ever gone out for the day, only to wonder “Did I close the garage door?” Worse, have you ever returned home after a long day or vacation to find a wide open garage door?

Open garage doors will cost you in heating/cooling bills. Not to mention, they’re a security risk.

Avoid the frustration and control your garage door from anywhere in the world. Meet the Chamberlain MyQ Smart Garage Hub. This top-rated smart home product not only sets up in minutes with little fuss, but it’s on sale now for about $22 —  27 percent off! As a Tech Editor, I’m impressed.

What Is the Chamberlain MyQ Smart Garage Hub?

A smart garage hub like the Chamberlain MyQ Smart Garage Hub can be an absolute game-changer.

Similar to an Amazon Echo device that operates lights or controls the thermostat, the Chamberlain MyQ controls your garage door. You just need a place to mount the hub, a smart phone for the app and a WiFi connection to make sure everything communicates.

More than anything, the smart garage hub ensures your home and belongings are protected. It’s as easy as opening the companion app and closing the door, or setting a schedule for autonomous garage door operation. It works with all major garage door openers made after 1993, so you don’t need a fancy new model.

How to Use the Chamberlain MyQ Smart Garage Hub

Myq Chamberlain Smart Garage Control

All you need to set up the Chamberlain MyQ Smart Garage Hub is a compatible garage door opener, a WiFi signal that reaches your garage and a Bluetooth-enabled mobile device.

To get started, install the myQ app and set up an account. The app guides you through installing and connecting your new hub.

Depending on your garage, you might need to mount the door sensor with included screws, base plate and Velcro strips in the garage. Setting it on a work bench or table also works. The only wiring you need is an outlet to plug it in. Once that’s done, just launch the app to check the status and control your garage door and lights.

You can set up real-time alerts if you leave your garage door open, as well as notifications whenever it opens and closes. To automate things, set up daily schedules that establish preset times for your garage door to close or the garage lights to turn on and off.

Another cool feature? You can sync the hub with Amazon Key so delivered groceries and packages can be left securely in your garage.

The Best Amazon User Reviews

Amazon shoppers love how simple the MyQ Smart Garage Hub makes managing the garage door and accessing settings on the go. More than 77,000 reviewers gave it an average of 4.4 stars.

Verified purchaser Penna Guy writes, “Awesome WiFi garage opener and very easy to set up! I was up and running in 15 minutes after hooking this up to my 15-year-old Craftsman garage door opener.”

Another verified purchaser, Paul J., writes: “Super easy, super fast installation. The unit basically works as a remote control for your garage door. Given the cost of the unit is $30 I cannot imagine why you would not buy this.”

Verified purchaser Allison writes, “I stress about packages sitting on the doorstep, so I was really excited about Amazon Key where they deliver packages inside your garage with the Chamberlain garage door opener. It was very easy to set this up. I followed the instructions in the box to initially get started.

“It comes with two parts: a ‘hub’ which is the brain of the thing that plugs in to an electrical outlet, and a sensor that sticks to the back of your garage door with provided Velcro sticky mounts.”

Where to Buy the Chamberlain MyQ Smart Garage Hub?

You can pick up the Chamberlain MyQ Smart Garage Hub at Amazon and the official Chamberlain website.

Shop Now

Shop smarter with our expert recommendations for tools, gear and money-saving deals on can’t miss DIY and home products. Sign up for the Stuff We Love newsletter. 


Article source here: This Smart Garage Opener Keeps Your Home Safer

Friday, May 27, 2022

How To Grow Basil

Did you know basil is considered the king of herbs? In Greek, the word basilikos means “royal,” and basil was once used only in royal ceremonies.

In my garden, I can hardly wait for spring weather to settle down so that I can transplant the basil I started from seed. I grow four types of basil because it’s my favorite herb to top homemade pizza and salads.

Types of Basil

There are many types you can grow in your garden.

Sweet basil

When you imagine basil’s heady aroma, you’re probably thinking of sweet basil varieties like ‘Genovese’ and ‘Large Leaf.’

Miniature basil

Basils also come in smaller varieties like ‘Boxwood,’ ‘Minette’ and ‘Spicy Bush.’ Maxing out at 10 to 12 inches, these are great for small containers.

Scented basil

Scented basil leaves smell and taste like cinnamon, lime, lemon, or anise, AKA Thai basil. The latter is native to Southeast Asia and popular in Asian dishes. It has dark stems, purple flowers and a slight licorice taste.

Holy basil

Holy basil’s clove-scented leaves are used in religious ceremonies and as a medicinal tea. It’s also a beautiful plant beloved by bees.

How To Plant Basil

Planting fresh herbs in the garden

When to plant basil

Plant basil outside after your last average frost date, once the soil warms to 65 F to 70 F. Like most vegetables and herbs, basil needs six to eight hours of sun per day. Prevent diseases by spacing plants far enough apart for good air circulation and rotating where you grow it from year to year.

Want basil fast? Plant transplants

  • Buy transplants at your local nursery or big box store.
  • Dig a hole slightly larger than the transplant pot in good, well-drained, neutral to slightly acidic soil.
  • Add a handful or two of compost to the hole, working into the soil around.
  • Plant the transplant.
  • Once the basil is planted, spread compost around the planting area as mulch and then water. You can buy compost like organic Happy Frog Soil Conditioner or make your own compost ahead of time.

Not in a hurry? Start seeds indoors

If you want to grow unique basil varieties, you can start seeds indoors.

Or, plant basil seeds directly outside

Alternatively, you can plant seeds directly outside.

  • Sprinkle seeds on well-drained soil and lightly cover.
  • Keep watering seeds daily until they sprout and grow.

How To Grow and Care for Basil

If you planted seeds outdoors, when basil seedlings have their second set of leaves, thin them to two inches apart.

Water as needed

To develop strong, deep roots, water basil about an inch once a week. Drip irrigation or soaker hoses water deeply and consistently. If it rains, you can skip watering.

Fertilizer

Fertilize plants about mid-season if the plant looks faded and stressed, but don’t overdo it. Rapid growth from nitrogen attracts insects and may change the flavor of the leaves.

Insect pests

These are the four most common insects that attack basil.

Diseases

Basil can be affected by a variety of diseases, including wilts and mildews.

  • Fusarium wilt: Plants grow normally until six to 12 inches tall, then leaves suddenly wilt and turn black. Throw infected plants in the trash. Do not compost.
  • Gray mold: Infection starts in the cut areas. To prevent this, don’t water overhead until 48 hours after harvesting, and don’t harvest on rainy days.
  • Leaf spots: Black spots appear on leaves. Pull off and discard leaves at the first sign of disease. If spotting continues, spray weekly with a natural fungicide like Bonide fungal disease control.
  • Downy mildew: This causes yellowing of leaves and small dark dead spots. Remove and dispose of affected plants in the trash. Plant downy-mildew resistant varieties like ‘Prospera,’ ‘Rutgers,’ ‘Devotion’ and ‘Rutgers Obsession.’

Grow basil in containers

If you don’t have a garden, you can grow basil in containers, such as flexible fabric grow bags or planting beds. You can grow most vegetables and herbs in containers. Pro tip: Grow tomatoes and basil together for an easy harvest.

How To Harvest Basil

  • Wait until plants are six inches tall.
  • Harvest individual leaves or cut back stems for a larger amount.
  • For a large harvest, don’t cut the plant back more than one-third.

Pruning basil

Pruning basil is easy, but don’t crush stems as you clip them. Trimming stems slows flower production and makes the plant bushier.

After harvest

Treat basil and other herbs like flowers and store them at room temperature. Place stems in a glass or vase of water. Pull off any leaves underwater that could become slimy. Stored as a cut flower, basil will last five to 10 days. Or you can cut it right before you’re going to eat it.

Too much bounty?

If you have a large summer harvest, make pesto, or chop and freeze basil in ice cubes for that fresh taste all year long. Here are other ways to preserve your garden goodies.


Article source here: How To Grow Basil

Homeowner’s Guide To Patio Flooring

With summer right around the corner, you and your family will likely be spending more time outside. A home patio serves as the headquarters of your outdoor space, the prime area to socialize, eat and relax.

If you’re interested in creating a patio from scratch or replacing your existing one, there are lots of choices to consider. I tapped my experience sourcing and setting a flagstone patio, as well as the expert insight of Paul Knapp, founder and Landscape Designer at Landscape Architectural, to assemble this list of popular options.

Poured Concrete Patio Flooring

VIew of large concrete floor patio area at backyard

If you’re looking for a basic, no-frills option on a budget, consider a poured concrete patio. According to Knapp, “concrete is relatively cheap, and the labor to install is reasonable, too.” Installation will run about $10 to $15 per square foot.

I personally find the flat surface convenient for rolling grills around and keeping patio furniture level. However, some might find it less visually appealing than other more creative options. It’s possible to install yourself, but unless you’re comfortable with building concrete forms, leave this to professionals.

Longevity also can be an issue. “It’s not a matter of if it will crack, but when it will crack,” Knapp says. “It’s fairly durable, but over time, with weather conditions and seasonal changes, concrete can crack.”

Pros:

  • Cheaper than most options;
  • Flat surface ideal for rolling grills and furniture;
  • Easy to maintain.

Cons:

  • Not as visually appealing as other options;
  • Will crack eventually;
  • Not ideal for most DIYers to install.

Stamped Concrete Patio Flooring

Stamped Concrete Patio

Stamped concrete patio flooring is poured flooring with a pattern “stamped” onto the wet concrete with a rubber form. It’s a relatively simple way to replicate the outline of pavers, bricks, stone or other geometrical patterns without sourcing, purchasing and placing separate components.

If you can pour concrete, you can stamp your own concrete flooring. But according to Knapp, “The installer must be careful to set the form on the desired area of concrete and then be able to lift it off without messing up the imprints.” Just like poured concrete flooring, stamped versions are also susceptible to cracking over time.

Pros:

  • More visually attractive than poured concrete;
  • Relatively low price;
  • Wide variety of patterns to choose from.

Cons:

  • Installation requires experience;
  • Will crack over time.

Paver Patio Flooring

Patio Pavers Familyhandyman

Paving stones, or simply pavers, can be made of concrete or clay. Traditionally 4- x 8-in. and 2.25 inches thick, they’re available in lots of colors and can be finished with a sealer to extend their lifespan.

Costs can vary. Clay tends to be more expensive than concrete but won’t fade in the sun, so it could be worth the extra investment. Proper installation with a solid base is especially important. Otherwise, you’ll end up with a lumpy, loose and uneven patio.

If you decide to install yourself, Knapp recommends a crushed gravel or recycled concrete base. To make it, first compact your soil with a hand or machine tamper. Then install two inches of gravel and compact again. Knapp says you should shoot for six inches of gravel base for a residential patio.

Pros:

  • Available in lots of shapes and colors;
  • Sealant extends their lifespan;
  • Clay pavers will never fade in the sun.

Cons:

  • Complex installation not ideal for first-timers

Natural Stone Patio Flooring

Woman serving husband his meal

Natural stone — also called flagstone patio flooring — comes in irregular shapes and sizes, terrific for those hoping to avoid the manufactured look of concrete and pavers. Like clay pavers, natural stone won’t fade in the sunlight.

The large size of natural stone pieces, the labor-intensive quarrying process and relative scarcity of the material — it can only be sourced from certain areas of the country — make it one of the more expensive options.

Pros:

  • Will never fade in sunlight;
  • Attractive, natural look.

Cons:

  • Expensive;
  • Challenging to install correctly.

Decorative Chip Gravel Patio Flooring

Private Patio Setup in the Backyard

Unlike solid flooring options, gravel patios feature loose stones contained within a border of plastic or metal edging. Although this option requires compacting the ground and applying a gravel base first, then topping it with the decorative gravel of your choice, installation is less intensive than pavers or natural stone.

If you do decide to install yourself, Knapp recommends no more than one inch of decorative gravel. Otherwise, he says, you can end up with a patio that’s too loose and uncomfortable to walk on. Gravel patios also can become messy, especially if you have kids or rambunctious pets.

Pros:

  • Relatively easy DIY installation;
  • Affordable.

Cons:

  • Can be messy;
  • Not ideal for rolling wheeled grills or furniture.


Article source here: Homeowner’s Guide To Patio Flooring

Thursday, May 26, 2022

I Tried Amazon’s Top Rated Outdoor Composter

I’ve had some of the best compost bins over the years. As someone who’s passionate about composting leaves, garden waste and kitchen scraps, one thing I haven’t quite mastered is aeration. All that organic material gets really heavy and can be a total chore to routinely aerate.

That’s why I decided to give Amazon’s bestselling composter a whirl to see if the tumbler-style container would make the job easier. The Vivosun compost bin really impressed me, and I don’t think I’ll ever go back to my old composting ways.

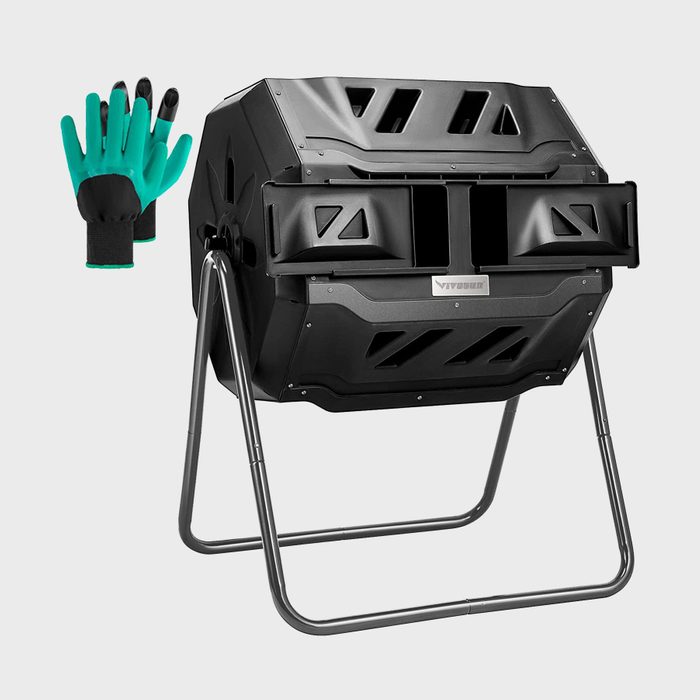
What Is the Vivosun Compost Bin?

The Vivosun is a double-chambered device for batch-style composting that significantly benefits your garden. One side cooks materials, while the other begins the composting process by breaking down fresh organic material. The result is easier, uninterrupted composting that can be used several times each season.

This is a big upgrade from DIY-style composters, because cold and temperate climates can typically only “harvest” their compost once or twice a year. Of course, you can still build a compost bin yourself. But if you have a large garden or frequent composting needs, this two-chambered beauty is a total win.

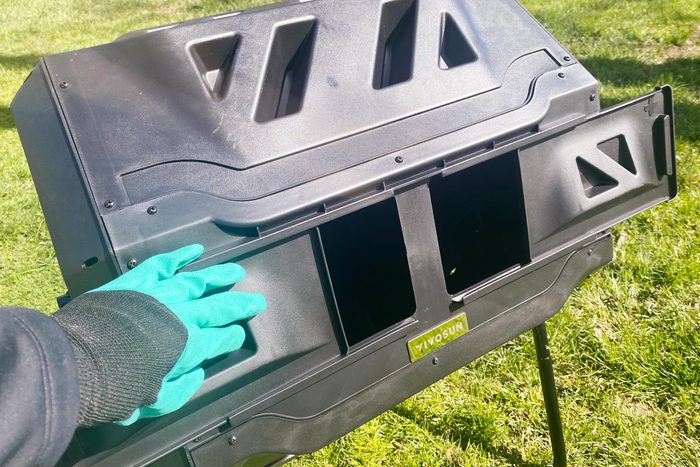
While the double-chambered design is certainly useful, the easy rotating tumbler-style format makes spinning and aeration easy for just about anyone, kids included. It lets you turn your compost without tedious digging or hand-mixing. Just fill it up, close the door and give it a spin every few days. It’s that easy.

How We Tested It

putting together the Vivosun Compost Bin

I’ve had a successful compost bin or two going for years, but I couldn’t keep up with the physical demands of regular shovel-mixing — something I wish I knew before starting a composting bin. I was excited to put this top-rated Vivosun compost bin to the test, starting with assembly.

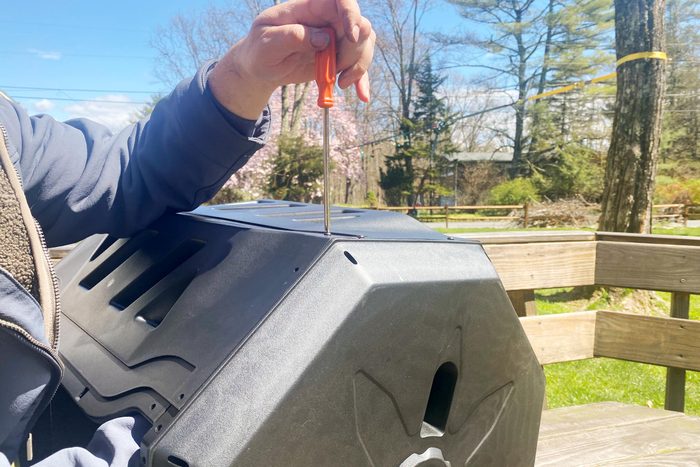
For starters, this composter is more affordable than comparable models because it comes unassembled. While that’s a turnoff for some, it shouldn’t be. Every tool you need is included. Screws, fasteners and even a screwdriver come with, so there’s no fishing around your toolbox for the right items. That alone is a timesaver.

It took me about 25 minutes to unpack the Vivosun, lay out all the components, study the instruction manual and put it together. While one person can certainly do it, it’s ideal to enlist a helper to hold some of the pieces as you fasten them. Once assembled, it turned easily.

I filled mine with a mixture of last season’s dried leaves, green scraps from kitchen countertop compost, old paper goods and some grass cuttings. I placed the large, black plastic bin in a sunny corner of my yard to heat up and work its magic. After all, heat is one of the most important components of making good (and fast) compost, and something I don’t have year-round in my Northern climate.

The thick black bin began heating in minutes. Within two hours, it reached an interior temperature of 90 F, even with outside temperature barely 55 F. The bin doesn’t come with a thermometer, so I added my own to measure how it was heating up. Experienced composters know optimal composting happens at about 135 F, so inching toward this temperature signaled to me the Vivosun compost bin would be a surefire success.

Vivosun Compost Bin Features

close up of Vivosun Compost Bin

With a 4.5 Amazon rating after more than 5,000 reviews, the Vivosun compost bin appeals for multiple reasons. The big one: Ease of rotation. Rotation is the key to aeration, one of the most important parts of a nutrient-rich compost pile, but it can be tiresome for those lacking upper body strength.

The Vivosun is such a breeze to turn one-handed, even at full capacity of 43 gallons, that my kids helped out with no problem.

Pros

  • Rotating design makes it easy for anyone to use;
  • Two chambers for on-demand composting;
  • Sturdy black plastic exterior quickly heats the inner chambers;
  • Easy sliding doors;
  • Stands on sturdy metal legs that are corrosion-resistant;
  • Includes tools to assemble;
  • Includes composting gloves;
  • Affordable price.

Cons

  • Requires assembly;
  • Includes an extra pair of white fabric gloves, but it’s not clear what they’re for.

FAQ

Is the Vivosun compost bin made of BPA-free plastic?

Yes, so you don’t have to worry about BPA (AKA bisphenol A, an industrial chemical) leaching into your compost.

How long does it take each batch of compost to be ready for use?

That depends on your climate and what you put in your bin. Reviewers in Northern states report eight to 12 weeks per batch depending on the season. It’s spring here in chilly upstate New York, and from the looks of my own Vivosun batch, I expect a turnaround time of eight to ten weeks.

How often do you need to turn the Vivosun compost bin?

That’s the beauty of this bin. You can turn it daily or weekly, and it’ll bring you nutrient-rich compost your roses will go wild for. It’s important to turn it frequently, but you don’t have to stress about missing a few days.

Can it be assembled as a single-chamber composter?

It sure can! Just leave the dividing circle out when you’re assembling the composter. But the dividing circle is difficult to insert after assembly, so make that decision before starting.

What Other Reviewers Had to Say

“My 26-year-old son easily put this together in about 30 minutes,” writes verified Amazon purchaser Elyse. “He had no complaint, except for the fact that the nuts and bolts were not in individual bags.

“I first used it to mix up a big batch of my planting mix which consists of manure, compost, and worm castings from my worm bin. The claw finger glove worked great for scooping the mixture out!”

Five-star reviewer and verified purchaser Hooman writes, “I’m very happy with this composter. I stuck it in a sunny spot in the backyard. I gather kitchen scraps in a bin and when it’s full, I bring it outside and pour the scraps in, then I add some leaves from the bottom of my leaf pile. I spin the composter around and the stuff inside breaks down rather quickly.

“It’s fun to see how much softer it gets between my trips to empty the full kitchen scrap bin. There is no odor. I have not added any water. That hasn’t seemed necessary.”

And verified Amazon purchaser Shara writes, “Rather nice design and much higher quality than I expected at the price. Assembly was straightforward. I got more than what I paid for.”

Final Verdict

If you’re a fan of easy composting and dislike shoveling, raking or hand-mixing each week, the Vivosun compost bin is a brilliant buy. It’s also more affordable than competing compost bins that offer less space and far fewer functions. It’s easily one of the best gifts for outdoor lovers and garden enthusiasts because it performs beyond its promise.

Where to Buy the Vivosun Compost Bin

Vivosun Outdoor Tumbling Composter Dual Rotating Batch Compost Bin

Head to Amazon to buy the Vivosun compost bin for $110. That’s a steal for a large composter with thick, dark plastic panels and dual chambers, and it’s likely to sell out as composting season nears.

Shop Now

Shop smarter with our expert recommendations for tools, gear and money-saving deals on can’t miss DIY and home products. Sign up for the Stuff We Love newsletter.


Article source here: I Tried Amazon’s Top Rated Outdoor Composter

How To Grow Corn in Your Backyard Garden

When I was a kid, I asked my dad why he didn’t grow sweet corn in his garden. He answered that you need a big garden to grow corn. Later, when I had my own garden, I proved you can grow corn in a smaller garden once you understand some basic requirements.

How to Plant Corn

All corn varieties, including sweet and ornamental corn, need the same things to thrive.

  • Choose a location in full sun. Corn is a heavy feeder. If you can, plant sweet corn in a spot where you grew beans or other legume vegetables the year before.
  • Wait until your garden is frost-free. Corn does not tolerate frost and prefers warmer soils to germinate.
  • Before sowing seeds, remove weeds and add compost to enrich the soil.
  • Plant the corn in blocks at least three rows wide, with a minimum row length of eight feet. Space rows about 18 inches apart in the block. Within each row, sow four or five seeds one inch deep in “hills” (small mounds of soil) spaced about one foot apart. Once seedlings germinate, thin to two seedlings per hill.
  • When planting later in the season, bury seeds two inches deep to ensure it doesn’t dry out during germination.

How to Grow and Care for Corn

Watering

Corn needs about one inch of rain a week, especially when ears are forming. If your garden doesn’t get that amount of rain, plan to water the corn patch.

Weeding

Weeds compete with the corn for soil nutrients. Lightly cultivate around the corn to remove any weeds, being careful not to disturb the corn roots.

Fertilizing

In many gardens, extra fertilizer may be needed. Test your soil to determine which nutrients are lacking and apply the appropriate fertilizer based on that information. You can also safely use an organic fertilizer labeled for vegetable gardens. Choose a balanced fertilizer with equal parts nitrogen, phosphorus and potassium (NPK).

Pollinating

Wind pollinates corn. When the corn begins to show tassels (the sprouts at the top), wind blows the pollen from the tassels to the silks of the just-forming ears. That’s why it’s best to plant the corn in blocks instead of one long row, increasing the chances of adequate pollination.

Corn that isn’t well-pollinated will produce ears with gaps in the kernels. To avoid different varieties from cross-pollinating each other, which can affect the taste, plan to grow only one variety of sweet corn. Or provide adequate distances, 300 feet or more, between different varieties.

Controlling pests

Corn earworms are common pests. They’re more of a problem later in the summer, so most home gardeners can avoid them by planting earlier in the season. The corn earworm is generally only in the tip of the ear, so cutting off that tip is also a good, safe option.

Extending your harvest

To harvest sweet corn throughout the summer, plant a block approximately every two weeks. Check the seed packet to determine how long the corn needs to ripen to maturity, so you aren’t planting that last block too late to pick before your first frost.

How Long Does It Take to Grow Corn?

Corn sapling in the agriculture field under sunshine

Generally, it takes two to three months from sowing seeds to picking ripe sweet corn. The exact amount of time depends on the variety. Usually, the number of days from sowing to harvest will be noted on the seed packet.

Honey and Cream‘ hybrid sweet corn takes approximately 84 days to mature after the seed germinates. ‘Inferno‘ hybrid sweet corn takes approximately 73 days, and ‘Silver N Gold‘ hybrid sweet corn approximately 65 days .

How to Harvest Corn

Most sweet corn is ready to pick about three weeks after you see the silks, the long strands sticking up from the top of the ear. These should be brown but not dried; the husks will still be dark green and not dried.

To verify ripeness, carefully pull back the husk and gently squeeze a kernel to see if the corn is at the “milk stage.” If it’s ripe, the liquid that comes out will be milky white. To harvest, grab the ear, pull it down and twist. Once a stand of corn shows ripe ears, most ears will ripen within a week or so.

To ensure the sweetest corn, cook and eat as soon as possible. The sugars in stored sweet corn quickly turn to starch, which will affect the taste and texture.


Article source here: How To Grow Corn in Your Backyard Garden

How To Grow Eggplant

In my kitchen garden, eggplant, or aubergine as it’s known in Europe, is a superstar. It’s easy to grow, especially the Asian varieties. It’s great in stir fries, like Thai spicy eggplant, or in Italian dishes like eggplant parmesan.

How to Plant Eggplant

From transplants, outdoors

Buy transplants from your local nursery or box store. Before buying, research online for disease-resistant varieties.

  • Plant eggplant in full sun after your last average frost date, when the temperature is consistently warm.
  • Dig a hole larger than the transplant in good, healthy, well-drained soil.
  • Plant at the same level the transplant was in its container.
  • Stake plants so they don’t fall over when loaded with fruit.
  • When planting, add a handful or two of compost to the hole, mixing it into the soil around your plant.
  • Cutworms can be a problem, but that’s easily averted at planting time. Push a large nail or the plant tag down into the soil next to the plant stem. If the cutworm can’t fold itself into a “C,” it can’t cut off the stem.
  • Eggplant grows to two to three feet tall and wide, so space plants 24 to 36 inches apart to increase harvests. Proper spacing also prevents disease.

From seeds, indoors

  • Start eggplant seeds indoors eight to 10 weeks before transplanting outside.
  • Use a standard seed-starting kit or upcycle household items, like salad boxes from the grocery store. Covered containers allow heat and moisture to build before seeds sprout. You can also cover containers with plastic wrap.
  • Eggplant needs bottom warmth from a heat mat to germinate properly.
  • Use a basic potting mix without extra fertilizer. Cover seeds lightly with soil and water them gently each day until they sprout.
  • If you scatter seeds in a larger container, gently separate and transplant them into a larger container, or thin seedlings two inches apart.
  • Once the seeds sprout, uncover and place plants under grow lights or full-spectrum LED lights. Select the strongest one or two plants per pot after they sprout their second set of leaves.
  • Grow eggplant at least three inches tall indoors, then transplant them outdoors after you gradually acclimate them to the outdoors (AKA harden off).

How to Grow and Care For Eggplant

Brinjal, eggplant, aubergine flowers

How much water?

Water eggplant consistently, at least one inch per week, with a thorough soaking to encourage deep roots. Use soaker hoses or drip irrigation at the base of the plant to conserve water and put it precisely where needed.

Weeding

Weeds compete with your plants for sunlight, nutrients and water. Use a hand weeder, like a Japanese weeding sickle or another type of hoe, to slice off weeds at the base. Compost any weeds without seed heads.

Mulching

Mulch around the base of plants to reduce weeds. Mulch also helps conserve water. If composed of organic matter, mulch will decompose and enrich your soil over time.

Fertilize

Eggplant is a heavy feeder and likes rich soil. Once eggplant starts to bloom, it benefits from a weekly liquid feeding of balanced organic fertilizer throughout the growing season. This can be done with a hose-end sprayer or with a drench from a watering can.

Insects

  • Flea beetles: Look for small holes in the leaves or insects on the bottom of them. Strong plants can fend off damage, another reason to fertilize and grow eggplant in warm weather. Use row covers but uncover plants during the day for pollination. Or grow a trap crop like radishes before planting your eggplant. Diatomaceous earth will desiccate and kill insects, but be mindful of pollinators.
  • Spider mites: To identify these pests, place a piece of white paper on the ground beneath the plant. Hold the plant by its stem and shake it over the paper, watching for the tiny red creatures. Get rid of spider mites easily by blasting them with a sharp spray of water.
  • Colorado potato beetles: Brown adults and larvae chew on leaves and stems. Handpick insects and squish, or toss them into soapy water.
  • Tobacco and tomato hornworms: These large green caterpillars can be hard to spot. Instead, look for frass (poop) beneath chewed leaves and stems. Remove and dispose of hornworms in the trash.

Diseases

For all eggplant diseases, the best defense is prevention. Grow eggplant in hot weather. Don’t overwater. Plant disease-resistant varieties, and don’t plant where tomatoes, potatoes or eggplant have grown in the past three years. Pull up diseased plants and place them in the trash bin.

  • Phytophthora blight: Caused by excess watering. It can affect roots, stems, leaves or fruit, causing fruit to turn brown and rot.
  • Bacterial wilt: The entire plant suddenly wilts and dies.
  • Southern wilt: At the bottom of the plant stem, you’ll see threadlike structures that rot the stem.
  • Phomopsis blight: Usually starts as pale, sunken spots on the fruit that become large and brown, rotting the fruit.

Although you can use fungicidal sprays for some diseases, by the time you notice it may be too late.

How to Harvest Eggplant

Harvest eggplant while the skin is still shiny, cutting the fruit off with clippers and leaving about an inch of stem on the fruit. Dull fruits are past their prime. Overripe and immature fruits can taste bitter.

Fruits are ready for harvest approximately 70 to 85 days after transplanting, depending on the variety. Usually, one to two fruits are harvested once or twice a week. If picked regularly, the plant will continue to produce flowers and fruit until frost.


Article source here: How To Grow Eggplant

How to Make a DIY Indoor Herb Garden

Cut all pieces of wood Cut the wood for the base (A), sides (B), top cap (C), front and back top faces (D) and pot supports (E). All the co...