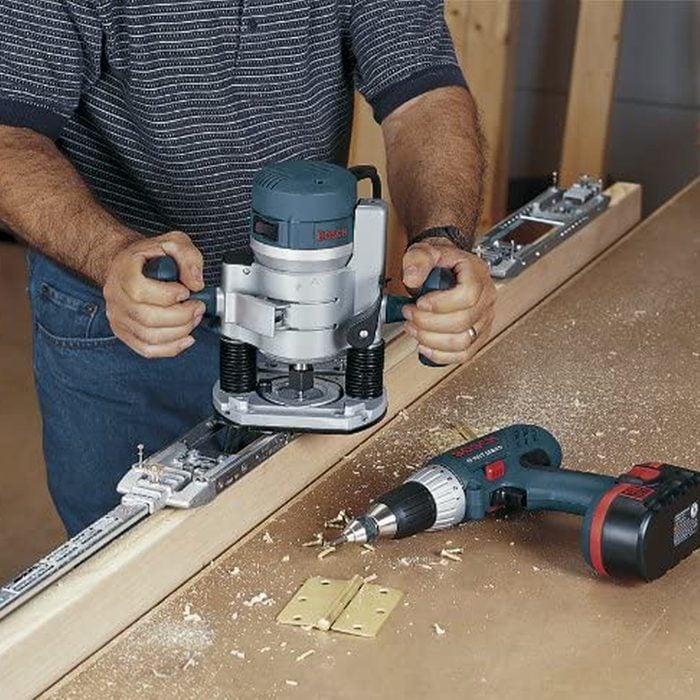
If you want to be a serious woodworker, sooner or later you’re going to need a plunge router. These handy little machines are designed to “plunge” their router bit directly into wood, so you can begin cutting in the middle of your workpiece. That is unlike fixed-base routers that are designed to be used only around edges.
A plunge router is perfect for creating decorative patterns on furniture, mortises, dowels and dadoes for joinery, or inlay recesses. I’ve used plunge routers on several large furniture projects, and have seen them used to cut out interior letters for a signage project. There is some variety in plunge routers though, so make sure to take these considerations into account when choosing one.
Collet Size: Make sure your router can hold the size bit you’re going to be using. While most models offer two collet (the collar that holds the bit in place) sizes, some do not, so don’t assume all routers are compatible with all bits. Most lighter-duty routers only offer 1/4-in. collets.
Speed: This can get a little complicated and require some complex geometry, but as a general rule, the larger the router bit, the slower the speed required. The experts at The Router Workshop recommend a minimum of 12,000 RPMS for larger bits (3 to 3-1/2 inches in diameter), and a maximum of 24,000 RPMs for smaller bits (1-inch in diameter).
Dust Collection: Routers can create a lot of dust and wood shavings, which can create a frustrating mess to clean up. If you plan to do a lot of routing, or just want to cut down on cleanup time, make sure to choose a plunge router that is compatible with your current dust collection capabilities, whether that’s a shop vacuum or a dedicated dust collection system.
Combination Kits: Fixed routers are just as useful as a plunge unit to have around, and with a combo kit, you can enjoy the benefits of both. These kits usually include a separate plunge base for the fixed router to fit into, and allow you to have all your routing bases covered. Combination kits do tend to cost more than a dedicated plunge router though, so if you already have a fixed base router, save some money and choose a standalone plunge unit.
The foundation of any home tool kit is a power drill, and with that, a set of reliable drill bits. These small tools are designed to bore through a variety of materials and allow you to create holes quickly and easily. This capability is essential for a wide range of tasks and projects, like mounting items to your walls using drywall anchors, creating pilot holes in wood for screws or heavier-duty jobs like drilling holes in studs for wiring or water lines. Although most drill bits look similar, there is actually more variety to them than you might think, and it can be intimidating to choose which bit is best for your specific application. Here are some factors to keep in mind when considering which bit to purchase.
The material being drilled: Most general-purpose drill bits are suitable for wood, PVC and some metals, but others are designed to be used on specific materials, like masonry bits for brick and concrete, or those that can be used on glass and tile without causing cracks. Always make sure your bit can safely and effectively drill through your material, or you can end up with a ruined workpiece and/or broken bit.
Bit Size: Make sure the bits you choose are the correct size for the task at hand. As a general rule, a range of 1/16- to 1/4-in. bits should prepare you for the majority of light-duty household jobs. Heavy-duty mounting projects can require up to 1/2-in. bits, so check to make sure your drill bit set has one before you get started.
Bit Type: There is some variety in drill bit types, and each is beneficial in its own way. Twist bits, the most common type, use a pointed tip and fluted sides to remove waste from the hole as you drill, and are your best bet for general use on wood, plastic and thin metal. Spade bits are paddle-shaped, with a wide head for creating extra-large holes, and are best for rough woodworking. Countersink bits are used to create a recessed hole to allow for your screws to sit flush with the surface of the wood, and are essential for fine woodworking and furniture building. Step bits are shaped like a pyramid, and allow you to drill multiple hole sizes, and because each “step” is labeled on the bit, you simply stop drilling when you’ve reached the size you want.
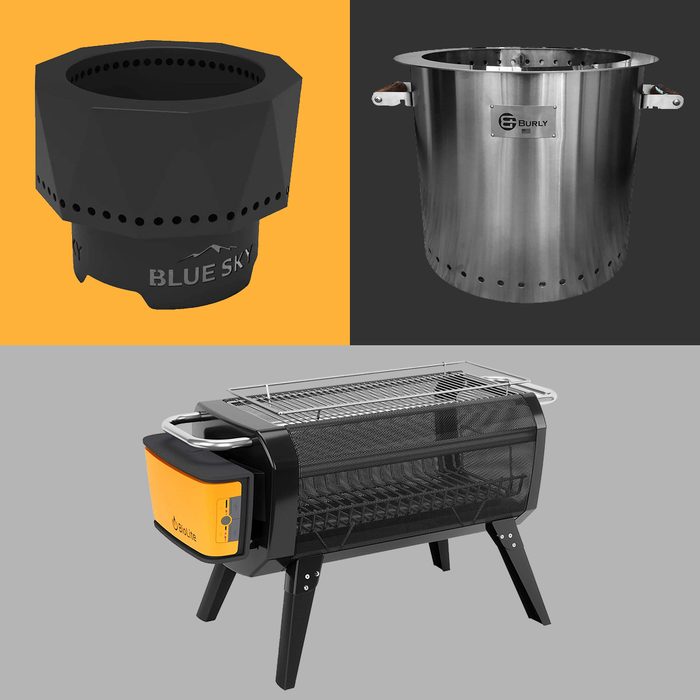
There is something innately comforting about sitting around the glow of a campfire, telling stories and sharing food with friends and family. But what isn’t comforting is catching a face full of smoke. Chances are, you’ve experienced the constant shifting in campfire seating as everyone circles the fire pit trying to find a spot that’s not plagued by a stream of smoke.
If you’re tired of all that moving around, then you’re going to love smokeless fire pits. These cleverly-designed fire pits allow you to enjoy fires without the annoying smoke byproduct. We’ll be looking at “smokeless” fire pits designed to burn logs, as well as wood pellets or charcoal. Propane-fueled fire pits are inherently smoke-free, so they don’t quite fall in this category.
Read on for a complete overview of what smokeless fire pits are, how they work, and the pros and cons of buying one or making your own.
What Is a Smokeless Fire Pit?
Smoke occurs when a fire isn’t hot enough to fully combust the fuel, leading to burnt particulates raising in the hot air. Modern smokeless fire pits use secondary combustion to create extremely high temperatures, essentially burning off these particles before they can escape and drift into the eyes and clothes of anyone nearby.
“Smokeless” may be a bit of an exaggeration, as it’s almost impossible to eliminate all of a fire’s smoke, especially while the fire is first being lit. So instead of “smokeless” think “less smoke.” Still, a well-designed smokeless fire pit produces so little smoke that it virtually eliminates the eye-burning clouds that come off a normal campfire.
Today, you can buy smokeless fire pits that are self-contained, portable devices, or that are meant to be built into a stationary, permanent fire ring.
How Do Smokeless Fire Pits Work?
The basic concept of smokeless fire pits dates back at least to the 1600s when the Dakota people crafted sunken fire pits. That additional airflow allowed them to cook and enjoy a fire’s heat while producing much less smoke.
Modern versions of the smokeless fire pit use the same concept, but achieve it with a double-walled fire ring. The outer wall has holes at the bottom, while the inner wall is ringed with holes near its top. When the fire pit is lit, air is drawn in through the outer wall and heats up as it contacts the inner wall. This heated air rises between the walls, expanding and eventually pushing out through holes along the top of the inner wall. That movement acts like natural bellows, fanning the flames with a stream of preheated oxygen. This “secondary combustion” burns so hot that the smoke particles are immolated (destroyed) before escaping the fire pit.
Pros and Cons of Smokeless Fire Pits
Pros
Less smoke. Just as advertised, they produce significantly less smoke than a traditional fire pit.
Easier fire starting. The design of most smokeless fire pits allows for strong ventilation, making it relatively easy to get the flames dancing in the first place.
Cons
Less radiant heat. The super-heated fire sends more heat up than out, so while the temperature is much higher, you’ll need to crowd in a little closer to feel that warmth.
Price. If you opt for a store-bought smokeless fire pit, you’ll pay significantly more than you would for a similarly-sized traditional fire pit. That said, the improved, smoke-free experience is a strong value, and you can always go the DIY route to save money.
How To Choose a Smokeless Fire Pit
There’s no shortage of options when looking for the right smokeless fire pit. The key is to identify the balance of cost, fuel type and portability that you’re looking for.
Cost
The biggest factor in cost is size. The larger a fire pit’s diameter, the larger the ticket price. Expect to pay a minimum of $70 for a solo backpacker unit, while some high-end smokeless fire pits run thousands of dollars. But if you’re looking for a simple fire pit that will accommodate a group of four to five people, $300 to $600 is a reasonable budget.
Fuel Type
A smokeless fire pit burns solid fuel, such as wood logs, charcoal, or wood pellets. Many models can burn multiple fuels, but their air flow and clean out is normally optimized for one specific type of fuel. You’ll have a minimum of headaches if you stick with the fuel the manufacturer recommends.
Remember: If you’re open to a gas-fed fire pit, which runs on propane or natural gas, all of your options will be smokeless, because they don’t produce the smoke-creating byproducts the way wood and charcoal do.
Portability
Looking for a mobile fire pit? You’ll certainly want to consider weight, but you’ll also want to look at the carrying convenience (such as whether it has handles) and the ease of clean-out (you don’t want to hike around with an ash-filled fire pit in your backpack).
The ‘X’ Factor
Often the right fire pit choice is driven by a particular style you’re drawn to or a specific usage you have in mind. If you want to do a lot of grilling, look for a model that has lots of cooking accessories. If you want a fire pit with a distinctive, modern look, aesthetics are a major factor. Or, maybe you know that you’ll be keeping the fire pit on a wooden deck, so you need a model that comes with an integrated or optional stand to keep the heat safely elevated. Whatever your particular X factor, keep it in mind as you compare models.
Can You Make a DIY Smokeless Fire Pit?
You absolutely can DIY a smokeless fire pit! While making a portable DIY smokeless fire pit is a little tricky, building a stationary smokeless fire pit for your backyard makes for a great beginner-level project. Simply use a hole saw or step bit to drill vent holes into a pre-made fire ring, and you’ve got the inner wall. While the exact steps will depend on your desired layout, the fundamentals of the smokeless design are relatively easy to achieve. Best of all, it’s extremely affordable. If you’re converting a traditional DIY fire pit into a smokeless super-burner, the total cost should be less than $100.
Recessed lights provide unobtrusive illumination, lighting up your living space without taking up space themselves. Because they sit outside of the perceived “room” they’re in, they help make ceilings appear taller and keep the focus on the objects they illuminate.
The two main parts of a recessed light are the housing (the part behind the ceiling) and the trim (the visible elements outside the ceiling).
When selecting recessed lights, here are the most important things to consider:
Illumination. Because they are recessed, they don’t illuminate as broad of an area, meaning you might need more recessed lights than ceiling lights to cover the same area.
Trim Design. Related to illumination, the trim design of a recessed light can affect light distribution. Common trims include baffle and reflector design. Baffles are designed to absorb light, making the recessed fixture less noticeable, while reflectors bounce light back into the room, providing more light but making the light fixture more noticeable.
Power Source. Most recessed lights are either hard-wired off standard 120-volt circuitry or low- voltage, which means they utilize a transformer to reduce the voltage, usually to 12 volts). There are also battery-operated recessed lights.
IC vs non-IC. If your recessed lights are in the top floor ceiling, they’ll likely be installed right in the middle of the attic’s insulation. Look for a light rated for insulation contact (IC) to allow the light to be touching insulation. Non-IC-rated lights generate too much heat when covered with insulation and can pose a fire hazard. You can install non-IC lights, but you’ll need to leave a 3-in. gap between the light and any insulation.
Location. Recessed lights can be installed almost anywhere, but not all of them are suited for all locations. Wet rated, damp rated, outdoor and in-wall models all have specific features to deal with their environment.
New Build or Remodel. Remodel lights have smaller housings and should always be used unless the installation is in new construction.
Special Features. These really boil down to personal preferences. Some recessed lights allow you to control everything from brightness to light color and can be controlled by a remote or a smart speaker.
Smokeless fire pits let you enjoy a fire without shuffling around to avoid wind-blown smoke.
All work on the same basic concept: Two-walled construction draws air in the bottom of the outer wall, then vents the now-heated air into the top of the fire. This natural bellows effect creates an oxygen-rich environment, producing secondary combustion that burns the smoke particles to nothing before they can escape the fire pit.
While these don’t eliminate all smoke, they do an extraordinarily good job of reducing it to the point most people will hardly notice the occasional whiff. In short, a smokeless fire pit makes a campfire more enjoyable.
To find the right smokeless fire pit for you, consider these factors:
Cost
There’s a big range, from $70 for something basic to high-end models into the thousands of dollars. For a smokeless fire pit large enough for a group of friends to gather around, $300 to $600 is a reasonable budget.
Fuel type
A smokeless fire pit burns solid fuels like wood, charcoal or wood pellets. Most can burn multiple fuel types if needed, but manufacturers often design the venting and clean-out for one specific fuel type. Note that gas-burning fire pits are always smokeless.
Portability
If you think you’ll be taking the fire pit on a road trip, consider the weight as well as carrying convenience. Does it have handles? Also consider the ease of clean-out, because you don’t want to put an ash-covered pit in the back of your car.
X-Factor
Do you have a specific purpose in mind for this fire pit? Whether you plan to entertain a crowd or backpack solo through a national park will impact the size and capabilities of the ideal smokeless fire pit for you.
“Working, ranch or sled dogs that may be far from their home, barn or kennel may also be good candidates for heated doghouses to give them a sheltered place to rest and sleep away from the elements,” says Dr. Jerry Klein, chief veterinary officer for the American Kennel Club.
What to Look For in a Heated Doghouse
Safety comes first, says Klein. Here’s what to look for to keep your dog safe.
Good materials: The house should be weatherproof and easy to clean and disinfect. A roof you can lift makes this easier.
Good insulation: This helps keep the cold out in winter and keeps the house cooler in summer. Be sure to cover all insulation with plywood, because it can be toxic if ingested.
Electrical cord safety: Make sure cords are well covered with a protective coating to prevent chewing, electrocution and fire.
Size: Your dog should be able to stand up, turn around and lie down comfortably, but otherwise not have a lot of extra space. “Instinct tells them to find a cozy spot that is warm, provides shelter from the elements, and is safe from predators,” says Klein. “[And] it’s easier for a dog’s own body heat to keep the house warm if it’s not too large.” This usually equates to the height and length being about 1-1/2 times your dog’s dimensions, and the width about the same length as your dog. Measure from the floor to the top of their head, or ears if they’re a little taller, and from the tip of their nose to the base of the tail.
Entrance: Ideally, the door will be offset to one side, or have a small vestibule to help keep wind, rain, snow and sun from directly blowing or shining inside. The door only needs to be tall enough for your dog’s shoulders to clear, and just wide enough to accommodate your dog at their widest point.
Note: It’s best to place an outdoor doghouse on a platform off the ground for drainage and better air circulation.
Outdoor Doghouse Precautions
Heated doghouses are best used when a person is also outside, especially during the day, says Klein. “There is a saying that if the weather is too cold for you, it’s probably too cold for animals for any extended period of time and they should be brought inside,” Klein says.
Here are more recommendations:
Always consult a veterinarian to see if it’s okay for your dog to stay outside, even just part-time.
If they’re going to be outside for a while, slowly acclimate them to the environment.
Dogs will burn more calories in colder temperatures, so slowly acclimate them to those diet changes as well.
Check on them at least twice a day for frostbite on their noses, ears and paws. Remember that wind chill can cause deadly hypothermia.
Don’t leave dogs housed or unsupervised outside for any period of time when it’s below 45 F, except well-acclimated double-coated Arctic sled-type breeds.
Check their water bowls at least twice a day to make sure they aren’t frozen. Or buy a heated bowl.
Keep the doghouse clean.
Who Should Not Use a Heated Doghouse?
According to Klein, only double-coated dogs acclimated to cooler temperatures should spend any amount of wintertime in a doghouse. He also says never leave these dogs in a doghouse in winter:
Short-coated or hairless breeds;
Elderly dogs or those with serious medical concerns like arthritis, spinal or cardiac conditions;
Puppies and young dogs, because they are more vulnerable and need ample socialization with humans.
“Keeping most dogs outside all night, even in a heated doghouse, is not encouraged,” he says. “And keeping a dog in a doghouse is not a reason to ignore or mistreat a dog.”
There are plenty of products on the market to pour down your drains and chew through the nastiest of clogs. But those products typically contain nasty chemicals that can be bad for your health and harmful to your plumbing. So why go that route when safer and equally effective options exist?
Here are some of the best ways to unclog your drains without using harsh chemicals.
Dish Soap
Grease can easily congeal in pipes and clog a sink drain, causing a whole host of issues. To break up a grease clog, attack it with something you likely have sitting right next to your sink — dish soap. Here’s how:
Fill a kettle with water and heat it to a boil.
Remove any standing water from the sink and the drain.
Squirt a liberal amount of dish soap down the drain.
Let the soap drip for a few minutes so it reaches the grease clog.
Pour the hot water from the kettle down the drain to flush it.
It may take more than one cycle to fully break down a grease clog. If the clog persists, you’re most likely dealing with something other than grease.
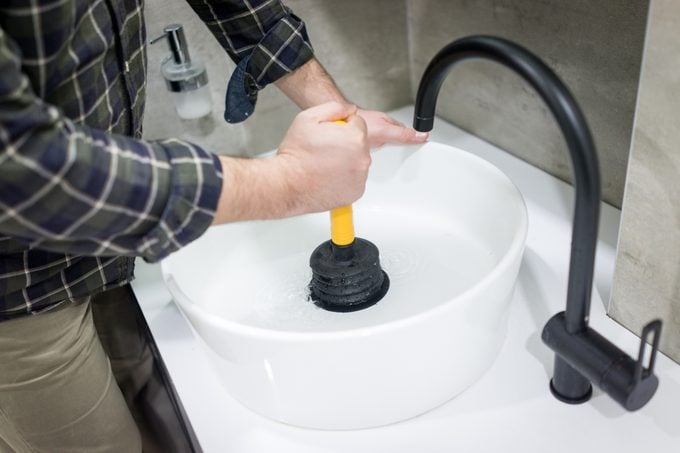
Grab a Plunger
Bathroom sinks are notorious for hair and soap scum clogs. The good news is, you can use the same tool to unclog your bathroom sink as you do your toilet — a plunger. Just don’t use the same plunger you use on your toilet, or at least clean the plunger thoroughly first.
Here’s how to unclog a sink with a plunger:
Remove any plug or cover from the drain.
Let the faucet run until there’s about an inch of water in the sink.
Place the plunger over the drain so it covers it entirely and creates a complete seal.
Pump the plunger up and down vigorously for up to half a minute.
Watch to see how the water drains. If it stays in the sink, pump the plunger again.
Baking Soda and Boiling Water
Baking soda is a fantastic natural cleaner that chews through grit and grime. Combine baking soda with a little vinegar and some boiling water and you’ve got yourself a powerful, chemical-free unclogging compound. Here’s what to do:
Fill a kettle with water and heat it to a boil.
Pour the boiling water down the drain to loosen the clog and warm the pipes.
Fill the kettle back up and heat up more water.
Pour one cup of baking soda and a solution of one cup water and one cup vinegar down the drain.
Plug the drain for 10 minutes.
Pour boiling water into the drain.
The reaction between the baking soda and the vinegar should loosen the clog enough so the boiling water flushes it from the pipe.
The Wire Hanger Method
You can also use a wire hanger from your closet to break up drain clogs. Here’s how:
Use a pair of needle-nosed pliers to straighten the hanger into a long single wire, keeping the hook intact on one end.
Stick the hook end down the drain, rotating it as you go while keeping a tight grip on the other end.
Once you reach a point of resistance, wiggle the hanger around and rotate it a few more times.
Slowly pull the hanger out of the drain and clean off any gunk with a paper towel.
Repeat until the clog is entirely removed.
Work carefully while using this method. Too much force will smash the clog deeper into the pipe, making the problem worse.
Drain Snake
If a wire hanger isn’t doing the job, you might need to buy a drain snake. These are specifically designed to unclog drains. They tend to do a pretty good job if you know how to use them. Here’s how:
Place the end of the drain snake into the drain.
Turn the handle on the end of the drain snake. This will push the tip of the snake down into the drain.
Keep cranking the snake into the drain until you feel resistance.
Rotate the snake and continue cranking until you feel the snake break through the clog.
Once you break through the clog, crank the drain snake the opposite way to pull it out of the drain.
Run hot water into the drain for a few minutes to flush the clog.
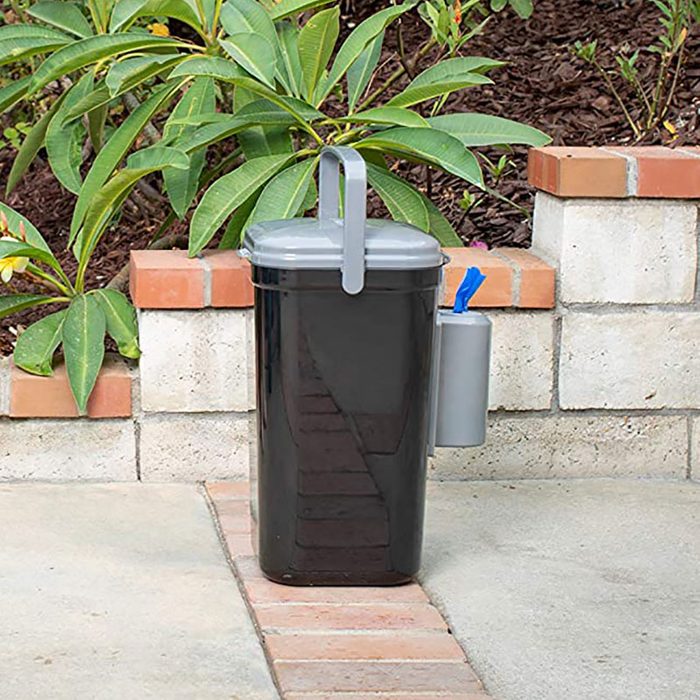
We love our pets, but cleaning up after them is not one of our favorite chores. And once you pick up or scoop the poop, what do you do with it?
Put it in a cat and dog poop trash can, just as you do with normal household rubbish. Many of our featured cat and dog poop trash cans hold the mess until trash day, when you tie off the can liner and toss it into the regular garbage bin for weekly pick up.
Properly disposing of pet waste is important for your family and community. When buying a cat or dog poop trash can, look for these important features:
Capacity. Do you have one little dog, several cats or a team of Siberian huskies? Be sure the receptacle you choose can hold at least a week’s worth of their poop.
Leak-proof. The can top should be airtight and seal securely to contain the contents and smells.
Material. Plastic is lightweight and won’t rust. Stainless steel and aluminum are durable, long-lasting and best for storing outdoors. Whichever kind you buy, be sure it’s washable.
Hygiene. Bins that come with foot pedals, disposable or reusable liners help stop germs and bacteria from spreading.
Cost. Basic bins can go for around $15, while flashy ones can be as much as $400.
In the market for cat and/or dog poop trash can you can count on? Our list gives you lots of top-notch options.
If you want to keep your pets out of certain rooms or prevent them from escaping the yard, a good pet gate is an effective solution.
Gates can soothe anxious pets by creating a cozy, manageable area where they feel safe and secure. For vulnerable puppies and kittens, a gate restricts access to hazards like stairs and swimming pools.
Size. The gate needs to fit the threshold or opening it will go across. Many gates adjust to narrower or wider-than-standard spaces.
Safety. Look for double-locks, small spaces between bars and non-toxic materials and finishes.
Types. Walk-through (doors to pass through so you don’t have to climb over), retractable, folding, free-standing or pressure-mounted (spring-loaded).
Durability. Wood is elegant and plastic lightweight. But if your pet likes to chew, metal is the sturdier non-edible choice.
Portability. Ideal for moving the gate from room to room or from indoors to the backyard.
Ease of installation. If you don’t want to put holes in the walls or wood trim, or you need a temporary solution, a free-standing gate is a good choice.
Cost. Pet gate prices range between $20 to $200, depending on the quality and features.
The following is our list of the top pet gates on the market.
The first electric arc light bulbs were made in the 1830s, before the famous inventors Nikola Tesla and Thomas Edison were even born. And although light bulbs would change the world, it took a while for them to become commonplace. A century ago, only half of the homes in the United States had electricity. From then until the 1980s, choosing which bulb to buy for your lamp was simple, because there was only one choice — the traditional incandescent bulb. Today that old standard is on the way out, complicating the decision of which light bulb type to buy.
But don’t worry. We’re here to help crack the modern light bulb code.
Light Bulb Evolution
Incandescents still make up about one-third of light bulb sales in the U.S., but they’re being phased out for more efficient options.
“It is rare that clients request incandescent bulbs now because the LED bulbs have become more affordable, higher quality and we have adapted to seeing them in most places,” says Jennifer Johnson, owner of The Light Center in Fort Collins, Colorado.
According to the U.S. Environmental Protection Agency (EPA), 90 percent of the energy used by most incandescent bulbs ends up wasted as heat, leaving only 10 percent to deliver actual light. “We were essentially lighting homes with small heaters,” says Enesta Jones of the EPA.
The evolution of LED technology changed that. LEDs are about 90 percent efficient, and over the last decade their price has dropped by nearly 90 percent to around $5. That means each bulb pays for itself in energy savings after a few months.
LED technology is also progressing rapidly. Smart bulbs create moods in a room. Color customization throughout the day supports circadian rhythms. LED fixtures provide creative and discrete designs that integrate into cabinets and furniture. Of course, switching to LEDs is also an easy step for homeowners to reduce energy use.
“The bottom line is that LED technology is the better option for lighting, no matter your choices at the store,” says Jones.
“If every American home replaced their five most frequently used light fixtures or the bulbs in them with ones that have earned the Energy Star, we would save more than $5 billion each year in energy costs and prevent greenhouse gases equivalent to the emissions from more than six million cars.”
While LEDs are today’s darlings, there are other options on the shelves. Here’s how to find light bulbs to fulfill your home lighting needs.
Light Bulb Types
There are four main types of light bulbs for home lighting:
Incandescent. Though still in use, especially in specialty products like Edison-style filament bulbs, these are no longer the go-to for renovations and new construction. People still like them for their color, although LEDs with the right color temperature can match that.
Halogen: These are a form of incandescent. Halogen gas in the bulb allows it to burn longer and brighter than traditional incandescents, increasing efficiency by about 30 percent. They produce a slightly whiter color, though they’re pricier and much hotter to the touch.
Compact fluorescent:CFL bulbs are about 75 percent more efficient than incandescent bulbs, but they contain mercury and are temperature-sensitive. “Fluorescent in general are not preferred in most residential projects,” says Doreen Le May Madden, owner of Lux Lighting Design in Belmont, Massachusetts and chair of the Illuminating Engineering Society, Residential Environments Committee. “LED offers better light quality and energy savings now.”
LED (light emitting diode): Besides their energy efficiency, higher lumen ratings and versatility, all the experts we consulted lauded LED bulbs for their light quality, dimming response and color rendering. “LED is the standard now for general lighting,” says Melissa Thomas, owner of Mr. Electric in Land O’ Lakes, Wisconsin. “For existing homes looking for an upgrade, we typically recommend changing to recessed LED fixtures. This gives a clean appearance over the old surface fixtures. For just bulbs, we go with the new standard LED bulbs.” LED bulbs can replace most incandescents in your existing fixtures.
Within the world of LEDs, there are a couple of specialty products gaining steam:
Smart bulbs: Also known as intelligent bulbs, these are programmable LEDs with microchips that can be turned off and on, dimmed and color adjusted remotely from a laptop, tablet or phone.
Solar- and battery-powered bulbs: These LEDs are used in step lighting and outdoor flood lighting with motion and light-sensors.
Light Bulb Features
When choosing a bulb, here are a few things to keep in mind:
Brightness: Lumens describes how much light a bulb emits, while wattage is the amount of power it uses to produce that light. Knowing each will help you understand the efficiency of the bulb. If a chandelier can hold up to 100 watts per socket of incandescent lamps, using a 1,600-lumen light bulb that only uses 13 watts will yield the same perception of brightness as the 100 watts. “I always recommend to go brighter [more lumens] and put in a dimmer if it is too bright,” says Thomas. “When changing from old incandescent to new LED, the light will appear brighter initially, but [people] get use to it fairly quick and enjoy the brightness.”
Color: LED bulbs come in a wide range of light colors, from warm (like a traditional incandescent light) to cool (more bluish and daylight-like). Light colors are measured in Kelvin (K) temperatures, and newer LED fixtures often have adjustable color ranges. Which one to choose comes down to a personal preference. Johnson says she mostly sells 3,000K, which “is warm enough to not feel stark, but is crisp enough to not muddy whites. Occasionally people will strongly prefer 2,700 K, and because males tend to prefer cooler temperatures in lighting, they may request 3,500 K.” Le May Madden says her common residential ranges are 2,400 K to 2,700 K, “since they give the effect of incandescent bulbs. However, these may not be the best option in a room with all cool colors. Some prefer a whiter light of 3,000 K, since this highlights both warm and cool colors equally.”
Aesthetics: Consider the bulb shape and glass/lens color, as well as how it looks when lit. “Not all bulbs are created equal and until you see them on, you may not be able to tell the difference,” says Johnson.
There’s no industry standard set of light bulb sizes and bases, so there are hundreds of variations. Sizes are indicated by a letter-number combination, like A19, T10, B10, MR16, etc. The bulbs that fit most table and floor lamps are called A-lamps, with an Edison (E26) base. Candelabras use E12s.
To determine which one you need, look at your fixture. If you have an old bulb, bring it to the store to match the size and base.
Best Standard Residential Light Bulbs
Everyone’s preferences differ, so there’s no one “best bulb.” However, for most situations our experts recommend a high-quality LED bulb, adjusted to your preferred color temperature and purchased from a reputable company.
“The number one thing to do when shopping for lighting is to first look for the Energy Star label,” says Jones. Energy Star bulbs are independently tested and certified to make sure they perform as promised. “[It] works as a seal of approval for LED bulbs, to indicate they save energy, deliver on brightness, and work the way you expect light bulbs should,” Jones says.
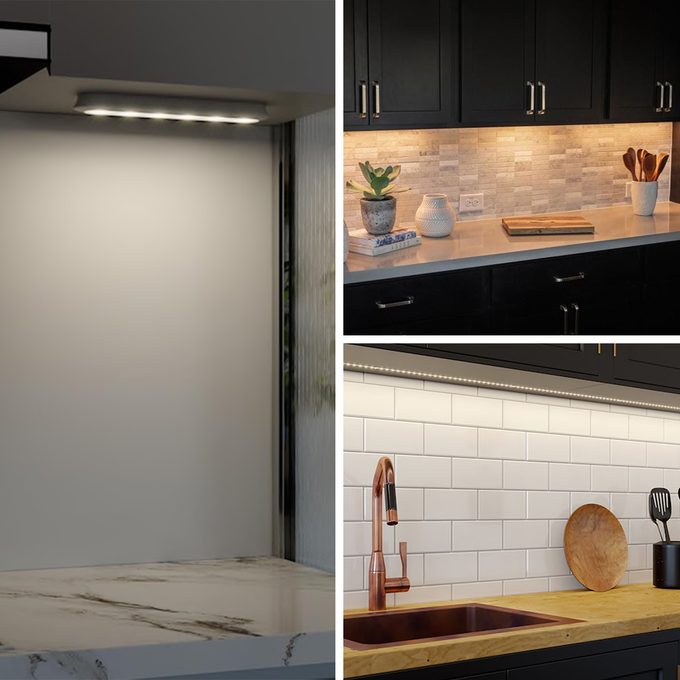
Whether in a kitchen, laundry room or work space, quality under cabinet lighting presents a clever way to illuminate your countertop. To find the right lights for you, consider the following factors:
Power source. Is the light 120-volt, low-voltage or battery powered? If it’s 120-volt, is it direct wired or plug-in?
Type of light. There are many options on the market, including LED strips, LED bulbs, incandescent bulbs and fluorescent or halogen bulbs. LEDs are the most energy efficient.
Modular installation. Some 120-volt and low-voltage under cabinet lights can be connected or daisy-chained together, making installation easier and requiring less outlet access.
Purpose of lighting. If you’re lighting a work space, choose stronger, more direct lights positioned where your head or hands can’t cast shadows on your work area. If it’s an eating or accent area, then color and temperature of the light is more important than the positioning.
Convenience. Some lights come with a remote control or motion sensor. Some are dimmable or offer a range of color display options.
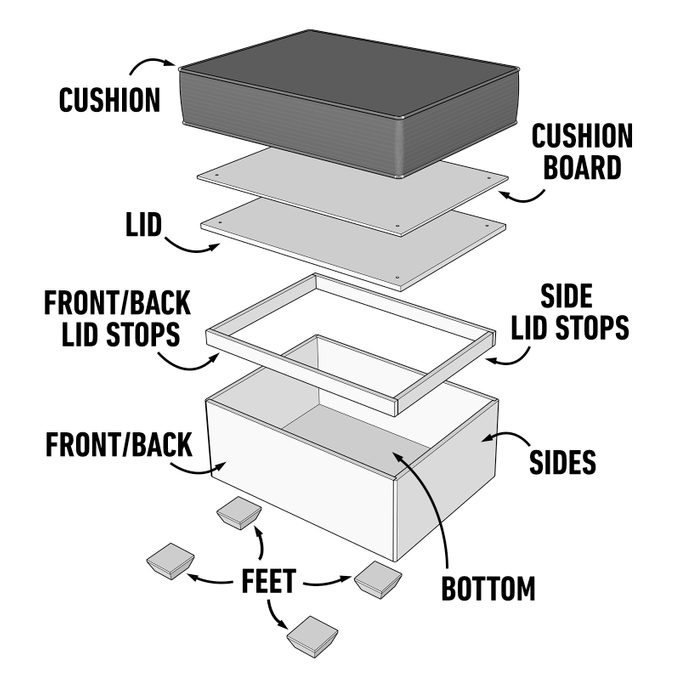
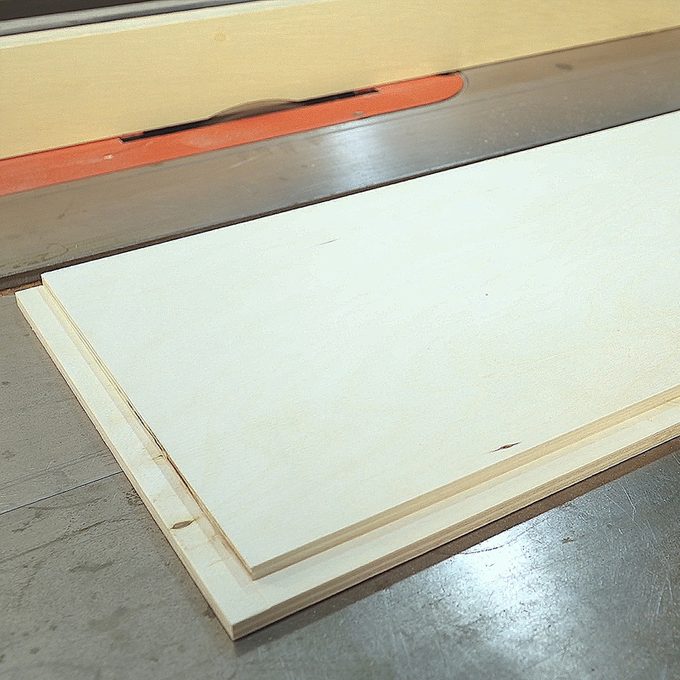
First cut the front, back and sides according to the cutting list.
Cut the remainder of the parts after the box is glued together.
At this point, move on to cutting rabbits on the front, back and sides.
Cutting Rabbit Joints
If available, install a dado blade on your table saw. You can also use a router with a rabbiting bit to cut rabbit joints. Or make multiple passes on your table saw to cut rabbits.
Cut 1/2-in. wide x 1/4-in. deep rabbit along the two sides and the bottom edge of both side boards.
Next, cut another rabbit 1/2-in. wide x 1/4-in. deep along the bottom edge of the front and back boards.
Remove the dado blade and re-install your table saw blade.
As the saying goes, waste not, want not. That’s certainly true for paper towels, which most people use for every wipe, swipe and spill, as well as some clever household hacks.
They’re a hot commodity these days, so the last thing any of us would want to do is waste them. And yet, if you’ve recently cleaned your mirrors, bathrooms or dusty dressers, you’re guilty of doing just that.
And that’s not the only problem you’ll encounter with these kitchen staples. For starters, paper products aren’t great for the environment, and they’ll also cost you a bundle over time. Plus, this seemingly innocuous choice could be damaging the very items you’re trying to clean!
Here are 15 things you should instead clean with reusable cloths, sponges, brushes or other gadgets. Make these easy swaps and you won’t believe you ever used so many paper towels.
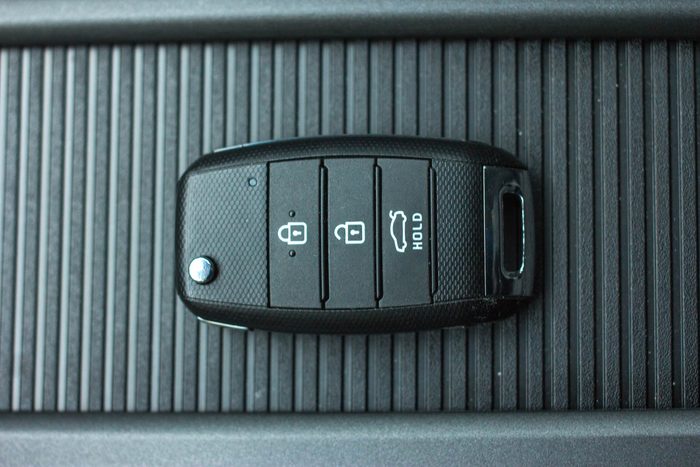
How did we ever live without keyless start cars? From eliminating fumbling with a key ring to all the little-known uses for your car key fob, keyless ignition systems are becoming more and more attractive to consumers. And that’s a good thing, because they’ll soon be universal.
Edmunds.com reports more than half of cars sold in the last year had a keyless ignition system. But as with so many technological advancements comes the inevitable plague … hackers. And that key fob may be their latest target.
When you unlock your car from a distance, the key fob sends an electronic code to your vehicle. According to Jim Milan of Auto Accessories Garage, thieves can actually steal the code as it’s being sent to your car.
“Under normal circumstances, when you are not close to your car, the radial signal the car uses to activate the key is too weak for proper signal communication and the keyless entry feature will not work,” Milan said. “However, when thieves use a special signal amplifier between your car and the key, the car will think the key is next to it and will unlock.”
So how can you protect your key fob from thieves? Store it inside a metal container, says Laura Gonzales of Autonation. The signal from a fob can pass through doors, windows and walls, but metal can stop it. Some suggest storing your fob in the refrigerator or microwave when you get home.
If you feel like you’ll forget your keys in the fridge or — worse — accidentally zap it in the microwave, Mark Cann, founder of Completely Keyless, has a solution. He suggests storing the fob far from where your vehicle is parked so its signals can’t be intercepted. A signal-blocking wallet or pouch would also work.
Portable fire extinguishers successfully put out more than 80 percent of home fires before they get out of hand. But it’s vital to keep the right extinguisher in your home and know how to use it before there’s an emergency.
“There is a saying, ‘An ounce of prevention is worth a pound of cure,’ and I think this holds true for fires,” says Brian O’Connor, technical services engineer with the National Fire Prevention Association.
“Preventing fires from occurring in the first place, through fire safe practices, is of utmost importance. But in the event a fire does occur, fire extinguishers, in the hands of a trained person, can be great for putting out small incipient fires.”
Types of Fire Extinguishers
There are five classes of fire extinguishers. Though they tackle different sources of fire, each operates the same way. The type you need depends on what might catch fire in the room where you keep it, whether it’s the kitchen, workshop or bedroom.
Class A: Fires in ordinary combustibles like wood, paper or cloth.
Class B: Flammable liquids like grease, gasoline, oil and some paints.
Class C: Energized electrical fires caused by tools or plugged-in equipment.
Class D: Flammable metals like magnesium, sodium and lithium.
Class K: Cooking fats and oils in cooking appliances.
Class A, B, and C extinguishers are for homes and businesses. Class D are often found in factories, and Class K in commercial kitchens. That’s according to John Otero, regional director at PuroClean.
Many home extinguishers can be used on different types of fires. They’re labeled for all appropriate classes, like A-B, B-C or A-B-C. For more information, see this blog from the NFPA and this fact sheet.
How To Use a Fire Extinguisher
Only use a fire extinguisher if it’s safe to approach the fire, and keep a safe distance while putting it out. Then remember the acronym PASS:
Pull the pin (or unlock the latch). As you release the locking mechanism, hold the extinguisher with the nozzle pointed away from you.
Aim low. Point the nozzle toward the base of the fire.
Squeeze the lever slowly and evenly.
Sweep the nozzle from side to side until the fire is out.
Stand approximately eight feet from the flames. “If you’re too far away it’s likely the fire won’t be extinguished effectively,” says Thaddeus Harrington, public affairs specialist with the U.S. Consumer Product Safety Commission. “But if you’re too close, the flames could spread even farther, compromising your physical safety too.”
Common Fire Extinguisher Mistakes
Here’s what often goes wrong when people use a home fire extinguisher, according to the experts.
Not reading the instructions: Every extinguisher has steps and precautions on it. Review them from time to time before there’s an emergency. “Reading the instructions in the event of a fire is not the best idea,” says Harrington. “This is because not only will it use up valuable time, allowing the fire to grow, but it may also be difficult to fully comprehend the instructions in a state of panic.”
Standing too close: Remember, the recommended distance is approximately eight feet away.
Where to spray the fire: People often point the nozzle at the top of the blaze and make their way down. Instead, sweep from the bottom up. “This is because the fuel that is feeding the fire will be at its base,” says Harrington.
Forgetting to pull the pin: “In a moment of urgency, failing to remove the safety pin is all too common,” says Harrington. If you don’t pull the pin, the extinguisher won’t work.
Improper extinguisher class: “Some extinguishers expel water, which is great for Class A fires,” says O’Connor. “But if water was used on a Class K cooking oil fire, it would just spread the fire and make things worse.”
Tackling too big of a fire. “Fire extinguishers are not for putting out large fires,” Otero says. “Use them for small fires in confined areas only.”
Other Extinguisher and Fire Safety Tips
Get hands-on training from the local fire departments or fire equipment distributor.
Inspect your fire extinguisher regularly to ensure the pressure gauge is in the operable range and the unit is not damaged or expired.
The true promise of a “smart home” centers around convenience. Smart devices are supposed to make your day-to-day life easier through simple tech solutions.
Unfortunately, today’s smart technology is anything but simple. There are so many smart brands and smart hubs that it seems nearly impossible to make every device in your home communicate and work together.
According to the company that created it, Matter will allow all the smart devices in your home to work together much more smoothly. Matter does not control any of your devices on its own. Instead, it provides pathways for them to communicate with each other regardless of brand.
Theoretically, that means you could control smart devices from Amazon like the Ring Doorbell with devices from competing brands like Google much more seamlessly. Through Matter, smart devices could realize their full potential and create a unified “smart home” experience.
“Taking an open-source SDK [software development kit] approach means everyone that develops a Matter device can use the same code base,” said Tobin Richardson, CEO of the Connectivity Standards Alliance and a member of the Matter Standards Working Group. “That’s an absolutely critical element to ensuring rapid adoption and market success — but we need to get it right.
“The ultimate goal remains to deliver a specification and SDK that delivers on our promise to create a common language for the smart home and improve consumer smart home experiences and spur greater innovation.”
Matter’s emergence could encourage major brands to make their smart devices work together in the early stages of development, creating cross-brand products that can be mixed and matched. Hopefully, 2022 will be the year smart home technology turn less frustrating and clunky and finally lives up to the intelligence its name implies.
If your home is powered all or in part by electricity, you probably view your monthly electric bill with at least a sliver of dread. Depending on where you live, the price for electricity can vary widely.
According to this chart from the U.S. Energy Information Agency (EIA), consumers in New England pay an average of 22 cents per kilowatt-hour of electricity, almost twice as much as those in Kentucky, Mississippi, Alabama and Tennessee. Regional electricity costs depend factors like the type of fuel used, the integrity of the regional power grid, weather conditions and state regulations.
But here’s something else that affects your electric bill — when you use it. In some states and with some power companies, the average amount you pay per kilowatt-hour fluctuates during the day. In what’s known as “time of use” billing, or peak hour/off-peak billing, power companies charge according to demand.
Knowing how electricity peak hours work can save you some money, as well as take some of the strain off your community’s power grid.
What Are Peak Electricity Hours?
These are the times of day when electricity consumption is highest. It varies by season and region.
For residential dwellings, think about the times of day you and your family are most active — watching TV, blow-drying your hair, making coffee, running the dishwasher or tossing in a load of laundry. If everyone else in your community follows the same usage pattern, there’s much higher demand for electricity during those periods. And here’s a new wrinkle affecting peak hours — people charging their electric cars.
The time of year determines peak hours, too. In most parts of the country, when summertime temperatures soar, electricity consumption peaks during the hottest hours of the day as businesses, schools and malls crank the air conditioning.
In contrast, winter months see lower household daytime consumption when homes are more likely to be empty, but peak consumption at night when families return and fire up household appliances.
What Are Time of Use Rates?
Time of use rates (abbreviated as TOU) fluctuate based on peak hours. Power companies charge more for electricity during peak hours and less in off-peak times.
These rates exist for understandable reasons. When there is more pressure on the power grid, it costs more to produce the additional electricity to meet the demand. Higher rates theoretically give consumers incentive to decrease their usage during peak times, lessening pressure on the grid.
Some power companies offer TOU rate plans, guaranteeing a fixed kilowatt-hour rate when you consume electricity during off-peak hours. The difference between peak and off-peak TOU rates varies from company to company, but may be as much as 15 to 20 cents per kilowatt-hour.
What’s the Cheapest Time of Day To Use Electricity?
The formula for finding the cheapest time of day to use electricity is pretty simple — don’t use it when everyone else is!
In practical terms, in most parts of the country, these are considered peak hours:
In summer, typically between noon and 6 p.m. when air conditioners are on full-throttle.
In winter, typically between 6 a.m. and 9 a.m., and again between 5 p.m. and 9 p.m. — before and after work.
Off-peak hours line up like this:
In summer, from about 5 p.m. to 10 p.m., after the hottest part of the day.
In winter, from about 9 a.m. to 5 p.m., when houses are empty and daytime temps are higher
In virtually all seasons and regions, nighttime hours from 9 p.m. or until 5 a.m. are off-peak.
Electricity Money Saving Tips
While it might make financial sense to avoid peak hours, the rhythms of daily life often dictate our electricity use. But there are some ways to take advantage of off-peak rates:
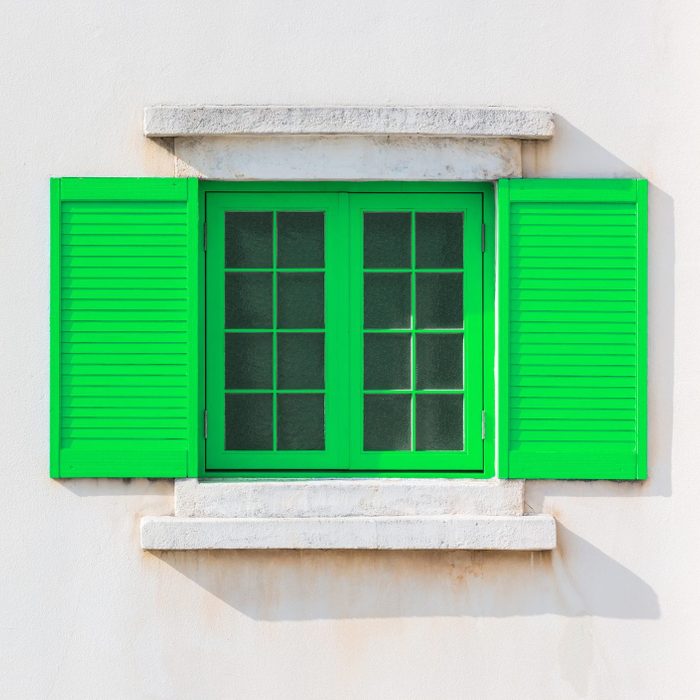
Painting your windows might not be the first project you think of when planning your next home remodel. However, giving your windows a fresh new look doesn’t take much work or cash, and a little goes a long way. Here are five ideas you should consider for painting your home’s windows.
Pick a White That Pops
White paint is timeless. A bright white will pair perfectly with most non-white walls, including grays or a bold color.
One important factor when picking white paint is the sheen. With windows and trim, better to go with a satin or semi-gloss. An expert at your local paint store can help you narrow the choices.
Add a Splash of Color
Bold isn’t for everyone, but for the daring, a vibrant pop of color can add a tremendous focal point to your home. Bright green or orange will make your home stand out. Whether that’s good or bad is up to the beholder.
Make sure whatever window color you choose matches the interior and exterior walls. If you already have a bold wall color, you might want to go with something more neutral for your windows. Or paint the walls a neutral color to better complement your window choice.
Choose Something Moody
Adding color doesn’t have to mean bright or vibrant. A moody color like a dark green is inviting and gives your home a modern, bold look. If you do go this route, consider extending it beyond the windows and painting an entire accent wall that moody color.
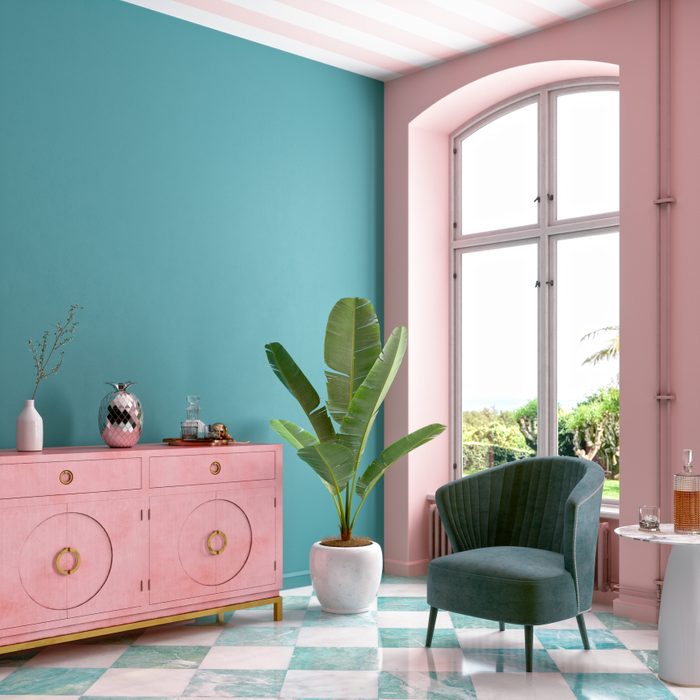
Color Match With Your Home’s Décor
If you love that old arm chair, bold colored cabinets or a piece of artwork in your living room, draw that color out and add it to your windows.
The nice thing about this is, you don’t already have to have a bold color in your home. If you purchase the paint color you want for your windows, use extra paint on a dresser, coffee table or something else to tie it back to your windows.
Bring the Outdoors In
Is your home next to the ocean or a lake? Try a nice blue. If you live in the mountains or a heavily wooded area, consider a rich green color. Matching your window paint to the region will remind you every day why you love living there.
Over the eons, wind and water gradually weather rocks, breaking them down into particles that help form soil. That silty sand in your yard might have once been a towering granite cliff. That clay? It could have come from a lava flow of basalt, or limestone that formed under an ancient sea.
Wherever it originated, once it becomes soil, we classify it based on particle size. Sand has the largest particles. Clay has the finest. Silt is somewhere in between. Mix this trio together and voilà! — you have loam, the goddess of garden soils.
What Is Loam Soil?
Loam soil is a balanced mixture of sand, silt and clay, ideal for growing garden plants. Loam’s mineral content, and the way the three sizes of particles work together, combine to make it extremely fertile.
The larger sand grains prevent the soil from compacting, so it drains well and helps oxygen reach plant roots. The extra spaces between the sand attract worms and microorganisms. The silt helps the sand and clay mix together, holds moisture and also makes a good home for microorganisms and decaying organic matter (humus).
The clay also holds water in the soil. Plus, it’s negatively charged, which attracts positively charged nutrients like calcium, iron, potassium, phosphorus and magnesium.
“The ideal soil, called loam, contains all three of these different-sized particles in relatively equal amounts,” says Em Shipman, executive director of KidsGardening.org.
What Are the Benefits of Loam Soil?
Loam soil is considered ideal for garden fruits, vegetables and flowers because it:
Allows water to travel through it slowly enough for the plants to get it, but fast enough to prevent it from getting soggy;
Some gardeners who grow root crops and tubers, or live where there’s a lot of rain, may desire a more sandy soil for ease of harvest and better drainage. Also, some native plants that evolved and adapted to local soil conditions may do fine without loam soil.
When in doubt, apps such as NatureID can help you determine the best soil mixture and nutrients for particular plants.
How Do I Know if I Have Loam Soil?
Besides taking a sample to a lab for a soil test, the easiest way is a squeeze test. Take a handful of moist soil and form it into a ball. If it’s loam, it will compress into a loose ball that crumbles easily.
“If no ball is formed, then the sand content is too high,” says Dr. Tony Provin, soil chemist and professor at Texas A&M University. “If the ball formed could be used by the local youth baseball team, the clay content is likely high.”
How To Create Loam Soil
First, let’s clarify the difference between the soil-science definition and common use of the word loam. In science, loam is soil with a balanced mixture of sand, silt and clay. Commonly it refers to nutrient-rich, crumbly garden soils that contain organic matter.
“Technically speaking, you can’t transform your garden soil into loam by adding sand or clay, because that results in a muddy mess, or worse, almost concrete,” says Shipman.
But you can create more loamy soil in the common sense of the word by adding organic matter. That improves soil structure, or how well the soil particles are held together in clumps by humus, the glue-like substance formed when organic matter decomposes.
“A soil with good structure has lots of these clumps, called aggregates, which loosen heavy clay soil and help sandy soils hold moisture and nutrients,” says Shipman.
Earthworms, microbes and other soil creatures consume and break down this organic matter, transforming it and releasing the nutrients it contains into forms plants can take up. The glue-like humus, which binds soil particles and improves soil structure, forms during decomposition.
Add two or three inches of organic matter. The ideal time is in fall, but you can also do it in early spring.
Work the organic matter into the top six to eight inches of soil with a shovel or rototiller, then wait to plant until spring rolls around. Don’t overdo the rototilling to avoid harming soil life.
If you add fresh (uncomposted) organic material in the spring, wait two to four weeks before planting to let the material start breaking down. Otherwise, microbes can “lock up” some nutrients so plants can’t get at them. However, you can add fully composted material any time and plant seeds or seedlings right away.
Can You Buy Loam Soil?
Yes. “Although quality topsoil is more expensive than cheap fill dirt, it’s worth the investment if you hope to grow a bountiful garden,” says Shipman.
For gardens, Shipman recommends a blend of topsoil and compost. For those who want to get more technical, Provin offers this advice:
“Whenever possible during soil purchasing, look for the abundance of soil peds (natural occurring aggregates), as roots do not grow through individual sand, silt or clay particles, but around these soil aggregates. The lack of aggregates, even in a loam-textured soil, is a root-ability issue.”
How To Maintain Loam Soil
Once you’ve created great loam soil, your garden will be gorgeous for a while. But eventually, nutrients need replenshing.
“Soil improvement is not a one-and-done task,” says Shipman. “Rather, it’s an ongoing process that includes adding organic material to the soil each year.”
Here are some methods to maintain your loam soil:
Organic matter: You can till in organic matter each fall or spring, the same way you first established your loamy soil. You can also add mulch (like leaves) in the fall to protect the soil over winter.
Don’t over-till: Over-tilling the soil will release the stored nitrogen into the atmosphere and wash away nutrients. It also disrupts the habitat created by billions of helpful microorganisms. “More specifically, many gardeners over-till the soil and subsequently destroy native soil aggregation and undo developing aggregation, thus causing root and water problems,” says Provin.
Cover crops:Cover crops planted between growing seasons can protect the soil from erosion by enriching it with nutrients. Alfalfa, buckwheat, barley oats, mustard, parsley, radish, rye, red clover, wheat and winter peas are all good cover crops.
Another trick for healthy soil: Planting native plants.
“The root systems of many native plants are complex and large,” says Mary Phillips, senior director at Garden for Wildlife. “They help sequester carbon and their root channels aid in water run-off and absorption in the soil.”
Provin also recommends that you:
Avoid walking on garden soil, especially when it’s wet. Foot traffic can compact the soil and make it harder for plants to root.
Test the soil annually. Problems can develop from over-fertilization, which introduces too much phosphorus and soluble salts and may skew the soil pH.