Meal Prep Delivery

Monday, October 31, 2022

How to Bend Wood with Steam

Meet the Expert

Fh21djf 607 03 032 Courtesy Jay Cork

Project editor Jay Cork has taught classes on bending wood with steam. Truly, no one is more full of hot air.

Fh23djf 622 53 056 1 How To Bend Wood With Steam

How Does Wood Bend?

Fh23dja 622 53 045 0001 How To Bend Wood With Steam

Some wood species — ash or oak, even cherry or walnut — can be bent by softening their lignin with heat. Think of lignin as the glue holding the wood fibers together. As the lignin and fibers are heated, they become pliable for a short time and the wood can be bent around a form.

Air-Dried is Best, But …

It’s a common misconception that only air-dried lumber bends well. I have found this to be only partly true. Kiln-dried lumber has a bad reputation because during the drying process, the lignin cooks and becomes stiff. If this happens, no amount of heat will bring it back.

Despite this risk, I’ve found kiln-dried wood can indeed be bent if it’s steamed for a longer period.

Build the Steam Chamber

Cut the box parts

Size the steam chamber to the parts being bent; any larger will waste heat energy. The box can be made from any wood — even PVC pipe!

  • Pro tip: I chose CDX ­(exterior) plywood because it’s cheap, easy to work with and holds heat better than PVC pipe.

Fh23dja 622 53 003 Fhm How To Bend Wood With Steam


Article source here: How to Bend Wood with Steam

The 6 Best Artificial Christmas Trees on Sale Right Now

National Tree Company Artificial Full Christmas Tree Ecomm Amazon.com

Amazon

National Tree Company Dunhill Fir

The Dunhill Fir from the National Tree Company was named the most realistic tree in our recent best artificial Christmas tree roundup. Finding an artificial tree that doesn’t look fake can be expensive, but this tree looks incredibly lifelike and is one of the best Christmas tree sales on our list. Thanks to its wide, full-bodied branches, you’ll have plenty of space to display all your favorite decorations and Christmas tree lights. Each branch is individually crafted with needles made of realistic-looking PVC that’s both hypo-allergenic and fire-resistant, making this a kid- and pet-friendly tree.

The 7-1/2-foot version of this Dunhill Fir typically retails for $330. That’s not a bad price, but right now you can snag it while it’s marked almost 40% off.

Shop Now


Article source here: The 6 Best Artificial Christmas Trees on Sale Right Now

Friday, October 28, 2022

10 Best Ways To Protect Your Home

man hand in a black jacket rings the door intercom

Never Open Your Door to Strangers

When someone comes to your door, do you promptly open it, assuming it’s a neighbor or delivery person? if so, stop right now. Those with bad intentions can easily knock you aside and gain entry to your home.

Your best bet to protect your home is adding a video doorbell camera. These easy-to-install devices let you see and talk to whoever’s at your door through an app on your phone. You don’t have to open the door.

A bonus: You can talk to visitors whether you’re home or not. And the camera can catch package thieves, too. Here’s our list of the top video doorbell cameras to help you choose the right one for you.


Article source here: 10 Best Ways To Protect Your Home

Homeowner’s Guide To Choosing and Using Staples

If you’re like most people, your first exposure to staples was probably binding together the pages of a homework project. Paper staples are, ahem, a staple in every school and office in the world.

Lots of products apply staples, from mini-staplers to heavy-duty implements that can bind 130 sheets of paper at once.

Staples aren’t just for paper, though. Woodworkers, electricians, builders, flooring installers and upholsterers all use them, and they aren’t the staples you remember from high school. They’re longer, beefier and in many instances do the same job as nails. And they all work in essentially the same way.

In most cases a triggering mechanism releases a spring-loaded hammer that pushes the staple from an aperture with enough force to sink it into the intended material. Staples fence builders and electricians use are exceptions; they hammer those in.

If you do work around the house, you’ll need staples at some point, so it’s good to know what kinds are available and how to use them.

Consideration When Buying Staples

Staples are simple metal fasteners that differ in small but significant ways. Each has a roughly U-shape. The head of the staple (called the crown) is usually square, although it can also be round or triangular. The two sections extending vertically from the crown are the legs, with the tip of each leg called the point.

Here are the main ways staples vary:

  • Crown: Crown width ranges from narrow (1/4-inch) to wide (one inch or more). Narrow and medium widths are best for woodworking and upholstery, while wide ones are most appropriate for packages and cartons.
  • Legs: Leg length varies from several millimeters to an inch and a half or more. When choosing leg length, multiply the thickness of the material you’re binding times three. When fastening thin materials, it’s customary to add 4-mm to the thickness of the material. When fastening hard materials like wood, double the thickness.
  • Wire gauge: This measures the thickness of the staple It varies from 22 (thin) to 10 (heavy). Use thin gauge staples (20-22) for upholstery, vinyl and paper; medium gauge (18-19) for woodwork, house sheathing, subflooring and similar purposes; and heavy gauge (10-16) for furniture framework, roofing shingles and other construction purposes.
  • Material: Galvanized steel is the most common. You can also buy copper-coated staples, often used for packaging. Aluminum staples for woodworking projects are easier on saw blades. Stainless steel staples work best when you need better corrosion resistance.

Stapling Tools Pros and Cons

There is usually a selection of tools for particular classes of staples. The variety of paper staplers available provides a familiar example. You can choose a standard desktop stapler, a handheld one, one with an elongated base for stapling booklets or a compact mini-stapler to save space in your drawer.

Here’s a rundown of the more heavy-duty tools you might need, depending on the project:

Manual staple gun

manual Staple Gun

The staple gun features a spring-loaded trigger you squeeze to eject a staple. It’s intended for light- and medium-gauge staples with narrow and medium-width crowns.

Use for: Upholstery, sheet plastic, house siding paper, woodcrafts, flooring underlayment and carpeting.

Pros

  • Lightweight and portable;
  • Easy to load;
  • Accepts a variety of staples.

Cons

  • Squeezing the trigger repeatedly can be tiring;
  • Staples tend to stick between the hammer and the front shield.

Electric staple gun

Electric Staple Gun

An electric staple gun can be corded or cordless. An internal electronic control eliminates the need to squeeze a trigger. It may accept longer staples than a manual one, depending on the model.

Use for: The same jobs requiring a manual staple gun, especially those calling for a large number of staples.

Pros

  • Less tiring to use than a manual staple gun;
  • More powerful.

Cons

  • Can’t be used without battery or electric power;
  • May accept only proprietary staples.

Pneumatic stapler

Pneumatic Stapler

A pneumatic stapler is a heavy-duty tool similar to a nail gun. It runs on compressed air and can drive the longest, heaviest-gauge staples. Some electric staplers pack almost the same power as pneumatic ones.

Use for: Heavy construction, furniture framework, roof shingles, packaging and wire fencing.

Pros

  • The most powerful stapler available;
  • Can substitute for a nail gun in certain situations.

Cons

  • Heavy;
  • Needs an external compressor.

Flooring stapler

Floor Stapler

A flooring stapler is pneumatic with an angled drive head. It drives staples into the tongues of hardwood flooring.

Use for: Installing engineered or solid hardwood flooring.

Pros

  • Makes hardwood installation faster and easier;
  • Automatically sinks staples to the exact depth you need.

Cons

  • Needs a compressor;
  • Not useful for jobs other than flooring installation.

Hammer tacker

Hammer Tacker

A hammer tacker is a type of manual staple gun. You swing it like a hammer. Each time the head strikes a hard surface, it ejects a staple.

Use for: Installing roofing or siding paper, floor underlayment or carpeting.

Pros

  • Fast and easy;
  • Longer reach than other staplers.

Cons

  • Staples frequently stick;
  • You need clearance to swing it.


Article source here: Homeowner’s Guide To Choosing and Using Staples

What Is SPC Flooring and Should You Get It?

The debut of vinyl flooring at the 1934 Chicago World Fair attracted a lot of interest from fairgoers. But it wasn’t until World War II ended and the military demand for petroleum subsided that vinyl flooring began appearing in American kitchens, basements and sometimes living rooms. Homeowners liked its durability and water resistance, but not its synthetic appearance.

The industry responded with luxury vinyl tiles, engineered in layers and closely resembling hardwood, stone and other natural materials. They became popular in Europe and Asia in the ’80s and subsequently in North America.

The original luxury vinyl tiles (LVT) and luxury vinyl planks (LVP) were vinyl all the way through. Around 2010, manufacturers began reinforcing the core with plastic composite to produce rigid core flooring. That core typically consists of wood plastic composite (WPC) or stone plastic composite (SPC). The latter is the type you increasingly find in modern LVT and LVP products.

WPC is a type of high-density fiberboard. Although sealed by layers of vinyl, it can be as vulnerable to moisture as wood. But an SPC core contains no wood.

What Is SPC Flooring?

SPC flooring is luxury vinyl plank or tile flooring with a stone-plastic composite core. Also known as rigid core or engineered vinyl flooring, it’s manufactured in four or five layers, depending on whether the backing is foam or cork. The backing is often added for comfort and insulation.

Manufacturers produce the SPC core, typically from 3.2- to 7 millimeters thick, by combining limestone powder, polyvinyl chloride and stabilizers. SPC is thinner than typical WPC because stone is denser than wood. Owing to the limestone core, SPC floors are durable, with typical warranty periods running 25 years or so.

Pros and Cons of SPC Flooring

In general, SPC flooring shares the benefits and drawbacks of rigid core flooring.

Pros

  • Easy to install: SPC flooring boards snap together like laminate boards and float above the subfloor. No glue or nails required.
  • Durable: A wear layer protects the design layer, resisting scratches and damage from ultraviolet light.
  • Comfortable: Most SPC flooring planks and tiles feature an underlayment cushion for comfortable walking and some heat and sound insulation.
  • Lots of design choices: Designs mimic various types of hardwood and stone flooring, as well as geometric patterns reminiscent of old-style linoleum and vinyl sheet flooring.

Cons

  • Undeniably imitation: No matter how realistic the design layer, SPC flooring still looks like vinyl. That’s not a huge issue for geometric design patterns or even faux stone, but a wood pattern will never look like real wood.
  • Colors fade: Despite the UV protective coating, SPC flooring fades over time in direct sunlight.
  • Not scratch-proof: The wear layer is scratch-resistant, not scratch-proof. Heavy foot and pet traffic eventually makes it look worn.
  • Can’t be restored: Once your SPC floor loses its luster, you can’t refinish it. The only option is replacement.

SPC flooring also has multiple pluses and one big minus compared to WPC. On the plus side:

  • More stable: Because it doesn’t contain wood, SPC flooring won’t expand and contract with changing temperature and moisture conditions.
  • More impact resistant: SPC flooring is denser and resists impact more than WPC.
  • Less expensive: SPC is generally more affordable.

On the minus side, SPC features a thinner core layer than WPC. It feels less comfortable to walk on, and doesn’t provide as much thermal and sound insulation. These problems can be remedied by installing an underlayment first.

How Much Does SPC Flooring Cost?

It’s less expensive than real hardwood or stone tile, especially if you install it yourself. The national average for rigid core flooring, including SPC and WPC options, is around $4 per square foot (psf). Compare that to hardwood, which costs from $3 to $10 psf, and stone tile, which runs $5 to $10 psf — not including installation.

SPC could be considered a type of laminate, because the planks are constructed the same way with different materials, and installation is similar. Laminates tend to cost from $1.50 to $3.50 psf, so they can be cheaper than SPC. Laminate flooring is not as durable, long-lasting or comfortable, however. The cost for professional installation is similar to laminate, about $3 to $8 psf.

How To Install SPC Flooring

Luxury vinyl flooring with an SPC core comes in planks or tiles that snap together to form a floating floor. Unlike earlier versions, most require no glue. They’re easy to assemble, even easier than laminate planks, because you can cut them by scoring with a knife and snapping. You only need a saw for cutting curves and notches.

SPC flooring can be installed over many other types of flooring, including hardwood, vinyl and some types of tile. The subfloor must be flat, however, so some preparation might be required first. An underlayment is also recommended if the product you install doesn’t have one. Finally, you’ll need to install baseboards to hold the flooring down.


Article source here: What Is SPC Flooring and Should You Get It?

Thursday, October 27, 2022

10 Kitchen Color Trends That Are Hot Right Now

Beautiful kitchen interior with new stylish furniture

Warm, Earthy Green

There are plenty of ways to use trendy greens that will work for your kitchen. You won’t go wrong with almost any shade of green, although sage-ier hues are trending hottest at the moment. Everything from rich, dark hunter green to light, peppy mint will look fresh and new.

Green could show up as wall paint or in a wall covering pattern. It can really take center stage as cabinetry paint, or even in countertops like green Rainforest granite.


Article source here: 10 Kitchen Color Trends That Are Hot Right Now

DIY Toolbox

The Renter

Personalize your current home with budget-friendly projects & products that will help you use every inch of space.

Dewalt Utility Knives Dwht10046 64 1000
DEWALT Retractable Utility Knife
$12.07Add to CartLearn More
Hdx Specialty Hammers N D16chd 64 1000
HDX 16 oz. Ash Handle Hammer
$5.98Add to CartLearn More
Husky Screwdriver Sets 70381h 64 1000
Husky 8-in-1 Precision Torx Screwdriver Set
$5.97Add to CartLearn More
Buildabathroombench Cover
Build A Bathroom Bench
$6.99Add to CartLearn More

The New Homeowner

Roll up your sleeves and get ready to transform your new house into the home of your dreams.

Stanley Tape Measures 33 425d 64 1000
Stanley 25 ft. PowerLock Tape Measure
$10.97Add to CartLearn More
Maximizedrawerspace Cover
Maximize Drawer Space
$6.99Add to CartLearn More
Dewalt Stud Finders Dw0100 64 1000
DEWALT 3/4 in. Stud Finder
$22.97Add to CartLearn More
Paint Kits Rs 808 64 1000
8-Piece Shed Resistant White Woven Paint Tray Kit
$14.97Add to CartLearn More

The Weekend Warrior

Discover quick & easy home improvements or upgrades you can accomplish in just one weekend or less!

Hdx Flooring Knee Pads Hdx2n1kp 64 1000
HDX 2-in-1 Work Knee Pad
$6.97Add to CartLearn More
Workbench Cover 1
Basic Workbench
$6.99Add to CartLearn More
Black Ridgid Modular Tool Storage Systems 221733 64 1000
RIDGID 22 in. Pro Tool Box, Black
$39.97Add to CartLearn More
Battery Charging Cover 1
Battery Charging Station
$6.99Add to CartLearn More

The Pro

Restock your workshop with hot new tools and find advanced-level projects you’d be proud to have under your tool belt.

Garage Cabinet Cover 1
Garage Cabinet Organizer
$6.99Add to CartLearn More
Dewalt Portable Table Saws Dwe7491rs 64 1000
DEWALT 15 Amp Corded 10 in. Job Site Table Saw with Rolling Stand
$599.00Add to CartLearn More
Woodleatherslingchair Cover
Wood & Leather Sling Chair
$6.99Add to CartLearn More
Makita Circular Saws 5008mga 64 1000
Makita 15 Amp 8-1/4 in. Magnesium Circular Saw
$239.00Add to CartLearn More


Article source here: DIY Toolbox

What Happens When Chip and Joanna Gaines Renovate a Castle

Fans of HGTV’s Fixer Upper know Chip and Joanna Gaines aren’t strangers to out-of-this-world renovations. But just when you thought there was nothing they hadn’t already done, they stepped up their game—and this time, they may have beaten every project they’ve ever done before. They just renovated a castle—specifically, the historic Cottonland Castle.

Situated near downtown Waco, Texas, the Cottonland Castle is the focal point of the couple’s new Magnolia Network limited series Fixer Upper: The Castle. While you can watch the reno as it unfolds on the show, here are some cool details about the castle and the project to know before you hit play on Discovery+ or catch it on cable.

What Is the Cottonland Castle?

Completed in 1913, the Cottonland Castle is such a landmark in Waco a nearby neighborhood was named Castle Heights. It comes with an intriguing and troubled history, according to Waco’s official website.

The first two owners abandoned the project before completion because of financial difficulties. A group of investors bought the property and hired Roy E. Land to transform it into a three-story castle, inspired by one in Germany along the Rhine River. The result? A white sandstone exterior with limestone accents and an interior featuring Italian marble and mahogany paneling from Honduras.

The Cottonland Castle passed through several more hands before public ownership via the Austin Avenue Methodist Church. For several years, much of the community enjoyed the castle through youth events and church gatherings.

Again, the building’s financial burden proved too much. In 1969 the church sold it to Jack Schwan for $50,000 (about $408,000 in today’s economy, per the U.S. Bureau of Labor Statistic’s inflation calculator). The Schwans repaired the home and secured a historical marker for the building before moving out in 1991. More owners came and went, and the renovations didn’t last because of the high costs of restoration for a historic home. After one group’s attempt to renovate the castle in 2014, Chip and Joanna Gaines eventually purchased it in 2019 with the intent of restoring it to its former glory.

The Cottonland Castle’s Features

The Cottonland Castle features 4,300 square feet of living space with four bedrooms, three-and-a-half bathrooms, eight fireplaces and a pool, per an Instagram Reel from the Magnolia Network . Its heavy front door with gothic details looks like something out of a fairy tale.

Photos of the interior reveal crown molding, detailed fireplace mantles, ornate woodwork, old wallpaper and wood flooring. In the winter 2019 edition of the Magnolia Journal, photos of the castle pre-reno also give a glimpse of the fireplaces as well as the bright, latticed windows throughout.

What Will the Renovation Look Like?

Chip Gaines was all for restoring the castle from the moment he first saw it nearly two decades ago, but Joanna admits she was hesitant to say “yes” to such a daunting renovation project. And with good reason—there are many things to consider before restoring a historic home. Chip put in offers on the house for years and waited, watching other owners do little to bring the castle back to life.

The Magnolia Network Instagram account shared some insight into the couple’s vision. As with many of their projects, their goal was to blend “the past and present, beauty and functionality, [and] sophistication and charm into the design.” In the preview for Magnolia Network’s Fixer Upper: The Castle, which premiered on Oct. 14, you can see some of the incredible details the Gaineses put into the Cottonland Castle, including marble tiles and antique portraits. They clearly know what’s worth restoring in a historic home. But all their hard work hasn’t come without frustration. In the limited series trailer, Joanna notes how hard it was to find 100-year-old stone to match the facade—one of the downsides of renovating an old home.

The Magnolia Network releases a new episode each Friday night at 9 p.m. EST. The couple hasn’t revealed many clips or pictures of the completed project, so you’ll need to tune in to see the entire reno unfold.

How to Visit It

After the Gaines’s completed their renovation, they opened the Cottonland Castle to public tours from late July to late October. Unfortunately, tickets are no longer available. If you’d like to tour the castle in person, keep an eye out for updates on the Magnolia website or the Gaineses’ social media accounts.


Article source here: What Happens When Chip and Joanna Gaines Renovate a Castle

Wednesday, October 26, 2022

Everything You Need To Know About Lathes

Before I used a lathe for woodturning, I always looked at the machine and process with a sense of wonder. Watching a woodturner at a craft fair, with a part spinning at full speed and chips flying, filled me with a sense of romance.

When I finally used one, I was not disappointed. My first pieces weren’t works of art. But they were perfectly round, and this little tase of lathe work whetted my appetite for more.

What is a Lathe?

Similar to a potter’s wheel in ceramics, the lathe spins a wooden part on a central axis, creating cylindrical objects. And like a potter’s wheel, it’s an ancient tool; turned wooden parts trace back to the sixth century B.C.

Sharp chisels supported by the lathe tool rest are integral to the operation of a lathe. No machine can create bowls or spindles like a lathe.

How Does A Lathe Work?

A lathe usually sits on a bench, legs or heavy column, with the spinning axis horizontal. A wooden blank is mounted to the motor end, or headstock.

While the part spins, turning tools, also called chisels, sit on the tool rest. They’re gently pushed into the spinning workpiece, carving the wood into shape.

The distance between the headstock and tailstock determines how long a part can be turned, while the distance between the center of the axis to the bed determines how large in diameter a part can be turned.

Short pieces, like bowls or platters, are mounted firmly to a plate that screws to the headstock. Slender pieces more than 10 or 12 inches long, like chair or stair spindles, are generally supported on each end. One is mounted to the headstock, and the other to the tail stock.

Types of Lathes

Lathes are typically categorized by size depending on the kind of turning desired. Small, intricate parts are turned with smaller lathe chisels. Large parts need tools with long handles to manage the greater forces generated by larger, heavier work pieces. Smaller lathes also come with accessories suited to that size of work.

Mini-Lathe

Rikon Power Tools Mini Lathe Ecomm Amazon.com

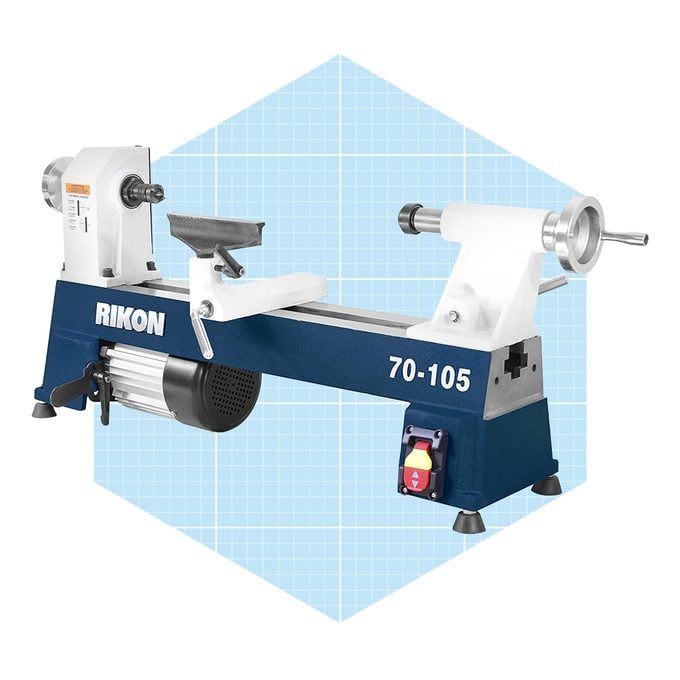
The mini-lathe is ideal for turning objects like pens and chopsticks in the quiet of one’s basement.

The Rikon Mini-Lathe offers five speeds and can turn a part up to 18-in. long and 7-in.-dia. Small motors (about 1/2-horsepower) can be plugged into a conventional residential outlet. Though cast iron, this mini-lathe weighs less than 75 pounds and can be installed relatively easily.

Midi-Lathe

Grizzly Variable Speed Benchtop Wood Lathe Ecomm Grizzly.com

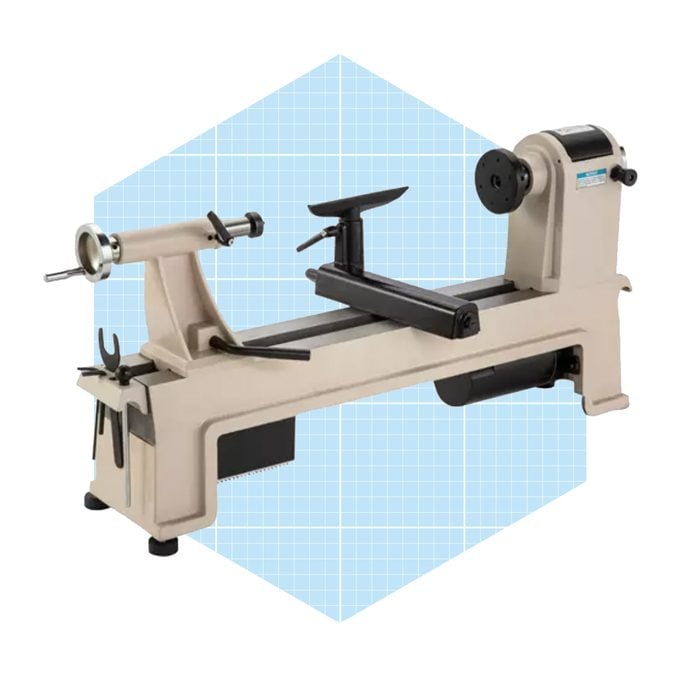
Larger and more powerful, the midi-lathe can sit on a bench or legs. The Grizzly Variable Speed Bench-Top Wood Lathe can turn a part 20-in. long and 14-in.-dia. These larger parts require a more powerful motor and heavier, more robust frame to absorb the vibration.

While these don’t require any additional skill to operate than larger lathes, greater forces demand lathe tools with longer handles. Lathes of this scale still generally can be plugged into a surge-protected residential outlet.

Full-size lathe

Shop Fox W1758 Wood Lathe With Cast Iron Legs And Digital Readout Ecomm Amazon.com

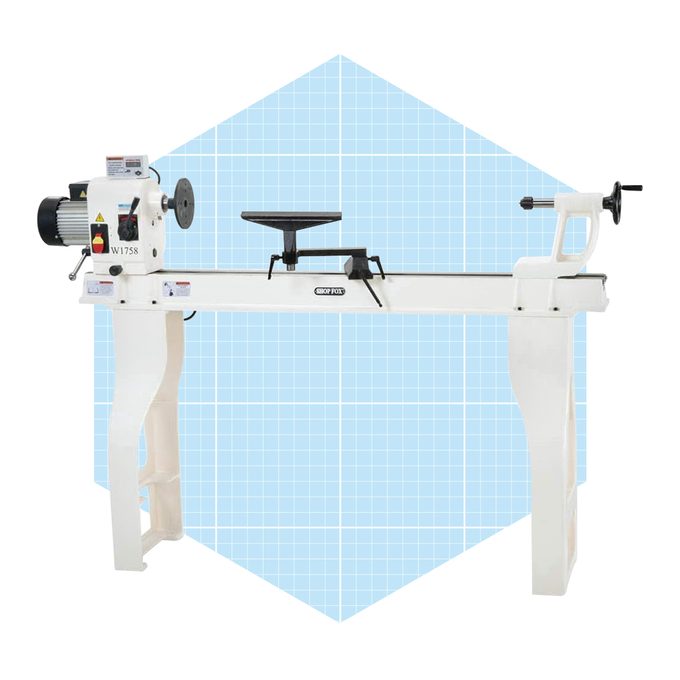
These can turn just about anything, spinning parts two feet and longer and 18 inches or more in diameter. These excel at turning furniture-sized pieces like chair legs and the like.

Lathes like the Shop Fox Wood Lathe come with cast iron legs and weigh more than 330 pounds, providing mass to counteract the greater spinning weight of larger blanks. While this machine can turn a part up to 46 inches long, bed extensions allow turning items like solid bed posts.

The distance between the center of the motor and the bed limits bowl turning, so some heads swivel to make room. A separate tool rest is necessary for this type of work.

What To Consider When Buying A Lathe

What type of work do you want to make? In this case, larger isn’t necessarily better. Each type allows one to engage in turning, just at a different scale. Some considerations:

Cost

Mini- and midi-lathes are much less expensive and are great for small projects like bottle stops or drawer pulls. Full-size, fully outfitted lathes can quickly top $5,000, whereas smaller lathes run around $500.

Size

Smaller machines are easier to install, and each part weighs much less! If you’re only making small objects or pens and working out of your basement, the mini- or midi-lathe is a great option.

Power

Most mini- and midi-lathes plug into a house outlet, but many full-size machines with larger motors require increased amperage. Consult with an electrician for your specific needs.

Lathe Maintenance and Repair

Lathes are among the simplest tools. Most modern motors require little maintenance, and the lathe motor is no exception. Because the lathe bed is rarely painted, it’s prone to rust development and should be regularly cleaned and waxed. If rust accumulates over time, the bed can become pitted.

Everything Else You Need To Know

Full-size machines need more tools

Woodcraft Woodshop African Wood Pen Blank Assortment Ecomm Woodcraft.com

Larger machines utilize larger workpieces, so you’ll need a chainsaw, bandsaw or other tools. Logs must be turned into parts before mounting on a lathe. Small machines, on the other hand, can use parts sold a small lathe, like 32 Pieces of African Hardwood for pens.

Keep your tools sharp

Woodturning Carbide Lathe Tools Ecomm Amazon.com

Dull tools are dangerous and inaccurate. No matter the size or scale of your work, you’ll need a way to maintain sharp tools.

Traditionalists use a grinder, but you also can buy lathe tools with replaceable carbide tips. This set of three full size tools with replaceable tips is a bargain.

Protect yourself

Lathes are quiet so you can skip the hearing protection. But eyewear is a must, and wearing a dust mask or respirator is recommended. Keep your hair tied up and sleeves rolled up; the spinning parts can grab loose fabric and pull it into the machine.


Article source here: Everything You Need To Know About Lathes

How To Winterize Strawberry Plants

I love walking over to my strawberry bed in early summer to pick ripe berries to snack on. Then on the coldest days of winter, I dream about how good those homegrown strawberries are. I also think about how glad I am that I took the time to winterize my strawberry bed so there’ll be more berries next summer.

Why Winterize Strawberry Plants

Strawberries are generally considered hardy enough to grow in U.S. Department of Agriculture Plant Hardiness Zones 4 through 8. But the crown of the strawberry plant can die if temperatures dip below 20 degrees and they haven’t been protected. If you live where it’s that cold, take extra steps to winterize your strawberries.

Another reason to winterize strawberries: Alternate periods of freezing and thawing can cause strawberry plant roots to heave out of the ground and dry out.

When To Winterize Strawberry Plants

There’s no need to rush to do this before late fall. Give your strawberry plants a chance to acclimate to the cold weather. They’ll stop growing and be fine even as temperatures dip below freezing.

We don’t take the final steps of preparing strawberry plants for winter until November for the coldest zones and into December for USDA Zone 6.

Tools and Materials for Winterizing Strawberry Plants

If you live in colder USDA zones, you’ll need to mulch or cover your strawberry plants with something. A four- to six-inch layer of clean straw works well.

When purchasing locally, make sure it’s straw and not hay. Hay contains lot of weed seeds. Also be sure the straw wasn’t treated with a herbicide. Residue from the herbicide might damage your strawberries.

Other options for mulching strawberries include pine needles or any coarsely chopped plant material that doesn’t mat down when wet or have weed seeds.

How To Winterize Strawberries

Follow these steps to protect your strawberry plants.

Strawberry plants in the ground

To winterize your strawberry plants in the ground:

  • Weed the bed before the ground freezes.
  • If your fall is dry, continue to water until plants go dormant, especially if it’s a new bed.
  • If you live where temperatures dip below 20 degrees, or where conditions alternate between freezing and thawing, cover your strawberries with a four- to six-inch layer of straw once the ground starts to freeze and plants go dormant.

In spring, once strawberry plants begin to grow again, remove the straw. You can leave some straw on the ground around the plants, which keeps fruit off the bare ground. Stash the remaining straw nearby. If the plants begin to flower and frost is predicted, cover the plants again with the same straw.

Strawberry plants in pots

Overwintering strawberry plants in pots can be challenging. At around the same time you’d winterize the plants in the ground, move your pots to an unheated garage or outbuilding where they can be kept cold enough to stop growing. Check the soil occasionally and water sparingly to keep it moist but not wet.

Another option: Bury the container in the garden, leaving the top exposed, then cover it with straw.

If your plants don’t grow back in the spring, pull them out, replace some of the potting soil and start over with new plants.


Article source here: How To Winterize Strawberry Plants

How To Winterize Hydrangeas

I confess, I don’t do much to prepare my hydrangeas for winter.

Most bloom on new wood, which means flower buds form in the spring and don’t need to overwinter. Or they’re the re-blooming types of hydrangeas, which form flower buds on old and new wood. That means if flower buds are killed off over the winter, ones form on the new wood. So I’ll still get some blooms, just later in the year.

I don’t even prune my hydrangeas in the fall. But if your hydrangeas depend on overwintering, you might need to do a little more work to prepare them for the coldest season.

Can Hydrangeas Survive Frost?

Yes. Some varieties are hardy only to U.S. Department of Agriculture Plant Hardiness Zone 6, while many others can survive the colder winters of Zone 4. Even a potted, blooming hydrangea from a florist can survive outside with proper care.

Most of these florist-grown types are big-leaf hydrangeas, Hydrangea macrophylla. They can be hardened off by gradually exposing them to outside conditions in the spring or early summer, then planted in the garden. They’re generally hardy enough to grow in USDA Zones 6 through 8. I’d even try growing them in USDA Zones 4 and 5 with some winter protection.

Why Winterize Hydrangeas?

Most garden hydrangeas don’t need much extra attention before winter. Most don’t even need to be pruned in the fall because their flower buds form in the spring.

The exception to this is Hydrangea macrophylla. Depending on the type of flowers produced, these are commonly called mophead or lacetop hydrangeas. They form flower buds in late summer and may need winter protection to ensure they flower the following year.

When To Winterize Hydrangeas

In USDA Zones 5 and colder, begin winterizing big leaf hydrangeas once temperatures turn consistently cold. Depending on where you live, this could be as late as the end of November.

Tools and Materials for Winterizing Hydrangeas

If you need to protect your big leaf hydrangeas from cold winters, you can easily do it with a few basic supplies:

How To Winterize Hydrangeas

For all hydrangeas, make sure they’re well-watered through the fall. If you don’t get adequate rain, you may need to water your hydrangeas, especially if you planted them in the last year.

Make sure to cover the ground around them with two to three inches of mulch. This helps to moderate soil temperature and prevent freezing and thawing, which can expose roots and cause them to dry out.

How to Winterize Hydrangeas Grown in Containers

Hydrangeas grown in winter-proof containers can be overwintered in place if the containers are too large to move. Add mulch and make sure the soil hasn’t completely dried out before the ground freezes. If the soil is dry, water lightly.

If you can safely do so, move the containers to a more sheltered location to protect them from strong winds but still get some sun and moisture.


Article source here: How To Winterize Hydrangeas

Best Hand Planers of 2022

Tanley Hand Planer, Contractor Grade Ecomm Amazon.com

Best All Purpose Planer

The block plane is a handy tool for breaking and chamfering board edges, straightening studs, removing milling marks and fine-tuning wooden drawer slides.

The heavy-duty Stanley Six-Inch Low Angle Block Plane is accurate and dependable. Featuring a 21-degree bed angle, it’s ideal on a variety of construction materials and trimwork. Its cast-iron base, machined side and bottom and hardened steel blade ensure accurate cuts every time. Dialing it in perfectly takes time, but the effort will be quickly rewarded.

Type: Block.
Length: Six inches.
Bevel: Up.
Cutting iron width: 1.375-inches.

Pros

  • Inexpensive;
  • Durable;
  • Great entry level plane.

Cons

  • Takes time to dial in;
  • Performs best in softwoods.

Buy Now


Article source here: Best Hand Planers of 2022

6 Genius Uses for Mouthwash Around the House

Mouthwash is one of the most versatile yet underrated household items. From cleaning your home to freshening up laundry, there are plenty of uses for mouthwash beyond the typical mouth rinse routine. According to the Smithsonian Natural Museum of American History, Listerine mouthwash was originally branded as a surgical antiseptic, deodorant and dandruff solution. From day one, we knew mouthwash could be used for so much more.

It’s time we tap into this product’s fullest potential, including these genius uses for mouthwash around the house.

Unexpected Ways to Use Mouthwash

1. Freshen Up Your Laundry

After spending a hot day outside doing yard work, add mouthwash into your washing machine with your soiled clothes for fresher, better-smelling laundry. Between a half cup and a full cup should do the trick depending on how many items you’re washing.

When you remove your clothes, they’ll smell fresh with no lingering musty odor. For best results, be sure to use a nearly color-free mouthwash that’s alcohol-based.

2. Alleviate Poison Ivy-Induced Itchiness

If you recently encountered poison ivy and need a quick fix to reduce itchiness, apply mouthwash to the irritated area to promote faster healing. It dries out the area and reduces inflammation. Best of all, you probably already have some on hand.

3. Clean Your Toilet

There’s nothing better than an homemade cleaner with ingredients you likely already have in your cabinet. Simply add a cup of mouthwash into your toilet and let it sit for 30 minutes. Then quickly give it a scrub with your toilet brush and flush for sparkling clean results.

4. Give Your Flowers a Boost

If you love fresh-cut flowers around your home but dislike how quickly they fade, mouthwash can keep them looking beautiful longer. This is a terrific little-known use for mouthwash; it slows decomposition and controls the bacteria. The ratio is simple: One cap of mouthwash per quart of water.

5. Treat Fungal Infections

If you’ve ever wondered, “Can mouthwash be used as an antiseptic?” you’ll be thrilled to learn the answer is a resounding yes. Because it features alcohol and additional antiseptic ingredients, it can effectively treat fungal infections.

Soak a cotton ball in equal parts mouthwash and white vinegar, then blot the area. Repeat two to three times daily. Pro tip: If you don’t have bacitracin, dab mouthwash on blisters or cuts for cleanliness.

6. Make a Homemade Mosquito Repellent

You might be surprised to learn that mouthwash and beer will ward off insects. To keep bugs at bag around your yard, combine a bottle of mouthwash with three cups of Epson salt and three 12-ounce bottles of beer. Mix until the Epson salt has dissolved and transfer to a spray bottle. Spray around the yard and you will can say bye-bye to insects for 2-3 months.


Article source here: 6 Genius Uses for Mouthwash Around the House

How to Make a DIY Indoor Herb Garden

Cut all pieces of wood Cut the wood for the base (A), sides (B), top cap (C), front and back top faces (D) and pot supports (E). All the co...