
Replace a Hard-wired Smoke Detector
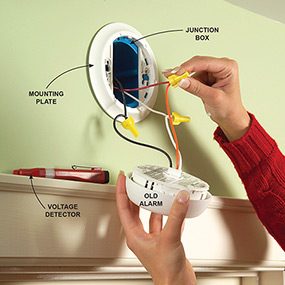
Photo 1: Disconnect the old hard-wired smoke alarm
Turn the power off. Remove the alarm and use a non-contact voltage detector to check the wires to make sure the power is off. Disconnect the wires and unscrew the mounting plate from the junction box. 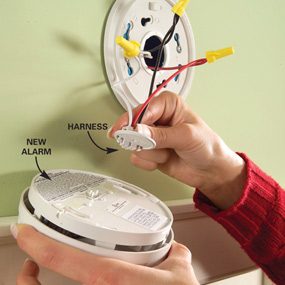
Photo 2: Connect the new wired smoke alarm
Screw the new mounting plate to the junction box and connect the wires. Plug the harness into the new alarm, stuff the wires into the box, and mount the alarm on the plate.
If the smoke alarms in your house are at least 10 years old, it’s time to replace them. To get started, remove each alarm from its mounting plate. Most alarms have arrows that tell you which way to rotate the alarm for removal. You may have to use both hands and twist hard. Learn more tips on smoke detectors.
If you find that your alarms are connected to wires, don’t be intimidated. Replacing a hard-wired smoke detector is almost as easy as replacing a battery-powered version. New alarms are inexpensive. If your old alarms are connected to three wires as shown here, that means the alarms are interconnected — when one alarm detects smoke, they all howl. To ensure that your new alarms will work together, buy alarms of a single brand and model and replace them all at the same time. You’ll also need a non-contact voltage detector (Photo 1) and a wire stripper.
Turn off the power at the main electrical panel and disconnect the old alarm (Photo 1). Check to make sure the power is off with your voltage tester. If the wires aren’t connected as shown here (with each wire connected to another of the same color), make a simple sketch so you can connect the new alarm the same way. Your old alarm may be connected to two wires instead of three. Your new alarm will have a third “interconnect” wire (usually red or orange), but leave it unconnected if the old alarm had just two connections. Check the manufacturer’s instructions for other details. Write “replace in 2031” (or whenever it’s 10 years old) on the alarm’s back or mounting plate. Turn the power back on and push the alarm’s test button. If you connected three wires to each alarm, they should all sound at the same time.
Make a Tight Connection Between Stranded and Solid Wire
To install hard-wired smoke detectors, light fixtures, or dimmer switches, you usually have to connect solid wire to “stranded” wire, which is actually a bundle of tiny wires. Often, the wire connector doesn’t grab the stranded wire but just pushes it down, creating a poor connection. Here’s how to make a reliable connection: Strip off extra insulation so the exposed stranded wire is about 1/8 inch longer than the exposed solid wire. Then twist the strands together and screw the connector onto both wires.
Required Tools for this Project
Have the necessary tools for this hard-wired smoke detector DIY project lined up before you start — you’ll save time and frustration. [project-tools]
Required Materials for this Project
Avoid last-minute shopping trips for a hard-wired smoke detector by having all your materials ready ahead of time. Here’s a list. [project-materials]
Article source here: Install New Hard-Wired or Battery-Powered Smoke Alarms

No comments:
Post a Comment