
How to Drain a Water Heater Step 1: Learn all about sediment
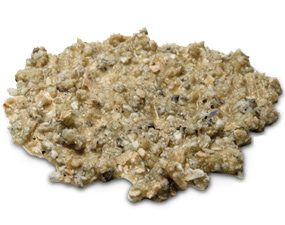
Yuck!
This is what the sediment in your water heater looks like.
Sediment Buildup Signs
One sign of excessive sediment buildup is a popping or rumbling sound coming from your water heater. That’s the sound of steam bubbles percolating up through the muck. On a gas water heater, the sediment creates hot spots that can damage the tank and cause premature failure. On an electric water heater, sediment buildup can cause the lower heating element to fail. So learning how to drain a water heater and flushing offers a payback in lower energy bills and extended heater life.
However, if you’ve never flushed your water heater, or haven’t done it in years, you could be in for a nasty surprise. As soon as you open the drain valve, the sediment will likely clog it and prevent you from closing the valve all the way after it’s drained. Then you’ll have sediment buildup and a leaking water heater. We’ll show you the best way for how to drain a hot water heater and the sediment out of even the most neglected heater and save a $200 service call. You’ll need about $40 in plumbing parts from a home center, a garden hose, a wet vacuum, pliers and a pipe wrench to able to do this how to drain a water heater project. Read on to learn how to drain a water heater.
Step 2: Buy the parts
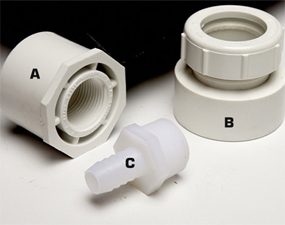
Build a shop vacuum adapter
Glue a 1-1/2-in. PVC x 3/4-in. FIP adapter (A) onto a female PVC trap adapter (B). This allows you to attach your vacuum to 3/4-in. pipe. The barbed fitting (C) connects to 1/2-in. I.D. vinyl tubing.
Not only will an old drain clog up, but you won’t be able to suck debris through its small opening. The key is to build a new drain valve with a 3/4-in. full-port brass ball valve with threaded ends, a 3-in. x 3/4-in. galvanized nipple, and a 3/4-in. MIP x G.H. garden hose adapter (one choice is the BrassCraft/Plumbshop No. HU22-12-12TP).
Then build a shop vacuum adapter. If your shop vacuum has a 2-1/2-in. hose, buy a converter to reduce it to 1-1/4-in. (the Shop Vac No. 9068500 is one option). Then assemble a vacuum hose-to-plumbing adapter with a 1-1/4-in. x 1-1/2-in. female PVC trap adapter, a 3/4-in. MIP x 1/2-in. barb fitting, a second 3/4-in. x 3-in. nipple and a 24-in. piece of 1/2-in. I.D. vinyl tubing.
Step 3: Drain Water Heater Liquid

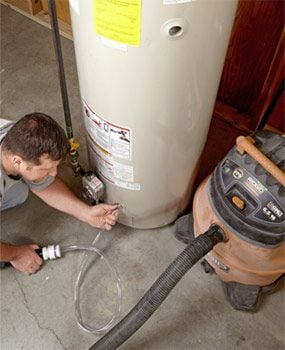
Apply suction
Remove the temperature pressure release valve and screw in the vacuum adapter. Attach the shop vacuum hose and fire up the vacuum.
Shut off the gas or electricity to the water heater and open a hot water faucet and let it run full blast for about 10 minutes to reduce the water temperature in the tank. Then shut off the cold water valve at the top of the tank and attach a garden hose to the existing drain valve and route it to a floor drain. (Use a kitchen colander to catch the sediment so it doesn’t clog the floor drain.) Then open a hot water faucet on an upper floor and the water heater drain valve. Let the tank drain until sediment clogs the valve and reduces the flow. Then close the upstairs hot water faucet and water heater drain valve.
Next, you’ll remove the clogged drain valve and swap in the new full-port valve. But first, remove the blow-off tube and the temperature pressure release (TPR) valve and apply suction to the tank so you won’t get soaked when you yank the old drain valve.
Step 4: Replace the old drain valve with a full-port brass ball valve

Photo 1: Remove the valve
Remove the old valve. If it breaks off, saw the broken portion with a hacksaw blade until you hit metal threads. Then use a hammer and screwdriver to chip out the pieces.
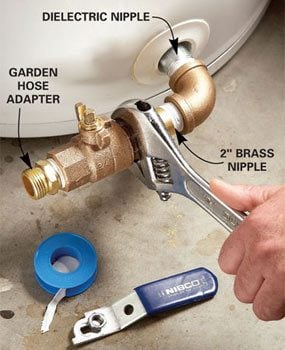
Photo 2: Assemble the new valve
Remove the handle from the ball valve so you can assemble all the 3/4-in. fittings.

Install the new valve
Unscrew the old drain valve and install the full-port valve (closed position). Attach one end of the garden hose to the valve and run the other end into a colander and on to the floor drain.
Unfortunately, most water heaters come with crummy drain valves. And once you open them to begin this how to drain a hot water heater project to drain the sediment, the debris clogs the valve, keeping it from sealing. But you can replace the crummy factory drain valve with a full-port ball valve.
While applying suction through the TPR port with a shop vacuum, unscrew and remove the valve by turning the plastic nut behind the knob. If the valve breaks, don’t panic. Saw the broken portion with a hacksaw blade until you hit metal threads. Then use a hammer and screwdriver to chip out the pieces.
CAUTION!
Remove the ball valve handle after you flush the water heater, especially if the water heater is located where people could walk by it and accidentally bump the handle. The valve could open and release scalding water, causing serious burns. (Twist-tie the handle to the valve so you don’t lose it.)
Step 5: Finish by removing the remaining sediment
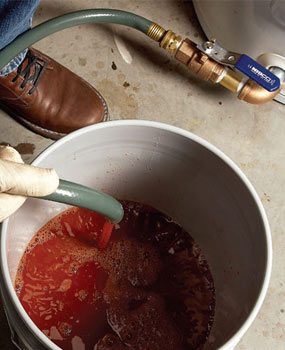
Flush the tank
Open the new ball valve and flush the sediment into a bucket. Let the water flow until it runs clear
Suck out the sediment
Remove the full-port valve and suck out the remaining sediment with your shop vacuum adapter and 1/2-inch vinyl tubing.
Remove the vacuum hose from the TPR port and flush the tank. Most of the sediment will flush out through the full-port valve. To remove the rest, open the cold water valve at the top of the tank in short bursts to blast it toward the drain. If you still can’t get the last bit out, try vacuuming it using the 1/2-inch vinyl tubing and barbed fitting to finish this how to drain a hot water heater project.
When you’re done, close the ball valve and leave it in place. But remove the lever handle to prevent accidental opening. Then reinstall the TPR valve and blow-off tube. Refill the water heater and turn on the gas or electricity, and you’ll be back in hot water without all the noise after completing this how to drain a hot water heater project.
Required Tools for this how to drain a water heater Project
Have the necessary tools for this how to drain a hot water heater DIY project lined up before you start—you’ll save time and frustration.
- 4-in-1 screwdriver
- Adjustable wrench
- Bucket
- Hacksaw
- Hammer
- Knee pads
- Plumbers tape
- Rags
- Shop vacuum
- Slip joint pliers
Required Materials for this how to drain a water heater Project
Avoid last-minute shopping trips by having all your materials ready ahead of time. Here’s a list.
- 1-1/4-in. x 1-1/2-in. female PVC trap adapter
- 2" brass nipple
- 24-in. piece of 1/2-in. I.D. vinyl tubing
- 3/4-in. MIP x 1/2-in. barb fitting
- 3/4-in. x 3-in. nipple
- Brass ball valve
- Brass elbow
- Dielectric nipple
- Garden hose adapter
- Shop vacuum hose adapter
Article source here: How to Flush a Water Heater
No comments:
Post a Comment