

For many homeowners, a stone and masonry pizza oven is the pride and joy of a fabulous outdoor dining and entertainment area. An outdoor pizza oven clad in brick and natural stone has a sturdy, authentic feel to it, and can be designed to look rustic or modern. Like a barbecue grill or an outdoor kitchen, a permanently installed outdoor pizza oven can be a year-round gathering place for friends and family.
If you pay a skilled stonemason to build a stone and masonry oven, you’ll likely wind up with a beautiful finished product. But it could cost tens of thousands of dollars, depending on where you live and how elaborate the design. Building a DIY stone and brick oven is a challenging, incredibly rewarding job, but one we recommend only if you’ve got advanced masonry skills.
Here are some of the major steps, materials and tools required for a DIY outdoor pizza oven.
DIY Outdoor Pizza Oven Tools and Materials
The tools you’ll need will depend on the design and the materials you choose to work with. But these basic hand and power tools will be necessary for any DIY pizza oven.
- Heavy-duty buckets for mixing mortar;
- Mixer drill with a paddle attachment for mixing mortar;
- Handheld circular saw with brick- and stone-cutting blades;
- Stonemason’s hammer and chisel;
- Masonry trowels (triangular and square-end);
- Wire brush;
- Vent piping and cap (if not included with insert kit).
Depending on your build, materials you’ll need are likely to include:
- Mortar/concrete;
- Refractory mortar (or fireclay mortar additive);
- Firebricks;
- Bricks;
- Natural stone;
- Concrete blocks;
- Vermiculite (insulation);
- Roof underlayment;
- Roofing sealant;
- Rebar mesh (for pouring a concrete slab).
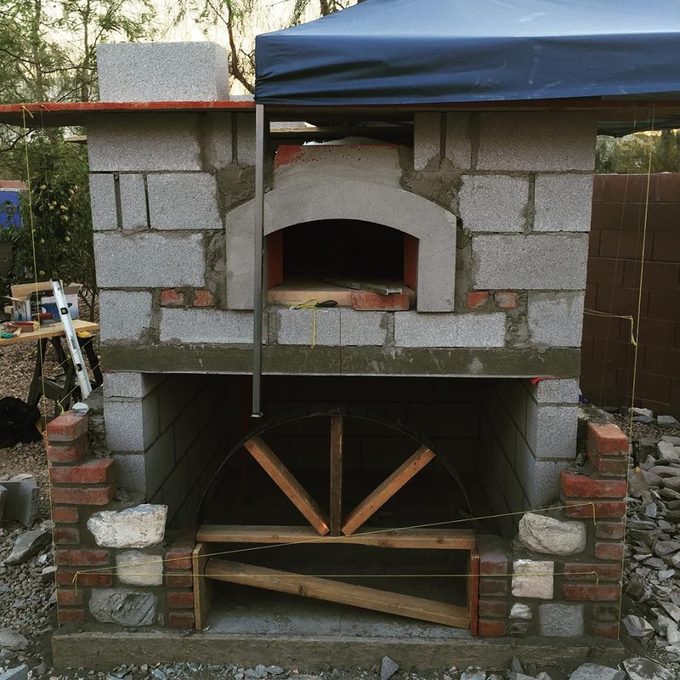
Pro tip: If your design has an arch, you’ll need to construct an arch-shaped support, which you’ll remove when the arch is built and the mortar is set. The support can be wood and plywood, particleboard or hardboard. Or you can get a welder or blacksmith to make you a metal one.
Build the Pizza Oven Base
Whether you buy a ready-made pizza oven insert or build your own dome (see below), your pizza oven needs a solid, level base.
- Built it on a sturdy surface that will not shift or settle. A concrete slab reinforced with rebar mesh is the safest option.
- Because the base must support a few thousand pounds of brick, stone and mortar, concrete block is preferred.
- If you buy an insert, the manufacturer usually includes specs for how tall and wide your base needs to be. If you’re building everything on your own, draw out a design that considers the overall height of the base as well as the oven door placement. Decide on a height that’s comfortable for those using the oven the most.
Pro tip: Design your concrete base in a U shape, and use the space under the oven for wood storage.
Choose a Pizza Oven Insert or Build a Dome
Traditional pizza ovens are dome-, igloo- or airplane hangar-shaped forms heated by wood fire. They’re capable of reaching and maintaining the extremely high temperatures needed to quickly cook thin, crispy Neapolitan-style pizzas. For your DIY pizza oven, you can buy a ready-made insert or build your own. The option you choose depends on your budget and your DIY chops.
Here are some choices to consider:
Ready-made inserts. A ready-made insert takes the guesswork out of building an airtight dome that won’t lose heat. Masonry pizza oven kits usually come with detailed instructions for constructing a base and installing the oven, and often include a materials list. The downside? They’re expensive. Even the smallest pizza oven insert adds more than $2,000 to your budget.
Build with a “dummy” insert. There’s a reason it takes years for stonemasons to learn to build flawless arches and vaults — it’s hard to do! One shortcut is to buy a ready-made “dummy” form, around which you build your oven vault with firebricks and refractory mortar. When the mortar is set, just slide out the styrofoam form and behold your masonry vault.
Build a sand base. Assuming you’re not a veteran stonemason, here’s another trick for building a uniformly shaped dome: Create a sand base first. On top of the brick oven floor that you’ve already set with mortar, build a dome using mason’s sand (like that used with pavers), which you may need to dampen occasionally to help it keep its shape. Then use firebricks and refractory mortar to form the masonry dome around your sand mold. When the masonry is set, dig the sand out of the now-solid dome.
DIY Pizza Oven Stone and Brick Work
Now the fun starts. Your pizza oven’s facade is entirely up to your imagination and masonry skills.
Many DIYers are content to cover their oven dome with refractory cement and stucco and leave it at that. But you can get more creative and build a flat, domed or gabled roof on top of your oven.
Face the oven with brick or a combination of brick and stone, using an interplay of the two materials to create an Old World look. If you’ve designed a large enough base, consider adding a hand-built barbecue grill next to the oven.
Some tips to keep in mind as you design your pizza oven facade:
- You only need refractory mortar and firebricks for the dome and floor of the oven. Elsewhere, you can use standard bricks and mortar.
- To create a “house” around your pizza oven dome, build it with concrete blocks, clad in brick and stone.
- Don’t forget the chimney! Leave space for the chimney and be sure to attach and seal it before you start the masonry on that section.
- If your roof design creates a space between the oven dome and facade, fill it with lightweight, nonflammable vermiculite, which you’ll find in the garden section of home improvement centers. For a flat-roof design, you can cover the vermiculite with butcher paper before pouring on concrete for the roof.
Article source here: How to Build an Outdoor Pizza Oven
Article source here:
No comments:
Post a Comment