
I’m not a big fan of mowing the lawn. The sweat streaming down your brow, salty droplets stinging your eyes as you push your lawn mower up the hill…nah. Not for me.
I know I could get a riding lawn mower and make it easier on myself. But they’re expensive. And I’d be hard-pressed to find space for one among all the bikes, wagons, strollers, balls and everything else crowding my garage. There had to be an easier way.
I first became familiar with robotic lawn mowers on a pre-dawn run, when the approaching light of my neighbor’s self-propelled cutter startled me. I thought it was the start of War of the Worlds. Movie references aside, a robotic lawn mower seemed like a good idea to make short work of my weekly lawn mowing chore — or eliminate it altogether.
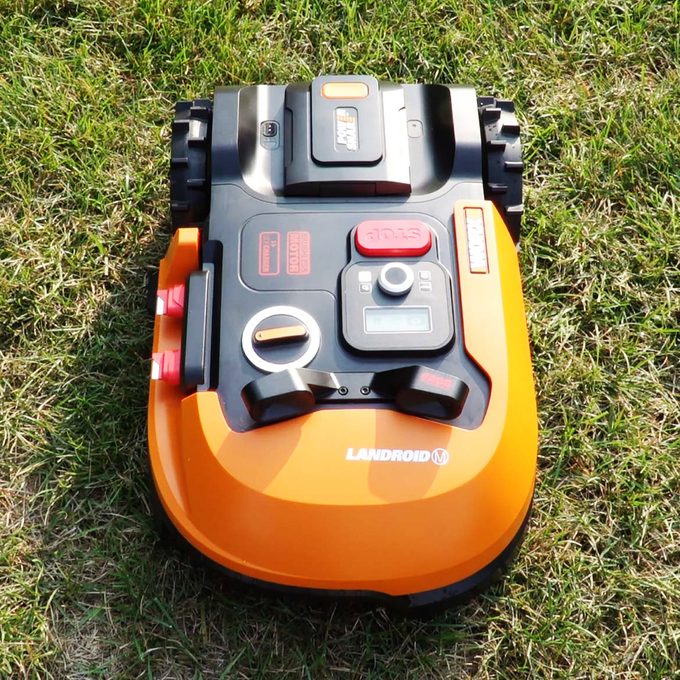
What is the Worx Landroid?
Robot lawn mowers work much like robot vacuums, such as the popular Roomba model, with a slight difference. Robot vacs are confined within the walls of your home or by a short laser barrier. Robot mowers run inside a boundary wire that encircles your yard, creating an invisible barrier keeping it inside. A fence that fully encloses your yard serves the same purpose.
For my yard, I opted for the Landroid model WR147.
How We Tested
Charging base installation
The first step is choosing a spot for the Landroid’s charging base. It can’t be more than 32 feet from a receptacle (preferably a GFCI) for the power supply to reach the base. The base must be on a flat surface, with 31 inches behind it and 12 inches in front.
The charging base secures to the ground with long plastic screws that drive into the grass with an included hex/Allen key. I found a nice spot to the side of my deck, tucked out of the way.
Because I have an irrigation system, I opted for the add-on peripheral Landroid Garage. It keeps the mower and its battery out of the direct sunlight and protects it from rainfall and water.
Setting up the boundary wire
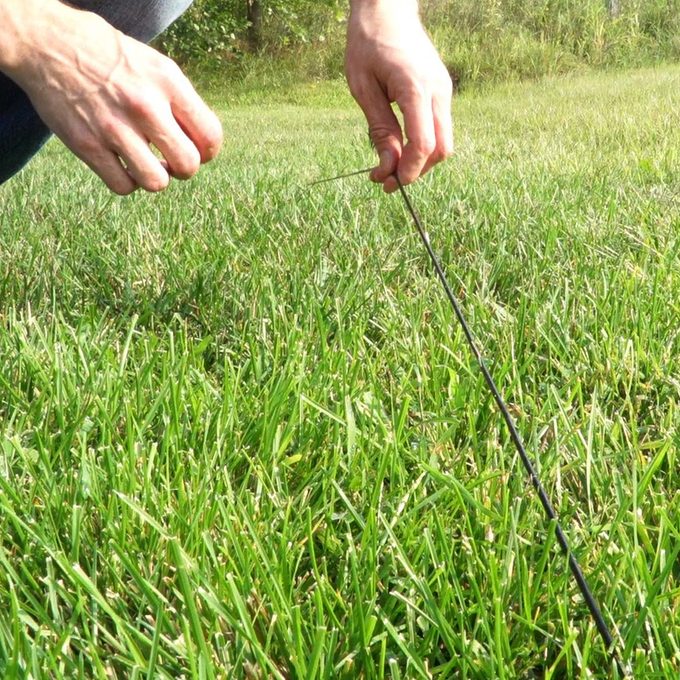
This part took the most time. I encircled the perimeter of my yard, staking the boundary wire to the ground with the included wire pegs. The 590-foot spool was more than enough for my medium-sized city lot. To test the Landroid, I kept the boundary to the backyard only.
The instructions say to place the wire pegs two to three feet apart, depending upon elevation. I found it necessary to place them closer to a foot apart to keep the wire pinned to the ground. The idea is that eventually the grass will grow over the wire, making it undetectable.
To keep the Landroid away from landscaping, the kit comes with a Boundary Wire Distance Gauge. If you’re bordering a driveway or somewhere where the Landroid’s wheels can ride across, you only need to keep the wire four inches away, as it drives along roughly halfway over the boundary wire. Keep the wire 10 inches from landscaping areas you don’t want it to drive on.
For off-limits areas like trees or landscaping in the middle of your yard, encircle the object with the boundary wire in a clockwise direction coming off the main border wire at a right angle. After making a complete, unbroken circle around your yard, connect back up to the charging base. The green lights mean you did everything correctly.
Because my yard has a playset, trampoline and kids’ climbing dome, I opted for the Landroid ACS, or Anti-Collision System. It attaches to the top of the Landroid and uses ultrasonic detection to avoid running into things. More on this later.
WiFi/app setup
Once you finish setting up the boundary wire and charging the Landroid, you’re ready to start mowing. You can run everything via the on-board controls, but I wanted the deeper level of control you get with the app.
Download the Landroid app through Google Play or the Apple App Store. Create an account the way you would with most products. Open the app and scan the QR code under the rear hood on the Landroid. This prompts the app setup where your phone connects the Landroid to your home WiFi. You can even create a custom name for your Landroid.
Connecting the Landroid with our home WiFi proved the most difficult part of the process. Here’s where things get a little technical. The Landroid, like most Internet of Things (IOT) devices, runs off the 2.4 ghz band of your wireless router. My mesh router broadcasts both 2.4 ghz and 5 ghz bands under the same SSID (wireless name), and I cannot separate them. On some routers, you can.
Because my phone automatically connects to whatever band has the best signal (favoring 5 ghz), I kept getting a setup failure. My phone also doesn’t let me choose between the two bands. To remedy the problem, I moved the Landroid further out into my yard. In this spot my phone would only pick up the 2.4 ghz band. Then I completed setup and was ready to go.
App configuration
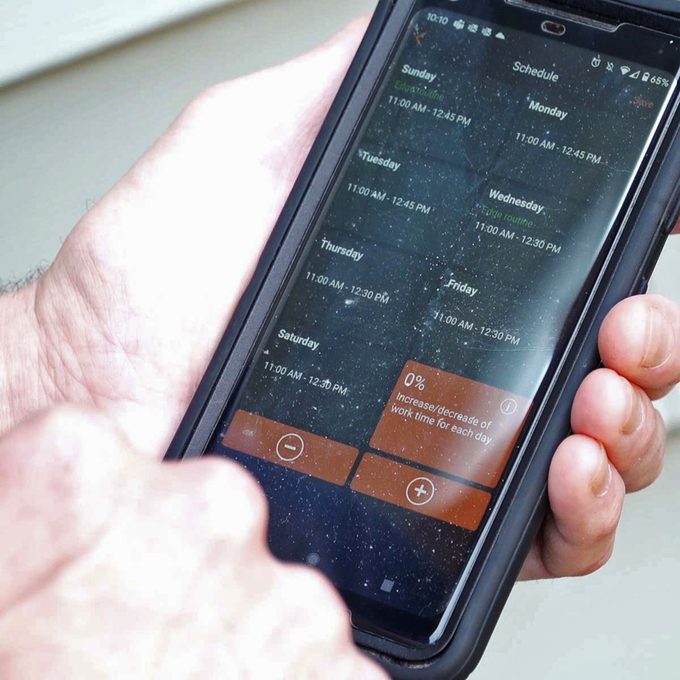
The app itself has a nice user interface that, like most apps, requires some getting used to. It calculates your mowing area using your phone’s camera.
The app drops augmented reality pins around the perimeter of your yard as you walk around, taking video. After calculating your mowing area and entering in your soil and grass varieties, the app creates a suggested mowing schedule and takes everything from there.
Smart home integration
Worx Landroid gets bonus points for including Alexa and Google Assistant integration. There’s nothing cooler than starting your lawn mower by saying, “Hey Google, start Landroid,” or whatever clever name you pick for it.
Final Verdict on Worx Landroid Robotic Lawnmower
After a few weeks of use, the Landroid created its own schedule and went off mowing for a short time twice every day. Initially, I liked not mowing my backyard. It’s a hassle moving around the trampoline and kids’ items to mow under them. But that’s also where the Landroid’s drawbacks manifested themselves.
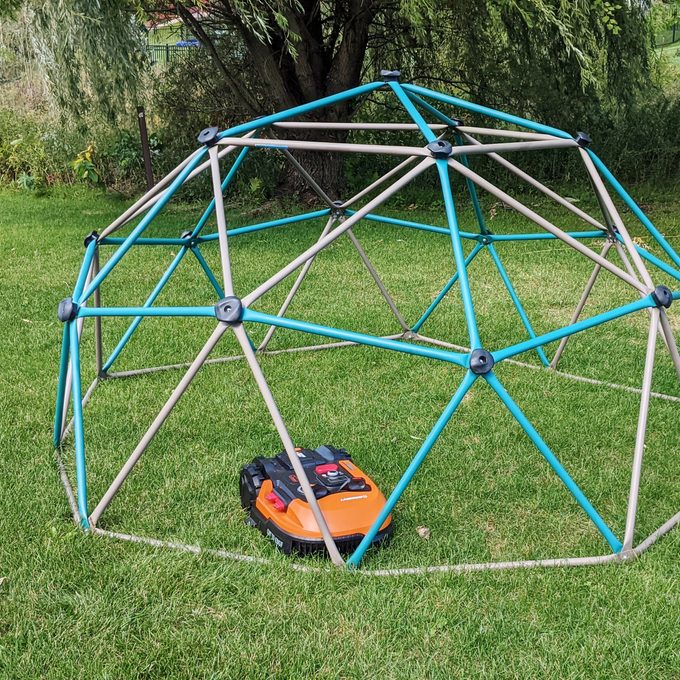
Nearly every time it went on its mowing schedule, I would get a “Landroid lifted,” or “Landroid stuck” notification on the app. It would drive up on the trampoline legs or get stuck under my kids’ climbing dome. When that happened, it would continue churning its wheels, digging spots in the yard before sending out the notification. Then I would have to go outside and pick it up and move it.
The Landroid ACS is supposed to remedy this problem by “seeing” those items and driving around them. And it did work — sometimes. If the Landroid was driving straight toward an object, it would register it and circle around. But in my case, there were just too many ways for it to get stuck.
This became an issue if we weren’t at home or I was in a meeting and couldn’t go out and move it before it dug a hole in the yard.
There’s also the way in which it mows. If you like a nice, tidy pattern of stripes across your lawn, you won’t get it with the Landroid. It moves haphazardly, bouncing around the yard without any sort of direction. It uses algorithms to calculate its trajectory, but the results aren’t nice and neat. It would occasionally miss spots too, but it mowed so often that it wasn’t really an issue.
In the end, I think I’ll try moving it to the front and side yard, where there aren’t any obstacles in the way.
Where to buy
You can get the Worx Landroid at most big box home improvement stores and online. The company’s products are also available on Amazon. There are a few models to choose from depending on the size of your yard and the add-ons you want.
Article source here: We Tried It: Worx Landroid Robotic Lawn Mower
No comments:
Post a Comment