Fix a TV remote
TV Remote Not Working? Here’s How to Fix It
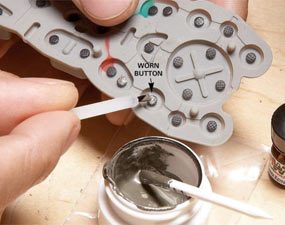
If one of the buttons on your TV remote doesn’t work, and you want to avoid the high cost of a replacement remote, fix it yourself. Most remotes have electrically conductive paint on the bottom of each rubber button. The more you use each button, the more the paint wears off. The good news: You can buy a repair kit that includes two-part conductive paint. (We used the Chemtronics CW2605 rubber keypad repair kit, at mcmelectronics.com.) The bad news: You have to figure out how to disassemble the remote, and every one is different. But here are some general disassembly tips.
Start by removing the screws. They’re usually hidden in the battery compartment under labels and rubber feet. Next, take a digital photo of the remote with the screws near their holes. Be sure you get a clear shot of all the buttons and any slide switches along the side of the remote. Once you pop open the remote, those slide switches may fly out.
To separate the halves, press a butter knife along the seam and look for “give.” Press in at those points and pry the halves apart. Inside you’ll find either individual rubber buttons, or a single molded sheet containing all the buttons. If you’ve spilled anything sticky on your remote, dunk the rubber buttons/sheet, plastic case and any hard plastic buttons in a bowl of warm water and dishwashing liquid. Brush off the debris, rinse all the parts with warm water and let them dry.
Next, following the mixing and application instructions, paint the buttons (Photo 2). Paint all of them as long as you have the case open. The paint dries in about 24 hours, but it needs a full 72 hours to cure completely. That’s why we had you take digital photos—so you could remember how to reassemble your remote three days later. Don’t rush the curing process or you’ll be repeating the repair in a year or so. Reassemble the remote and you’re ready to surf.
Required Tools for this Project
You’ll need a small screwdriver, old toothbrush, butter knife and a digital camera for this repair.
Required Materials for this Project
Avoid last-minute shopping trips by having all your materials ready ahead of time. Here’s a list.
- Dishwashing liquid
- Repair kit
Article source here: How to Repair the TV Remote


No comments:
Post a Comment