
This Gazebo is Builder-Friendly
This how to build a gazebo project is not as difficult as it looks. Think of it as a series of several shorter projects with an end goal in sight for each. You can make all the decorative parts in your garage or shop (especially on rainy days).
If you have several friends help you with the slab and framing (promise them anything), you can spread these two tasks over several weeks. A project like this would take two experienced carpenters nine working days from start to finish. An intermediate do-it-yourselfer who has built a deck should plan this as a whole summer project. Check out these 12 one-hour projects for your summer bucket list.
NOTE: You must have a site that slopes less than 4 in. over 12 ft. (any more than this will require some excavating).
Figuring Out The Slab:
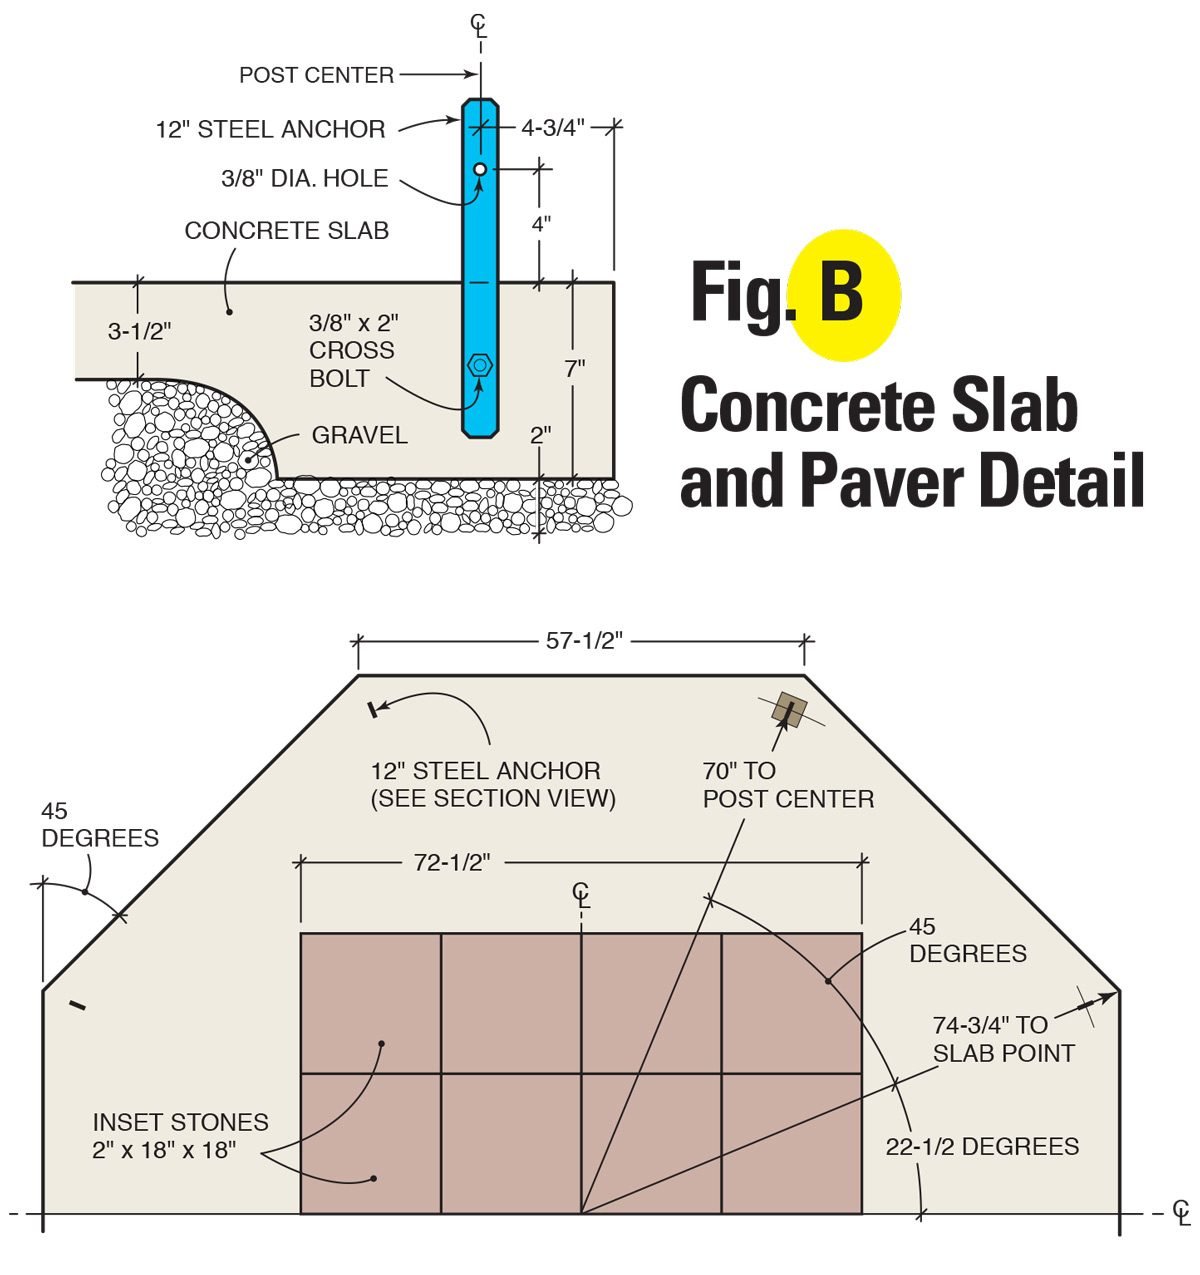
You don’t have to get the slab dimensions perfect, but the closer they come to it, the easier things will be later. If you hate doing concrete work, skip this section, photocopy it and give it to your concrete mason. A crew can do the work for about $1,200 while you’re out shopping for lumber or cutting parts (but you can cut the cost to a couple of hundred if you do it!). Follow Fig. B (above and below in “Additional Information”) closely if you decide to pour the concrete slab yourself.
Running an Electrical Conduit
To build your own gazebo, begin by driving a 2-ft. piece of rigid electrical conduit at the intended center of the gazebo. Drive it in 18 in. Remove the sod with a rented sod cutter. You’ll need to excavate a 9-in. deep area radiating out about 78 in. from the conduit. After that you’ll set forms and put in a layer of ¼-in. gravel to the dimensions shown in Fig. B. The idea is to have the outside foot or more of the slab thicker to support the weight of the structure. Here’s how to run power anywhere.
Tips for Building Your Forms
Build your forms after carefully examining Fig. B. Set your circular saw at 22-½ degrees and cut eight 2×8 exterior forms with the short side measuring 57-½ in. Screw the forms together with 3-in. deck screws. Have a friend help you align the forms so the eight corners of the forms are all the same distance from the conduit center. If these measurements are all equal, your slab will be a perfect octagon– get it as close as you can. Drive ¾ in. x 2-½ in. stakes along the outside of the forms at each intersection, level the forms and screw the forms to the stakes.
Now build a square inner form for the patio inlay, 72-½ in. on each side. Center it as shown and drive in the stakes on the inside of the forms and screw them together.
Concrete Slab Requirements
The slab will require about 1-½ yds. of concrete and four 10-ft. pieces of No. 4 rebar. Have plenty of help (at least three strong backs and two heavy-duty wheelbarrows). Wheelbarrow the concrete and dump it into the forms, lay rebar 4 in. in along the perimeter, screed the concrete with a straight 2×4, then run the hand float over it. Set your anchors in at the locations shown in Fig. B. Wait till the concrete is firm (you should have to push hard to leave a thumbprint). Smooth it with a steel trowel, cover it with 4-mil clear plastic and let it set for two days. Keep kids and pets away.
Additional Information For this How to Build a Gazebo Project:
Cut the Posts to Length
- Bolt posts to the steel strap anchors. Here’s how to do it:
- Make the anchors by cutting 12-in. lengths of 1/8-in. x 1-1/8 in. steel and boring 7/16-in. dia. holes into them as shown in Fig. B.
- Pro tip: You can find steel stock next to the threaded rod at your home center.
- For extra grabbing power for your posts, be sure you put a bolt and nut into the base before you push the steel into the concrete.
- The 6 in. of steel anchor above the concrete fits into a saw kerf at the base of each post.
- Cut this kerf with a circular saw.
- Pro tip: The blade won’t cut all the way through, so flip the post over to continue the cut in the other side.
- Make the kerf wide enough so you don’t have to struggle to slip it over the steel anchor.
- Before you mark your anchor hole cut your posts to length and bolt them to the steel strap anchors locations, screw the aluminum post standoff to the base of the post.
- Pro tip: These standoffs keep the post elevated for protection against rot.
- Mark the anchor hole locations as shown in photo, then drill a 1-¼ in. hole ½ in. deep on each side of the post, followed by a 3/8-in. hole all the way through.
- Pro tip: The 1-¼ in. hole recesses the bolt head and nut to make room for the piece you’ll nail over the post later.
- Grab a buddy to help set the post while you push the bolt through the hole and tighten it.
- Once all the posts are in place, cut the 2×6 top plates and screw them to the top of the posts with a pair of 3-in. deck screws.
- Plumb this framework with some temporary braces.

Article source here: How to Build a Gazebo
Article source here:
No comments:
Post a Comment