
Swing Design
The smooth, gentle glide of this porch swing will keep you daydreaming for hours. In fact, you may lose your ambition for good!
The swing’s simple cuts and no-hassle glue and screw assembly techniques make it a great first-time woodworking project. You can build it in a weekend for a few hundred dollars.
We designed the swing with a unique suspension system made from ordinary one-half inch black steel pipe (commonly used for gas piping) slipped through the swing frame to act as a cradle and eliminate stress on wood joints. Eye bolts are then fastened through the steel pipe and covered by soft rubber caps to prevent scrapes. The swing assembly is then supported with welded steel chain, securely fastened to solid framing in the porch roof.
While your work ethic is still intact, round up the following tools: a circular saw, drill with bits and screwdriver attachment, jigsaw, tape measure, square, pencil, power sander, hacksaw and an adjustable wrench. You’ll also need access to a table saw.
If you’re a first-timer, be aware that you’ll need to pre-drill holes for every screw so you don’t split the wood or bust the screw shaft. To make this process easier, buy a special countersink bit that can do both in one operation and has a driver on the opposite end.
CAUTION!
Swings are inherently dangerous for small children. This swing moves slowly, but it has hard edges that can give a nasty bump. Kids will love this swing, but never let small children play around it unattended.
Pick Knot Free Boards and Measure Carefully

Photo 1: Rip the supports
Set your saw at 27-½ degrees and rip the pieces that make the center and top back supports. If you don’t have a table saw, ask the lumberyard or a well-equipped neighbor to help.

Photo 2: Cut the curved pieces
Clamp the seat support parts to the workbench to keep them from wandering while you cut the curves. Follow the pattern in Fig. A to accurately copy the curves for the seat frames as well as the arms. Sand along the curves after cutting.
Knots can weaken a board and spell disaster, especially on furniture. Also, stay away from cedar, redwood and soft pine for this project. They’ll mar easily and won’t hold screws as well as other, denser woods. Excellent wood choices are fir, Southern yellow pine, cypress, poplar, white oak and maple. Oak and maple are harder to cut, sand, drill and screw, so if you’re a first-timer, avoid them. We chose poplar because it’s strong, readily available, easy to work and takes paint well.
Cut all the parts to the dimensions in the Cutting List (see Additional Information, below). Using a table saw, make 1x3s from your 1x6s (see Cutting List). Then notch the front arm supports as shown in Fig. A. Draw the curved shapes (parts A and P) onto hardboard as shown in Photo 2 and trace them onto boards, or simply draw the one inch square grids directly onto the pieces. Cut them out with your jigsaw and sand the curves smooth with 100-grit sandpaper. Drill seven-eighths inch diameter holes with a sharp spade bit into parts A for the front pipe hanger.
Cut the center and top horizontal back braces (parts F and G) from 1x4s as shown in Photo 1. A table saw works best. If you’re an ace with a circular saw, you can set your saw bevel, tack the 1×4 to the tops of your sawhorses to keep the board from moving, and then saw along a line right down the length of the board. Next, mark a diagonal taper onto a 1×3 as shown in Fig. A to make the two outer slats (K) from this single piece. Cut along the line with your jigsaw, then use a block plane to smooth the cut edge. Set the seat assembly aside.
Figure A: Free Porch Swing Plans
This cutaway drawing shows the construction details for the porch swing. To download a larger PDF version of these free porch swing plans, see Additional Information. The complete Cutting List and Shopping List are also in Additional Information.
Assemble The Swing on a Temporary Workbench

Photo 3: Assemble the front arm supports
Notch the front arm supports with a jigsaw to accept the front stringer ©. Drill pilot and countersink holes and apply a dab of construction adhesive at each joint. Fasten with 1-5/8 in. deck screws.

Photo 4: Attach the rear stringer
Trace the angle of the center seat brace (A2) onto each side brace to get the proper positioning of the rear stringer (D) fastening points. Again, drill pilot holes and glue and screw the seat braces to the front stringer and the front arm braces. Next, glue and screw the rear stringer to the seat braces.

Photo 5: Fasten the back slats
Lay all the back slats face down on a flat surface and slip temporary one-quarter inch spacers between the slats. Fasten the bottom brace (E) to the middle slat, using a framing square to make sure they’re joined at 90 degrees.

Photo 6: Cut the top curves
Trace the top curves on the front side of the back assembly using a simple homemade beam compass. Nail one end of the compass 14 inches from the top and in the center of the 1×6 back slat. Insert your pencil into the one-quarter inch hole drilled in the other end of the compass. Cut along the mark with your jigsaw.

Photo 7: Join the back and seat assemblies
Hang the lower part of the back assembly over the edge of the work surface to make room as you slide the seat assembly onto it. Align the rear stringer of the seat assembly with a mark drawn 2-½ in. from the bottom of the back assembly. Glue the joint, then clamp and screw the assemblies together.
Create a large work surface by laying a sheet of plywood across sawhorses (Photo 7). Glue and screw the front stringer © to the front arm braces (B). Next, fasten this assembly to the seat braces (A1 and A2) and rear stringer (D) to complete the seat frame assembly (Photo 4). Drill through the front arm braces (B) with your seven-eighths inch drill bit after you’ve glued and screwed the side seat braces to them (Photo 4). These two holes will complete the pathway for the front pipe support (Q).
After you assemble the arm braces, stringers and seat braces, glue and screw the curved front arm supports (L) to the sides of B as shown in Fig. A.
Assemble the back as shown in Fig. A and Photo 5. Cut one-quarter inch spacers from scrap wood (one-quarter inch plywood pieces are perfect) to help maintain consistent spacing.
Start at the center and work out to the sides. When you get to the fourth slat on each side, check your spacing; you may need to adjust it so the outer edge of the tapered slat (K) is flush with the end of the lower back brace (E).
Now it’s time to cut the curves on the back assembly. Make a simple beam compass from a scrap of wood as shown in Photo 6. Flip the backrest assembly over, use your beam compass to mark the curves and cut along the mark with a jigsaw. With the backrest assembly in this position, measure and mark a 2-½ in. line parallel to the bottom edge (Photo 7).
Grab the seat frame assembly you built earlier and finesse it onto the backrest assembly (Photo 7). It’s crucial to align the rear seat frame stringer (D) to the 2-½ in. line on the backrest so the rest of the assembly will fit together.
Drill seven-eighth inch holes in the horizontal arm supports (M) to the exact dimensions shown in Fig. A. Then glue and screw these pieces to the front arm braces (B) and the center back brace (F; Photo 8). Next, glue and screw the seat slats to the seat braces. Start in the back and leave approximately a three-sixteenths of an inch space between each piece. Trim the last slat to overhang the front stringer one-half inch. Plane the transition piece on the curve of the seat (Photo 10) and at the leading edge of the front seat slat for maximum comfort.
Why Construction Adhesive?
Buy a small tube of construction adhesive for this outdoor project. Be sure to buy the heavy-duty type for exterior use. Construction adhesive will help your porch swing stand up to both weather and stress. The small tube shown is the same stuff as in the larger “caulk-gun” sized tubes but is less cumbersome for a smaller project like the swing. Apply a small bead at every joint. If the glue oozes slightly, let the excess harden and then scrape it off with a sharp putty knife or wood chisel.
Don’t Skimp on the Hardware

Photo 8: Fit the pipes
Cut and drill the pipes (Fig. A) and slide them into the holes. File the inside of the seven-eighths inch hole in the arm support (M) with a coarse half-round file if the support pipe won’t easily slide through. The rear support pipe should fit snugly under the center back brace (F) as it protrudes through each arm support.

Photo 9: Add screws for stops
Drill a three-sixteenths inch hole in the center of the rear support pipe, then screw a two inch No. 8 sheet metal screw (use a one-eighth inch pilot hole) up into the center back support. This connection will keep the pipe from sliding to one side while the swing is swinging.
Buy oversize (three-sixteenth inch or one-quarter inch thick) chain with welded links for good looks and safety. Also buy one-quarter inch threaded eyebolts along with thread-locking compound to keep the nuts from working loose. The quick-link eyes (Photo 11) are indispensable for linking chain quickly. Buy your black pipe at a hardware store and have it cut to exact lengths without threaded ends.
Now, test-fit the pipe, chain and connecting links to the wooden assembly (Fig. A). It’s a good time to discover any glitches and correct them before you paint. Slide the pipes through the holes in the seat frame and along the back, leaving an equal amount exposed on each side. Mark the hole locations in the pipes to lock them to the swing (Photo 9 and Fig. A). Drill three-sixteenth inch diameter holes for the sheet metal lockscrews and 9/32-in. diameter screws for the eye bolts. Angle the eye bolts slightly toward the center of the swing to minimize the torque on the pipe and prevent the lockscrews from breaking.
Remember, this swing could be holding 400 lbs. or more, so you must anchor the swing’s chain with one-half inch shaft screw eyes screwed at least two inches into solid framing as shown in Fig. C. Also, distribute the weight to more than one ceiling joist by screwing a pair of 2x4s 54 inches apart and then inserting the screw eyes into the 2x4s.
Figure B: Porch Swing End View
To download a larger PDF version of Figure B and the rest of these heavy duty porch swing plans, see Additional Information, below. The complete Cutting List and Shopping List are also in Additional Information.
Ease the Wood Edges Before You Paint

Photo 10: Even out high spots
Shave off any high spots in the seat slats with a block plane. Because the seat is curved, the slat edges can ride high at certain points, making for a less-than-comfortable ride later.

Ease the edges
A block plane is the quickest way to ease sharp edges and high spots.
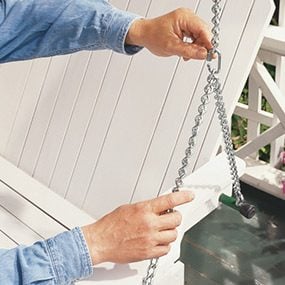
Photo 11: Hang the swing
Hang the swing securely using special quick-link eyes to join the lengths of chain. The swing should tip back slightly at the arms (about one inch from back to front) when the swing is at rest.
Remove the chains and pipes to paint the wood assembly. Sand the pipes with 100-grit sandpaper, then wipe them down with a rag dampened with mineral spirits. Let the mineral spirits evaporate off the surfaces, then spray-paint the pipes with exterior primer followed by an exterior enamel.
Sand the wood parts with 100-grit sandpaper, paying particular attention to the arms and the edges of the seat and back. Softer edges will be safer and more comfortable and hold paint better.
Wipe off the dust and vacuum the swing. You’ll make better time if you roll (use a small four inch roller) on a good-quality primer and follow it up with a brush to even the coat. Use the brush to paint between the slats and then look for runs and drips coming through the other side. Use oil-based primer (or water-based if you prefer), then lightly sand the swing the next day with 150-grit sandpaper. Choose the best polyurethane exterior paint you can find and apply it using the same roller and brush technique. Let the paint cure for a couple of days before you rehang the swing. Note: During the final assembly, squirt thread-locking compound on the eye bolt threads. Be sure to cut the eye bolts flush with the nuts for safety.
Figure C: Hanging Detail
Screw a length of 2×4 into solid framing to support each chain. Be sure to use four inch long lag screws and span at least three ceiling joists. (See Additional Information for a printable PDF version of Figure C.)
Free porch swing plans: Project PDF Files
Click the links below to download the construction drawings, materials list, cutting list and free porch swing plans for this project.
Cutting and Materials Lists and Construction Drawings
Additional Information and Porch Swing Plans
- Figure C: Hanging Detail
- Shopping List
- Figure A: Porch Swing Details
- Figure B: Porch Swing End View
- Cutting List
Required Tools for this Project
Have the necessary tools for this DIY project lined up before you start — you’ll save time and frustration. [project-tools]
Article source here: How to Build a Porch Swing
Article source here:


No comments:
Post a Comment