
Two benefits come with building or remodeling with wood studs. The studs provide the strength and framework for the structure, and the empty spaces between the studs serve an important function, too: If you know how to drill into a stud safely, they provide the perfect place a veritable vertical freeway to run pipes, vents, drains, wires and ductwork.
The drawback? When you have to run pipes, ducts or wires horizontally, you often have to notch or drill holes sometimes big ones into a stud to get them to their destination. But you can’t just drill and saw away. There are rules you have to follow for drilling and notching studs. Some rules help ensure the structural integrity of a wall. Others are aimed at protecting pipes and wires that could be damaged by screws, nails and other fasteners driven into a wall.
Rules for Notching and Boring Studs
There are LOTS of building codes dictating just how large a hole or notch you can cut, and building codes allow you to drill bigger holes and cut bigger notches in non-load-bearing walls than in load-bearing walls.
The technical yet important rules are:
- Holes in bearing wall studs (exterior and interior walls that bear the weight of the roof and/or other stories above) may not exceed 40 percent of the width of the stud.
- Notches in bearing wall studs may not exceed 25 percent of the stud’s width.
- Holes in non-bearing walls can’t exceed 60 percent of their width.
- Notches in non-bearing walls can’t exceed 40 percent of their width.
- The edge of a hole must be at least 5/8 in. from the edge of a stud.
To appease the plumbing gods, building codes have made at least one notable exception: In bearing walls, you can bore 60 percent size holesas long as you double up the studs and don’t drill into more than two successive pairs of these doubled-up studs. This allows you to run a short section of drain, waste, vent (DWV) pipe through a 2×4 wall without beefing up the whole wall to 2×6 dimensions.
There are other, less specific guidelines:
- When possible, notch a stud near the top, rather than the bottom.
- Don’t locate holes and notches near large or loose knots.
- Don’t group too many in the same area of the stud.
- Finally, notch only when necessary; holes weaken it less than notches.
In areas subject to high winds, earthquakes or tornadoes, maintaining wall strength is particularly important. Furthermore, studs with too much meat removed tend to bow and warp. Your building inspector will be on the lookout for overzealous notching and boring, so follow the rules.
In reality, few walls ever out-and-out collapse during everyday duty from being riddled with too many holes and notches. But there are LOTS of cases in which unprotected or inadequately protected pipes and wires have been nicked and punctured by screws and nails. Any plumber or electrician will tell you that’s what you REALLY need to watch out for!
Protect Wires and Pipes
The National Electrical Code requires holes containing non-metallic cable (often called Romex) or flexible metal-clad cable (the type you buy with the wires already in it) be set back 1-1/4 in. or more from the edge of a studto protect the wires from nails and screws. (The 1-1/4-in. screws and nails used to secure 1/2-in. drywall penetrate the studs about 3/4 in.)
Most electricians keep their inspector happy by drilling 3/4-in. holes dead center on a 3-1/2 in. wide stud. This gives them a hole large enough to run two electrical cables and leave 1-3/8 in. of protective wood on each side. If they need to run more wires, they’ll drill more holes directly above the others. If a hole comes any closer than 1-1/4 in., your inspector will make you install a 1/16-in. thick protective metal plate.
The mechanical codes for plumbing and heating, ventilation and cooling (HVAC) systems also dictate that holes containing pipes be set back 1-1/4 in. from the edge of a stud to protect the pipes from fasteners. Those that come closer need to be covered by metal plates; for big pipes, use a long protective plate.
Electricians and plumbers spend lots of time drilling big holes, so they know a few tricks to make the job easier (or avoid it altogether).
Tips for Less Drilling and Notching
- Before beginning any project, plot out exactly where large pipes and ducts will run and determine how you’ll get them there.
- Wherever possible, run large pipes and ducts vertically into unfinished attics or basements. Then, install elbows and run the pipe or duct horizontally below the floor joists or above the ceiling joists.
- Build 2×6 stud walls where DWV pipes and holes exceed the limits described above.
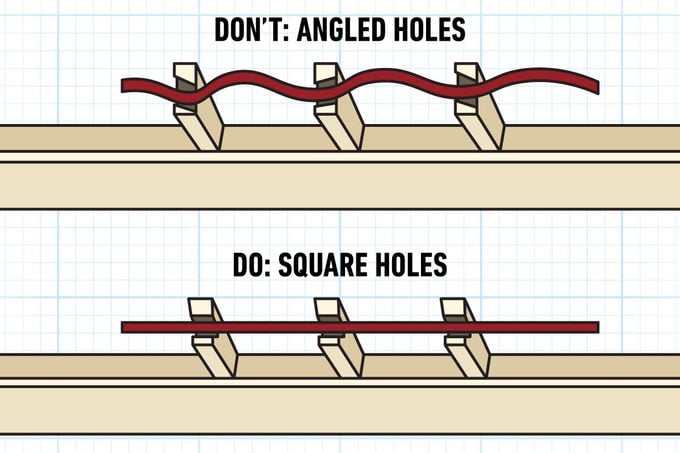
- Rent a right-angle drill and use Selfeed or hole saw bits for boring large holes. The right angle drill allows you to drill holes square to the stud face. Holes drilled at an angle will wind up oval and therefore larger.
- Keep the holes centered on the studs and a consistent height off the floor.
- Drill holes into a stud at least 1/4 in. oversize, especially for hot water pipes. If you don’t, they’ll make annoying sounds as they expand, contract and rub along studs.
- Joist hanger manufacturers sell wrap-around, stud reinforcer plates. Ask your inspector if they are permissible in special situations.
- When boring electrical holes, keep them square to the stud for easier wire installation or pulling. This may seem trivial, but angled holes catch the wire and keep you from pulling wire through more than two or three studs at a time. Holes in a linelet you pull wire through an entire wall length of studs at one time.
Article source here: How To Drill Into a Stud
No comments:
Post a Comment