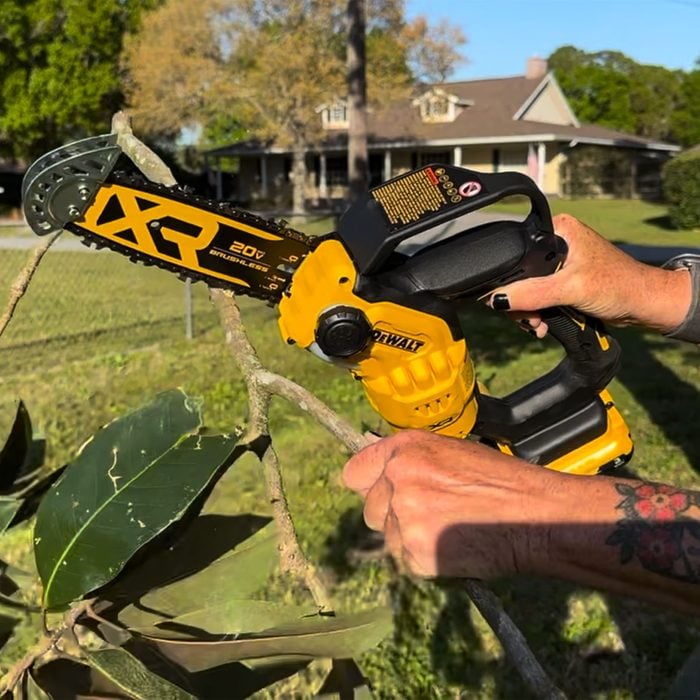
The Dewalt Mini Chainsaw was one of two that shipped with bar and chain oil. This was one of the first things I noticed upon unpackaging it, and it was indeed a welcome accessory. As with most of the saws, it required virtually nothing to get up and running. The device has the usual black and yellow Dewalt styling and uses 20v batteries that are common across many Dewalt tools such as drills, drivers, and saws.
It shipped with a 20V three-amp-hour battery, which was plenty of power to cut through everything I planned to trim in my yard (which is about an acre). Had I planned on taking down all the invasive Austrian pines to a length that my fire pit could handle, I definitely would have run out of juice. Still, overall, the three-amp-hour battery did the trick, and the 20V was plenty of power to cut through four- to six-inch diameter fruit and pine trees.
The brushless motor ran quietly, and the device, which weighed about 5 pounds with the battery attached, was light enough to work with for extended periods. A tool is required to adjust the chain tension, but the tool is included and stored on the device.
The nice thing about a dolly is that you don’t have to hoist a heavy object as high as you would with a wheelbarrow. And with the dolly’s two wheels and lower center of gravity, the load is much more stable. We used a dolly for moving a 250-lb. plate compactor from the truck to the excavation, for transporting large flagstones across lawns and for hauling stacks of brick and block to their destination.
For heavy outdoor uses like these, rent a dolly that has large pneumatic tires. They roll more easily over surfaces that are rough or soft (grass). Make sure the tires are correctly inflated or you’ll get a flat!
Walk backward and pull the loaded dolly up a hill or stairs.You’ll have more leverage and better control. And rest the handle on your thigh to support the weight when you have to take a quick break. That way you won’t need to tip the dolly upright and then tip the load down again.
Use Your Head Before Your Back
As a landscape contractor, I move a lot of stone, brick and concrete blocks by hand. I have one basic rule: Use your head before your back. Whenever you face a heavy rock, timber or pile of bricks, stop and consider the various options you have for moving it.
Reject any technique that might cause a serious strain, especially to your back. The safe method may require you to make more trips, rent better equipment, ruin more of the lawn or spend a bit more, but don’t take chances with your health.
Trench landscape edging looks great in informal garden settings. Use trench edging as a border around spreading evergreens or groundcovers or in areas where vinyl or other permanent landscape edging material would look too formal and unnatural. You can easily shift it if plants outgrow the bed.
An open trench holds back the adjacent grass better than a trench filled with mulch. But if you prefer a more finished look, fill it with mulch. You’ll have to redig the trench once in a while to keep it neat and to hold back the lawn, but it doesn’t take long and you can add the trimmings to your compost pile.
Digging a Planter Edging Trench
Dig a trench 4 to 6 in. deep and about 4 in. wide with a straight spade. Angle the sides outward at the top. Next, fill theplanter edging trench with wood chips or other organic mulch for a more finished look and to deter weeds.
Benefits of Landscape Edging
Landscape edging not only makes your yard look sharp with neat lines around garden beds and pathways, but it also keeps everything in place, preventing soil erosion and stopping pesky plants from taking over where they shouldn’t. Plus, it makes yard work like mowing and weeding a whole lot easier, giving you more time to kick back and enjoy your outdoor space.
Maintaining an attractive lawn takes lots of hard work, knowledge, timing and good weather. It also takes the precise (and seemingly endless) application of grass seed, soil builder and fertilizer. Each product you apply requires a different spread rate. Too much is wasteful and could kill your lawn; too little wont do the job.
A goodbroadcastspreader can apply just the right amount of product. The key is to choose a model that has an adjustable spread rate setting to deliver the product uniformly and in accurate amounts to the left, center and right while applying the recommended volume for your lawn size.
Broadcast spreaders are reasonably priced and widely available from garden and home centers. Here, well show you how to use your grass seed spreader more effectively to save time and make your lawn more attractive.
What Is a Broadcast Spreader?
Also called a broadcaster, these devices use a spinning wheel to spread grass seed, lawn fertilizer, salt, etc. over a wide area. They work best for covering large areas, yards larger than 4,000 sq. ft.
How Does a Broadcast Spreader Work?
One of their wheels is geared so that as you push the broadcaster, the drive wheel turns a whirling impeller plate with several fins on it under the hopper that catches and throws the payload. When the shutoff plate is open, the impeller broadcasts the material in a 180-degree arc 7 ft. to 11 ft. wide (depending on the products granular size and your walking speed).
Broadcast Spreaders vs. Drop Spreaders
What’s a drop spreader?
Drop spreaders lay a trail of material the width of their hopper (less than 24 in.). They work best on small lawns and in yards with numerous flowerbeds, sidewalks or patios where you need to control the spread pattern carefully. Unless youre meticulous about lining up adjacent passes, the payload either is laid too thick or misses portions of the grass, resulting in visible striping.
Broadcaster spreaders and drop spreaders are push-powered workhorses that share many features in common. At the heart of both is a hopper with adjustable holes in the bottom. A gauge mounted on the spreaders handlebar allows you to accurately set the size of these holes (following the recommended setting listed on many bags of lawn products), allowing the proper volume of material to uniformly exit the hopper. Alongside the gauge, a flow lever controls when the material drops onto the lawn by opening and closing a plate under the hopper holes.
How to Use a Broadcast Spreader
Whether you’re reseeding your lawn or just maintaining it, the key to operating a broadcaster spreader is to achieve even dispersal at the right concentration.
Find the right setting and test the dispersal pattern
Dial in the product manufacturers recommended setting on the spread rate gauge, and test and measure the products dispersal pattern through the spreader.
Conduct the dispersal pattern test in your driveway or another flat, clear area. Be sure to sweep dirt and debris away if you are using your driveway.
With a broadcast spreader, the right side of the dispersal pattern will be a foot or two wider than the left. Use this test information to establish the pattern youll use to push the spreader across your yard for total coverage with 6 in. to 1 ft. of overlap. Write this wide side, narrow side measurement information on a piece of masking tape and stick it to the back of the hopper so you dont forget the broadcast pattern for each side.
Important:Dont sweep, blow or wash this test material into the street. Sweep it up and dump it back in the hopper.
If the product doesnt list a recommended setting for your spreader, consult your owners manual for generic equivalents of each product. Otherwise, youll have to resort to trial and error. Set the spreader to a light coverage (try a 1/4-in. to 3/16-in. hole in the hopper), apply the product over the recommended square footage, and check how much product you have left in the hopper. Adjust the dial to spread the remaining material over the same area, going perpendicular to the first pattern.
Start spreading product on your lawn
Begin your yard pattern by spreading across hills first. This way, youll have enough lawn product in the hopper to reduce skipping over the uneven terrain.
Keep a steady pace
Maintain the pace youd use to take a middle-aged, midsized dog for a walk (about 3 mph). Your walking speed affects how wide and how much product the broadcaster throws. Walking too slow reduces the throw width and increases product density; walking too fast thins out the coverage.
Stopping and turning
Each time youre ready to stop or make a turn, close the flow lever to stop dispersing the product and continue one more stride. This reduces waste and avoids damaging the lawn from saturated product coverage. Avoid pulling the spreader backward when the flow lever is open; youll release more of the product.
Keep the spreader level
Operate the spreader, keeping the impeller plate close to level. Tilting the handlebar up or down from level throws the product too high or low, resulting in uneven coverage.
Don’t overdo it!
Dont over-apply fertilizer and weed killer. Follow the recommended coverage rate for each product. Overuse and overapplication can lead to lawn runoff that contaminates lakes and streams. Protect yourself by wearing gloves and a nuisance dust mask when handling chemical lawn products that contain pesticides and herbicides.
Optimal Broadcast Spreader Pattern
Follow this optimal pattern for running your broadcaster spreader. Apply a header strip by circling the spreader once around the yard’s perimeter. Avoid throwing the material payload into adjacent flowerbeds by running the spreader back from those areas the distance your driveway test showed.
Complete the pattern by pushing the spreader on a serpentine route back and forth in the longest direction on the lawn while overlapping the throw patterns about a foot.
Shut off the flow lever as you near the end of a row when the spreader is within 5 ft. of the header strip. Keep the lever off during the turn and open it to begin the new row.
Garbage disposals are one of the unsung heroes in the kitchen. Performing the thankless job of grinding up food scraps daily and sending them down the drain, they’re easy to take for granted. But if your garbage disposal stops working, it can disrupt the entire workflow of your kitchen.
If your garbage disposal is humming but not spinning, read on for expert troubleshooting tips and guidance from two licensed plumbers Liam Hogan from Hogan Mechanical Incorporated and Armand Lamour, a master plumber from Smith Vocational and Agricultural High School.
Why Is My Garbage Disposal Humming, but Not Spinning?
Your garbage disposal may be humming, but not spinning, for various reasons, like:
The garbage disposal is jammed
Most likely, it’s stuck. “Usually it’s some sort of particle jammed in the impeller,” Hogan says, which prevents the blades from turning. Lamour agrees. “A portion of the inner disposal workings is likely jammed,” he says. This can happen if a piece of food, a plastic bag or utensil becomes wedged into the blade impeller and stops it from rotating. “You’ll still hear the hum as it powers on, but nothing will happen,” Hogan says.
The garbage disposal motor has failed
Besides an obstruction, the motor or other mechanical components may be failing or faulty. “It could be a bearing wearing out or the motor dying,” Hogan says. According to Lamour, a damaged or broken motor can stop spinning the impeller despite having power.
How to Fix a Garbage Disposal That’s Humming
Immediately turn off a garbage disposal that is humming but not spinning to prevent damaging the unit. You can try a few things before calling in a pro, depending on your skill and comfort level.
Safety Precautions
Before attempting to troubleshoot, always turn off the power to the garbage disposal. Especially when jammed, the blade could suddenly move when freed. Keep fingers away from the blade at all times.
Steps or methods to troubleshoot
If the unit is humming, there’s still power going to the disposal. “If that’s the case, you can rule out an electrical issue,” Hogan says. Here are some troubleshooting steps if your garbage disposal is humming, but not spinning.
Turn off the power: Shut the power off at the disposal and the breaker and unplug the disposal if applicable.
Visually inspect for obstructions: Use a flashlight to look into the disposal chamber. Use long-handled pliers or tongs to remove any food or utensils you find carefully. “Never put your hand or fingers in the opening of the disposal,” Lamour says. Run the water and test the disposal.
Manually rotate the blades: If there are no obstructions, or the unit is still not working, insert an Allen key or disposal wrench (it comes with the unit) into the hex-shaped hole found at the bottom of the unit. Rotate the blade back and forth to help remove any remaining or unseen blockage. Turn the disposal flywheel only, do not try to move the blade directly with a tool or your fingers. Run the water and test the disposal.
Smell and listen: If the disposal is still not working, it’s likely not a blockage, but a bad mechanical part. Failing motors can give off a burning smell. “You might also hear a grinding noise coming from the motor,” Hogan says, so listen for any unusual sounds when operating the disposal. These point to a failing disposal that requires replacement.
When to Call a Pro
“If you are unable to see and remove an object causing a blockage in the disposal, you can not get the disposal to spin manually using the Allen key in the bottom, or the disposal is leaking into the motor windings, it is time to call in a professional,” Lamour says.
However, replacing a garbage disposal can be a straightforward DIY project if you are comfortable with the required skills and have the necessary tools.
FAQs
Do Garbage Disposals Go Bad?
“Anything mechanical can fail,” Hogan says, “However, you should expect 15 years of average use for a garbage disposal.”
How Do You Make a Garbage Disposal Last?
“Be mindful of what you put down them,” Hogan says. “In my home, we scrape plates into the garbage first, then rinse in the sink.” Lamour advises always to run the water when the disposal is turned on to keep the inside lubricated.
Regular cleaning can help extend the life of your disposal as well. “Grinding up lemon chunks every three weeks or so [keeps] the disposal smelling fresh and the acidity in the lemon juice will help free up stuck food particles,” Lamour says.
When Should You Replace Your Garbage Disposal?
If it goes bad and stops working, it’s definitely time to replace it. Hogan points out that if you’re doing a kitchen remodel, it’s a great time to put in a new disposal. “Tackle replacement then,” he says. Also, replacement makes sense if your disposal is starting to make loud noises, or if you’re looking for a quieter option.
About the Experts
Liam Hogan is the owner of Hogan Mechanical Incorporated a full-service residential and commercial plumbing company in Springfield, Massachusetts. He has a Journeymans Plumbing License.
Armand Lamour is a Plumbing Instructor at Smith Vocational and Agricultural High School in Northampton, Massachusetts. He holds a Master Plumbers license in Massachusetts, Connecticut and Rhode Island. Mr. Lamour has over twenty years experience in the field.
Vinyl siding is durable, attractive, and relatively inexpensive compared to other siding choices, such as brick and wood. It lasts, too. Once it’s up on your house, it’s staying there for about 30 years. But what if you want to add lighting on your porch or above the garage? Do you have to rip off a section of siding? That sounds like a major hassle.
Luckily, no large-scale demolition is necessary. All you need to do is drill a hole and use a handy mounting block specifically made for vinyl siding. I’m a licensed electrician, and I’ve spent many hours on punch lists and change orders. Returning to a project to add stuff that wasn’t on the original prints can be frustrating, but vinyl siding mounting blocks make the process much easier.
Below, I’ll introduce you to the concept, and give helpful tips so you can tackle the project yourself.
What Is a Vinyl Mounting Block?
A vinyl mounting block provides a flat surface on which to mount a light fixture. Vinyl siding, just like wood clapboard and aluminum siding, is attached to your home in “laps,” or long horizontal boards that overlap each other to keep out the elements. This uneven surface makes it difficult to install a light fixture without leaving gaps or causing the siding to buckle. Vinyl mounting blocks are available for almost any lap and securely hold lights upright.
When Do You Need a Vinyl Mounting Block?
A mounting block is needed anytime a light needs to be attached to the uneven lap of the siding. Here are two likely situations, the only difference being whether the electrical wiring is ready and waiting for you or you have to pull it later.
In an ideal scenario, when your house was being built, an electrician would pull wire or run pipe through the walls to every place you’d like a light and mount an accessible electrical box on a stud behind the siding. The siding installer would work around the box so that a light could be installed later. The electrician would come back after the siding was up and install the block and light.
There is another scenario (perhaps one you’re facing now) where you won’t have the existing wiring or box. Don’t worry. It’s more labor-intensive than just mounting a light, but it’s still a doable DIY project. Once you know where you want the light, you’ll bring a cable from a nearby electrical source to the location, poke it through to the outside, and mount the block and light.
How To Install a Vinyl Mounting Block
First, ensure you buy a block with the same lap size as your siding. Mounting blocks come in multiple lap sizes and colors to match your existing siding. According to the National Electrical Code (NEC), lights have to be secured to an electrical box. So if you don’t have one at your new location, make sure to buy a mounting block with an integrated box.
If you already have a light or wires at the location, say, you’re replacing an old mount that’s cracked or an ugly color, rejoice. All you have to do is turn off the electricity to the circuit (always test with a non-contact voltage tester to be sure), remove the light and block, and replace it by threading the wire through the new block, seating it on the siding, and making the connections.
If you’re starting from scratch, decide where you’ll get power first. A single light fixture uses very little juice half an amp with a 60-watt bulb so the easiest way is to tap into an existing lighting circuit. See if you can access a garage light or other nearby light fixture, turn off the power, and bring a same-sized Romex cable from the light to your new location. Fishing wires can be a little dicey, but believe me, there’s always a way.
Drill a small (half-inch or so) hole through your siding, and pull the cable through. Protect the cable by installing a connector in the block, and feed the wire through. Attach the block to the stud, if present, or the wood sheathing behind the siding, adding a bead of sealant to prevent water intrusion. Make the electrical connections at the light, attach the light to the block, and turn on the power.
FAQ
How do I maintain the light fixture after it’s installed?
Periodically inspect the light. If you see sagging, gaps or loose caulk, turn off the power before attempting to re-seat the fixture. If you experience flickering, buzzing, weird smells or sparks, turn off the power and call a licensed electrician.

 PAMELA BONDURANT/FAMILY HANDYMAN


